Quantcast
Channel: KitPloit - PenTest Tools!
Viewing all 5854 articles
Browse latest View live

WPScan v3.3.1 - Black Box WordPress Vulnerability Scanner

$
0
0

WPScan is a free, for non-commercial use, black box WordPress vulnerability scanner written for security professionals and blog maintainers to test the security of their sites.

INSTALL

Prerequisites:
  • Ruby >= 2.2.2 - Recommended: 2.3.3
  • Curl >= 7.21 - Recommended: latest - FYI the 7.29 has a segfault
  • RubyGems - Recommended: latest

From RubyGems:
gem install wpscan

From sources:
Prerequisites: Git
git clone https://github.com/wpscanteam/wpscan

cd wpscan/

bundle install && rake install

Docker
Pull the repo with docker pull wpscanteam/wpscan

Usage
wpscan --url blog.tld This will scan the blog using default options with a good compromise between speed and accuracy. For example, the plugins will be checked passively but their version with a mixed detection mode (passively + aggressively). Potential config backup files will also be checked, along with other interesting findings. If a more stealthy approach is required, then wpscan --stealthy --url blog.tld can be used. As a result, when using the --enumerate option, don't forget to set the --plugins-detection accordingly, as its default is 'passive'.
For more options, open a terminal and type wpscan --help (if you built wpscan from the source, you should type the command outside of the git repo)
The DB is located at ~/.wpscan/db
WPScan can load all options (including the --url) from configuration files, the following locations are checked (order: first to last):
  • ~/.wpscan/cli_options.json
  • ~/.wpscan/cli_options.yml
  • pwd/.wpscan/cli_options.json
  • pwd/.wpscan/cli_options.yml
If those files exist, options from them will be loaded and overridden if found twice.
e.g:
~/.wpscan/cli_options.yml:
proxy: 'http://127.0.0.1:8080'
verbose: true
pwd/.wpscan/cli_options.yml:
proxy: 'socks5://127.0.0.1:9090'
url: 'http://target.tld'
Running wpscan in the current directory (pwd), is the same as wpscan -v --proxy socks5://127.0.0.1:9090 --url http://target.tld

PROJECT HOME
https://wpscan.org

VULNERABILITY DATABASE
https://wpvulndb.com


BetterCap v2.10 - The Swiss Army Knife For 802.11, BLE And Ethernet Networks Reconnaissance And MITM Attacks

$
0
0

bettercap is the Swiss Army knife for 802.11, BLE and Ethernet networks reconnaissance and attacks.

How to Install
A precompiled version is available for each release, alternatively you can use the latest version of the source code from this repository in order to build your own binary.
Make sure you have a correctly configured Go >= 1.8 environment, that $GOPATH/bin is in $PATH, that the libpcap-dev and libnetfilter-queue-dev (this one is only required on Linux) package installed for your system and then:
$ go get github.com/bettercap/bettercap
$ cd $GOPATH/src/github.com/bettercap/bettercap
$ make build && sudo make install
This command will download bettercap, install its dependencies, compile it and move the bettercap executable to /usr/local/bin.
Now you can use sudo bettercap -h to show the basic command line options and just sudo bettercap to start an interactive session on your default network interface, otherwise you can load a caplet.
Once bettercap is installed, you can download/update system caplet with the command:
sudo bettercap -eval "caplets.update; q"

Update
In order to update to an unstable but bleeding edge release from this repository, run the commands below:
$ go get -u github.com/bettercap/bettercap
$ cd $GOPATH/src/github.com/bettercap/bettercap
$ make build && sudo make install

Documentation and Examples
The project is documented in this wiki.


CT-Exposer - An OSINT Tool That Discovers Sub-Domains By Searching Certificate Transparency Logs

$
0
0

Discover sub-domains by searching through Certificate Transparency logs.

What is CT?
Certificate Transparency (CT) is an experimental IETF standard. The goal of it was to allow the public to audit which certificates were created by Certificate Authorities (CA). TLS has a weakness that comes from the large list of CAs that your browser implicitly trusts. If any of those CAs were to maliciously create a new certificate for a domain, your browser would trust it. CT adds benefits to TLS certificate trust: Companies can monitor who is creating certificates for the domains they own. It also allows browsers to verify that the certificate for a given domain is in the public log record.
These logs end up being a gold mine of information for penetration testers and red teams.

What can you find with ct-exposer?
ct-exposer will query the CT logs for a given domain, and then try to do DNS lookups for the domains to see which ones exist in DNS. In my experience, so far, I've found numerous sub-domains that were not located with 'site:domain.com' google searches. Keep in mind that the domains that do not resolve, they can either be old domains, or internal only domains (Ex: you need access to the internal DNS server to resolve them).

Requirements
Python3, gevent, requests, and urllib3.
pip3 install -r requirements.txt

Usage
usage: ct-exposer.py [-h] -d DOMAIN [-u] [-m]

optional arguments:
-h, --help show this help message and exit
-d DOMAIN, --domain DOMAIN
domain to query for CT logs, ex: domain.com
-u, --urls ouput results with https:// urls for domains that
resolve, one per line.
-m, --masscan output resolved IP address, one per line. Useful for
masscan IP list import "-iL" format.

Example output
python3 ct-exposer.py -d teslamotors.com
[+]: Downloading domain list...
[+]: Download of domain list complete.
[+]: Parsed 76 domain(s) from list.

[+]: Domains found:
205.234.27.243 adfs.teslamotors.com
104.92.115.166 akamaisecure.qualtrics.com
211.147.80.202 cn.auth.teslamotors.com
211.147.88.104 cnvpn.teslamotors.com
209.10.208.24 energystorage.teslamotors.com
209.11.133.110 epc.teslamotors.com
149.14.82.93 euvpn.teslamotors.com
209.11.133.50 extconfl.teslamotors.com
209.11.133.35 extissues.teslamotors.com
209.10.208.31 fleetview.teslamotors.com
64.125.183.134 leaseapp.teslamotors.com
64.125.183.134 leaseappde.teslamotors.com
209.11.133.11 lync.teslamotors.com
211.147.80.201 mycn-origin.teslamotors.com
205.234.27.211 origin-www45.teslamotors.com
205.234.31.120 owner-api.teslamotors.com
12.201.132.70 plcvpn.teslamotors.com
205.234.27.246 quickbase.teslamotors.com
104.86.205.249 resources.teslamotors.com
209.10.208.55 sdlcvpn.teslamotors.com
209.11.133.37 service.teslamotors.com
205.234.27.226 sftp.teslamotors.com
23.227.38.64 shop.eu.teslamotors.com
209.133.79.61 shop.teslamotors.com
23.227.38.64 shop.uk.teslamotors.com
205.234.27.197 smswsproxy.teslamotors.com
209.11.133.36 supercharger.teslamotors.com
209.133.79.59 suppliers.teslamotors.com
209.133.79.61 tesla.com
209.11.133.106 teslamotors.com
205.234.27.200 teslaplm-external.teslamotors.com
209.11.133.107 toolbox.teslamotors.com
209.10.208.20 trt.teslamotors.com
205.234.27.250 upload.teslamotors.com
209.10.208.27 us.auth.teslamotors.com
205.234.27.218 vpn.teslamotors.com
211.147.80.205 wechat.teslamotors.com
205.234.27.212 wsproxy.teslamotors.com
209.133.79.54 www-origin.teslamotors.com
104.86.216.34 www.teslamotors.com
209.11.133.61 xmail.teslamotors.com
211.147.80.203 xmailcn.teslamotors.com

[+]: Domains with no DNS record:
none cdn02.c3edge.net
none creditauction.teslamotors.com
none evprd.teslamotors.com
none imail.teslamotors.com
none jupytersvn.teslamotors.com
none leadgen.teslamotors.com
none lockit.teslamotors.com
none lockpay.teslamotors.com
none neovi-vpn.teslamotors.com
none origin-wte.teslamotors.com
none referral.teslamotors.com
none resources.tesla.com
none securemail.teslamotors.com
none shop.ca.teslamotors.com
none shop.no.teslamotors.com
none sip.teslamotors.com
none sjc04p2staap04.teslamotors.com
none sling.teslamotors.com
none tesla3dx.teslamotors.com
none testimail.teslamotors.com
none toolbox-energy.teslamotors.com
none vpn-node0.teslamotors.com
none wd.s3.teslamotors.com
none www-uat2.teslamotors.com
none www45.teslamotors.com


PatrOwl - Open Source, Free And Scalable Security Operations Orchestration Platform

$
0
0

PatrOwl is a scalable, free and open-source solution for orchestrating Security Operations.
PatrowlManager is the Front-end application for managing the assets, reviewing risks on real-time, orchestrating the operations (scans, searches, API calls, ...), aggregating the results, relaying alerts on third parties (ex: Incident Response platform like TheHive, Splunk, ...) and providing the reports and dashboards. Operations are performed by the PatrowlEngines instances. Don't forget to install and deploy them ;)

Project pitch desk


Architecture
Fully-Developed in Python, PatrOwl is composed of a Front-end application PatrowlManager (Django) communicating with one or multiple PatrowlEngines micro-applications (Flask) which perform the scans, analyze the results and format them in a normalized way. It remains incredibly easy to customize all components. Asynchronous tasks and engine scalability are supported by RabbitMQ and Celery. 


The PatrowlManager application is reachable using the embedded WEB interface or using the JSON-API. PatrowlEngines are only available through generic JSON-API calls (see Documentation).


WinSpy - A Windows Reverse Shell Backdoor Creator With An Automatic IP Poisener

$
0
0

WinSpy: WindowsReverse Shell Backdoor Creator With ip poisener.

Dependencies
  • 1 - metasploit-framework
  • 2 - xterm
  • 3 - apache2
  • 4 - whiptail

Installation
sudo apt-get install git
git clone https://github.com/TunisianEagles/winspy.git
cd winspy
chmod +x setup.sh
./setup.sh
chmod +x winspy.sh
./winspy.sh

Tested on :
  • BackBox Linux
  • Kali linux
  • Parrot os

Tutorial


Contact


    Bashark - Bash Post Exploitation Toolkit

    $
    0
    0

    Bashark aids pentesters and security researchers during the post-exploitation phase of security audits.

    Usage
    To launch Bashark on compromised host, simply source the bashark.sh script from terminal: $ source bashark.sh Then type help to see Bashark's help menu

    Features
    • Single Bash script
    • Lightweight and fast
    • Multi-platform: Unix, OSX, Solaris etc.
    • No external dependencies
    • Immune to heuristic and behavioural analysis
    • Built-in aliases of often used shell commands
    • Extends system shell with post-exploitation oriented functionalities
    • Stealthy, with custom cleanup routine activated on exit
    • Easily extensible (add new commands by creating Bash functions)
    • Full tab completion

    Demo


    TLS-Scanner - The TLS-Scanner Module From TLS-Attacker

    $
    0
    0

    TLS-Scanner is a tool created by the Chair for Network and Data Security from the Ruhr-University Bochum to assist pentesters and security researchers in the evaluation of TLS Server configurations.
    Please note:TLS-Scanner is a research tool intended for TLS developers, pentesters, administrators and researchers. There is no GUI. It is in the first version and may contain some bugs.

    Compiling
    In order to compile and use TLS-Scanner, you need to have Java and Maven installed, as well as TLS-Attacker in Version 2.5
    $ cd TLS-Scanner
    $ mvn clean package
    Alternatively, if you are in hurry, you can skip the tests by using:
    $ mvn clean package -DskipTests=true
    If you want to use TLS-Scanner as a library you need to install it with the following command:
    $ mvn clean install
    For hints on installing the required libraries checkout the corresponding GitHub repositories.
    Please note:In order to run this tool you need TLS-Attacker version 2.5

    Running
    In order to run TLS-Scanner you need to run the jar file in the apps/ folder.
    $ java -jar apps/TLS-Scanner.jar -connect localhost:4433
    You can specify a host you want to scan with the -connect parameter. If you want to improve the performance of the scan you can use the -threads parameter (default=1).


    Twitter-Intelligence - Twitter Intelligence OSINT Project Performs Tracking And Analysis Of The Twitter

    $
    0
    0

    A project written in Python to twitter tracking and analysis without using Twitter API.

    Prerequisites
    • This project is a Python 3.x application.
    • The package dependencies are in the file requirements.txt. Run that command to install the dependencies.
    pip3 install -r requirements.txt

    Database
    • SQLite is used as the database.
    • Tweet data are stored on the Tweet, User, Location, Hashtag, HashtagTweet tables.
    • The database is created automically.

    Usage Example
    Get help
     python3 tracking.py -h 

    Get tweets by username
     python3 tracking.py --username "HaberSau" 

    Get tweets by query
     python3 tracking.py --query "sakarya" 

    Get tweet at a specific date range
     python3 tracking.py --username "HaberSau" --since 2015-09-10 --until 2015-09-12 --maxtweets 10 

    If you get location of tweets, add --location "True" param but application will be slower due to new response times.
     python3 tracking.py --query "sakarya" --location "True"

    Analysis
    analysis.py performs analysis processing. User, hashtag and location analyzes are performed.

    Get help:
    python3 analysis.py -h

    for location analysis
    python3 analysis py --location


    location analysis runs through address http://localhost:5000/locations
    You must write Google Map Api Key in setting.py to display google map.
    GOOGLE_MAP_API_KEY='YOUR_GOOGLE_MAP_API_KEY'

    Runs hashtag analysis.
    python3 analysis.py --hashtag


    Runs user analysis.
    python3 analysis.py --user

    Graphical User Interface
    socialgui.py used for gui application


    Shellcode-Encrypter-Decrypter - Shellcode Encrypter & Decrypter By Using XOR Cipher To Encrypt And Decrypt Shellcode

    $
    0
    0

    A Shellcode Encrypter & Decrypter, Using XOR Cipher to enc and dec shellcode.

    Installation
    git clone https://github.com/blacknbunny/Shellcode-Encrypter-Decrypter.git && python enc.py --help

    Usage Example
    Encryption:

    python encdecshellcode.py --shellcode \x41\x41\x42\x42 --key SECRETKEY --option encrypt

    Decryption:

    python encdecshellcode.py --shellcode \x41\x41\x42\x42 --key SECRETKEY --option decrypt

    Finding Shellcode For Any Architecture
    http://shell-storm.org/shellcode/

    Help
    usage: enc.py [-h]  [-s SHELLCODE]  [-k KEY]  [-o OPTION]

    Encrypting & Decrypting Shellcode

    optional arguments:
    -h, --help show this help message and exit
    -s SHELLCODE, --shelcode SHELCODE
    Shellcode To Encrypt & Decrypt
    -k KEY, --key KEY Key Of The Shellcode To Encrypt & Decrypt
    -o OPTION, --option OPTION
    Argument For Encrypting & Decrypting Shellcode


    Telebix - An Application That Communicates With A Bot On The Telegram To Receive Commands And Send Information From An Infrastructure Monitored By Zabbix

    $
    0
    0

    Telebix is an application that communicates with a Bot on the Telegram to receive commands and send information from an infrastructure monitored by Zabbix, which also sends messages in real time if any problems occur in the infrastructure, it is totally written in Python with Shell Script and has a graphical interface to help the network administrator more intuitively. The application can run on any computer as long as all credentials are properly posted.

    How to use

    Creating a bot

    In the search bar on Telegram, type "BotFather" and send the command "/newbot".

    The BotFather will ask for a name for your bot, after it will ask for a username as well.

    Copy the generated access Token.

    Send any message to your bot by Telegram.

    Installation


    git clone https://github.com/Warflop/Telebix.git
    cd Telebix
    chmod +x setup.sh
    sudo ./setup.sh --install

    Configuration


    In the Settings tab are the fields to be populated with the Zabbix login information, bot token and Telegram user ID (or Group ID).

    The token you already have after creating the Bot.

    To get the user ID you can use the "GET ID" button in the settings tab after talking to the bot or add manually,
    access the address below by changing TOKENHERE by the token you copied, there will be your user ID.

    You can use the ID of any group that you are entered as well.

    https://api.telegram.org/botTOKENHERE/getUpdates

    Commands Available

    [+] /graphs hostname - List images graphs of specific host
    [+] /webs - List monitored web scenarios
    [+] /status - List status of zabbix
    [+] /events - List last five events
    [+] /help - Help and information
    [+] /hosts - List hosts
    [+] /users - List users


    Httplab - Inspect HTTP Requests And Forge Responses

    $
    0
    0

    The interactive web server.
    HTTPLabs let you inspect HTTP requests and forge responses.

    Install

    Golang
    go get github.com/gchaincl/httplab
    go install github.com/gchaincl/httplab/cmd/httplab

    Archlinux
    yaourt httplab

    SnapFIXME
    On systems where snap is supported:
    snap install httplab

    Binary distribution
    Each release provides pre-built binaries for different architectures, you can download them here: https://github.com/gchaincl/httplab/releases/latest

    Help
    Usage of httplab:
    -a, --auto-update Auto-updates response when fields change. (default true)
    -b, --body string Specifies the inital response body. (default "Hello, World")
    -c, --config string Specifies custom config path.
    --cors Enable CORS.
    --cors-display Display CORS requests. (default true)
    -d, --delay int Specifies the initial response delay in ms.
    -H, --headers strings Specifies the initial response headers. (default [X-Server:HTTPLab])
    -p, --port int Specifies the port where HTTPLab will bind to. (default 10080)
    -s, --status string Specifies the initial response status. (default "200")
    -v, --version Prints current version.

    Key Bindings
    KeyDescription
    TabNext Input
    Shift+TabPrevious Input
    Ctrl+aApply Response changes
    Ctrl+rResets Request history
    Ctrl+sSave Response as
    Ctrl+fSave Request as
    Ctrl+lToggle Responses list
    Ctrl+tToggle Response builder
    Ctrl+oOpen Body file
    Ctrl+bSwitch Body mode
    Ctrl+hToggle Help
    Ctrl+wToggle line wrapping
    qClose popup
    PgUpPrevious Request
    PgDownNext Request
    Ctrl+cQuit
    HTTPLab uses file to store pre-built responses, it will look for a file called .httplab on the current directory if not found it will fallback to $HOME. A sample file can be found here.
    HTTPLab is heavily inspired by wuzz


    Slither - Static Analyzer For Solidity

    $
    0
    0

    Slither is a Solidity static analysis framework written in Python 3. It runs a suite of vulnerability detectors, prints visual information about contract details, and provides an API to easily write custom analyses. Slither enables developers to find vulnerabilities, enhance their code comphrehension, and quickly prototype custom analyses.

    Features
    • Detects vulnerable Solidity code with low false positives
    • Identifies where the error condition occurs in the source code
    • Easy integration into continuous integration pipelines
    • Built-in 'printers' quickly report crucial contract information
    • Detector API to write custom analyses in Python
    • Ability to analyze contracts written with Solidity >= 0.4
    • Intermediate representation (SlithIR) enables simple, high-precision analyses

    Usage
    $ slither tests/uninitialized.sol # argument can be file, folder or glob, be sure to quote the argument when using a glob
    [..]
    INFO:Detectors:Uninitialized state variables in tests/uninitialized.sol, Contract: Uninitialized, Vars: destination, Used in ['transfer']
    [..]
    If Slither is run on a directory, it will run on every .sol file of the directory. All vulnerability checks are run by default.

    Configuration
    • --solc SOLC: Path to solc (default 'solc')
    • --solc-args SOLC_ARGS: Add custom solc arguments. SOLC_ARGS can contain multiple arguments
    • --disable-solc-warnings: Do not print solc warnings
    • --solc-ast: Use the solc AST file as input (solc file.sol --ast-json > file.ast.json)
    • --json FILE: Export results as JSON
    • --exclude-name: Excludes the detector name from analysis

    Printers
    • --printer-summary: Print a summary of the contracts
    • --printer-quick-summary: Print a quick summary of the contracts
    • --printer-inheritance: Print the inheritance relations
    • --printer-inheritance-graph: Print the inheritance graph in a file
    • --printer-vars-and-auth: Print the variables written and the check on msg.sender of each function

    Checks available
    By default, all the checks are run. Use --detect-name-of-check to run one check at a time.
    NumCheckWhat it DetectsImpactConfidence
    1suicidalSuicidal functionsHighHigh
    2uninitialized-stateUninitialized state variablesHighHigh
    3uninitialized-storageUninitialized storage variablesHighHigh
    4arbitrary-sendFunctions that send ether to an arbitrary destinationHighMedium
    5reentrancyReentrancy vulnerabilitiesHighMedium
    6locked-etherContracts that lock etherMediumHigh
    7tx-originDangerous usage of tx.originMediumMedium
    8assemblyAssembly usageInformationalHigh
    9const-candidates-stateState variables that could be declared constantInformationalHigh
    10low-level-callsLow level callsInformationalHigh
    11naming-conventionConformance to Solidity naming conventionsInformationalHigh
    12pragmaIf different pragma directives are usedInformationalHigh
    13solc-versionIf an old version of Solidity used (<0.4.23)InformationalHigh
    14unused-stateUnused state variablesInformationalHigh
    Contact to get access to additional detectors.

    How to install
    Slither requires Python 3.6+ and solc, the Solidity compiler.

    Using Pip
    $ pip install slither-analyzer

    Using Git
    $ git clone https://github.com/trailofbits/slither.git && cd slither
    $ python setup.py install


    testssl.sh - Testing TLS/SSL Encryption Anywhere On Any Port

    $
    0
    0

    testssl.sh is a free command line tool which checks a server's service on any port for the support of TLS/SSL ciphers, protocols as well as some cryptographic flaws.

    Key features
    • Clear output: you can tell easily whether anything is good or bad
    • Ease of installation: It works for Linux, OSX/Darwin, FreeBSD, NetBSD, OpenBSD (needs bash) and MSYS2/Cygwin out of the box: no need to install or to configure something. No gems, CPAN, pip or the like/
    • Flexibility: You can test any SSL/TLS enabled and STARTTLS service, not only webservers at port 443
    • Toolbox: Several command line options help you to run YOUR test and configure YOUR output
    • Reliability: features are tested thoroughly
    • Verbosity: If a particular check cannot be performed because of a missing capability on your client side, you'll get a warning
    • Privacy: It's only you who sees the result, not a third party
    • Freedom: It's 100% open source. You can look at the code, see what's going on and you can change it.
    • Heck, even the development is open (github)

    Installation
    You can download testssl.sh by cloning this git repository:
    git clone --depth 1 https://github.com/drwetter/testssl.sh.git
    Or help yourself downloading the ZIP archive https://github.com/drwetter/testssl.sh/archive/2.9dev.zip. testssl.sh --help will give you some help upfront. More help: see doc directory with man pages. Older sample runs are at https://testssl.sh/.

    Status
    Here in the 2.9dev branch you find the development version of the software -- with new features and maybe some bugs -- albeit we try our best before committing to test changes. Be aware that we also change the output or command line.
    For the previous stable version please see testssl.sh or download the interim release 2.9.5 from here 2.9.5 which is is the successor of 2.8 and stable for day-to-day work.

    Compatibility
    testssl.sh is working on every Linux/BSD distribution out of the box. Since 2.9dev most of the limitations of disabled features from the openssl client are gone due to bash-socket-based checks. As a result you can also use e.g. LibreSSL. testssl.sh also works on other unixoid system out of the box, supposed they have /bin/bash>= version 3.2 and standard tools like sed and awk installed. System V needs to have GNU grep installed. MacOS X and Windows (using MSYS2 or cygwin) work too. OpenSSL version version >= 1.0.2 is recommended for better LOGJAM checks and to display bit strengths for key exchanges.

    Update notification here or @ twitter.

    Features implemented in 2.9dev
    • Using bash sockets where ever possible --> better detection of ciphers, independent on the openssl version used.
    • Testing 364 default ciphers (testssl.sh -e/-E) with a mixture of sockets and openssl. Same speed as with openssl only but additional ciphers such as post-quantum ciphers, new CHAHA20/POLY1305, CamelliaGCM etc.
    • Further tests via TLS sockets and improvements (handshake parsing, completeness, robustness),
    • TLS 1.2 protocol check via socket in production
    • Finding more TLS extensions via sockets
    • TLS Supported Groups Registry (RFC 7919), key shares extension
    • Non-flat JSON support
    • File output (CSV, JSON flat, JSON non-flat) supports a minimum severity level (only above supplied level there will be output)
    • Support of supplying timeout value for openssl connect -- useful for batch/mass scanning
    • Parallel mass testing (!)
    • File input for serial or parallel mass testing can be also in nmap grep(p)able (-oG) format
    • Native HTML support instead going through 'aha'
    • Better formatting of output (indentation)
    • Choice showing the RFC naming scheme only
    • LUCKY13 and SWEET32 checks
    • Check for vulnerability to Bleichenbacher attacks
    • Ticketbleed check
    • Decoding of unencrypted BIG IP cookies
    • LOGJAM: now checking also for known DH parameters
    • Check for CAA RR
    • Check for OCSP must staple
    • Check for Certificate Transparency
    • Expect-CT Header Detection
    • Check for session resumption (Ticket, ID)
    • TLS Robustness check (GREASE)
    • Postgres und MySQL STARTTLS support, MongoDB support
    • Decodes BIG IP F5 Cookie
    • Fully OpenBSD and LibreSSL support
    • Missing SAN warning
    • Man page
    • Better error msg suppression (not fully installed OpenSSL)
    • DNS over Proxy and other proxy improvements
    • Better JSON output: renamed IDs and findings shorter/better parsable
    • JSON output now valid also for non-responsing servers
    • Added support for private CAs
    • Exit code now 0 for running without error
    • ROBOT check
    • Better extension support
    • Better OpenSSL 1.1.1 support
    • Supports latest and greatest version of TLS 1.3, shows drafts supported

    Please file bug reports @ https://github.com/drwetter/testssl.sh/issues.

    Documentation
    For a start see the wiki. Help is needed here. Will Hunt provides a good description for version 2.8, including useful background info.


    Python-Nubia - A Command-Line And Interactive Shell Framework

    $
    0
    0
    Nubia is a lightweight framework for building command-line applications with Python. It was originally designed for the “logdevice interactive shell (aka. ldshell)” at Facebook. Since then it was factored out to be a reusable component and several internal Facebook projects now rely on it as a quick and easy way to get an intuitive shell/cli application without too much boilerplate.
    Nubia is built on top of python-prompt-toolkit which is a fantastic toolkit for building interactive command-line applications.
    Disclaimer: Nubia is beta for non-ldshell use-cases. Some of the design decisions might sound odd but they fit the ldshell usecase perfectly. We are continuously making changes to make it more consistent and generic outside of the ldshell use-case. Until a fully stable release is published, use it on your own risk.
    See the CONTRIBUTING file for how to help out.
    If you are curious on the origins of the name, checkout Nubia on Wikipedia with its unique and colourful architecture.

    Key Features
    • Interactive mode that offers fish-style auto-completion
    • CLI mode that gets generated from your functions and classes.
    • Optional bash/zsh completions via an external utility ‘nubia-complete’ (experimental)
    • A customisable status-bar in interactive mode.
    • An optional IPython-based interactive shell
    • Arguments with underscores are automatically hyphenated
    • Python3 type annotations are used for input type validation

    Interactive mode
    The interactive mode in Nubia is what makes it unique. It is very easy to build a unique shell for your program with zero overhead. The interactive shell in its simplistic form offers automatic completions for commands, sub-commands, arguments, and values. It also offers a great deal of control for developers to take control over auto-completions, even for commands that do not fall under the typical format. An example is the “select” command in ldshell which is expressed as a SQL-query. We expect that most use cases of Nubia will not need such control and the AutoCommand will be enough without further customisation.
    If you start a nubia-based program without a command, it automatically starts an interactive shell. The interactive mode looks like this:


    Non-interactive mode
    The CLI mode works exactly like any traditional unix-based command line utility.


    Examples
    It starts with a function like this:
    import socket
    import typing

    from termcolor import cprint
    from nubia import argument, command, context

    @command
    @argument("hosts", description="Hostnames to resolve", aliases=["i"])
    @argument("bad_name", name="nice", description="testing")
    def lookup(hosts: typing.List[str], bad_name: int):
    """
    This will lookup the hostnames and print the corresponding IP addresses
    """
    ctx = context.get_context()
    print(f"hosts: {hosts}")
    cprint(f"Verbose? {ctx.verbose}")

    for host in hosts:
    cprint(f"{host} is {socket.gethostbyname(host)}")

    # optional, by default it's 0
    return 0

    Requirements
    Nubia-based applications require python 3.6+ and works with both Mac OS X or Linux. While in theory it should work on Windows, it has never been tried.

    Installing Nubia
    If you are installing nubia for your next project, you should be able to easily use pip for that:
    pip3 install python-nubia

    Building Nubia from source
    Ensure is pipenv installed:
    pip3 install pipenv
    You can either setup.py to build a tarball, or use pipenv to setup a virtualenv with all the dependencies installed.

    Running example in virtualenv:
    If you would like to run the example, then you need to add the root of the source tree into your PYTHONPATH.
    pipenv update --dev
    pipenv shell

    export PYTHONPATH="$(pwd)"
    cd example/
    python nubia_example.py
    To run the unit tests:
    pipenv run nosetests

    Getting Started
    See the getting started guide to learn how to build a simple application with Nubia.


    XSStrike v3.0 - Most Advanced XSS Detection Suite

    $
    0
    0

    Why XSStrike?
    Every XSS scanner out there has a list of payloads, they inject the payloads and if the payload is reflected into the webpage, it is declared vulnerable but that's just stupid. XSStrike on the other hand analyses the response with multiple parsers and then crafts payloads that are guaranteed to work. Here are some examples of the payloads generated by XSStrike:
    }]};(confirm)()//\
    <A%0aONMouseOvER%0d=%0d[8].find(confirm)>z
    </tiTlE/><a%0donpOintErentER%0d=%0d(prompt)``>z
    </SCRiPT/><DETAILs/+/onpoINTERenTEr%0a=%0aa=prompt,a()//
    Apart from that, XSStrike has crawling, fuzzing, WAF detection capabilities as well. It also scans for DOM XSS vulnerabilities.

    Main Features
    • Reflected and DOM XSS Scanning
    • Multithreaded crawling
    • Context analysis
    • Configurable Core
    • Highly Researched Workflow
    • WAF detection & evasion
    • Handmade HTML & JavaScript parser
    • Powerful fuzzing engine
    • Intelligent payload generator
    • Complete HTTP Support
    • Powered by Photon, Zetanize and Arjun

    Gallery

    DOM XSS


    Reflected XSS


    Crawling


    Hidden Parameter Discovery


    Interactive HTTP Headers Prompt


    PasteJacker - Add PasteJacking To Web-Delivery Attacks

    $
    0
    0

    The main purpose of the tool is automating (PasteJacking/Clipboard poisoning/whatever you name it) attack with collecting all the known tricks used in this attack in one place and one automated job as after searching I found there's no tool doing this job the right way.
    Now while this attack depends on what the user will paste, imagine adding this attack to Metasploit web delivery module.

    See this simple scenario to make things clear:
    1. The target opens an HTML page served by the tool and this page has anything that makes the wants to copy from it to the terminal like some installation instructions.
    2. Target copies a thing from the page then it replaced quickly with our line.
    3. The user pastes it in the terminal and before he notices that the line changed, the line gets executed by itself in the background and the terminal gets cleared.
    4. All of that happened in a second and the user sees the terminal is usable again and maybe thinks this is a bad program and he won't install it but you already got your meterpreter shell.

    This tool uses 3 methods to trick user into copying our payload instead of the command he copies:
    • Using javascript to hook the copy event and replace copied data.
      • Advantages :
        1. Anything the user copies in the page will be replaced with our line.
        2. Command executed by itself once target paste it without pressing enter.
      • Disadvantages :
        1. Requires Javascript to be enabled on the target browser.
    • Using span style attribute to hide our lines by overwriting.
      • Advantages :
        1. Doesn't require javascript to be enabled.
        2. Works on all browsers.
      • Disadvantages :
        1. Target must select all the text in the page or the first two words to ensure that he copies our hidden malicious lines.
    • Using span style again but this time to make our text transparent and non-markable.
      • Advantages :
        1. Doesn't require javascript to be enabled.
      • Disadvantages :
        1. Target must select all the text in the page to ensure that he copies our hidden malicious lines.
        2. Not working on opera and chrome.

    What's the payload user copies ?
    PasteJacker gives you the option to do one of this things:
    1. Generate a msfvenom backdoor on our machine and the liner target gonna copy will download the backdoor on the its machine, through wget or certutil depends on the OS, then executes it on the background without printing anything to the terminal.
    2. Serve a liner that gets you a reverse netcat connection on the target machine running in the background of course.
    3. Serve your custom liner like Metasploit web-delivery payload with adding some touches to hide any possible output.

    Screenshots


    Installing and requirements
    • Python 3 and setuptools module.
    • Linux or Unix-based system (Currently tested only on Kali Linux rolling and Ubuntu 16.04).
    • Third-party requirements like msfvenom but only if you are gonna use the msfvenom option of course.
    • Third-party library ncurses-dev for Ubuntu (Thanks for @mhaskar).
    • Root access.

    Installing
    • For Linux :
    git clone https://github.com/D4Vinci/PasteJacker.git
    sudo python3 -m pip install ./PasteJacker
    sudo pastejacker

    Updating the framework or the database
    • On Linux while outside the directory
    cd PasteJacker && git pull && cd ..
    sudo python3 -m pip install ./PasteJacker --upgrade

    References

    Contact

    Disclaimer
    PasteJacker is created to help in penetration testing and it's not responsible for any misuse or illegal purposes.
    Copying a code from this tool or using it in another tool is accepted as you mention where you get it from.
    Pull requests are always welcomed :D


    Faraday v3.2 - Collaborative Penetration Test and Vulnerability Management Platform

    $
    0
    0

    Here is a list of all the goodies in Faraday v3.2:

    Workspace names- with numbers!
    With this new version, workspaces’ names are now allowed to start with numbers (before they could only start with letters).

    Search unconfirmed vulns
    In this version was added the filter to be able to show unconfirmed vulns as well:


    Multi column search
    Was added support to the operator “AND” on the search field in the Status Report, this is one of the first logical operators that we support in Faraday. Is working to add the “OR” operator soon.


    Here is the full change log for version 3.2:

    • Added logical operator AND to Status Report search
    • Restkit dependency removed.                      
    • Improvement on manage.py change-password
    • Add feature to show only unconfirmed vulns.      
    • Add ssl information to manage.py status-check    
    • Update wpscan plugin to support latest version.                                                                  
    • Allow workspace names to start with numbers.  


    JQShell - A Weaponized Version Of CVE-2018-9206 (Unauthenticated arbitrary file upload vulnerability in Blueimp jQuery-File-Upload

    $
    0
    0

    JQShell
    A weaponized version of CVE-2018-9206 (Unauthenticated arbitrary file upload vulnerability in Blueimp jQuery-File-Upload <= v9.22.0).

    Disclaimer
    Using this agianst servers you dont control, is illegal in most countries. The author claims no responsibility for the actions of those who use this software for illegal purposes. This software is intended for educational use only. No servers were illegally pwned in the making of this software.

    Features
    Single TargetMulti TargetTor

    Prerequisites
    Please install these required packages.

    Python3
    pip3 install requests pysocks subprocess stem

    Tor Control Port
    To use tor, in this script, you must edit your torrc file and enable tor control port on 9051.
    Typically this file is here: /etc/tor/torrc
    open this file and change this line:
    #ControlPort 9051
    to
    ControlPort 9051
    restart tor service

    Usage
    usage: jqshell.py [-h] [-l LIST_INIT] [-t SINGLE_TARGET] -s SHELL_LOC
    [-o OUTPUTZ] [-tor]

    optional arguments:
    -h, --help show this help message and exit
    -l LIST_INIT, --list LIST_INIT
    Select for a list of assets to exploit
    -t SINGLE_TARGET, --target SINGLE_TARGET
    Single exploit target
    -s SHELL_LOC, --shell SHELL_LOC
    This is required, put the fullpath to your shell
    -o OUTPUTZ, --output OUTPUTZ
    This is full path to were you want to save your list
    of confirmed hosts
    -tor, --tor_proxy Select if you have tor installed, you will need to
    enable control port

    Examples
    Running agianst single target.
    python3 jqshell.py -t localhost/folderwerejqueryis -s /var/www/html/shell.php
    Running agianst single target, with saving output.
    python3 jqshell.py -t localhost/folderwerejqueryis -s /var/www/html/shell.php -o pwned.txt
    Running a list, with saving output.
    python3 jqshell.py -l /opt/jquery/test.txt -s /var/www/html/shell.php -o pwned.txt

    Author


    Lynis 2.7.0 - Security Auditing Tool for Unix/Linux Systems

    $
    0
    0

    We are excited to announce this major release of auditing tool Lynis. Several big changes have been made to core functions of Lynis. These changes are the next of simplification improvements we made. There is a risk of breaking your existing configuration.

    Lynis is an open source security auditing tool. Used by system administrators, security professionals, and auditors, to evaluate the security defenses of their Linux and UNIX-based systems. It runs on the host itself, so it performs more extensive security scans than vulnerability scanners.

    Supported operating systems

    The tool has almost no dependencies, therefore it runs on almost all Unix-based systems and versions, including:
    • AIX
    • FreeBSD
    • HP-UX
    • Linux
    • Mac OS
    • NetBSD
    • OpenBSD
    • Solaris
    • and others
    It even runs on systems like the Raspberry Pi and several storage devices!

    Installation optional

    Lynis is light-weight and easy to use. Installation is optional: just copy it to a system, and use "./lynis audit system" to start the security scan. It is written in shell script and released as open source software (GPL). 

    How it works

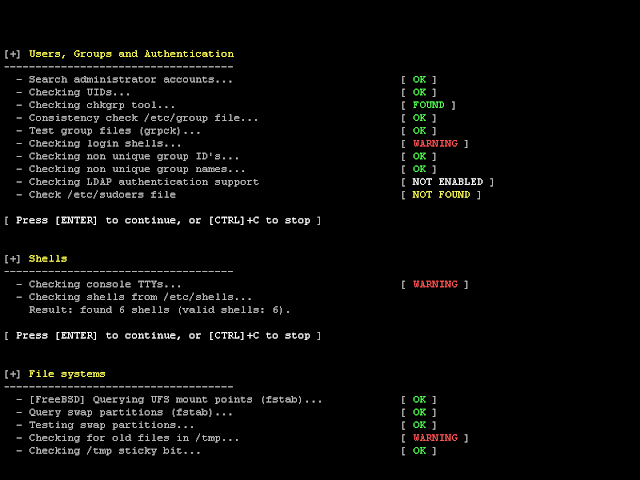
    Lynis performs hundreds of individual tests, to determine the security state of the system. The security scan itself consists of performing a set of steps, from initialization the program, up to the report.

    Steps
    1. Determine operating system
    2. Search for available tools and utilities
    3. Check for Lynis update
    4. Run tests from enabled plugins
    5. Run security tests per category
    6. Report status of security scan
    Besides the data displayed on the screen, all technical details about the scan are stored in a log file. Any findings (warnings, suggestions, data collection) are stored in a report file.

    Opportunistic Scanning

    Lynis scanning is opportunistic: it uses what it can find.
    For example, if it sees you are running Apache, it will perform an initial round of Apache related tests. When during the Apache scan it also discovers an SSL/TLS configuration, it will perform additional auditing steps on that. While doing that, it then will collect discovered certificates so they can be scanned later as well.

    In-depth security scans

    By performing opportunistic scanning, the tool can run with almost no dependencies. The more it finds, the deeper the audit will be. In other words, Lynis will always perform scans which are customized to your system. No audit will be the same!

    Use cases

    Since Lynis is flexible, it is used for several different purposes. Typical use cases for Lynis include:
    • Security auditing
    • Compliance testing (e.g. PCI, HIPAA, SOx)
    • Vulnerability detection and scanning
    • System hardening

    Resources used for testing

    Many other tools use the same data files for performing tests. Since Lynis is not limited to a few common Linux distributions, it uses tests from standards and many custom ones not found in any other tool.
    • Best practices
    • CIS
    • NIST
    • NSA
    • OpenSCAP data
    • Vendor guides and recommendations (e.g. Debian Gentoo, Red Hat)

    Lynis Plugins

    Plugins enable the tool to perform additional tests. They can be seen as an extension (or add-on) to Lynis, enhancing its functionality. One example is the compliance checking plugin, which performs specific tests only applicable to some standard.

    Changelog
    Upgrade note
    ## Lynis 2.7.0 (2018-10-26)

    ### Added
    - MACF-6240 - Detection of TOMOYO binary
    - MACF-6242 - Status of TOMOYO framework
    - SSH-7406 - OpenSSH server version detection
    - TOOL-5160 - Check active OSSEC analysis daemon

    ### Changed
    - Changed several warning labels on screen
    - AUTH-9308 - More generic sulogin for systemd rescue.service
    - OS detection now ignores quotes for getting the OS ID.


    KillShot - Information Gathering Tool

    $
    0
    0

    A Penetration Testing Framework, Information gathering tool & Website Vulnerability Scanner

    Why KillShot ?
    You Can use this tool to Spider your website and get important information and gather information automaticaly using whatweb-host-traceroute-dig-fierce-wafw00f or to Identify the cms and to find the vulnerability in your website using Cms Exploit Scanner && WebApp Vul Scanner Also You can use killshot to Scan automaticly multiple type of scan with nmap and unicorn . And With this tool You can Generate PHP Simple Backdoors upload it manual and connect to the target using killshot.
    This Tool Bearing A simple Ruby Fuzzer Tested on VULSERV.exe And Linux Log clear script To change the content of login paths Spider can help you to find parametre of the site and scan xss and sql.

    Menu
    {0} Spider 
    {1} Web technologie
    {2} WebApp Vul Scanner
    {3} Port Scanner
    {4} CMS Scanner
    {5} Fuzzers
    {6} Cms Exploit Scanner
    {7} Backdoor Generation
    {8} Linux Log Clear

    WebApp Vul Scanner
    {1} Xss scanner
    {2} Sql Scanner
    {3} Tomcat RCE

    Port Scanner
     [0] Nmap Scan
    [1] Unicorn Scan
    Nmap Scan
    [2] Nmap Os Scan
    [3] Nmap TCP Scan
    [4] Nmap UDB Scan
    [5] Nmap All scan
    [6] Nmap Http Option Scan
    [7] Nmap Live target In Network
    Unicorn Scan
    [8] Services OS
    [9] TCP SYN Scan on a whole network
    [01] UDP scan on the whole network

    Backdoor Generation
     {1} Generate Shell
    {2} Connect Shell

    USAGE
    1 ----- Help Command 
    [site] MAKE YOUR TARGET
    [help] show this MESSAGE
    [exit] show this MESSAGE
    2 ------ Site command
    Put your target www.example.com
    without the http

    Linux Setup
    git clone https://github.com/bahaabdelwahed/killshot
    cd killshot
    ruby setup.rb (if setup show any error just try to install the gems/tool manual )
    ruby killshot.rb

    Video


    Viewing all 5854 articles
    Browse latest View live