Quantcast
Channel: KitPloit - PenTest Tools!
Viewing all 5854 articles
Browse latest View live

Airba.sh - A POSIX-compliant, Fully Automated WPA PSK Handshake Capture Script Aimed At Penetration Testing

$
0
0

Airbash is a POSIX-compliant, fully automated WPA PSK handshake capture script aimed at penetration testing. It is compatible with Bash and Android Shell (tested on Kali Linux and Cyanogenmod 10.2) and uses aircrack-ng to scan for clients that are currently connected to access points (AP). Those clients are then deauthenticated in order to capture the handshake when attempting to reconnect to the AP. Verification of a captured handshake is done using aircrack-ng. If one or more handshakes are captured, they are entered into an SQLite3 database, along with the time of capture and current GPS data (if properly configured).
After capture, the database can be tested for vulnerable router models using crackdefault.sh. It will search for entries that match the implemented modules, which currently include algorithms to compute default keys for Speedport 500-700 series, Thomson/SpeedTouch and UPC 7 digits (UPC1234567) routers.

Requirements
WiFi interface in monitor mode aircrack-ng SQLite3 openssl for compilation of modules (optional) wlanhc2hcx from hcxtools
In order to log GPS coordinates of handshakes, configure your coordinate logging software to log to .loc/*.txt (the filename can be chosen as desired). Airbash will always use the output of cat "$path$loc"*.txt 2>/dev/null | awk 'NR==0; END{print}', which equals to reading all .txt files in .loc/ and picking the second line. The reason for this way of implementation is the functionality of GPSLogger, which was used on the development device.

Calculating default keys
After capturing a new handshake, the database can be queried for vulnerable router models. If a module applies, the default keys for this router series are calculated and used as input for aircrack-ng to try and recover the passphrase.

Compiling Modules
The modules for calculating Thomson/SpeedTouch and UPC1234567 (7 random digits) default keys are included in src/
Credits for the code go to the authors Kevin Devine and peter@haxx.in.
On Linux:
gcc -fomit-frame-pointer -O3 -funroll-all-loops -o modules/st modules/stkeys.c -lcrypto
gcc -O2 -o modules/upckeys modules/upc_keys.c -lcrypto
If on Android, you may need to copy the binaries to /system/xbin/ or to another directory where binary execution is allowed.

Usage
Running install.sh will create the database, prepare the folder structure and create shortlinks to both scripts which can be moved to a directory that is on $PATH to allow execution from any location.
After installation, you may need to manually adjust INTERFACE on line 46 in airba.sh. This will later be determined automatically, but for now the default is set to wlan0, to allow out of the box compatibility with bcmon on Android.
./airba.sh starts the script, automatically scanning and attacking targets that are not found in the database. ./crackdefault.sh attempts to break known default key algorithms.
To view the database contents, run sqlite3 .db.sqlite3 "SELECT * FROM hs" in the main directory.

Update (Linux only ... for now):
Airbash can be updated by executing update.sh. This will clone the master branch into /tmp/ and overwrite the local files.

Output
_n: number of access points found
__c/m: represents client number and maximum number of clients found, respectively
-: access point is blacklisted
x: access point already in database
?: access point out of range (not visible to airodump anymore)

The Database
The database contains a table called hs with seven columns.
id: incrementing counter of table entries
lat and lon: GPS coordinates of the handshake (if available)
bssid: MAC address of the access point
essid: Name identifier
psk: WPA Passphrase, if known
prcsd: Flag that gets set by crackdefault.sh to prevent duplicate calculation of default keys if a custom passphrase was used.
Currently, the SQLite3 database is not password-protected.


Metateta - Automated Tool For Scanning And Exploiting Network Protocols Using Metasploit

$
0
0


Metateta Automated Tool For Scanning And Exploiting Network Protocols Using Metasploit 
For faster pen testing for large networks

What You Can Do
  • Scanning with all metasploit modules for specific network Protocol like smb,smtp,snmp
  • Run all Auxiliary modules against specific network Protocol
  • Run all Possible MetasploitExploits for specific network Protocol That's is not recommended for real pen testing
  • Can Run against one target or network or even text file with targets

Using example's
run.py -R 192.168.1.15-255 -p smb -x exploit 

run.py -r 192.168.1.15 -p smtp -x scan

run.py -f hosts.txt -p smb -x auxiliary
Hossam Mohamed – @wazehell


Takeover - SubDomain TakeOver Vulnerability Scanner

$
0
0

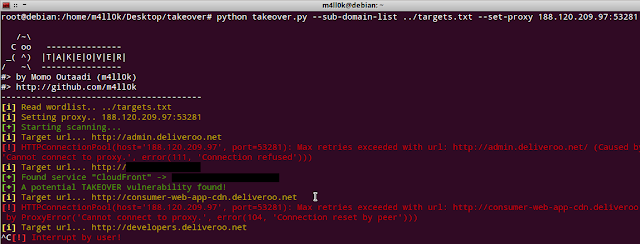
Sub-domain takeovervulnerability occur when a sub-domain (subdomain.example.com) is pointing to a service (e.g: GitHub, AWS/S3,..) that has been removed or deleted. This allows an attacker to set up a page on the service that was being used and point their page to that sub-domain. For example, if subdomain.example.com was pointing to a GitHub page and the user decided to delete their GitHub page, an attacker can now create a GitHub page, add a CNAME file containing subdomain.example.com, and claim subdomain.example.com. For more information: here


Installation:
# git clone https://github.com/m4ll0k/takeover.git
# cd takeover
# python takeover.py
or:
wget -q https://raw.githubusercontent.com/m4ll0k/takeover/master/takeover.py && python takeover.py


M4Ngl3M3 - Common Password Pattern Generator Using Strings List

$
0
0

Common password pattern generator using strings list.

Quick Installation:
$ git clone https://github.com/localh0t/m4ngl3m3
$ cd m4ngl3m3
$ ./main.py

Basic Help:
usage: main.py [-h] [-fy FROM_YEAR] [-ty TO_YEAR] [-sy] [-nf NUMBERS_FILE]
[-sf SYMBOLS_FILE] [-cf CUSTOM_FILE] [-sbs] [-sap]
[-mm MUTATION_METHODS]
MUTATION_MODE STRINGS_FILE OUTPUT_FILE

Common password pattern generator using strings list

positional arguments:
MUTATION_MODE Mutation mode to perform: (prefix-mode |
suffix-mode | dual-mode)
STRINGS_FILE File with strings to mutate
OUTPUT_FILE Where to write the mutated strings

optional arguments:
-h, --help show this help message and exit
-fy FROM_YEAR, --from-year FROM_YEAR
Year where our iteration starts (default:
2015)
-ty TO_YEAR, --to-year TO_YEAR
Year where our iteration ends (default:
2020)
-sy, --short-year Also add shorter year form when iterating
(default: False)
-nf NUMBERS_FILE, --numbers-file NUMBERS_FILE
Numbers prefix/suffix file (default:
./files/numbers/numbers_set2.txt)
-sf SYMBOLS_FILE, --symbols-file SYMBOLS_FILE
Symbols prefix/suffix file (default:
./files/symbols/symbols_set2.txt)
-cf CUSTOM_FILE, --custom-file CUSTOM_FILE
Custom words/dates/initials/etc file
(default: None)
-sbs, --symbols-before-suffix
Insert symbols also before years/numbers/
custom (when in suffix-mode or dual-mode)
(default: False)
-sap, --symbols-after-prefix
Insert symbols also after years/numbers/
custom (when in prefix-mode or dual-mode)
(default: False)
-mm MUTATION_METHODS, --mutation-methods MUTATION_METHODS
Mutation methods to perform (comma
separated, no spaces) (valid: see
MUTATION_METHODS.md)
(default:
normal,uppercase,firstup,replacevowels)

--from-year (-fy), --to-year (-ty):
Here we set where we want our script to start and end iterating over years. Many times people include the current year in an effort to add some entropy. Because passwords could be outdated, or the years included could be in the (near) future, we are going to add them as a range. For online environments, we would be looking at a conservative approach and only include ranges in the order of (-1, +1) or (-2, +2). For offline environments, the range could be wider to (-20, +5) or even (-50, +10). Output example:
password2017
[...]
password2018
[...]
password2019

--short-year (-sy):
When iterating years, also add its shorter double digit form. Output example:
password17
[...]
password18
[...]
password19

--numbers-file (-nf):
In this argument we are going to select a file containing numbers that people frequently add to their passwords. By default I included 6 sets, the largest being the 6, and the rest being subsets of the previous one. The numbers included in the first sets (1,2…) are more likely to be present that the ones only included in latest sets (…5,6). Again, for online environments, we would be looking at using the first three sets, where in offline environments, we could use the last ones. By default, the script uses the set number 2. Output example:
password1
[...]
password123
[...]
password1234

--symbols-file (-sf):
In this argument we are going to select a file containing symbols that people frequently add to their passwords. Again, set number 1 is the shortest, set number 6 is the largest. The symbols included in the first sets (1,2…) are more likely to be present that the ones only included in latest sets (…5,6). By default, the script uses the set number 2. Output example:
password123!
[...]
password2018?
[...]
password1234.

--custom-file (-cf):
Here we add anything else we know about our targets (and it’s not considered as the “base” of the password itself). Let the creativity roll in! It could be from company initials, birth dates, special dates… to specific years, shortkeywords, etc. This custom strings will be treated in the same way that the years/numbers. Output example:
passwordABC
[...]
password01011980!
[...]
password.admin

MUTATION_MODE (positional argument):
In this parameter we are going to select how the tool will work when shifting strings. You can choose one of three:
  • suffix-mode: It will add years, numbers, symbols and custom after the main string. Example: password2018!
  • prefix-mode: It will add years, numbers, symbols and custom before the main string. Example: !2018password
  • dual-mode: As the name suggests, it uses both modes (generates both outputs).

STRINGS_FILE (positional argument):
File containing strings to mutate. If you’re for example, doing a pentest and don’t know where to start, I would suggest you using a tool like CeWL to spider the company website, and keep the most recurring words (including the company name of course).

OUTPUT_FILE (positional argument):
Simply, file where we want to write the mutated strings.

--symbols-before-suffix (-sbs):
When this flag is enabled, and we are running the tool either in suffix-mode or dual-mode, the script will also add the symbols before years/numbers/custom. Output example:
password2018!
[...]
password!2018
[...]

--symbols-after-prefix (-sap):
When this flag is enabled, and we are running the tool either in prefix-mode or dual-mode, the script will also add the symbols after years/numbers/custom. Output example:
!2018password
[...]
2018!password
[...]

--mutation-methods (-mm):
In this parameter we define which mutation methods are going to be performed. Mutation methods are base transformations made before starting iterating over years/numbers/symbols/custom. You can select as many mutation methods as you want. For a list of all valid mutation methods, check: MUTATION_METHODS.md.
By default, m4ngl3m3! runs with the following: Normal, UpperCase, FirstUp and ReplaceVowels.

Usage examples:

Usage example (1):
$ ./main.py --from-year 2017 --to-year 2018 --symbols-before-suffix suffix-mode strings.txt output.txt
(or, shorter version)
$ ./main.py -fy 2017 -ty 2018 -sbs suffix-mode strings.txt output.txt
[!] Starting...
[+] Normal-Mangling mutation method done on string: admin
[+] UpperCase-Mangling mutation method done on string: admin
[+] FirstUp-Mangling mutation method done on string: admin
[+] ReplaceVowels-Mangling mutation method done on string: admin
---
[+] Normal-Mangling mutation method done on string: companyname
[+] UpperCase-Mangling mutation method done on string: companyname
[+] FirstUp-Mangling mutation method done on string: companyname
[+] ReplaceVowels-Mangling mutation method done on string: companyname
---
[!] All done!
[!] Strings read: 2
[!] Strings written: 888
[!] Exiting ...
“Iterate from year 2017 to 2018, default numbers and symbols file, suffix mode only, insert symbols also before suffix, default mutation methods.”

Input file:
admin
companyname

Output file:
admin
admin!
[...]
Admin2017!
Admin!2017
[...]
COMPANYNAME1234!
COMPANYNAME!1234
[...]
c0mp4nyn4m32018@
c0mp4nyn4m3@2018
[...]

Usage example (2):
$ ./main.py -fy 2016 -ty 2019 -sy -nf ./files/numbers/numbers_set1.txt -sf ./files/symbols/symbols_set1.txt -sbs -sap -mm normal,firstup,doubleandfirstup,basicleet dual-mode strings.txt output.txt
[!] Starting...
[+] Normal-Mangling mutation method done on string: password
[+] FirstUp-Mangling mutation method done on string: password
[+] DoubleAndFirstUp-Mangling mutation method done on string: password
[+] BasicLeet-Mangling mutation method done on string: password
---
[+] Normal-Mangling mutation method done on string: example
[+] FirstUp-Mangling mutation method done on string: example
[+] DoubleAndFirstUp-Mangling mutation method done on string: example
[+] BasicLeet-Mangling mutation method done on string: example
---
[!] All done!
[!] Strings read: 2
[!] Strings written: 1288
[!] Exiting ...
“Iterate from year 2016 to 2019, with short year form also, use set 1 for numbers and symbols, dual-mode (prefix and suffix), insert symbols also before suffix, insert symbols also after prefix, mutation methods: Normal, FirstUp, DoubleAndFirstUp, BasicLeet.”

Input file:
password
example

Output file:

password
password!
password@
[...]
!2018PasswordPassword
!18PasswordPassword
2018!PasswordPassword
18!PasswordPassword
[...]
p455w0rd$1
p455w0rd123
p455w0rd123!
p455w0rd!123
[...]
Example!2019
Example!19
[...]


One-Lin3r v1.1 - Gives You One-Liners That Aids In Penetration Testing Operations

$
0
0

One-Lin3r is simple and light-weight framework inspired by the web-delivery module in Metasploit.


It consists of various one-liners that aids in penetration testing operations:
  • Reverser: Give it IP & port and it returns a reverse shell liner ready for copy & paste.
  • Dropper: Give it an uploaded-backdoor URL and it returns a download-&-execute liner ready for copy & paste.
  • Other: Holds liners with the general purpose to help in penetration testing (ex: Mimikatz, Powerup, etc...) on the trending OSes (Windows, Linux, and macOS) "More OSes can be added too".

Features
  • Search for any one-liner in the database by its full name or partially.
  • You can add your own liners by following these steps to create a ".liner" file. Also, you can send it to me directly and it will be added in the framework and credited with your name .
  • Autocomplete any framework command and recommendations in case of typos (in case you love hacking like movies ).
  • Command line arguments can be used to give the framework a resource file to load and execute for automation.
  • The ability to reload the database if you added any liner without restarting the framework.
  • You can add any platform to the payloads database just by making a folder in payloads folder and creating a ".liner" file there.
  • More...
The payloads database is not big now because this the first edition but it will get bigger with updates and contributions.

Screenshots


Usage

Commandline arguments
usage: one-lin3r [-h] [-r R] [-x X] [-q]

optional arguments:
-h, --help show this help message and exit
-r Execute a resource file (history file).
-x Execute a specific command (use ; for multiples).
-q Quit mode (no banner).

Framework commands
Command             Description
-------- -------------
help/? Show this help menu
list/show List payloads you can use in the attack.
search <Keyword> Search payloads for a specific one
use <payload> Use an available payload
info <payload> Get information about an available payload
banner Display banner
reload/refresh Reload the payloads database
check Prints the core version and database version then check for them online.
history Display command line most important history from the beginning
save_history Save command line history to a file
exit/quit Exit the framework

Installing and requirements

To make the tool work at its best you must have :
  • Python 3.x or 2.x (preferred 3).
  • Linux (Tested on kali rolling), Windows system, mac osx (tested on 10.11)
  • The requirements mentioned in the next few lines.

Installing
+For windows : (After downloading ZIP and upzip it)
python -m pip install ./One-Lin3r-master
one-lin3r -h
+For Linux :
git clone https://github.com/D4Vinci/One-Lin3r.git
apt-get install libncurses5-dev
pip install ./One-Lin3r
one-lin3r -h

Updating the framework or the database
  • On Linux while outside the directory
cd One-Lin3r && git pull && cd ..
pip install ./One-Lin3r --upgrade
  • On Windows if you don't have git installed, redownload the framework zipped!


RiskySPN - Detect And Abuse Risky SPNs

$
0
0

RiskySPNs is a collection of PowerShellscripts focused on detecting and abusing accounts associated with SPNs (Service Principal Name). This module can assist blue teams to identify potentially risky SPNs as well as red teams to escalate privileges by leveraging Kerberos and Active Directory.
For detailed information: http://www.cyberark.com/blog/service-accounts-weakest-link-chain/

Usage

Install the module
Import-Module .\RiskySPNs.psm1
Or just load the script (you can also IEX from web)
. .\Find-PotentiallyCrackableAccounts.ps1
Make sure Set-ExecutionPolicy is Unrestricted or Bypass

Get information about a function (very detailed :))
Get-Help Get-TGSCipher -Full
All fucntions also have -Verbose mode

Search vulnerable SPNs
Find vulnerable accounts
Find-PotentiallyCrackableAccounts
Sensitive + RC4 = $$$
Generate full deatiled report about vulnerable accounts (CISO <3)
Export-PotentiallyCrackableAccounts

Get tickets
Request Kerberos TGS for SPN
Get-TGSCipher -SPN "MSSQLSvc/prodDB.company.com:1433"
Or
Find-PotentiallyCrackableAccounts -Stealth -GetSPNs | Get-TGSCipher

The fun stuff :)
Find-PotentiallyCrackableAccounts -Sensitive -Stealth -GetSPNs | Get-TGSCipher -Format "Hashcat" | Out-File crack.txt
oclHashcat64.exe -m 13100 crack.txt -a 3


wpCrack - Wordpress Hash Cracker

PwnAdventure3 - Game Open-World MMORPG Intentionally Vulnerable To Hacks

$
0
0

Pwnie Island is a limited-release, first-person, true open-world MMORPG set on a beautiful island where anything could happen. That's because this game is intentionally vulnerable to all kinds of silly hacks! Flying, endless cash, and more are all one client change or network proxy away. Are you ready for the mayhem?

YouTube Series
This setup is part of a video series covering the different hacks and challenges in this game.

Install Server

Requirements
From the official README:
  • At least 2GB of RAM, more RAM will allow more instances to be run on a single machine
  • The Game Server does not need any graphics hardware and runs purely on console. It is known to run well on Amazon AWS and Digital Ocean VPS instances.
  • The Game Server requires a lot of RAM to run, but uses fork and copy-on-write memory to allow many instances to run on a single host.
  • For a server with 2GB of RAM, it is not recommended to run more than 5 instances, but a server with 8GB of RAM can typically run as many as the CPU can handle.
  • It is recommended to use 2-3 instances per CPU core if you have sufficient RAM. You may be able to run 4-5 instances per core, but doing so may introduce slight lag.
  • The files for the client and server are over 2GB as well, so several GB of free disk space are required.
There are several ways to build and deploy your own server.

Option 1 - Original
One option is to download and follow the instructions included in the README of the official files. The download can be found on the official website here http://www.pwnadventure.com/#server.

Option 2 - Guide
@Beaujeant created an excellent, and easy to follow step-by-step guide. It was also the basis for building the docker image from Option 3. The guide can be found here: https://github.com/beaujeant/PwnAdventure3/blob/master/INSTALL-server.md.

Option 3 - Docker
This option is super easy, as long as docker and docker-compose are installed on a host. It makes it easy to run and tear down a server, without making changes to the actual host system.
First, gather all necessary files:
git clone https://github.com/LiveOverflow/PwnAdventure3.git
cd PwnAdventure3
wget http://pwnadventure.com/pwn3.tar.gz
tar -xvf pwn3.tar.gz
In order to run the server, docker and docker-compose have to be installed. Docker is moving fast, so it's a good idea to follow the current official steps for installation (which could also include to remove an older system version of docker):
Then simply build the image and launch the master and game server:
docker-compose build
docker-compose up
docker-compose up can also run in detached/background mode with -d.

Install Client
First download the client from the official website here: http://www.pwnadventure.com/#downloads
To get a client connected to the new server, the server.ini for the client has to be modified. The server launched with docker expects that hostnames master.pwn3 and game.pwn3 are being used (These could theoretically be changed in the docker/setup files).
The server.ini for the client has to look something like this:
[MasterServer]
Hostname=master.pwn3
Port=3333

[GameServer]
Hostname=game.pwn3
Port=3000
Username=
Password=
Instances=
Make sure that the client can reach these hosts, for example by adding them to the /etc/hosts file. In this example the server is running on 192.168.178.57 and the entry for them would be:
192.168.178.57  master.pwn3
192.168.178.57 game.pwn3
Warning: Using an IP as Hostname in the server.ini does not work! I spent 2 hours trying to figure out what was wrong.
To stop the server, simply type docker-compose down.
Warning: The database file is not persistent - taking down the container resets everything. So backup first.

Troubleshooting

Error: docker-compose build
$ docker-compose build
Building init
ERROR: Error processing tar file(exit status 1): write /client/PwnAdventure3_Data/PwnAdventure3/PwnAdventure3/Content/Paks/Characters.pak: no space left on device
A: Get more disk space.
$ docker-compose build
Building init
ERROR: Couldn't connect to Docker daemon at http+docker://localunixsocket - is it running?
A: Your user is probably not part of the docker group or docker service not running. sudo usermod -a -G docker pwn3, verify with id. Or service docker restart.

File Integrity
Check if the archive is corrupted
$ md5sum pwn3.tar.gz
d3f296461fa57996018ce0e4e5a653ee pwn3.tar.gz
$ sha1sum pwn3.tar.gz
022bd5174286fd78cd113bc6da6d37ae9af1ae8e pwn3.tar.gz

PwnAdventure3 Client Errors
Connection Error: Unable to connect to master server
This probably means that the MasterServer is not reachable.
  • Client issues:
    • Check the [MasterServer] entry in the client's server.ini
    • Can you ping master.pwn3 from the host from your system?
    • Is the IP correct in the /etc/hosts file?
  • Server issues:
    • Is the server not running and listening on port 3333?
    • Check with sudo netstat -tulpn
      • Is the master server listening: tcp6 0 0 :::3333 :::* LISTEN 31913/docker-proxy
    • Check docker ps if the two containers are up
      • master server running? 880f93374070 pwn3server "/opt/pwn3/setup/mas…" 0.0.0.0:3333->3333/tcp, 5432/tcp pwnadventure3_master_1
Waiting in connection queue...
This means the MasterServer is reachable and is waiting now for a free GameServer that can be given to the client. This probably means that no GameServer is running, or was not able to connect to the MasterServer.
  • Server issues:
    • Is a game server running and listening on port 3000-3005?
    • Check listening processes with sudo netstat -tulpn
    • tcp6 0 0 :::3000 :::* LISTEN 32160/docker-proxy
    • Is pwnadventure3_game_1 container running? Check with docker ps -a
      • 84343f81034f pwn3server "/opt/pwn3/setup/gam…" 0.0.0.0:3000-3010->3000-3010/tcp, 5432/tcp pwnadventure3_game_1
    • do you see the following line in the log from docker-compose up: line 1: 7 Killed ./PwnAdventure3Server; pwnadventure3_game_1 exited with code 137
      • GET MORE RAM!

Docker versions
These versions were used during testing as a host:
$ uname -a
Linux ubuntu 4.4.0-31-generic #50~14.04.1-Ubuntu SMP Wed Jul 13 01:07:32 UTC 2016 x86_64 x86_64 x86_64 GNU/Linux
$ docker-compose version
docker-compose version 1.19.0, build 9e633ef
docker-py version: 2.7.0
CPython version: 2.7.13
OpenSSL version: OpenSSL 1.0.1t 3 May 2016
$ docker --version
Docker version 17.12.1-ce, build 7390fc6

Screenshots


Sslmerge - Tool To Help You Build A Valid SSL Certificate Chain From The Root Certificate To The End-User Certificate

$
0
0

Is an open source tool to help you build a valid SSL certificate chain from the root certificate to the end-user certificate. Also can help you fix the incomplete certificate chain and download all missing CA certificates.

How To Use
It's simple:
# Clone this repository
git clone https://github.com/trimstray/sslmerge

# Go into the repository
cd sslmerge

# Install
./setup.sh install

# Run the app
sslmerge -i /data/certs -o /data/certs/chain.crt
  • symlink to bin/sslmerge is placed in /usr/local/bin
  • man page is placed in /usr/local/man/man8

Parameters
Provides the following options:
  Usage:
sslmerge <option|long-option>

Examples:
sslmerge --in Root.crt --in Intermediate1.crt --in Server.crt --out bundle_chain_certs.crt
sslmerge --in /tmp/certs --out bundle_chain_certs.crt --with-root
sslmerge -i Server.crt -o bundle_chain_certs.crt

Options:
--help show this message
--debug displays information on the screen (debug mode)
-i, --in add certificates to merge (certificate file, multiple files or directory with ssl certificates)
-o, --out saves the result (chain) to file
--with-root add root certificate to the certificate chain

How it works
Let's start with ssllabs certificate chain. They are delivered together with the sslmerge and can be found in the example/ssllabs.com directory which additionally contains the all directory (containing all the certificates needed to assemble the chain) and the server_certificate directory (containing only the server certificate).
The correct chain for the ssllabs.com domain (the result of the openssl command):
Certificate chain
0 s:/C=US/ST=California/L=Redwood City/O=Qualys, Inc./CN=ssllabs.com
i:/C=US/O=Entrust, Inc./OU=See www.entrust.net/legal-terms/OU=(c) 2012 Entrust, Inc. - for authorized use only/CN=Entrust Certification Authority - L1K
1 s:/C=US/O=Entrust, Inc./OU=See www.entrust.net/legal-terms/OU=(c) 2012 Entrust, Inc. - for authorized use only/CN=Entrust Certification Authority - L1K
i:/C=US/O=Entrust, Inc./OU=See www.entrust.net/legal-terms/OU=(c) 2009 Entrust, Inc. - for authorized use only/CN=Entrust Root Certification Authority - G2
2 s:/C=US/O=Entrust, Inc./OU=See www.entrust.net/legal-terms/OU=(c) 2009 Entrust, Inc. - for authorized use only/CN=Entrust Root Certification Authority - G2
i:/C=US/O=Entrust, Inc./OU=www.entrust.net/CPS is incorporated by reference/OU=(c) 2006 Entrust, Inc./CN=Entrust Root Certification Authority
The above code presents a full chain consisting of:
  • Identity Certificate (Server Certificate)
    issued for ssllabs.com by Entrust Certification Authority - L1K
  • Intermediate Certificate
    issued for Entrust Certification Authority - L1K by Entrust Root Certification Authority - G2
  • Intermediate Certificate
    issued for Entrust Root Certification Authority - G2 by Entrust Root Certification Authority
  • Root Certificate (Self-Signed Certificate)
    issued for Entrust Root Certification Authority by Entrust Root Certification Authority

Scenario 1
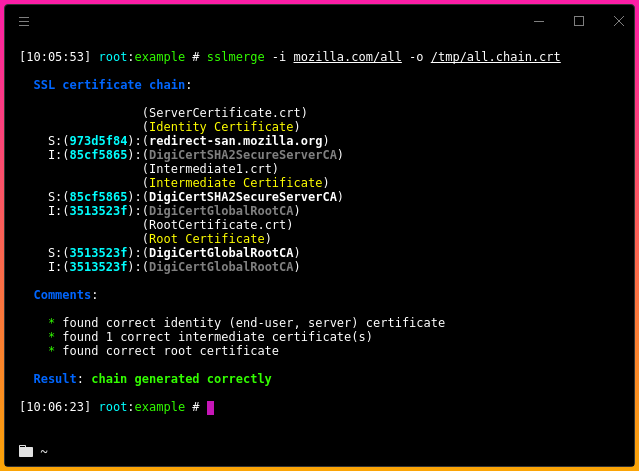
In this scenario, we will chain all delivered certificates. Example of running the tool:

Scenario 2
In this scenario, we only use the server certificate and use it to retrieve the remaining required certificates. Then, as above, we will combine all the provided certificates. Example of running the tool:

Certificate chain
In order to create a valid chain, you must provide the tool with all the necessary certificates. It will be:
  • Server Certificate
  • Intermediate CAs and Root CAs
This is very important because without it you will not be able to determine the beginning and end of the chain.
However, if you look inside the generated chain after generating with sslmerge, you will not find the root certificate there. Why?
Because self-signed root certificates need not/should not be included in web server configuration. They serve no purpose (clients will always ignore them) and they incur a slight performance (latency) penalty because they increase the size of the SSL handshake.
If you want to add a root certificate to the certificate chain, call the utility with the --with-root parameter.

Certification Paths
Sslmerge allows use of two certification paths:

Output comments
When generating the chain of certificates, sslmerge displays comments with information about certificates, including any errors.
Here is a list of all possibilities:

not found identity (end-user, server) certificate
The message is displayed in the absence of a server certificate that is the beginning of the chain. This is a unique case because in this situation the sslmerge ends its operation displaying only this information. The server certificate is the only certificate required to correctly create a chain. Without this certificate, the correct chain will not be created.

found correct identity (end-user, server) certificate
The reverse situation here - message displayed when a valid server certificate is found.

not found first intermediate certificate
This message appears when the first of the two intermediate certificates is not found. This information does not explicitly specify the absence of a second intermediate certificate and on the other hand it allows to determine whether the intermediate certificate to which the server certificate was signed exists. Additionally, it can be displayed if the second intermediate certificate has been delivered.

not found second intermediate certificate
Similar to the above, however, it concerns the second intermediate certificate. However, it is possible to create the chain correctly using the second certification path, e.g. using the first intermediate certificate and replacing the second with the main certificate.

one or more intermediate certificate not found
This message means that one or all of the required intermediate certificates are missing and displayed in the absence of the root certificate.

found 'n' correct intermediate certificate(s)
This message indicates the number of valid intermediate certificates.

not found correct root certificate
The lack of the root certificate is treated as a warning. Of course, when configuring certificates on the server side, it is not recommended to attach a root certificate, but if you create it with the sslmerge, it treats the chain as incomplete displaying information about the incorrect creation of the chain.

an empty CN field was found in one of the certificates
This message does not inform about the error and about the lack of the CN field what can happen with some certificates (look at example/google.com). Common Name field identifies the host name associated with the certificate. There is no requirement in RFC3280 for an Issuer DN to have a CN. Most CAs do include a CN in the Issuer DN, but some don't, such as this Equifax CA.

Requirements
Sslmerge uses external utilities to be installed before running:

Other

Contributing
See this.

Project architecture
See this.


Probequest - Toolkit For Playing With Wi-Fi Probe Requests

$
0
0

Toolkit allowing to sniff and display the Wi-Fi probe requests passing near your wireless interface.
Probe requests are sent by a station to elicit information about access points, in particular to determine if an access point is present or not in the nearby environment. Some devices (mostly smartphones and tablets) use these requests to determine if one of the networks they have previously been connected to is in range, leaking personal information.
Further details are discussed in this paper.


Installation
pip3 install --upgrade probequest


Documentation
The project is documented here.

Usage
Enabling the monitor mode


To be able to sniff the probe requests, your Wi-Fi network interface must be set to monitor mode.

With ifconfig and iwconfig

sudoifconfig<wirelessinterface>down
sudoiwconfig<wirelessinterface>modemonitor
sudoifconfig<wirelessinterface>up
For example:
sudoifconfigwlan0down
sudoiwconfigwlan0modemonitor
sudoifconfigwlan0up

With airmon-ng from aircrack-ng

To kill all the interfering processes:
sudoairmon-ngcheckkill
To enable the monitor mode:
sudoairmon-ngstart<wirelessinterface>
For example:
sudoairmon-ngstartwlan0


Command line arguments

Toolkit for Playing with Wi-Fi Probe Requests
usage:probequest[-h][--debug]-iINTERFACE[--ignore-case]
[--mode{RAW,TUI}][-oOUTPUT][--version]
[-eESSID[ESSID...]|-rREGEX]
[--excludeEXCLUDE[EXCLUDE...]|-sSTATION[STATION...]]

Named Arguments

--debug
debug mode
Default: False
-i, --interface
wireless interface to use (must be in monitor mode)
--ignore-case
ignore case distinctions in the regex pattern (default: false)
Default: False
--mode
Possible choices: RAW, TUI
set the mode to use
Default: RAW
-o, --outputoutput file to save the captured data (CSV format)
--versionshow program’s version number and exit
-e, --essidESSID of the APs to filter (space-separated list)
-r, --regexregex to filter the ESSIDs
--excludeMAC addresses of the stations to exclude (space-separated list)
-s, --stationMAC addresses of the stations to filter (space-separated list)

Example of use

sudoprobequest-iwlan0

PE Linux - Linux Privilege Escalation Tool

$
0
0

New LinuxPrivilege Escalation Tool.

Getting Started
  • System Information Gatherer
  • Kernel Information Gatherer
  • Checking Development environments on the system (Escaping Restricted Shells)
  • Extract PATH & environment Information
  • Check Kernel if Vulnerable To Dirty cow Exploit
  • Password Collector
  • Log Analyzer For interesting Information
  • Check Password Policy
  • Database Password Collector
  • Check If SSH Are Allowed With Root
  • Checking For interesting Root,Home,Var Directory Files
  • RSA Key's Collector
  • Command History Analyzer
  • Users Enumeration (Root - Sudo - UID List - GID List)
  • Cron Jobs Enumeration (Permissions - Own Cron - Cron Content - Writable Cron)
  • Network Information Lookup (TCP Connections - ARP - Services)
  • List Are Open For Updates :)

VOOKI - Web Application Vulnerability Scanner

$
0
0

Vooki is a free web application vulnerability scanner. Vooki is a user-friendly tool that you can easily scan any web application and find the vulnerabilities. Vooki includes Web Application Scanner, Rest API Scanner, and reporting section.

Vooki – Web Application Scanner can help you to find the following attacks
  • Sql Injection
  • Command Injection
  • Header Injection
  • Cross site scripting – reflected,
  • Cross site scripting – stored
  • Cross site scripting – dom based
  • Missing security headers
  • Malicious JS script execution
  • Using components with known vulnerabilities
  • Jquery Vulnerabilites
  • Angularjs Vulnerabilites
  • Bootstrap Vulnerabilities
  • Sensitive Information disclosure in response headers
  • Sensitive Information disclosure in error messages
  • Missing Server Side Validation
  • Javascript Dyanamic Code Execution
  • Sensitive Data Exposure

How to use Vooki Web Application Scanner


  • Start Application.
  • Connect the browser proxy to Vooki port.
  • Visit al the pages of your web application.
  • Right click on node appearing on Vooki tool and click on the scan.
  • After scan gets completed click on generate report from the menu bar.

Rest API Scanner


Vooki – Rest API Scanner can help you to find the following attacks
  • Sql Injection
  • Command Injection
  • Header Injection
  • Cross site scripting ( possibilities  )
  • Missing security headers
  • Sensitive Information disclosure in response headers
  • Sensitive Information disclosure in error messages
  • Missing Server Side input Validation
  • Unwanted use of HTTP methods
  • Improper HTTP Response

How to use Vooki Rest Scanner


  • Start Application.
  • Create new Project.
  • Add the new request in created project.
  • Provide proper headers, url and data.
  • Save and run the scan from the menu bar.
  • After scan gets completed click on generate report from the menu bar.

SubOver v1.1.1 - A Powerful Subdomain Takeover Tool

$
0
0

Subover is a Hostile Subdomain Takeover tool originally written in python but rewritten from scratch in Golang. Since it's redesign, it has been aimed with speed and efficiency in mind. Till date, SubOver detects 30+ services which is much more than any other tool out there. The tool uses Golang concurrency and hence is very fast. It can easily detect and report potential subdomain takeovers that exist. The list of potentially hijackable services is very comprehensive and it is what makes this tool so powerful.

Installing
You need to have Golang installed on your machine. There are no additional requirements for this tool.
go get github.com/Ice3man543/SubOver

Usage
./SubOver -l subdomains.txt
  • -l List of Subdomains
  • -t Number of concurrent threads. (Default 10)
  • -v Show verbose output (Default False)
  • -https Force HTTPS Connection (Default HTTP)
  • -timeout Set custom timeout (Default 10)
  • -h Show help message

Currently Checked Services
Github, Heroku, Unbounce, Tumblr, Shopify, Instapage, Desk, Tictail, Campaignmonitor, Cargocollective, Statuspage, Amazonaws, Cloudfront, Bitbucket, Smartling, Acquia, Fastly, Pantheon, Zendesk, Uservoice, Ghost, Freshdesk, Pingdom, Tilda, Wordpress, Teamwork, Helpjuice, Helpscout, Cargo, Feedpress, Surge, Surveygizmo, Mashery, Intercom, Webflow, Kajabi, Thinkific, Tave, Wishpond, Aftership, Aha, Brightcove, Bigcartel, Activecompaign, Compaignmonitor, Acquia, Proposify, Simplebooklet, Getresponse, Vend, Jetbrains, Azure
Count : 51

FAQ
Q: What should my wordlist look like?
A: Your wordlist should include a list of subdomains you're checking and should look something like:
backend.example.com
something.someone.com
apo-setup.fxc.something.com

Changelog

[1.1.1] - 2018-03-20
  • Providers corrected using EdOverflow's Awesome List
  • Added Information regarding various takeovers to the tool

[1.1.0] - 2018-03-16
  • Rewritten from scratch in Golang
  • This time it's damn fast because of Go Concurrency.
  • The console output looks better :-)

[1.0.0] - 2018-02-04
  • Initial Release with 35 Services written in Python.
  • Pretty Slow :-)


Impacket - Collection Of Python Classes For Working With Network Protocols

$
0
0


Impacket is a collection of Python classes for working with network protocols. Impacket is focused on providing low-level programmatic access to the packets and for some protocols (e.g. SMB1-3 and MSRPC) the protocol implementation itself.
Packets can be constructed from scratch, as well as parsed from raw data, and the object oriented API makes it simple to work with deep hierarchies of protocols. The library provides a set of tools as examples of what can be done within the context of this library.

The following protocols are featured in Impacket

  • Ethernet, Linux "Cooked" capture.
  • IP, TCP, UDP, ICMP, IGMP, ARP.
  • IPv4 and IPv6 Support.
  • NMB and SMB1, SMB2 and SMB3 (high-level implementations).
  • MSRPC version 5, over different transports: TCP, SMB/TCP, SMB/NetBIOS and HTTP.
  • Plain, NTLM and Kerberos authentications, using password/hashes/tickets/keys.
  • Portions/full implementation of the following MSRPC interfaces: EPM, DTYPES, LSAD, LSAT, NRPC, RRP, SAMR, SRVS, WKST, SCMR, DCOM, WMI
  • Portions of TDS (MSSQL) and LDAP protocol implementations.

The following tools are featured in Impacket

Remote Execution

  • psexec.py: PSEXEC like functionality example using RemComSvc(https://github.com/kavika13/RemCom).
  • smbexec.py: A similar approach to PSEXEC w/o using RemComSvc. The technique is described here. Our implementation goes one step further, instantiating a local smbserver to receive the output of the commands. This is useful in the situation where the target machine does NOT have a writeable share available.
  • atexec.py: This example executes a command on the target machine through the Task Scheduler service and returns the output of the executed command.
  • wmiexec.py: A semi-interactive shell, used through Windows Management Instrumentation. It does not require to install any service/agent at the target server. Runs as Administrator. Highly stealthy.
  • dcomexec.py: A semi-interactive shell similar to wmiexec.py, but using different DCOM endpoints. Currently supports MMC20.Application, ShellWindows and ShellBrowserWindow objects.

Kerberos

  • GetTGT.py: Given a password, hash or aesKey, this script will request a TGT and save it as ccache.
  • GetST.py: Given a password, hash, aesKey or TGT in ccache, this script will request a Service Ticket and save it as ccache. If the account has constrained delegation (with protocol transition) privileges you will be able to use the -impersonate switch to request the ticket on behalf another user.
  • GetPac.py: This script will get the PAC (Privilege Attribute Certificate) structure of the specified target user just having a normal authenticated user credentials. It does so by using a mix of [MS-SFU]'s S4USelf + User to User Kerberos Authentication.
  • GetUserSPNs.py: This example will try to find and fetch Service Principal Names that are associated with normal user accounts. Output is compatible with JtR and HashCat.
  • GetNPUsers.py: This example will attempt to list and get TGTs for those users that have the property 'Do not require Kerberos preauthentication' set (UF_DONT_REQUIRE_PREAUTH). Output is compatible with JtR.
  • ticketer.py: This script will create Golden/Silver tickets from scratch or based on a template (legally requested from the KDC) allowing you to customize some of the parameters set inside the PAC_LOGON_INFO structure, in particular the groups, ExtraSids, duration, etc.
  • raiseChild.py: This script implements a child-domain to forest privilege escalation by (ab)using the concept of Golden Tickets and ExtraSids.

Windows Secrets

  • secretsdump.py: Performs various techniques to dump secrets from the remote machine without executing any agent there. For SAM and LSA Secrets (including cached creds) we try to read as much as we can from the registry and then we save the hives in the target system (%SYSTEMROOT%\Temp directory) and read the rest of the data from there. For DIT files, we dump NTLM hashes, Plaintext credentials (if available) and Kerberos keys using the DL_DRSGetNCChanges() method. It can also dump NTDS.dit via vssadmin executed with the smbexec/wmiexec approach. The script initiates the services required for its working if they are not available (e.g. Remote Registry, even if it is disabled). After the work is done, things are restored to the original state.
  • mimikatz.py: Mini shell to control a remote mimikatz RPC server developed by @gentilkiwi.

Server Tools/MiTM Attacks

  • ntlmrelayx.py: This script performs NTLM Relay Attacks, setting an SMB and HTTP Server and relaying credentials to many different protocols (SMB, HTTP, MSSQL, LDAP, IMAP, POP3, etc.). The script can be used with predefined attacks that can be triggered when a connection is relayed (e.g. create a user through LDAP) or can be executed in SOCKS mode. In this mode, for every connection relayed, it will be available to be used later on multiple times through a SOCKS proxy.
  • karmaSMB.py: A SMB Server that answers specific file contents regardless of the SMB share and pathname specified.
  • smbserver.py: A Python implementation of an SMB server. Allows to quickly set up shares and user accounts.

WMI

  • wmiquery.py: It allows to issue WQL queries and get description of WMI objects at the target system (e.g. select name from win32_account).
  • wmipersist.py: This script creates/removes a WMI Event Consumer/Filter and link between both to execute Visual Basic based on the WQL filter or timer specified.

Known Vulnerabilities

  • goldenPac.py: Exploit for MS14-068. Saves the golden ticket and also launches a PSEXEC session at the target.
  • sambaPipe.py: This script will exploit CVE-2017-7494, uploading and executing the shared library specified by the user through the -so parameter.
  • smbrelayx.py: Exploit for CVE-2015-0005 using a SMB Relay Attack. If the target system is enforcing signing and a machine account was provided, the module will try to gather the SMB session key through NETLOGON.

SMB/MSRPC

  • smbclient.py: A generic SMB client that will let you list shares and files, rename, upload and download files and create and delete directories, all using either username and password or username and hashes combination. It's an excellent example to see how to use impacket.smb in action.
  • getArch.py: This script will connect against a target (or list of targets) machine/s and gather the OS architecture type installed by (ab)using a documented MSRPC feature.
  • rpcdump.py: This script will dump the list of RPC endpoints and string bindings registered at the target. It will also try to match them with a list of well known endpoints.
  • ifmap.py: This script will bind to the target's MGMT interface to get a list of interface IDs. It will used that list on top of another list of interface UUIDs seen in the wild trying to bind to each interface and reports whether the interface is listed and/or listening.
  • opdump.py: This binds to the given hostname:port and MSRPC interface. Then, it tries to call each of the first 256 operation numbers in turn and reports the outcome of each call.
  • samrdump.py: An application that communicates with the Security Account Manager Remote interface from the MSRPC suite. It lists system user accounts, available resource shares and other sensitive information exported through this service.
  • services.py: This script can be used to manipulate Windows services through the [MS-SCMR] MSRPC Interface. It supports start, stop, delete, status, config, list, create and change.
  • netview.py: Gets a list of the sessions opened at the remote hosts and keep track of them looping over the hosts found and keeping track of who logged in/out from remote servers
  • reg.py: Remote registry manipulation tool through the [MS-RRP] MSRPC Interface. The idea is to provide similar functionality as the REG.EXE Windows utility.
  • lookupsid.py: A Windows SID brute forcer example through [MS-LSAT] MSRPC Interface, aiming at finding remote users/groups.

MSSQL / TDS

  • mssqlinstance.py: Retrieves the MSSQL instances names from the target host.
  • mssqlclient.py: An MSSQL client, supporting SQL and Windows Authentications (hashes too). It also supports TLS.

File Formats

  • esentutl.py: An Extensibe Storage Engine format implementation. Allows dumping catalog, pages and tables of ESE databases (e.g. NTDS.dit)
  • ntfs-read.py: NTFS format implementation. This script provides a mini shell for browsing and extracting an NTFS volume, including hidden/locked contents.
  • registry-read.py: A Windwows Registry file format implementation. It allows to parse offline registry hives.

Other

  • GetADUsers.py: This script will gather data about the domain's users and their corresponding email addresses. It will also include some extra information about last logon and last password set attributes.
  • mqtt_check.py: Simple MQTT example aimed at playing with different login options. Can be converted into a account/password brute forcer quite easily.
  • rdp_check.py: [MS-RDPBCGR] and [MS-CREDSSP] partial implementation just to reach CredSSP auth. This example test whether an account is valid on the target host.
  • sniff.py: Simple packet sniffer that uses the pcapy library to listen for packets in # transit over the specified interface.
  • sniffer.py: Simple packet sniffer that uses a raw socket to listen for packets in transit corresponding to the specified protocols.
  • ping.py: Simple ICMP ping that uses the ICMP echo and echo-reply packets to check the status of a host. If the remote host is up, it should reply to the echo probe with an echo-reply packet.
  • ping6.py: Simple IPv6 ICMP ping that uses the ICMP echo and echo-reply packets to check the status of a host.


CMSeeK - CMS Detection And Exploitation Suite

$
0
0

What is a CMS?
A content management system (CMS) manages the creation and modification of digital content. It typically supports multiple users in a collaborative environment. Some noteable examples are: WordPress, Joomla, Drupal etc.

Release History
- Version 1.0.0 [15-06-2018]

Functions Of CMSeek:
  • Basic CMS Detection of over 20 CMS
  • Advanced Wordpress Scans
    • Detects Version
    • Detects Users (3 Detection Methods)
    • Looks for Version Vulnerabilities and much more!
  • Modular bruteforce system
    • Use pre made bruteforce modules or create your own and integrate with it

Requirements and Compatibility:
CMSeeK is built using python3, you will need python3 to run this tool and is compitable with unix based systems as of now. Windows support will be added later.

Installation and Usage:
It is fairly easy to use CMSeeK, just make sure you have python3 and git (just for cloning the repo) installed and use the following commands:
  • git clone https://github.com/Tuhinshubhra/CMSeeK
  • cd CMSeeK
  • python3 cmseek.py
The rest should be pretty self explanotory.

Detection Methods:
CMSeek uses mainly 2 things for detection:
  • HTTP Headers
  • Page Source Code

Supported CMSs:
CMSeeK currently can detect 22 CMSs, you can find the list on cmss.py file which is present in the cmseekdb directory. All the cmss are stored in the following way:
 cmsID = {
'name':'Name Of CMS',
'url':'Official URL of the CMS',
'vd':'Version Detection (0 for no, 1 for yes)',
'deeps':'Deep Scan (0 for no 1 for yes)'
}

Scan Result:
All of your scan results are stored in a json file named cms.json, you can find the logs inside the Result\<Target Site> directory, and as of the bruteforce results they're stored in a txt file under the site's result directory as well.

Here is an example of the json report log:


Bruteforce Modules:
CMSeek has a modular bruteforce system meaning you can add your custom made bruteforce modules to work with cmseek. A proper documentation for creating modules will be created shortly but in case you already figured out how to (pretty easy once you analyze the pre-made modules) all you need to do is this:
  1. Add a comment exactly like this # <Name Of The CMS> Bruteforce module. This will help CMSeeK to know the name of the CMS using regex
  2. Add another comment ### cmseekbruteforcemodule, this will help CMSeeK to know it is a module
  3. Copy and paste the module in the brutecms directory under CMSeeK's directory
  4. Open CMSeeK and Rebuild Cache using U as the input in the first menu.
  5. If everything is done right you'll see something like this (refer to screenshot below) and your module will be listed in bruteforce menu the next time you open CMSeeK.
Need More Reasons To Use CMSeeK?
If not anything you can always enjoy exiting CMSeeK (please don't), it will bid you goodbye in a random goodbye message in various languages.
Also you can try reading comments in the code those are pretty random and weird!!!

Screenshots:

Main Menu

Scan Result

WordPress Scan Result


Operative Framework HD - The Digital Investigation Framework, You Can Interact With Websites, Email Address, Company, People, Ip Address, And More

$
0
0


operative framework HD is the digital investigation framework, you can interact with websites, email address, company, people, ip address ... with basic/graphical view and export with XML, JSON.


How to Install
You need this packages
  • mongoDB
  • NPM
  • Python 2

Create mongoDB database
$ mongo
$ use operative_framework
$ db.createUser({user: 'operative', pwd:'operative', roles: [ "readWrite", "dbAdmin" ]})
For security restart now mongoDB with --auth argument

Install manually a operative framework HD
$ sudo pip install -r requirements.txt
$ sudo python framework/load_modules.py
$ cd client
$ npm install
$ cd ..
$ cd bin
$ sudo ./opf_users
$ create operative mypass
$ cd ..
open two shell
1) $ sudo python framework/app.py
2) $ cd client && npm start

Install globally a operative framework HD
$ git clone https://github.com/graniet/operative-framework-HD.git
$ cd operative-framework-HD
$ chmod +x install.sh
$ ./install.sh
$ cd framework
$ python load_modules.py

create first user
$ sudo opf_users
opf_users > create operative Op3r4tIv3P$$SS

run operative framework without console
first shell:
$ sudo opf_server
second shell:
$ sudo opf_client

run operative framework with console
$ sudo opf_console
$ opf_console > run_server
$ opf_console > run_client


Crypto Identifier - Tool To Uncipher Data Using Multiple Algorithms And Block Chaining Modes

$
0
0

Crypto tool for pentest and ctf : try to uncipher data using multiple algorithms and block chaining modes. Usefull for a quick check on unknown cipher text and key dictionary.

Supported Algorithms :
  • AES
  • ARC2
  • ARC4
  • Blowfish
  • CAST
  • DES
  • DES3
  • XOR
Supported modes :
  • ECB
  • CBC
  • CFB
  • OFB

Usage:
python ./crypto_identifier.py --help
usage: crypto_identifier.py [-h] --input INPUT [--key KEY] [--keys KEYS]
[--printable] [--grep GREP]
[--algo {ARC4,CAST,AES,XOR,ARC2,DES,Blowfish,DES3}]
[--mode {ECB,CBC,CFB,OFB}]

optional arguments:
-h, --help show this help message and exit
--input INPUT, -i INPUT
input string (base64)
--key KEY, -k KEY key string
--keys KEYS, -ks KEYS
keys file
--printable, -p display only printable results
--grep GREP, -g GREP grep string in results
--algo {ARC4,CAST,AES,XOR,ARC2,DES,Blowfish,DES3}, -a {ARC4,CAST,AES,XOR,ARC2,DES,Blowfish,DES3}
cipher algo to use
--mode {ECB,CBC,CFB,OFB}, -m {ECB,CBC,CFB,OFB}
block chaining mode to use

Examples :

Multi ciphers + modes
python ./crypto_identifier.py --input "WpbizgqtUDjD5TV5ELVswFL92ao3T41T" --key secret
CAST128Cipher (ECB) : secret (with IV): '\x95\x12(\x8d0_O8\xc7\xb6\x1f\x9b\xc1\xbd5\xe0'
CAST128Cipher (CBC) : secret (with IV): '\xcf\x84\xcaC:\xf2\x1f\x00\x04S*\xe2\xd1\x08Y '
CAST128Cipher (CFB) : secret (with IV): '\x0f\nF\x83\xd6\xbe\x942\xc4\xcco\x11p\xa7\x81\xd5'
CAST128Cipher (OFB) : secret (with IV): '\x0f\xfb\xd1\x01\xd2L\xed\x18\xc1\x1c5^\xfdv\xab\xfb'
AESCipher (CFB) : secret (with IV): '\x14\xa9%\xfdN\xa3F\xbf\x9b7,0@"\xf6\xb14V\xfb{F\xc2\xcf?'
ARC2 (ECB) : secret (with IV): '\xab4\x8ac\x93 \xe6\xca\x19\xe7\x15M\x7f\xa7\xe8'
ARC2 (CBC) : secret (with IV): '\xf1\xa2h\xad\x99\x8dp\xde\t\xfc\xd2l]\xca\xcb('
ARC2 (CFB) : secret (with IV): '\xb8\x06r\xaa\x0fX\x8c\x92)\x00\xc0\xed\x0e\xa8\x0e\xa7'
ARC2 (OFB) : secret (with IV): '\xb87}9{\xc8f\xa3\x99\xe4\xda?,\x01`\x11'
DESCipher (ECB) : secret (with IV): 'a DES test case'
DESCipher (CBC) : secret (with IV): ';\xb6\xa6\x8bY\x8d$]\xb0\x91\x15\x1aq\xc6\t\xc0'
DESCipher (CFB) : secret (with IV): '\xc0\x06\xe6\x7fl\xae\x8bv\xee\xcf\x8c[\x88\x07!\x07'
DESCipher (OFB) : secret (with IV): '\xc0\x86ug\x1f\x16\xd4)\xff0\xc3\x07-\x10&\x80'
BlowfishCipher (ECB) : secret (with IV): '\x1eBkl\xbe\x14\x81\x8c9*\xaa\xee\xebW-3'
BlowfishCipher (CBC) : secret (with IV): 'D\xd4\x89\xa2\xb4\xb9\xd1\xb4\xfa\xcf\x9f\x97\xfb\xe2A\xf3'
BlowfishCipher (CFB) : secret (with IV): '\x83\xf59\xea`-\xfdd8KN\xb0\xcfYo\xef'
BlowfishCipher (OFB) : secret (with IV): '\x83\xd1V\x01\xdf\xad^\tkP5\x94\xeer\xa0\x9f'
DES3Cipher (ECB) : secret (with IV): "<\x00ml\xa0\xc1\x84\\\xcf\x1e,o'\xbd\xa1\xa8"
DES3Cipher (CBC) : secret (with IV): 'f\x96\x8f\xa2\xaal\xd4d\x0c\xfb\x19\x167\x08\xcdh'
DES3Cipher (CFB) : secret (with IV): '\x8e\xe2\x04\x9a\xaa\x08\xedJ\xfd%(\xa2F\x92\x06\xa9'
DES3Cipher (OFB) : secret (with IV): '\x8eS+\x18\xce[\xc5\x0f\x13\xc7k8\xde\xbc\xdaF'
ARC4Cipher : secret : '\xb7\xa00\xd2\x88\t\x86\x9e\xf1.\x8e\xa5\xe3S\x99\xf7\xff\xca\xabH\xb4\xbcI\x0f'
CAST128Cipher (ECB) : secret : '\xc7\xcby\r\xd4\xe6\xcf\xa7\x95\x12(\x8d0_O8\xc7\xb6\x1f\x9b\xc1\xbd5\xe0'
CAST128Cipher (CBC) : secret : '\xc7\xcby\r\xd4\xe6\xcf\xa7\xcf\x84\xcaC:\xf2\x1f\x00\x04S*\xe2\xd1\x08Y '
CAST128Cipher (CFB) : secret : '\xc6\xa4<\xf0>\xe3\x1dg\x0f\nF\x83\xd6\xbe\x942\xc4\xcco\x11p\xa7\x81\xd5'
CAST128Cipher (OFB) : secret : '\xc6\x8a"?\xd5#=\x9931;a\xdaB\xd0v\xcbQ>6+L\xc1\x9d'
AESCipher (CFB) : secret : '\x14\xa9%\xfdN\xa3F\xbf\x9b7,0@"\xf6\xb14V\xfb{F\xc2\xcf?'
XORCipher : secret : ")\xf3\x81\xbco\xd9#]\xa0\x97P\rc\xd0\x0f\xb27\x89\xaa\xcfT=\xe8'"
ARC2 (ECB) : secret : '\x97 \xb6\x9b\xb5Z\x8a\xdc\xab4\x8ac\x93 \xe6\xca\x19\xe7\x15M\x7f\xa7\xe8'
ARC2 (CBC) : secret : '\x97 \xb6\x9b\xb5Z\x8a\xdc\xf1\xa2h\xad\x99\x8dp\xde\t\xfc\xd2l]\xca\xcb('
ARC2 (CFB) : secret : 'U\xef\x12x\x0b\x88\x87*\xb8\x06r\xaa\x0fX\x8c\x92)\x00\xc0\xed\x0e\xa8\x0e\xa7'
ARC2 (OFB) : secret : 'U\r\x86r\xfc|2\xbf\xfb\xb0\xa2\xaf\xba\xe0\xad\x8f6\x9aY\xd9\x926\x8c{'
DESCipher (ECB) : secret : 'This is a DES test case'
DESCipher (CBC) : secret : 'This is ;\xb6\xa6\x8bY\x8d$]\xb0\x91\x15\x1aq\xc6\t\xc0'
DESCipher (CFB) : secret : '>>\xd2\xfd\xe4\xf0!y\xc0\x06\xe6\x7fl\xae\x8bv\xee\xcf\x8c[\x88\x07!\x07'
DESCipher (OFB) : secret : '>\x1942H\x03\x04\xd6\x9a\xbd2v\x9b\x16\x19\r\xb0\xe5&\x1e(\xce\x0f\x12'
BlowfishCipher (ECB) : secret : '\xac\xb6\xcbz\xe8\xd76\x91\x1eBkl\xbe\x14\x81\x8c9*\xaa\xee\xebW-3'
BlowfishCipher (CBC) : secret : '\xac\xb6\xcbz\xe8\xd76\x91D\xd4\x89\xa2\xb4\xb9\xd1\xb4\xfa\xcf\x9f\x97\xfb\xe2A\xf3'
BlowfishCipher (CFB) : secret : '#X\xe0\rS\xf0y\xfe\x83\xf59\xea`-\xfdd8KN\xb0\xcfYo\xef'
BlowfishCipher (OFB) : secret : '#?\xa1\x06T\x7f\x98\x19\x0b\x000\xf3\x1a\xa9\x08.\x94\x8f\xd1a\x9c\x16\xe6\xb1'
DES3Cipher (ECB) : secret : "\x90\xc9\xa5\xd0\x18)'\x94<\x00ml\xa0\xc1\x84\\\xcf\x1e,o'\xbd\xa1\xa8"
DES3Cipher (CBC) : secret : "\x90\xc9\xa5\xd0\x18)'\x94f\x96\x8f\xa2\xaal\xd4d\x0c\xfb\x19\x167\x08\xcdh"
DES3Cipher (CFB) : secret : 'zp-\x9d\xb5\xe8R\x1a\x8e\xe2\x04\x9a\xaa\x08\xedJ\xfd%(\xa2F\x92\x06\xa9'
DES3Cipher (OFB) : secret : 'z\xe1DY\x07\x17#Y6n\xbf\xd8\x15%\xbc\x0f<M\x9c\xa60I\x9a\xbe'

Multi ciphers + modes, print only printable results
python ./crypto_identifier.py --input "WpbizgqtUDjD5TV5ELVswFL92ao3T41T" --key secret --printable
DESCipher (ECB) : secret (with IV): a DES test case
DESCipher (ECB) : secret : This is a DES test case

Single cipher / single mode
python ./crypto_identifier.py --input "WpbizgqtUDjD5TV5ELVswFL92ao3T41T" --key secret --algo DES --mode ECB
DESCipher (ECB) : secret (with IV): 'a DES test case'
DESCipher (ECB) : secret : 'This is a DES test case'

using a dictionary as keys
python ./crypto_identifier.py --input "WpbizgqtUDjD5TV5ELVswFL92ao3T41T" --keys ./500-worst-passwords.txt --printable
DESCipher (ECB) : secret (with IV): a DES test case
DESCipher (ECB) : secret : This is a DES test case

Requirements:
Python 2.7 / 3.x
  • Argparse
  • Crypto

LeakScraper - An Efficient Set Of Tools To Process And Visualize Huge Text Files Containing Credentials

$
0
0

LeakScraper is an efficient set of tools to process and visualize huge text files containing credentials. These tools are designed to help pentesters/redteamers doing OSINT, credentials gathering and credentials stuffing attacks.

Installation
  • First things first : have a working mongodb server.
  • Then :
     git clone -b mongodb https://github.com/Acceis/leakScraper
    cd leakScraper
    sudo ./leakScraper/install.sh
    It will install a few pip packages and debian packages (python-magic, python3-pymongo and bottle).

Requirements
Linux (debian), python 3.x and a mongodb server.

Usage
See the wiki

The different tools
LeakScraper is split into three parts :
  • leakStandardizer : A tool to standardize leaks you got from some legit place on the internet. It takes in input a file containing credentials following some weird format, containing non ascii characters or empty lines, lines containing invalid emails or no password. It will produce, with your help (using regular expression), an easily greppable file using the following format : email:hash:plain ("plain" for "plain text password").
  • leakImporter : A tool to import a standardized leak file into a mongodb database. It will take care of extracting data from the file, putting it into a mysql comprehensive format, creating/managing indexes ...
  • leakScraper : A tool and an interface to excavate data from the database and display it nicely.

Postulates
  • The covered usecase is the following : searching credentials belonging to a specific organization/company/structure. This is done by searching credentials associated to an email belonging to the organization in question. Eg: Searching credentials belonging to microsoft is done by searching credentials associated to accounts registered with an email ending with "@microsoft.com". It is the only usecase covered and it means a lot in terms of technical choices (database indexes and data representation in general).
  • Leaks can weight several gigabytes. It means that each process (standardizing, imports and researches) are using in-place algorithms in terms of memory. You can know beforehand how much memory theses tools will use to process a specific file, and it will never exhaust your computer's resources (unless you have a very old one).
  • Processing huge files and working with a lot of data takes time. It's important imo to have visual/real-time feedback to know how much time processing/importing a file will take. It's important to know if you just started a 7 hours long process or a 1,200 years long one.


LNK-Kisser - PowerShell Link Payload Generator

$
0
0
Making FUD Shortcut (.lnk) payloads with LNK-KISSER to remote execute malicious code.


Shortcut-Payload-Generator
  • Exploiting Powershell to make ShortCut Payloads [fud].
  • There is too much of awsome tricks there , u can make it better ^_^.
  • For Ex : Killing tcpview , taskmanager ..etc while downloading.
  • Set hidden attribs to the malware after downloading....etc
  • G00d by3.
  • ./9aylas


Fuxi Scanner - Network Security Vulnerability Scanner

$
0
0

Fuxi Scanner is an open source network security vulnerability scanner, it comes with multiple functions.
  • Vulnerability detection & management
  • Authentication Tester
  • IT asset discovery& management
  • Port scanner
  • Subdomain scanner
  • Acunetix Scanner (Integrate Acunetix API)


Installation
Documentation

Usage

Vulnerability Scanner
The scanner module integrate an open-sourced remote vulnerability testing and PoC development framework - Pocsuite
Like Metasploit, it is a development kit for pentesters to develope their own exploits. Based on Pocsuite, you can write the most core code of PoC/Exp without caring about the resulting output etc. There are at least several hundred people writing PoC/Exp based on Pocsuite up to date.
You can acquiring PoC scripts from Seebug community

The target can be IP, network segment or URL.


You can manage plugins in the Plugin Manager modules. The plugin must conform to the PoC Coding Style

Asset Management
IT Asset Registration:

Automatic Service Discovery:

You can scan the vulnerability by searching and filtering out specific services

Authentication Tester
This's a login cracker that supports many protocols to attack (HTTP Basic Auth, SSH, MySQL, Redis).
The target can be IP, network segment or URL.

Subdomain Scanner
It helps penetration testers and bug hunters collect and gather subdomains for the domain they are targeting
You can improved wordlist in settings for finding more subdomains


Acunetix Scanner
This module delivers scanning tasks by integrate Acunetix Web Vulnerability Scanner API


You can scan multiple websites at the same time

Port Scanner
Port scanner allows you to discover which TCP ports are open on your target host.
Port scanning is usually done in the initial phase of a penetration test in order to discover all network entry points into the target system


Settings


Links

Viewing all 5854 articles
Browse latest View live


<script src="https://jsc.adskeeper.com/r/s/rssing.com.1596347.js" async> </script>