Quantcast
Channel: KitPloit - PenTest Tools!
Viewing all 5816 articles
Browse latest View live

Sentry - Bruteforce Attack Blocker (ssh, FTP, SMTP, and more)

$
0
0

Sentry detects and prevents bruteforce attacks against sshd using minimal system resources.

SAFE

To prevent inadvertant lockouts, Sentry manages a whitelist of IPs that have connected more than 3 times and succeeded at least once. Never again will that forgetful colleague behind the office NAT router get us locked out of our system. Nor the admin whose script just failed to login 12 times in 2 seconds.

Sentry includes support for adding IPs to a firewall. Support for IPFW, PF, ipchains is included. Firewall support is disabled by default. This is because firewall rules may terminate existing session(s) to the host (attn IPFW users). Get your IPs whitelisted (connect 3x or use --whitelist) before enabling the firewall option.

SIMPLE

Sentry has an extremely simple database for tracking IPs. This makes it very easy for administrators to view and manipulate the database using shell commands and scripts. See the EXAMPLES section.
Sentry is written in perl, which is installed everywhere you find sshd. It has no dependencies. Installation and deployment is extremely simple.

FLEXIBLE

Sentry supports blocking connection attempts using tcpwrappers and several popular firewalls. It is easy to extend sentry to support additional blocking lists.

Sentry was written to protect the SSH daemon but anticipates use with other daemons. SMTP support is planned. As this was written, the primary attack platform in use is bot nets comprised of exploited PCs on high-speed internet connections. These bots are used for carrying out SSH attacks as well as spam delivery. Blocking bots prevents multiple attack vectors.

The programming style of sentry makes it easy to insert code for additonal functionality.

EFFICIENT

The primary goal of Sentry is to minimize the resources an attacker can steal, while consuming minimal resources itself. Most bruteforce blocking apps (denyhosts, fail2ban, sshdfilter) expect to run as a daemon, tailing a log file. That requires a language interpreter to always be running, consuming at least 10MB of RAM. A single hardware node with dozens of virtual servers will lose hundreds of megs to daemon protection.

Sentry uses resources only when connections are made. The worse case scenario is the first connection made by an IP, since it will invoke a perl interpreter. For most connections, Sentry will append a timestamp to a file, stat for the presense of another file and exit.

Once an IP is blacklisted for abuse, whether by tcpd or a firewall, the resources it can consume are practically zero.

Sentry is not particularly efficient for reporting. The "one file per IP" is superbly minimal for logging and blacklisting, but nearly any database would perform better for reporting. Expect to wait a few seconds for sentry --report.


REQUIRED ARGUMENTS
  • ip
    An IPv4 address. The IP should come from a reliable source that is difficult to spoof. Tcpwrappers is an excellent source. UDP connections are a poor source as they are easily spoofed. The log files of TCP daemons can be good source if they are parsed carefully to avoid log injection attacks.
All actions except report and help require an IP address. The IP address can be manually specified by an administrator, or preferably passed in by a TCP server such as tcpd (tcpwrappers), inetd, or tcpserver (daemontools).


ACTIONS
  • blacklist
    deny all future connections
  • whitelist
    whitelist all future connections, remove the IP from the blacklists, and make it immune to future connection tests.
  • delist
    remove an IP from the white and blacklists. This is useful for testing that sentry is working as expected.
  • connect
    register a connection by an IP. The connect method will log the attempt and the time. See CONNECT.
  • update
    Check the most recent version of sentry against the installed version and update if a newer version is available.


EXAMPLES

IP REPORT
$ /var/db/sentry/sentry.pl -r --ip=24.19.45.95
9 connections from 24.19.45.95
and it is whitelisted

HOME GATEWAY REPORT
$ /var/db/sentry/sentry.pl -r
-------- summary ---------
1614 unique IPs have connected 76525 times
1044 IPs are blacklisted
18 IPs are whitelisted

WEB SERVER REPORT
$ /var/db/sentry/sentry.pl -r
-------- summary ---------
1240 unique IPs have connected 285554 times
40 IPs are blacklisted
4 IPs are whitelisted

EUROPEAN DNS MIRROR
$ /var/db/sentry/sentry.pl -r
-------- summary ---------
3484 unique IPs have connected 15391 times
1127 IPs are blacklisted
6 IPs are whitelisted


USBkill - Anti-Forensic Kill-Switch that waits for a change on your USB ports

$
0
0

USBkill is an anti-forensic kill-switch that waits for a change on your USB ports and then immediately shuts down your computer.

To run:
sudo python usbkill.py

Why?

Some reasons to use this tool:
  • In case the police or other thugs come busting in (or steal your laptop from you when you are at a public library as happened to Ross). The police commonly uses a "mouse jiggler" to keep the screensaver and sleep mode from activating.
  • You don’t want someone retrieve documents (such as private keys) from your computer or install malware/backdoors via USB.
  • You want to improve the security of your (Full Disk Encrypted) home or corporate server (e.g. Your Raspberry).
[!] Important: Make sure to use (partial) disk encryption! Otherwise they will get in anyway.
Tip: Additionally, you may use a cord to attach a USB key to your wrist. Then insert the key into your computer and start usbkill. If they steal your computer, the USB will be removed and the computer shuts down immediately.

Feature List

(version 1.0-rc.2)
  • Compatible with Linux, *BSD and OS X.
  • Shutdown the computer when there is USB activity.
  • Customizable. Define which commands should be executed just before shut down.
  • Ability to whitelist a USB device.
  • Ability to change the check interval (default: 250ms).
  • Ability to melt the program on shut down.
  • Works with sleep mode (OS X).
  • No dependency except srm. sudo apt-get install secure-delete
  • Sensible defaults

Supported command line arguments (mainly for devs):
  • --no-shut-down: Execute all the (destructive) commands you defined in settings.ini, but don’t turn off the computer.
  • --cs: Copy program folder settings.ini to /etc/usbkill/settings.ini

AntiCuckoo - A Tool to Detect and Crash Cuckoo Sandbox

$
0
0

A tool to detect and crash Cuckoo Sandbox. Tested in Cuckoo Sandbox Official and Accuvant's Cuckoo version.

Features
  • Detection:
    • Cuckoo hooks detection (all kind of cuckoo hooks).
    • Suspicius data in own memory (without APIs, page per page scanning).
  • Crash (Execute with arguments) (out of a sandbox these args dont crash the program):
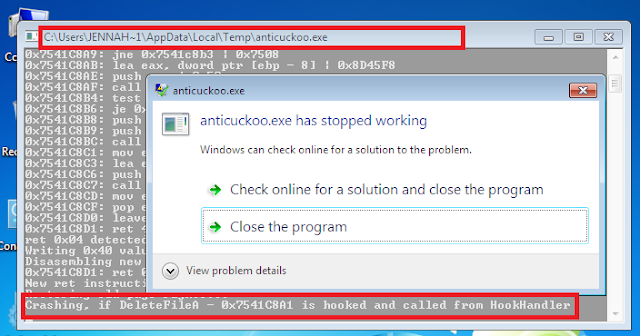
    • -c1: Modify the RET N instruction of a hooked API with a higher value. Next call to API pushing more args into stack. If the hooked API is called from the Cuckoo's HookHandler the program crash because it only pushes the real API args then the modified RET N instruction corrupt the HookHandler's stack.
The overkill methods can be useful. For example using the overkill methods you have two features in one: detection/crash and "a kind of Sleep" (Cuckoomon bypass long Sleeps calls).

Cuckoo Detection

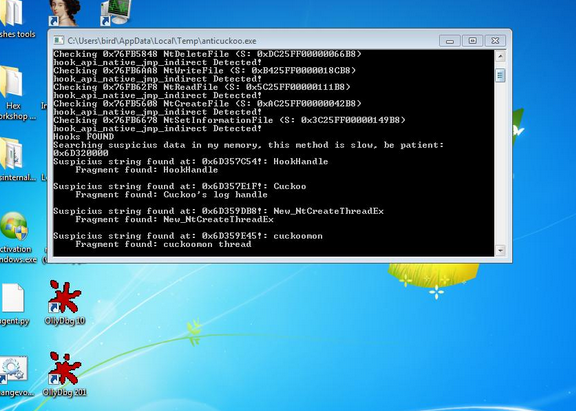
Submit Release/anticuckoo.exe to analysis in Cuckoo Sandbox. Check the screenshots (console output). Also you can check Accesed Files in Sumary:


Accesed Files in Sumary (django web):

Cuckoo Crash

Specify in submit options the crash argument, ex -c1 (via django web):

And check Screenshots/connect via RDP/whatson connection to verify the crash. Ex -c1 via RDP:


Cowrie - SSH Honeypot

$
0
0

Cowrie is a medium interaction SSH honeypot designed to log brute force attacks and, most importantly, the entire shell interaction performed by the attacker.

Cowrie is directly based on Kippo by Upi Tamminen (desaster).

Features

Some interesting features:
  • Fake filesystem with the ability to add/remove files. A full fake filesystem resembling a Debian 5.0 installation is included
  • Possibility of adding fake file contents so the attacker can 'cat' files such as /etc/passwd. Only minimal file contents are included
  • Session logs stored in an UML Compatible format for easy replay with original timings
  • Cowrie saves files downloaded with wget/curl or uploaded with SFTP and scp for later inspection
Additional functionality over standard kippo:
  • SFTP and SCP support for file upload
  • Support for SSH exec commands
  • Logging of direct-tcp connection attempts (ssh proxying)
  • Logging in JSON format for easy processing in log management solutions
  • Many, many additional commands

Requirements

Software required:
  • An operating system (tested on Debian, CentOS, FreeBSD and Windows 7)
  • Python 2.5+
  • Twisted 8.0+
  • PyCrypto
  • pyasn1
  • Zope Interface

Files of interest:
  • dl/ - files downloaded with wget are stored here
  • log/cowrie.log - log/debug output
  • log/cowrie.json - transaction output in JSON format
  • log/tty/ - session logs
  • utils/playlog.py - utility to replay session logs
  • utils/createfs.py - used to create fs.pickle
  • data/fs.pickle - fake filesystem
  • honeyfs/ - file contents for the fake filesystem - feel free to copy a real system here


Nikto2 - Web Server Scanner

$
0
0

Nikto is an Open Source (GPL) web server scanner which performs comprehensive tests against web servers for multiple items, including over 6700 potentially dangerous files/programs, checks for outdated versions of over 1250 servers, and version specific problems on over 270 servers. It also checks for server configuration items such as the presence of multiple index files, HTTP server options, and will attempt to identify installed web servers and software. Scan items and plugins are frequently updated and can be automatically updated.

Nikto is not designed as a stealthy tool. It will test a web server in the quickest time possible, and is obvious in log files or to an IPS/IDS. However, there is support for LibWhisker's anti-IDS methods in case you want to give it a try (or test your IDS system).

Not every check is a security problem, though most are. There are some items that are "info only" type checks that look for things that may not have a security flaw, but the webmaster or security engineer may not know are present on the server. These items are usually marked appropriately in the information printed. There are also some checks for unknown items which have been seen scanned for in log files.

Features

Here are some of the major features of Nikto. See the documentation for a full list of features and how to use them.
  • SSL Support (Unix with OpenSSL or maybe Windows with ActiveState's Perl/NetSSL)
  • Full HTTP proxy support
  • Checks for outdated server components
  • Save reports in plain text, XML, HTML, NBE or CSV
  • Template engine to easily customize reports
  • Scan multiple ports on a server, or multiple servers via input file (including nmap output)
  • LibWhisker's IDS encoding techniques
  • Easily updated via command line
  • Identifies installed software via headers, favicons and files
  • Host authentication with Basic and NTLM
  • Subdomain guessing
  • Apache and cgiwrap username enumeration
  • Mutation techniques to "fish" for content on web servers
  • Scan tuning to include or exclude entire classes of vulnerability checks
  • Guess credentials for authorization realms (including many default id/pw combos)
  • Authorization guessing handles any directory, not just the root directory
  • Enhanced false positive reduction via multiple methods: headers, page content, and content hashing
  • Reports "unusual" headers seen
  • Interactive status, pause and changes to verbosity settings
  • Save full request/response for positive tests
  • Replay saved positive requests
  • Maximum execution time per target
  • Auto-pause at a specified time
  • Checks for common "parking" sites
  • Logging to Metasploit
  • Thorough documentation

Basic usage
   Options:
-ask+ Whether to ask about submitting updates
yes Ask about each (default)
no Don't ask, don't send
auto Don't ask, just send
-Cgidirs+ Scan these CGI dirs: "none", "all", or values like "/cgi/ /cgi-a/"
-config+ Use this config file
-Display+ Turn on/off display outputs:
1 Show redirects
2 Show cookies received
3 Show all 200/OK responses
4 Show URLs which require authentication
D Debug output
E Display all HTTP errors
P Print progress to STDOUT
S Scrub output of IPs and hostnames
V Verbose output
-dbcheck Check database and other key files for syntax errors
-evasion+ Encoding technique:
1 Random URI encoding (non-UTF8)
2 Directory self-reference (/./)
3 Premature URL ending
4 Prepend long random string
5 Fake parameter
6 TAB as request spacer
7 Change the case of the URL
8 Use Windows directory separator (\)
A Use a carriage return (0x0d) as a request spacer
B Use binary value 0x0b as a request spacer
-Format+ Save file (-o) format:
csv Comma-separated-value
htm HTML Format
msf+ Log to Metasploit
nbe Nessus NBE format
txt Plain text
xml XML Format
(if not specified the format will be taken from the file extension passed to -output)
-Help Extended help information
-host+ Target host
-IgnoreCode Ignore Codes--treat as negative responses
-id+ Host authentication to use, format is id:pass or id:pass:realm
-key+ Client certificate key file
-list-plugins List all available plugins, perform no testing
-maxtime+ Maximum testing time per host
-mutate+ Guess additional file names:
1 Test all files with all root directories
2 Guess for password file names
3 Enumerate user names via Apache (/~user type requests)
4 Enumerate user names via cgiwrap (/cgi-bin/cgiwrap/~user type requests)
5 Attempt to brute force sub-domain names, assume that the host name is the parent domain
6 Attempt to guess directory names from the supplied dictionary file
-mutate-options Provide information for mutates
-nointeractive Disables interactive features
-nolookup Disables DNS lookups
-nossl Disables the use of SSL
-no404 Disables nikto attempting to guess a 404 page
-output+ Write output to this file ('.' for auto-name)
-Pause+ Pause between tests (seconds, integer or float)
-Plugins+ List of plugins to run (default: ALL)
-port+ Port to use (default 80)
-RSAcert+ Client certificate file
-root+ Prepend root value to all requests, format is /directory
-Save Save positive responses to this directory ('.' for auto-name)
-ssl Force ssl mode on port
-Tuning+ Scan tuning:
1 Interesting File / Seen in logs
2 Misconfiguration / Default File
3 Information Disclosure
4 Injection (XSS/Script/HTML)
5 Remote File Retrieval - Inside Web Root
6 Denial of Service
7 Remote File Retrieval - Server Wide
8 Command Execution / Remote Shell
9 SQL Injection
0 File Upload
a Authentication Bypass
b Software Identification
c Remote Source Inclusion
x Reverse Tuning Options (i.e., include all except specified)
-timeout+ Timeout for requests (default 10 seconds)
-Userdbs Load only user databases, not the standard databases
all Disable standard dbs and load only user dbs
tests Disable only db_tests and load udb_tests
-until Run until the specified time or duration
-update Update databases and plugins from CIRT.net
-useproxy Use the proxy defined in nikto.conf
-Version Print plugin and database versions
-vhost+ Virtual host (for Host header)
+ requires a value

Basic Testing

The most basic Nikto scan requires simply a host to target, since port 80 is assumed if none is specified. The host can either be an IP or a hostname of a machine, and is specified using the -h (-host) option. This will scan the IP 192.168.0.1 on TCP port 80:
perl nikto.pl -h 192.168.0.1
To check on a different port, specify the port number with the -p (-port) option. This will scan the IP 192.168.0.1 on TCP port 443:
perl nikto.pl -h 192.168.0.1 -p 443
Hosts, ports and protocols may also be specified by using a full URL syntax, and it will be scanned:
perl nikto.pl -h https://192.168.0.1:443/
There is no need to specify that port 443 may be SSL, as Nikto will first test regular HTTP and if that fails, HTTPS. If you are sure it is an SSL server, specifying -s (-ssl) will speed up the test.
perl nikto.pl -h 192.168.0.1 -p 443 -ssl
More complex tests can be performed using the -mutate parameter, as detailed later. This can produce extra tests, some of which may be provided with extra parameters through the -mutate-options parameter. For example, using -mutate 3, with or without a file attempts to brute force usernames if the web server allows ~user URIs:
perl nikto.pl -h 192.168.0.1 -mutate 3 -mutate-options user-list.txt

Multiple Port Testing

Nikto can scan multiple ports in the same scanning session. To test more than one port on the same host, specify the list of ports in the -p (-port) option. Ports can be specified as a range (i.e., 80-90), or as a comma-delimited list, (i.e., 80,88,90). This will scan the host on ports 80, 88 and 443.
perl nikto.pl -h 192.168.0.1 -p 80,88,443


Blackbone - Windows Memory Hacking Library

$
0
0
Blackbone, Windows Memory Hacking Library

Features
  • x86 and x64 support
  • Process interaction
    • Manage PEB32/PEB64
    • Manage process through WOW64 barrier
  • Process Memory
    • Allocate and free virtual memory
    • Change memory protection
    • Read/Write virtual memory
  • Process modules
    • Enumerate all (32/64 bit) modules loaded. Enumerate modules using Loader list/Section objects/PE headers methods.
    • Get exported function address
    • Get the main module
    • Unlink module from loader lists
    • Inject and eject modules (including pure IL images)
    • Inject 64bit modules into WOW64 processes
    • Manually map native PE images
  • Threads
    • Enumerate threads
    • Create and terminate threads. Support for cross-session thread creation.
    • Get thread exit code
    • Get main thread
    • Manage TEB32/TEB64
    • Join threads
    • Suspend and resume threads
    • Set/Remove hardware breakpoints
  • Pattern search
    • Search for arbitrary pattern in local or remote process
  • Remote code execution
    • Execute functions in remote process
    • Assemble own code and execute it remotely
    • Support for cdecl/stdcall/thiscall/fastcall conventions
    • Support for arguments passed by value, pointer or reference, including structures
    • FPU types are supported
    • Execute code in new thread or any existing one
  • Remote hooking
    • Hook functions in remote process using int3 or hardware breakpoints
    • Hook functions upon return
  • Manual map features
    • x86 and x64 image support
    • Mapping into any arbitrary unprotected process
    • Section mapping with proper memory protection flags
    • Image relocations (only 2 types supported. I haven't seen a single PE image with some other relocation types)
    • Imports and Delayed imports are resolved
    • Bound import is resolved as a side effect, I think
    • Module exports
    • Loading of forwarded export images
    • Api schema name redirection
    • SxS redirection and isolation
    • Activation context support
    • Dll path resolving similar to native load order
    • TLS callbacks. Only for one thread and only with PROCESS_ATTACH/PROCESS_DETACH reasons.
    • Static TLS
    • Exception handling support (SEH and C++)
    • Adding module to some native loader structures(for basic module api support: GetModuleHandle, GetProcAdress, etc.)
    • Security cookie initialization
    • C++/CLI images are supported
    • Image unloading
    • Increase reference counter for import libraries in case of manual import mapping
    • Cyclic dependencies are handled properly
  • Driver features
  • Allocate/free/protect user memory
  • Read/write user and kernel memory
  • Disable permanent DEP for WOW64 processes
  • Change process protection flag
  • Change handle access rights
  • Remap process memory
  • Hiding allocated user-mode memory
  • User-mode dll injection and manual mapping
  • Manual mapping of drivers

Babun - A Windows shell you will love!

$
0
0

Would you like to use a linux-like console on a Windows host without a lot of fuzz? Try out babun!

Installation

Just download the dist file from http://babun.github.io, unzip it and run the install.bat script. After a few minutes babun starts automatically. The application will be installed to the %USER_HOME%\.babun directory. Use the /target option to install babun to a custom directory.

Features in 10 seconds

Babun features the following:
  • Pre-configured Cygwin with a lot of addons
  • Silent command-line installer, no admin rights required
  • pact - advanced package manager (like apt-get or yum)
  • xTerm-256 compatible console
  • HTTP(s) proxying support
  • Plugin-oriented architecture
  • Pre-configured git and shell
  • Integrated oh-my-zsh
  • Auto update feature
  • "Open Babun Here" context menu entry

Features in 3 minutes

Cygwin

The core of Babun consists of a pre-configured Cygwin. Cygwin is a great tool, but there’s a lot of quirks and tricks that makes you lose a lot of time to make it actually usable. Not only does babun solve most of these problems, but also contains a lot of vital packages, so that you can be productive from the very first minute.

Package manager

Babun provides a package manager called pact. It is similar to apt-get or yum. Pact enables installing/searching/upgrading and deinstalling cygwin packages with no hassle at all. Just invoke pact --help to check how to use it.

Shell

Babun’s shell is tweaked in order to provide the best possible user-experience. There are two shell types that are pre-configured and available right away - bash and zsh (zsh is the default one). Babun’s shell features:
  • syntax highlighting
  • UNIX tools
  • software development tools
  • git-aware prompt
  • custom scripts and aliases
  • and much more!

Console

Mintty is the console used in babun. It features an xterm-256 mode, nice fonts and simply looks great!

Proxying

Babun supports HTTP proxying out of the box. Just add the address and the credentials of your HTTP proxy server to the .babunrc file located in your home folder and execute source .babunrc to enable HTTP proxying. SOCKS proxies are not supported for now.

Developer tools

Babun provides many packages, convenience tools and scripts that make your life much easier. The long list of features includes:
  • programming languages (Python, Perl, etc.)
  • git (with a wide variety of aliases and tweaks)
  • UNIX tools (grep, wget, curl, etc.)
  • vcs (svn, git)
  • oh-my-zsh
  • custom scripts (pbcopy, pbpaste, babun, etc.)

Plugin architecture

Babun has a very small microkernel (cygwin, a couple of bash scripts and a bit of a convention) and a plugin architecture on the top of it. It means that almost everything is a plugin in the babun’s world! Not only does it structure babun in a clean way, but also enables others to contribute small chunks of code. Currently, babun comprises the following plugins:
  • cacert
  • core
  • git
  • oh-my-zsh
  • pact
  • cygdrive
  • dist
  • shell

Auto-update

Self-update is at the very heart of babun! Many Cygwin tools are simple bash scripts - once you install them there is no chance of getting the newer version in a smooth way. You either delete the older version or overwrite it with the newest one losing all the changes you have made in between.
Babun contains an auto-update feature which enables updating both the microkernel, the plugins and even the underlying cygwin. Files located in your home folder will never be deleted nor overwritten which preserves your local config and customizations.

Installer

Babun features an silent command-line installation script that may be executed without admin rights on any Windows hosts.

Using babun

Setting up proxy

To setup proxy uncomment following lines in the .babunrc file (%USER_HOME%\.babun\cygwin\home\USER\.babunrc)
# Uncomment this lines to set up your proxy
# export http_proxy=http://user:password@server:port
# export https_proxy=$http_proxy
# export ftp_proxy=$http_proxy
# export no_proxy=localhost

Setting up git

Babun has a pre-configured git. The only thing you should do after the installation is to add your name and email to the git config:
git config --global user.name "your name"
git config --global user.email "your@email.com"
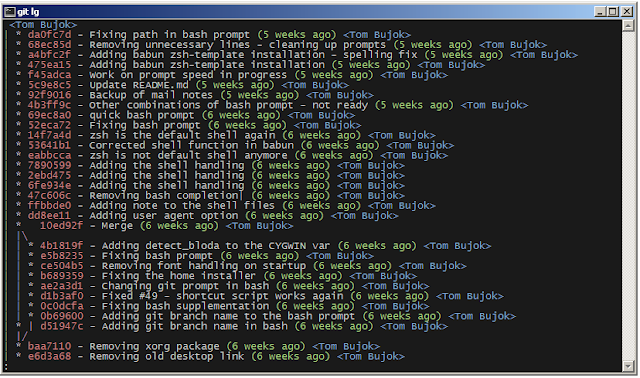
There’s a lot of great git aliases provided by the git plugin:
gitalias['alias.cp']='cherry-pick'
gitalias['alias.st']='status -sb'
gitalias['alias.cl']='clone'
gitalias['alias.ci']='commit'
gitalias['alias.co']='checkout'
gitalias['alias.br']='branch'
gitalias['alias.dc']='diff --cached'
gitalias['alias.lg']="log --graph --pretty=format:'%Cred%h%Creset -%C(yellow)%d%Creset %s %Cgreen(%cr) %Cblue<%an>%Creset' --abbrev-commit --date=relative --all"
gitalias['alias.last']='log -1 --stat'
gitalias['alias.unstage']='reset HEAD --'

Installing and removing packages

Babun is shipped with pact - a Linux like package manager. It uses the cygwin repository for downloading packages:
{ ~ } » pact install arj                                                                     ~
Working directory is /setup
Mirror is http://mirrors.kernel.org/sourceware/cygwin/
setup.ini taken from the cache

Installing arj
Found package arj
--2014-03-30 19:34:38-- http://mirrors.kernel.org/sourceware/cygwin//x86/release/arj/arj-3.10.22-1.tar.bz2
Resolving mirrors.kernel.org (mirrors.kernel.org)... 149.20.20.135, 149.20.4.71, 2001:4f8:1:10:0:1994:3:14, ...
Connecting to mirrors.kernel.org (mirrors.kernel.org)|149.20.20.135|:80... connected.
HTTP request sent, awaiting response... 200 OK
Length: 189944 (185K) [application/x-bzip2]
Saving to: `arj-3.10.22-1.tar.bz2'

100%[=======================================>] 189,944 193K/s in 1.0s

2014-03-30 19:34:39 (193 KB/s) - `arj-3.10.22-1.tar.bz2' saved [189944/189944]

Unpacking...
Package arj installed
Here’s the list of all pact’s features:
{ ~ }  » pact --help
pact: Installs and removes Cygwin packages.

Usage:
"pact install <package names>" to install given packages
"pact remove <package names>" to remove given packages
"pact update <package names>" to update given packages
"pact show" to show installed packages
"pact find <patterns>" to find packages matching patterns
"pact describe <patterns>" to describe packages matching patterns
"pact packageof <commands or files>" to locate parent packages
"pact invalidate" to invalidate pact caches (setup.ini, etc.)
Options:
--mirror, -m <url> : set mirror
--invalidate, -i : invalidates pact caches (setup.ini, etc.)
--force, -f : force the execution
--help
--version

Changing the default shell

The zsh (with .oh-my-zsh) is the default babun’s shell.
Executing the following command will output your default shell:
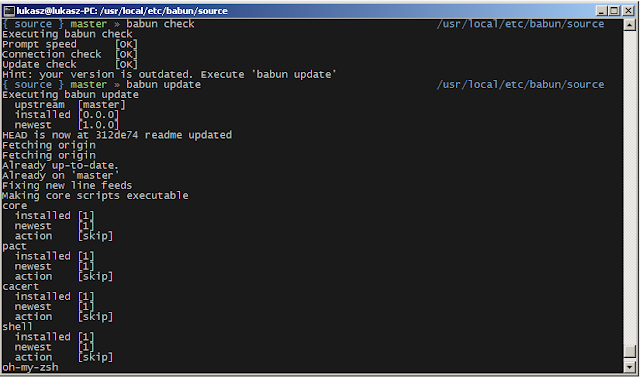
{ ~ } » babun shell                                                                          ~
/bin/zsh
In order to change your default shell execute:
{ ~ } » babun shell /bin/bash                                                                ~
/bin/zsh
/bin/bash
The output contains two lines: the previous default shell and the new default shell

Checking the configuration

Execute the following command the check the configuration:
{ ~ }  » babun check                                                                         ~
Executing babun check
Prompt speed [OK]
Connection check [OK]
Update check [OK]
Cygwin check [OK]
By executing this command you can also check whether there is a newer cygwin version available:
{ ~ }  » babun check                                                                            ~
Executing babun check
Prompt speed [OK]
Connection check [OK]
Update check [OK]
Cygwin check [OUTDATED]
Hint: the underlying Cygwin kernel is outdated. Execute 'babun update' and follow the instructions!
It will check if there are problems with the speed of the git prompt, if there’s access to the Internet or finally if you are running the newest version of babun.
The command will output hints if problems occur:
{ ~ } » babun check                                                                          ~
Executing babun check
Prompt speed [SLOW]
Hint: your prompt is very slow. Check the installed 'BLODA' software.
Connection check [OK]
Update check [OK]
Cygwin check [OK]
On each startup, but only every 24 hours, babun will execute this check automatically. You can disable the automatic check in the ~/.babunrc file.

Tweaking the configuration

You can tweak some config options in the ~/.babunrc file. Here’s the full list of variables that may be modified:
# JVM options
export JAVA_OPTS="-Xms128m -Xmx256m"

# Modify these lines to set your locale
export LANG="en_US.UTF-8"
export LC_CTYPE="en_US.UTF-8"
export LC_ALL="en_US.UTF-8"

# Uncomment these lines to the set your machine's default locale (and comment out the UTF-8 ones)
# export LANG=$(locale -uU)
# export LC_CTYPE=$(locale -uU)
# export LC_ALL=$(locale -uU)

# Uncomment this to disable daily auto-update & proxy checks on startup (not recommended!)
# export DISABLE_CHECK_ON_STARTUP="true"

# Uncomment to increase/decrease the check connection timeout
# export CHECK_TIMEOUT_IN_SECS=4

# Uncomment this lines to set up your proxy
# export http_proxy=http://user:password@server:port
# export https_proxy=$http_proxy
# export ftp_proxy=$http_proxy
# export no_proxy=localhost

Updating babun

To update babun to the newest version execute:
babun update
Please note that your local configuration files will not be overwritten.
The babun update command will also update the underlying cygwin version if never version is available. In such case babun will download the new cygwin installer, close itself and start the cygwin installation process. Once cygwin installation is completed babun will restart.

Screenshots

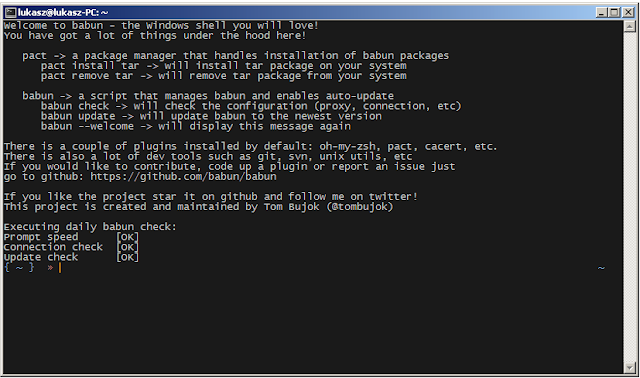
Startup screen


Pact - package installation


Pact - package installed


Babun oh-my-zsh - auto-update


VIM syntax highlighting


Nano syntax highlighting


Git aliases - git lg


Git aliases - git st


Shell prompt


Babun update


Open Babun here - Context Menu


Q-shell - Quick Shell for Unix Administrator

$
0
0
q-shell is quick shell for remote login into Unix system, it use blowfish crypt algorithm to protect transport data from client to server, you can get two program: 'qsh' for client, and 'qshd' for server, those program can rename by any name with you prefer.

Compile

Just enter 'make' and it will automation to compile, but, you must input the server key.

Usage
  1. server:
    Just run qshd on server:
       $ ./qshd
    But, you would like to run after change it to other name, such as:
       $ mv qshd smbd
    $ export PATH=.:$PATH
    $ smbd
  2. client:
    Set some environment variable, then run qsh:
      $ export _IP=127.0.0.1
    $ export _PORT=2800
    $ unset _P
    $ ./qsh shell
    Now you already login into server $_IP .

More function

q-shell include more function to manage system:

  1. put/get files:
    $ ./qsh get /path/to/server/file .
    $ ./qsh put /path/to/local/file /path/to/server/file
  2. run a command on server:
    $ ./qsh exec 'ls -l /bin'
  3. update server program:
    $ ./qsh update /path/to/local/qshd
    This function will update remote qshd, and run again.
  4. automation to run command on many server:
    $ for i in {10..20} ; do \
    export _IP=192.168.0.$i
    export _PORT=2800
    export _P=key # set key
    ./qsh exec 'ls -l /bin'
    done
    Note: qsh use $_P to fetch server key, so you should erase all history data after to use $_P.
  5. update password
    start with version 3.2, you can update the password as below:
      $ ./qsh passwd


Johnny - GUI for John the Ripper

$
0
0

Johnny is a cross-platform open-source GUI for the popular password cracker John the Ripper.

Features
  1. user could start, pause and resume attack (though only one session is allowed globally),
  2. all attack related options work,
  3. all input file formats are supported (pure hashes, pwdump, passwd, mixed),
  4. ability to resume any previously started session via session history,
  5. suggest the format of each hashes,
  6. try lucky guesses with password guessing feature,
  7. “smart” default options,
  8. accurate output of cracked passwords,
  9. config is stored in .conf file (~/.john/johnny.conf),
  10. nice error messages and other user friendly things,
  11. export of cracked passwords through clipboard,
  12. export works with office suits (tested with LibreOffice Calc),
  13. available in english and french,
  14. allows you to set environment variables for each session directly in Johnny


Snitch - Information Gathering via dorks

$
0
0

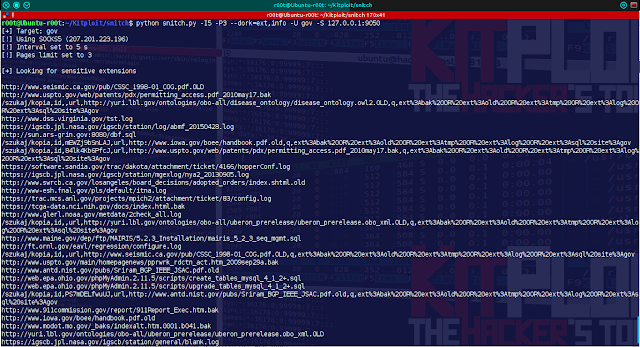
Snitch is a tool which automate dorking process for specified domain. Using build-in dork categories, this tool helps gather informations about domain which can be found using search engines. It can be quite useful in early phases of pentest.

Examples

devil@hell:~/snitch/$ python snitch.py

_ __ __
_________ (_) /______/ /_
/ ___/ __ \/ / __/ ___/ __ \
(__ ) / / / / /_/ /__/ / / /
/____/_/ /_/_/\__/\___/_/ /_/ ~0.2

Usage: snitch.py [options]

Options:
-h, --help show this help message and exit
-U [url], --url=[url]
domain(s) or domain extension(s) separated by comma *
-D [type], --dork=[type]
dork type(s) separated by comma *
-O [file], --output=[file]
output file
-S [ip:port], --socks=[ip:port]
socks5 proxy
-I [seconds], --interval=[seconds]
interval between requests, 2s by default
-P [pages], --pages=[pages]
pages to retrieve, 10 by default
-v turn on verbosity

Dork types:
info | Information leak & Potential web bugs
ext | Sensitive extensions
docs | Documents & Messages
files | Files & Directories
soft | Web software
all | All

Examples:
snitch.py -I5 -P3 --dork=ext,info -U gov -S 127.0.0.1:9050
snitch.py --url=site.com -D all -O /tmp/dorks


devil@hell:~/snitch/$ python snitch.py -U gov -D ext -P20 -S 127.0.0.1:9050
[+] Target: gov
[!] Using SOCKS5 (IP - XX.XX.XX.XX)
[!] Pages limit set to 20

[+] Looking for sensitive extensions

http://www.seismic.ca.gov/pub/CSSC_1998-01_COG.pdf.OLD
http://greengenes.lbl.gov/Download/Sequence_Data/Fasta_data_files/CoreSet_2010/formatdb.log
http://www.uspto.gov/web/patents/pdx/permitting_access.pdf_2010may17.bak
http://www.dss.virginia.gov/tst.log
http://appliedresearch.cancer.gov/nhanes_pam/create.pam_perday.log
ftp://ftp.eia.doe.gov/pub/oil_gas/natural_gas/feature_articles/2006/ngshock/ngshock.pdf.bak
http://appliedresearch.cancer.gov/nhanes_pam/create.pam_perminute.log
https://igscb.jpl.nasa.gov/igscb/station/mgexlog/nya2_20130905.log
http://www.swrcb.ca.gov/losangeles/board_decisions/adopted_orders/index.shtml.old
https://trac.mcs.anl.gov/projects/mpich2/attachment/ticket/83/config.log
https://tcga-data.nci.nih.gov/docs/index.html.bak
https://software.sandia.gov/trac/canary/attachment/ticket/3917/Pike_Hach%26SCAN_Oracle.edsx_convert.log
http://www.glerl.noaa.gov/metdata/2check_all.log
http://ft.ornl.gov/eavl/regression/configure.log
http://airsar.jpl.nasa.gov/airdata/PRECISION_LOG/hd1883.log
http://www.antd.nist.gov/pubs/Sriram_BGP_IEEE_JSAC.pdf.old
http://www-esh.fnal.gov/pls/default/itna.log
http://www.lanl.gov/wrtout/projects/tscattering/nano/Output//Defaults/ellipsoid.log
http://maine.gov/REVENUE/netfile/WS_FTP.LOG
http://mls.jpl.nasa.gov/lay/UARS_MLS.LOG
http://airsar.jpl.nasa.gov/airdata/PRECISION_LOG/hd1469.log
http://www.modot.mo.gov/_baks/indexalt.htm.0001.b041.bak
ftp://ftp.hrsa.gov/ruralhealth/FY04RAEDGuidance.pdf.bak
https://www.health.ny.gov/health_care/medicaid/nyserrcd.ini
http://www.thruway.ny.gov/business/contractors/expedite/bid.ini
http://www.star.bnl.gov/~pjakl/documents/configuration.cfg
http://www.wpc.ncep.noaa.gov/html/ecmwf0012loop500_ak.cfg
https://fermilinux.fnal.gov/documentation/security/krb5.conf
http://mirror.pnl.gov/macports/release/ports/security/fail2ban/files/pf-icefloor.conf
https://svn.mcs.anl.gov/repos/ZeptoOS/trunk/BGP/ramdisk/CN/tree/etc/syslog.conf
http://cmip-pcmdi.llnl.gov/cmip5/docs/esg.ini
https://security.fnal.gov/krb5.conf
http://collaborate2.nws.noaa.gov/canned_data/data_files/pqact.conf

[+] Done!


yarGen - A Generator for Yara Rules (for malware researchers)

$
0
0

yarGen is a generator for Yara rules.

What does yarGen do?

The main principle is the creation of yara rules from strings found in malware files while removing all strings that also appear in goodware files.

Since version 0.14.0 it uses naive-bayes-classifier by Mustafa Atik and Nejdet Yucesoy in order to classify the string and detect useful words instead of compression/encryption garbage.

Since version 0.12.0 yarGen does not completely remove the goodware strings from the analysis process but includes them with a very low score. The rules will be included if no better strings can be found and marked with a comment /* Goodware rule */. Force yarGen to remvoe all goodware strings with --excludegood. Also since version 0.12.0 yarGen allows to place the "strings.xml" from PEstudio in the program directory in order to apply the blacklist definition during the string analysis process. You'll get better results.

The rule generation process tries to identify similarities between the files that get analyzed and then combines the strings to so called "super rules". Up to now the super rule generation does not remove the simple rule for the files that have been combined in a single super rule. This means that there is some redundancy when super rules are created. You can supress a simple rule for a file that was already covered by super rule by using --nosimple.

Installation
  1. Make sure you have at least 2GB of RAM on the machine you plan to use yarGen
  2. Clone the git repository
  3. Install all dependancies with sudo pip install pickle scandir lxml naiveBayesClassifier
  4. Unzip the goodware database (e.g. 7z x good-strings.db.zip.001)
  5. See help with python yarGen.py --help

Memory Requirements

Warning: yarGen pulls the whole goodstring database to memory and uses up to 2 GB of memory for a few seconds.

Command Line Parameters

usage: yarGen.py [-h] [-m M] [-g G] [-u] [-c] [-o output_rule_file]
[-p prefix] [-a author] [-r ref] [-l min-size] [-z min-score]
[-s max-size] [-rc maxstrings] [-nr] [-oe] [-fs size-in-MB]
[--score] [--inverse] [--nodirname] [--noscorefilter]
[--excludegood] [--nosimple] [--nomagic] [--nofilesize]
[-fm FM] [--noglobal] [--nosuper] [--debug]

yarGen

optional arguments:
-h, --help show this help message and exit
-m M Path to scan for malware
-g G Path to scan for goodware (dont use the database
shipped with yaraGen)
-u Update local goodware database (use with -g)
-c Create new local goodware database (use with -g)
-o output_rule_file Output rule file
-p prefix Prefix for the rule description
-a author Author Name
-r ref Reference
-l min-size Minimum string length to consider (default=8)
-z min-score Minimum score to consider (default=5)
-s max-size Maximum length to consider (default=128)
-rc maxstrings Maximum number of strings per rule (default=20,
intelligent filtering will be applied)
-nr Do not recursively scan directories
-oe Only scan executable extensions EXE, DLL, ASP, JSP,
PHP, BIN, INFECTED
-fs size-in-MB Max file size in MB to analyze (default=3)
--score Show the string scores as comments in the rules
--inverse Show the string scores as comments in the rules
--nodirname Don't use the folder name variable in inverse rules
--noscorefilter Don't filter strings based on score (default in
'inverse' mode)
--excludegood Force the exclude all goodware strings
--nosimple Skip simple rule creation for files included in super
rules
--nomagic Don't include the magic header condition statement
--nofilesize Don't include the filesize condition statement
-fm FM Multiplier for the maximum 'filesize' condition
(default: 5)
--noglobal Don't create global rules
--nosuper Don't try to create super rules that match against
various files
--debug Debug output

Best Practice

See the following blog post for a more detailed description on how to use yarGen for YARA rule creation: How to Write Simple but Sound Yara Rules

Examples

Use the shipped database (FAST) to create some rules
python yarGen.py -m X:\MAL\Case1401

Use the shipped database of goodware strings and scan the malware directory "X:\MAL" recursively. Create rules for all files included in this directory and below. A file named 'yargen_rules.yar' will be generated in the current directory.

Show the score of the strings as comment

yarGen will by default use the top 20 strings based on their score. To see how a certain string in the rule scored, use the "--score" parameter.
python yarGen.py --score -m X:\MAL\Case1401

Use only strings with a certain minimum score

In order to use only strings for your rules that match a certain minimum score use the "-z" parameter. It is a good pratice to first create rules with "--score" and than perform a second run with a minimum score set for you sample set via "-z".
python yarGen.py --score -z 5 -m X:\MAL\Case1401

Preset author and reference
python yarGen.py -a "Florian Roth" -r "http://goo.gl/c2qgFx" -m /opt/mal/case_441 -o case441.yar

Exclude strings from Goodware samples
python yarGen.py --excludegood -m /opt/mal/case_441

Supress simple rule if alreay covered by a super rules
python yarGen.py --nosimple -m /opt/mal/case_441

Show debugging output
python yarGen.py --debug -m /opt/mal/case_441

Create a new goodware strings database
python yarGen.py -c -g C:\Windows\System32

Update the goodware strings database (append new strings to the old ones)
python yarGen.py -u -g "C:\Program Files"

Inverse rule creation (still beta)

In order to create some inverse rules on goodware, you have to prepare a directory with subdirectories in which you include all versions of the files you want to create inverse rules for with their original name and in their original folder. If that sounds strange, let me give you an example.
E.g. you want to create inverse rules for all Windows executables in the System32 folder, you have to create a goodware archive with the following directory structure:
  • G:\goodware
    • WindowsXP
      • System32 - all files
    • Windows2003
      • System32 - all files
    • Windows2008R2
      • System32 - all files
yarGen than creates rules that identify e.g. file name "cmd.exe" in path ending with "System32" and checks if the file contains certain necessary strings. If the strings don't show up, the rule will fire. This indicates a replaced system file or malware file that tries to masquerade as a system file.
python yarGen.py --inverse -oe -m G:\goodware\

You can also instruct yarGen not to include the file path but solely rely on the filename.
python yarGen.py --inverse -oe --nodirname -m G:\goodware\


MicEnum - Mandatory Integrity Control Enumerator for Windows

$
0
0


In the context of the Microsoft Windows family of operating systems, Mandatory Integrity Control (MIC) is a core security feature introduced in Windows Vista and implemented in subsequent lines of Windows operating systems. It adds Integrity Levels(IL)-based isolation to running processes and objects. The IL represents the level of trustworthiness of an object, and it may be set to files, folders, etc. Believe it or not, there is no graphical interface for dealing with MIC in Windows. MicEnum has been created to solve this, and as a tool for forensics.

MicEnum is a simple graphical tool that:
  • Enumerates the Integrity Levels of the objects (files and folders) in the hard disks.
  • Enumerates the Integrity Levels in the registry.
  • Helps to detect anomalies in them by spotting different integrity levels.
  • Allows to store and restore this information in an XML file so it may be used for forensic purposes.
  • Allows to set or modify the integrity levels graphically.

MicEnum scanning a folder

How does the tool work?

The only way by now, to show or set Integrity Levels in Windows is by using icacls.exe, a command line tool. There is no easy or standard way to detect changes or anomalies. As in NTFS, an attacker may have changed Integrity Levels of a file in a system to elevate privileges or leverage another attack, so, watching this kind of movements and anomalies is important for forensics or preventive actions.

The tool represents files and folders in a tree style. The integrity level of files and folders is shown in a column next to them. By scanning a folder, the tool will check all Integrity Levels and, if any of them does not match with its parent, it will expand it. If you have expanded some folders and want to group back the ones that are known to be the same, just use the checkbox at the bottom. It will hide the folders that are supposed to share same integrity level.

MicEnum scanning a Windows registry branch

For setting new integrity levels, just use the contextual menu again and set the desired level. Do not change them if you do not know what you are doing. You may need administrator privileges to achieve the change.

The program allows to set different integrity levels

For forensic purposes, the whole "session" or information about the integrity levels may be saved as an XML file. Later you may restore it with this same tool. Once restored, icons are missing, and there is no chance to set new values, of course, since you are not using your "live" hard disk.

If a session is loaded, the different values are shown

This all applies to registry branches as well, in its correspondent tab.

MicEnum is inspired in AccessEnum, a classical tool by Sysinternals that enumerates NTFS permissions and helps detecting anomalies.


SIMP - System Integrity Management Platform

$
0
0

SIMP is a framework that aims to provide a reasonable combination of security compliance and operational flexibility.

The ultimate goal of the project is to provide a complete management environment focused on compliance with the various profiles in the SCAP Security Guide Project and industry best practice.

Though it is fully capable out of the box, the intent of SIMP is to be molded to your target environment in such a way that deviations are easily identifiable to both Operations Teams and Security Officers.

Supported Operating Systems

The following Operating Systems are supported:
  • Red Hat Enterprise Linux
    • 6.6
    • 7.1
  • CentOS
    • 6.6
    • 7.1-1503-01

Technology components

SIMP uses Puppet to manage and maintain the configuration of the various component systems.
Though there are many possible configurations, out of the box SIMP provides:
  • Management
    • Puppet Server
    • PuppetDB
    • MCollective
  • Authentication
    • OpenLDAP
  • Kickstart/Update
    • YUM
    • DNS
    • DHCP
    • TFTP

SIMP Provided Materials

Build Materials

Puppet Modules

Forked External Modules

Most forks are simply to fit the materials into our build processes but some have modifications that we are looking to push back upstream when possible.


BetterCap - A complete, modular, portable and easily extensible MITM framework

$
0
0

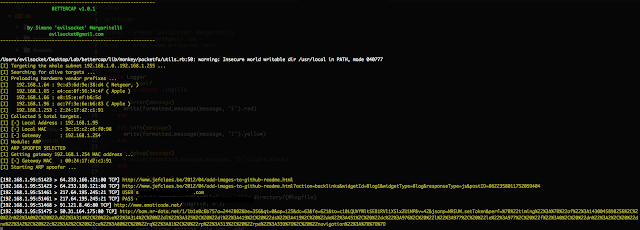
BetterCap is an attempt to create a complete, modular, portable and easily extensible MITM framework with every kind of features could be needed while performing a man in the middle attack.
It's currently able to sniff and print from the network the following informations:
  • URLs being visited.
  • HTTPS host being visited.
  • HTTP POSTed data.
  • FTP credentials.
  • IRC credentials.
  • POP, IMAP and SMTP credentials.
  • NTLMv1/v2 ( HTTP, SMB, LDAP, etc ) credentials.

DEPENDS
  • colorize (gem install colorize)
  • packetfu (gem install packetfu)
  • pcaprub (gem install pcaprub) [sudo apt-get install ruby-dev libpcap-dev]

KeyBox - A web-based SSH console that centrally manages administrative access to systems

$
0
0

KeyBox is a web-based SSH console that centrally manages administrative access to systems. Web-based administration is combined with management and distribution of user's public SSH keys. Key management and administration is based on profiles assigned to defined users.

Administrators can login using two-factor authentication with FreeOTP or Google Authenticator. From there they can manage their public SSH keys or connect to their systems through a web-shell. Commands can be shared across shells to make patching easier and eliminate redundant command execution.

KeyBox layers TLS/SSL on top of SSH and acts as a bastion host for administration. Protocols are stacked (TLS/SSL + SSH) so infrastructure cannot be exposed through tunneling / port forwarding. More details can be found in the following whitepaper: The Security Implications of SSH. Also, SSH key management is enabled by default to prevent unmanaged public keys and enforce best practices.

Prerequisites

To Run Bundled with Jetty

If you're not big on the idea of building from source...
Download keybox-jetty-vXX.XX.tar.gz
https://github.com/skavanagh/KeyBox/releases
Export environment variables
for Linux/Unix/OSX
 export JAVA_HOME=/path/to/jdk
export PATH=$JAVA_HOME/bin:$PATH
for Windows
 set JAVA_HOME=C:\path\to\jdk
set PATH=%JAVA_HOME%\bin;%PATH%
Start KeyBox
for Linux/Unix/OSX
    ./startKeyBox.sh
for Windows
    startKeyBox.bat
How to Configure SSL in Jetty (it is a good idea to add or generate your own unique certificate)
http://wiki.eclipse.org/Jetty/Howto/Configure_SSL

Using KeyBox

Open browser to https://<whatever ip>:8443
Login with
username:admin
password:changeme

Steps:
  1. Create systems
  2. Create profiles
  3. Assign systems to profile
  4. Assign profiles to users
  5. Users can login to create sessions on assigned systems
  6. Start a composite SSH session or create and execute a script across multiple sessions
  7. Add additional public keys to systems
  8. Disable any adminstrative public key forcing key rotation.
  9. Audit session history


Dharma - A generation-based, context-free grammar fuzzer

$
0
0
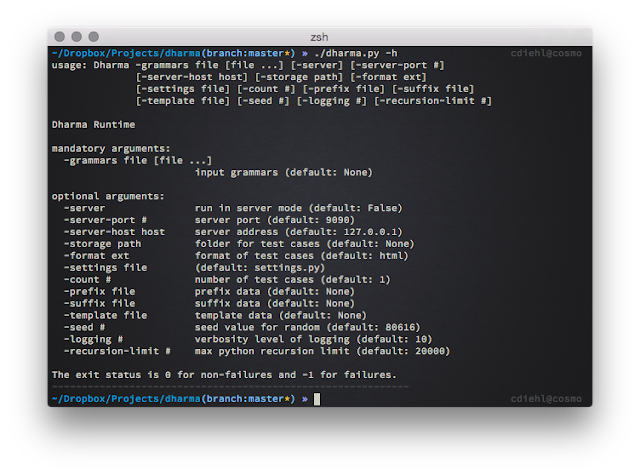
A generation-based, context-free grammar fuzzer.

Requirements

None

Examples

Generate a single test-case.
% ./dharma.py -grammars grammars/webcrypto.dg
Generate a single test case with multiple grammars.
% ./dharma.py -grammars grammars/canvas2d.dg grammars/mediarecorder.dg
Generating test-cases as files.
% ./dharma.py -grammars grammars/webcrypto.dg -storage . -count 5
Generate test-cases, send each over WebSocket to Firefox, observe the process for crashes and bucket them.
% ./dharma.py -server -grammars grammars/canvas2d.dg -template grammars/var/templates/html5/default.html
% ./framboise.py -setup inbound64-release -debug -worker 4 -testcase ~/dev/projects/fuzzers/dharma/grammars/var/index.html
Benchmark the generator.
% time ./dharma.py -grammars grammars/webcrypto.dg -count 10000 > /dev/null

Grammar Cheetsheet

Comment
%%% comment

Controls
%const% name := value

Sections
%section% := value
%section% := variable
%section% := variance

Extension methods
%range%(0-9)
%range%(0.0-9.0)
%range%(a-z)
%range%(!-~)
%range%(0x100-0x200)

%repeat%(+variable+)
%repeat%(+variable+, ", ")

%uri%(path)
%uri%(lookup_key)

%block%(path)

%choice%(foo, "bar", 1)

Assigning values
digit :=
%range%(0-9)

sign :=
+
-

value :=
+sign+%repeat%(+digit+)

Using values
+value+

Assigning variables
variable :=
@variable@ = new Foo();

Using variables
value :=
!variable!.bar();

Referencing values from common.dg
value :=
attribute=+common:number+

Calling javascript library functions
foo :=
Random.pick([0,1]);


Egress-Assess - Tool used to Test Egress Data Detection Capabilities

$
0
0

Egress-Assess is a tool used to test egress data detection capabilities.

Setup

To setup, run the included setup script, or perform the following:
  1. Install pyftpdlib
  2. Generate a server certificate and store it as "server.pem" on the same level as Egress-Assess. This can be done with the following command:
"openssl req -new -x509 -keyout server.pem -out server.pem -days 365 -nodes"

Usage

Typical use case for Egress-Assess is to copy this tool in two locations. One location will act as the server, the other will act as the client. Egress-Assess can send data over FTP, HTTP, and HTTPS.
To extract data over FTP, you would first start Egress-Assess’s FTP server by selecting “--server ftp” and providing a username and password to use:
./Egress-Assess.py --server ftp --username testuser --password pass123
Now, to have the client connect and send data to the ftp server, you could run...
./Egress-Assess.py --client ftp --username testuser --password pass123 --ip 192.168.63.149 --datatype ssn
Also, you can setup Egress-Assess to act as a web server by running....
./Egress-Assess.py --server https
Then, to send data to the FTP server, and to specifically send 15 megs of credit card data, run the following command...
./Egress-Assess.py --client https --data-size 15 --ip 192.168.63.149 --datatype cc


Lynis 2.1.1 - Security Auditing Tool for Unix/Linux Systems

$
0
0

Lynis is an open source security auditing tool. Commonly used by system administrators, security professionals and auditors, to evaluate the security defenses of their Linux/Unix based systems. It runs on the host itself, so it can perform very extensive security scans.

Supported operating systems

The tool has almost no dependencies, therefore it runs on almost all Unix based systems and versions, including:
  • AIX
  • FreeBSD
  • HP-UX
  • Linux
  • Mac OS
  • NetBSD
  • OpenBSD
  • Solaris
  • and others
It even runs on systems like the Raspberry Pi and several storage devices!

No installation required

The tool is very flexible and easy to use. It is one of the few tools, in which installation is optional. Just place it on the system, give it a command like "audit system", and it will run. It is written in shell script and released as open source software (GPL).

How it works

Lynis performs hundreds of individual tests, to determine the security state of the system. The security scan itself consists of performing a set of steps, from initialization the program, up to the report.

Steps
  1. Determine operating system
  2. Search for available tools and utilities
  3. Check for Lynis update
  4. Run tests from enabled plugins
  5. Run security tests per category
  6. Report status of security scan
During the scan, technical details about the scan are stored in a log file. At the same time findings (warnings, suggestions, data collection), are stored in a report file.

Opportunistic scanning

Lynis scanning is opportunistic: it uses what it can find.
For example if it sees you are running Apache, it will perform an initial round of Apache related tests. When during the Apache scan it also discovers a SSL/TLS configuration, it will perform additional auditing steps on that. While doing that, it then will collect discovered certificates, so they can be scanned later as well.

In-depth security scans

By performing opportunistic scanning, the tool can run with almost no dependencies. The more it finds, the deeper the audit will be. In other words, Lynis will always perform scans which are customized to your system. No audit will be the same!

Use cases

Since Lynis is flexible, it is used for several different purposes. Typical use cases for Lynis include:
  • Security auditing
  • Compliance testing (e.g. PCI, HIPAA, SOx)
  • Vulnerability detection and scanning
  • System hardening

Resources used for testing

Many other tools use the same data files for performing tests. Since Lynis is not limited to a few common Linux distributions, it uses tests from standards and many custom ones not found in any other tool.
  • Best practices
  • CIS
  • NIST
  • NSA
  • OpenSCAP data
  • Vendor guides and recommendations (e.g. Debian Gentoo, Red Hat)

Parameters
--auditor "Given name Surname"     Assign an auditor name to the audit (report)
--checkall -c Start the check
--check-update Check if Lynis is up-to-date
--cronjob Run Lynis as cronjob (includes -c -Q)
--help -h Shows valid parameters
--manpage View man page
--nocolors Do not use any colors
--pentest Perform a penetration test scan (non-privileged)
--quick -Q Don't wait for user input, except on errors
--quiet Only show warnings (includes --quick, but doesn't wait)
--reverse-colors Use a different color scheme for lighter backgrounds
--version -V Check program version (and quit)

Changelog
Lynis 2.1.1
=  Lynis 2.1.1 (2015-07-22)  =

This release adds a lot of improvements, with focus on performance, and
additional support for common Linux distributions and external utilities.
We recommend to use this latest version.

* Operating system enhancements
-------------------------------
Support for systems like CentOS, openSUSE, Slackware is improved.

* Performance
-------------
Performance tuning has been applied, to speed up execution of the audit on
systems with many files. This also includes code cleanups.

* Automatic updates
-------------------
Initial work on an automatic updater has been implemented. This way Lynis
can be scheduled for automatic updating from a trusted source.

* Internal functions
--------------------
Not all systems have readlink, or the -f option of readlink. The
ShowSymlinkPath function has been extended with a Python based check, which
is often available.

* Software support
------------------
Apache module directory /usr/lib64/apache has been added, which is used on
openSUSE.

Support for Chef has been added.

Added tests for CSF's lfd utility for integrity monitoring on directories and
files. Related tests are FINT-4334 and FINT-4336.

Added support for Chrony time daemon and timesync daemon. Additionally NTP
sychronization status is checked when it is enabled.

Improved single user mode protection on the rescue.service file.

* Other
-------
Check for user permissions has been extended.
Python binary is now detected, to help with symlink detection.
Several new legal terms have been added, which are used for usage in banners.
In several files old tests have been removed, to further clean up the code.

* Bug fixes
---------
Nginx test showed error when access_log had multiple parameters.
Tests using locate won't be performed if not present.
Fix false positive match on Squid unsafe ports [SQD-3624].
The hardening index is now also inserted into the report if it is not displayed
on screen.

* Functions
---------
Added AddSystemGroup function

* New tests
---------
Several new tests have been added:

[PKGS-7366] Scan for debsecan utility on Debian systems
[PKGS-7410] Determine amount of installed kernel packages
[TIME-3106] Check synchronization status of NTP on systemd based systems
[CONT-8102] Docker daemon status and gather basic details
[CONT-8104] Check docker info for any Docker warnings
[CONT-8106] Check total, running and unused Docker containers

* Plugins
---------

[PLGN-2602] Disabled by default, as it may be too slow for some machines
[PLGN-3002] Extended with /sbin/nologin

* Documentation
---------------
A new document has been created to help with the process of upgrading Lynis.
It is available at https://cisofy.com/documentation/lynis/upgrading/

--------------------------------------------------------------


Passgen - Random Character Generator Crunch to Crack WPA/WPA2

$
0
0

Passgen is an alternative for the random character generator crunch which attempts to solve cracking WPA/WPA2 keys by randomizing the output opposed to generating a list like so, (aaaaaaaa, aaaaaaab, aaaaaac, etc).

Example usuage with aircrack-ng
python passgen.py -l | sudo aircrack-ng --bssid 00:11:22:33:44:55 -w- WiFi.cap)

Argument switches are as followed:
-l lowercase ascii
-l1 lowercase ascii + digits(0-9)
-U uppercase ascii
-U1 uppercase ascii + digits
-lU lowercase + uppercase ascii
-lU1 lowercase + uppercase ascii + digits
-C [char] [length] custom character set + length


BackBox Linux 4.3 - Ubuntu-based Linux Distribution Penetration Test and Security Assessment

$
0
0

BackBox is a Linux distribution based on Ubuntu. It has been developed to perform penetration tests and security assessments. Designed to be fast, easy to use and provide a minimal yet complete desktop environment, thanks to its own software repositories, always being updated to the latest stable version of the most used and best known ethical hacking tools.

What's new
  • Preinstalled Linux Kernel 3.16
  • New Ubuntu 14.04.2 base
  • Ruby 2.1
  • Installer with LVM and Full Disk Encryption options
  • Handy Thunar custom actions
  • RAM wipe at shutdown/reboot
  • System improvements
  • Upstream components
  • Bug corrections
  • Performance boost
  • Improved Anonymous mode
  • Predisposition to ARM architecture (armhf Debian packages)
  • Predisposition to BackBox Cloud platform
  • New and updated hacking tools: beef-project, btscanner, dirs3arch, metasploit-framework, ophcrack, setoolkit, tor, weevely, wpscan, etc.

System requirements
  • 32-bit or 64-bit processor
  • 512 MB of system memory (RAM)
  • 6 GB of disk space for installation
  • Graphics card capable of 800×600 resolution
  • DVD-ROM drive or USB port (2 GB)

Upgrade instructions
To upgrade from a previous version (BackBox 4.x) follow these instructions:
sudo apt-get update
sudo apt-get dist-upgrade
sudo apt-get install -f
sudo apt-get install linux-image-generic-lts-utopic linux-headers-generic-lts-utopic linux-signed-image-generic-lts-utopic
sudo apt-get purge ri1.9.1 ruby1.9.1 ruby1.9.3 bundler
sudo gem cleanup
sudo rm -rf /var/lib/gems/1.*
sudo apt-get install backbox-default-settings backbox-desktop backbox-tools --reinstall
sudo apt-get install beef-project metasploit-framework whatweb wpscan setoolkit --reinstall
sudo apt-get autoremove --purge


Viewing all 5816 articles
Browse latest View live


<script src="https://jsc.adskeeper.com/r/s/rssing.com.1596347.js" async> </script>