Quantcast
Channel: KitPloit - PenTest Tools!
Viewing all 5816 articles
Browse latest View live

Xplico v1.1.1 - Open Source Network Forensic Analysis Tool (NFAT)

$
0
0

The goal of Xplico is extract from an internet traffic capture the applications data contained.

For example, from a pcap file Xplico extracts each email (POP, IMAP, and SMTP protocols), all HTTP contents, each VoIP call (SIP), FTP, TFTP, and so on. Xplico isn’t a network protocol analyzer. Xplico is an open source Network Forensic Analysis Tool (NFAT).

Features
  • Protocols supported: HTTP, SIP, IMAP, POP, SMTP, TCP, UDP, IPv6, …;
  • Port Independent Protocol Identification (PIPI) for each application protocol;
  • Multithreading;
  • Output data and information in SQLite database or Mysql database and/or files;
  • At each data reassembled by Xplico is associated a XML file that uniquely identifies the flows and the pcap containing the data reassembled;
  • Realtime elaboration (depends on the number of flows, the types of protocols and by the performance of computer -RAM, CPU, HD access time, …-);
  • TCP reassembly with ACK verification for any packet or soft ACK verification;
  • Reverse DNS lookup from DNS packages contained in the inputs files (pcap), not from external DNS server;
  • No size limit on data entry or the number of files entrance (the only limit is HD size);
  • IPv4 and IPv6 support;
  • Modularity. Each Xplico component is modular. The input interface, the protocol decoder (Dissector) and the output interface (dispatcher) are all modules;
  • The ability to easily create any kind of dispatcher with which to organize the data extracted in the most appropriate and useful to you;


Katana - Framework for Hackers, Professional Security and Developers

$
0
0

Katana is a framework written in python for making penetration testing, based on a simple and comprehensive structure for anyone to use, modify and share, the goal is to unify tools serve for professional when making a penetration test or simply as a routine tool, The current version is not completely stable, not complete.

The project is open to partners.

SOURCE CODE ORGANIZATION

The Katana source code is organized as follows:
-KatanaGUI/> Source code for graphical user interface
-KatanaLAB/> Source code for katana laboratory
-core/> Source code core
--core/db/> Dictionaries and tables
--core/logs/> Registers of modules
-files/> Files necessary for some modules
-tmp/> Temp files
-lib/> Libraries
-doc/> Documentation
-scripts/> Scripts(modules)

MAIN FILES

--core
¬Setting.py --- Setting variables
¬design.py --- Design template
¬Errors.py --- Error Debug
¬ping.py --- Funcitons
--scripts
¬__init__.py --- Modules List


REQUIREMENTS

OS requirement: Kali Linux

INSTALLATION 

Installation of Katana framework:
git clone https://github.com/RedToor/katana.git
cd Katana
chmod 777 install.py
python install.py

USAGE Commands

Stable ------------------------------------------------------------------
./sudo ktf.console 98% Builded - Enabled
./sudo ktf.run -m net/arpspoof 95% Builded - Enabled
Building ----------------------------------------------------------------
ktf.lab 30% Builded - No yet.
ktf.linker -m web/whois -t google.com -p 80 80% Builded - No yet.

MODULES (SCRIPTS)

Code NameDescriptionAutorVersion
web/httpbtBrute force to http 403Redtoor1.0
web/formbtBrute force to form-basedRedtoor1.0
web/cpfinderAdmin panel finderRedtoor1.0
web/joomscanScanner vul's cms joomlaRedtoor1.0
web/dosDenial of service webRedtoor1.0
web/whoisWho-is webRedtoor1.0
net/arpspoofARP-Spoofing attackRedtoor1.0
net/arplookARP-Spoofing detectorcl34r1.0
net/portscanPort ScannerRedToor1.0
set/gdreportGetting information with webRedToor3.0
set/mailboomE-mail boombing SPAMRedToor3.0
set/facebrokfacebook phishing plataformRedToor1.7
fle/brutezipBrute force to zip filesLeSZO ZerO1.0
fle/bruterarBrute force to rar filesLeSZO ZerO1.0
clt/ftpConsole ftp clientRedtoor1.0
clt/sqlConsole sql clientRedtoor1.0
clt/pop3Console pop3 clientRedtoor1.0
clt/ftpConsole ftp clientRedtoor1.0
ser/sqlStart SQL serverRedtoor1.0
ser/apacheStart Apache serverRedtoor1.0
ser/sshStart SSH serverRedtoor1.0
fbt/ftpBrute force to ftpRedtoor1.0
fbt/sshBrute force to sshRedtoor1.0
fbt/sqlBrute force to sqlRedtoor1.0
fbt/pop3Brute force to pop3Redtoor1.0

LINKS

Project in SF : http://sourceforge.net/projects/katanas/files/
Documentation: https://github.com/RedToor/Katana/tree/master/doc
Blog of project[ES]: http://cave-rt.blogspot.com.co/2015/07/instalacion-y-uso-katana-framework.html


SpiderFoot v2.6.1 - Open Source Intelligence Automation

$
0
0

SpiderFoot is an open source intelligence automation tool. Its goal is to automate the process of gathering intelligence about a given target.

Purpose 

There are three main areas where SpiderFoot can be useful:
  1. If you are a pen-tester, SpiderFoot will automate the reconnaisance stage of the test, giving you a rich set of data to help you pin-point areas of focus for the test.
  2. Understand what your network/organisation is openly exposing to the outside world. Such information in the wrong hands could be a significant risk.
  3. SpiderFoot can also be used to gather threat intelligence about suspected malicious IPs you might be seeing in your logs or have obtained via threat intelligence data feeds.

Features
  • Utilises a shedload of data sources; over 40 so far and counting, including SHODAN, RIPE, Whois, PasteBin, Google, SANS and more.
  • Designed for maximum data extraction; every piece of data is passed on to modules that may be interested, so that they can extract valuable information. No piece of discovered data is saved from analysis.
  • Runs on Linux and Windows. And fully open-source so you can fork it on GitHub and do whatever you want with it.
  • Visualisations. Built-in JavaScript-based visualisations or export to GEXF/CSV for use in other tools, like Gephi for instance.
  • Web-based UI. No cumbersome CLI or Java to mess with. Easy to use, easy to navigate. Take a look through the gallery for screenshots.
  • Highly configurable. Almost every module is configurable so you can define the level of intrusiveness and functionality.
  • Modular. Each major piece of functionality is a module, written in Python. Feel free to write your own and submit them to be incorporated!
  • SQLite back-end. All scan results are stored in a local SQLite database, so you can play with your data to your heart’s content.
  • Simultaneous scans. Each footprint scan runs as its own thread, so you can perform footprinting of many different targets simultaneously.
  • So much more.. check out the documentation for more information.

Data Sources
This is an ever-growing list of data sources SpiderFoot uses to gather intelligence about your target. A few require API keys but they are freely available.
SourceLocationNotes
abuse.chhttp://www.abuse.chVarious malware trackers.
AdBlockhttps://easylist-downloads.adblockplus.org/easylist.txtAdBlock pattern matches
AlienVaulthttps://reputation.alienvault.comAlienVault’s IP reputation database.
Autoshun.orghttp://www.autoshun.orgBlacklists.
AVG Site Safety Reporthttp://www.avgthreatlabas.comSite safety checker.
Binghttp://www.bing.comScraping but future version to also use API.
Blocklist.dehttp://lists.blocklist.deBlacklists.
Checkusernames.comhttp://www.checkusernames.comLook up username availability on popular sites.
DNSYour configured DNS server.Defaults to your local DNS but can be configured to whatever IP address you supply SpiderFoot.
DomainToolshttp://www.domaintools.com
DroneBLhttp://www.dronebl.org
DuckDuckGohttp://www.duckduckgo.com
Facebookhttp://www.facebook.comScraping but future version to also use API.
FreeGeoIPhttp://freegeoip.net
Githubhttp://www.github.com
Googlehttp://www.google.comScraping but future version to also use API.
Google+http://plus.google.comScraping but future version to also use API.
Google Safe Browsinghttp://www.google.com/safebrowsingSite safety checker.
IPCathttps://raw.githubusercontent.com/client9/ipcat/master/datacenters.csvIP Categorisation.
LinkedInhttp://www.linkedin.comScraping but future version to also use API.
malc0de.comhttp://malc0de.comBlacklists.
malwaredomainlist.comhttp://www.malwaredomainlist.comBlacklists.
malwaredomains.comhttp://www.malwaredomains.comBlacklists.
McAfee SiteAdvisorhttp://www.siteadvisor.comSite safety checker.
NameDroppershttp://www.namedroppers.org
Notepad.cchttp://www.notepad.cc
Nothink.orghttp://www.nothink.orgBlacklists.
Onion.Cityhttp://onion.citySearch engine for the dark web.
OpenBLhttp://www.openbl.orgBlacklists.
PasteBinhttp://www.pastebin.comAchieved through Google scraping.
Pastiehttp://www.pastie.org
PGP Servershttp://pgp.mit.edu/pks/PGP public keys.
PhishTankhttp://www.phishtank.orgIdentified phishing sites.
Project Honeypothttp://www.projecthoneypot.orgBlacklists. API key needed.
PunkSPIDERhttp://www.punkspider.org
RIPE/ARINhttp://stat.ripe.net/
Robtexhttp://www.robtex.com
SANS ISChttp://isc.sans.eduInternet Storm Center IP reputation database.
SHODANhttp://www.shodanhq.comAPI key needed.
SORBShttp://www.sorbs.netBlacklists.
SpamHaushttp://www.spamhaus.orgBlacklists.
ThreatExperthttp://www.threatexpert.comBlacklists.
TOR Node Listhttp://torstatus.blutmagie.de
TotalHash.comhttp://www.totalhash.comDomains/IPs used by malware.
UCEPROTECThttp://www.uceprotect.netBlacklists.
VirusTotalhttp://www.virustotal.comDomains/IPs used by malware. API key needed.
WayBack Machinehttp://www.archive.org
WhoisVariousWhois servers for different TLDs.
XSSposedhttp://www.xssposed.org
Yahoohttp://www.yahoo.comScraping but future version to also use API.
Zone-Hhttp://www.zone-h.orgEasy to get black-listed. Log onto the site in a browser from the IP you’re scanning from first and enter the CAPTCHA, then it should be fine.


0d1n - Tool For Automating Customized Attacks Against Web Applications

$
0
0

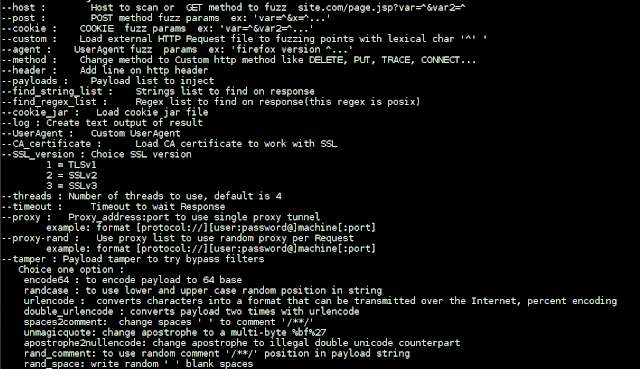
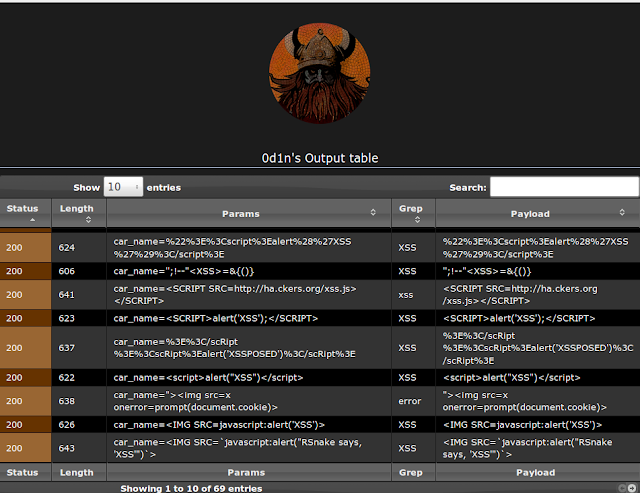
Web security tool to make fuzzing at HTTP inputs, made in C with libCurl.

You can do:
  • brute force passwords in auth forms
  • directory disclosure ( use PATH list to brute, and find HTTP status code )
  • test list on input to find SQL Injection and XSS vulnerabilities


To run:

require libcurl-dev or libcurl-devel(on rpm linux based)
$ git clone https://github.com/CoolerVoid/0d1n/
need libcurl to run
$ sudo apt-get install libcurl-dev
if rpm distro
$ sudo yum install libcurl-devel
$ make
$./0d1n

oclHashcat v2.01 - Worlds Fastest Password Cracker

$
0
0

oclHashcat is the world's fastest and most advanced GPGPU-based password recovery utility, supporting five unique modes of attack for over 170 highly-optimized hashing algorithms. oclHashcat currently supports AMD (OpenCL) and Nvidia (CUDA) graphics processors on GNU/Linux and Windows 7/8/10, and has facilities to help enable distributed password cracking.

Features

  • Worlds fastest password cracker
  • Worlds first and only GPGPU based rule engine
  • Free
  • Open-Source
  • Multi-GPU (up to 128 gpus)
  • Multi-Hash (up to 100 million hashes)
  • Multi-OS (Linux & Windows native binaries)
  • Multi-Platform (OpenCL & CUDA support)
  • Multi-Algo (see below)
  • Low resource utilization, you can still watch movies or play games while cracking
  • Focuses highly iterated modern hashes
  • Focuses dictionary based attacks
  • Supports distributed cracking
  • Supports pause / resume while cracking
  • Supports sessions
  • Supports restore
  • Supports reading words from file
  • Supports reading words from stdin
  • Supports hex-salt
  • Supports hex-charset
  • Built-in benchmarking system
  • Integrated thermal watchdog
  • ... and much more

Attack-Modes

  • Straight *
  • Combination
  • Brute-force
  • Hybrid dict + mask
  • Hybrid mask + dict
* accept Rules

Algorithms

  • MD4
  • MD5
  • Half MD5 (left, mid, right)
  • SHA1
  • SHA-256
  • SHA-384
  • SHA-512
  • SHA-3 (Keccak)
  • SipHash
  • RipeMD160
  • Whirlpool
  • GOST R 34.11-94
  • GOST R 34.11-2012 (Streebog) 256-bit
  • GOST R 34.11-2012 (Streebog) 512-bit
  • Double MD5
  • Double SHA1
  • md5($pass.$salt)
  • md5($salt.$pass)
  • md5(unicode($pass).$salt)
  • md5($salt.unicode($pass))
  • md5(sha1($pass))
  • md5($salt.md5($pass))
  • md5($salt.$pass.$salt)
  • md5(strtoupper(md5($pass)))
  • sha1($pass.$salt)
  • sha1($salt.$pass)
  • sha1(unicode($pass).$salt)
  • sha1($salt.unicode($pass))
  • sha1(md5($pass))
  • sha1($salt.$pass.$salt)
  • sha256($pass.$salt)
  • sha256($salt.$pass)
  • sha256(unicode($pass).$salt)
  • sha256($salt.unicode($pass))
  • sha512($pass.$salt)
  • sha512($salt.$pass)
  • sha512(unicode($pass).$salt)
  • sha512($salt.unicode($pass))
  • HMAC-MD5 (key = $pass)
  • HMAC-MD5 (key = $salt)
  • HMAC-SHA1 (key = $pass)
  • HMAC-SHA1 (key = $salt)
  • HMAC-SHA256 (key = $pass)
  • HMAC-SHA256 (key = $salt)
  • HMAC-SHA512 (key = $pass)
  • HMAC-SHA512 (key = $salt)
  • PBKDF2-HMAC-MD5
  • PBKDF2-HMAC-SHA1
  • PBKDF2-HMAC-SHA256
  • PBKDF2-HMAC-SHA512
  • MyBB
  • phpBB3
  • SMF
  • vBulletin
  • IPB
  • Woltlab Burning Board
  • osCommerce
  • xt:Commerce
  • PrestaShop
  • Mediawiki B type
  • Wordpress
  • Drupal
  • Joomla
  • PHPS
  • Django (SHA-1)
  • Django (PBKDF2-SHA256)
  • EPiServer
  • ColdFusion 10+
  • Apache MD5-APR
  • MySQL
  • PostgreSQL
  • MSSQL
  • Oracle H: Type (Oracle 7+)
  • Oracle S: Type (Oracle 11+)
  • Oracle T: Type (Oracle 12+)
  • Sybase
  • hMailServer
  • DNSSEC (NSEC3)
  • IKE-PSK
  • IPMI2 RAKP
  • iSCSI CHAP
  • Cram MD5
  • MySQL Challenge-Response Authentication (SHA1)
  • PostgreSQL Challenge-Response Authentication (MD5)
  • SIP Digest Authentication (MD5)
  • WPA
  • WPA2
  • NetNTLMv1
  • NetNTLMv1 + ESS
  • NetNTLMv2
  • Kerberos 5 AS-REQ Pre-Auth etype 23
  • Netscape LDAP SHA/SSHA
  • LM
  • NTLM
  • Domain Cached Credentials (DCC), MS Cache
  • Domain Cached Credentials 2 (DCC2), MS Cache 2
  • MS-AzureSync PBKDF2-HMAC-SHA256
  • descrypt
  • bsdicrypt
  • md5crypt
  • sha256crypt
  • sha512crypt
  • bcrypt
  • scrypt
  • OSX v10.4
  • OSX v10.5
  • OSX v10.6
  • OSX v10.7
  • OSX v10.8
  • OSX v10.9
  • OSX v10.10
  • AIX {smd5}
  • AIX {ssha1}
  • AIX {ssha256}
  • AIX {ssha512}
  • Cisco-ASA
  • Cisco-PIX
  • Cisco-IOS
  • Cisco $8$
  • Cisco $9$
  • Juniper IVE
  • Juniper Netscreen/SSG (ScreenOS)
  • Android PIN
  • GRUB 2
  • CRC32
  • RACF
  • Radmin2
  • Redmine
  • Citrix Netscaler
  • SAP CODVN B (BCODE)
  • SAP CODVN F/G (PASSCODE)
  • SAP CODVN H (PWDSALTEDHASH) iSSHA-1
  • PeopleSoft
  • Skype
  • 7-Zip
  • RAR3-hp
  • PDF 1.1 - 1.3 (Acrobat 2 - 4)
  • PDF 1.4 - 1.6 (Acrobat 5 - 8)
  • PDF 1.7 Level 3 (Acrobat 9)
  • PDF 1.7 Level 8 (Acrobat 10 - 11)
  • MS Office <= 2003 MD5
  • MS Office <= 2003 SHA1
  • MS Office 2007
  • MS Office 2010
  • MS Office 2013
  • Lotus Notes/Domino 5
  • Lotus Notes/Domino 6
  • Lotus Notes/Domino 8
  • Bitcoin/Litecoin wallet.dat
  • Blockchain, My Wallet
  • 1Password, agilekeychain
  • 1Password, cloudkeychain
  • Lastpass
  • Password Safe v2
  • Password Safe v3
  • eCryptfs
  • Android FDE <= 4.3
  • TrueCrypt 5.0+

Waldo - Multithreaded Directory and Subdomain Bruteforcer

$
0
0
Waldo is a lightweight and multithreaded directory and subdomain bruteforcer implemented in Python. It can be used to locate hidden web resources and undiscovered subdomains of the specified target.

Key Features
  • Quickly and easily generate a list of all subdomains of target domain
  • Discover hidden web resources that can be potentially leveraged as part of an attack
  • Written in Python and very portable
  • Fast, multithreaded design

Setup
Dependencies can be installed by running:
$ pip install -r pip.req
To run the waldo:
$ python waldo.py
Usage To enumerate subdomains at some-fake-site.example, execute the following:
$ python waldo.py -m s -d some-fake-site.example
To enumerate directories at some-fake-site.example, execute the following:
$ python waldo.py -m d -d some-fake-site.example
By default, output will be logged to waldo-output.txt. To specify a custom output file, use the -l flag:
$ python waldo.py -m s -l my-log-file.txt -d some-fake-site.example
Waldo uses 4 threads by default. To specify a custom threadpool size, use the -t flag:
$ python waldo.py -m s -d some-fake-site.example -t 15


Xiaopan OS - Pentesting Distribution for Wireless Security Enthusiasts

$
0
0

Xiaopan OS is an easy to use software package for beginners and experts that includes a number of advanced tools to penetrate wireless networks. Based on the Tiny Core Linux (TCL) operating system (OS), it has a slick graphical user interface (GUI) requiring no need for typing Linux commands. Xiaopan OS is Windows, Mac and Linux compatible and users can simply install and boot this ~70mb OS through a USB pen drive or in a virtual machine (VM) environment.

Alternatives

There are a number of professional operating systems that have been developed specifically for pentesting and security auditing which all are based on Linux. These include Kali, BackTrack and WiFiway. What sets Xiaopan OS apart from its competitors is that it Xiaopan OS is simple to use and just works, depending on a number of variables and providing you have all the right hardware of course.

Tools

Xiaopan OS includes a number of tools to hack WiFi Protected Setup (WPS), WiFI Protected Access (WPA) and Wireless Equivalent Privacy (WEP) encrypted networks:

  • Reaver: newly developed application with the ability to brute force crack WPS (WPA / WPA2) pins.
  • Inflator: this is the GUI version of command line reaver.
  • Aircrack-ng: the major backbone of many other Xiaopan tools including FeedingBottle (FB) and Minidwep with the ability to attack WPA networks through a dictionary attack and WEP networks through collecting and injecting packets.
  • FeedingBottle: so easy a baby could use it! FB is essentially the Aircrack-ng GUI and was created by Beini.
  • Minidwep: is similar to FB but has a better and similar GUI that is even easier to use than FB. The added advantage of Minidwep is that you can also run Reaver and Inflator from here as well.
  • Xfe: this is a simple file manager similar to say windows explorer

Tor Messenger - Chat over Tor, Easily

$
0
0
Tor Messenger is a cross-platform chat program that aims to be secure by default and sends all of its traffic over Tor. It supports a wide variety of transport networks, including Jabber (XMPP), IRC, Google Talk, Facebook Chat, Twitter, Yahoo, and others; enables Off-the-Record (OTR) Messaging automatically; and has an easy-to-use graphical user interface localized into multiple languages.

What it isn't...

Tor Messenger builds on the networks you are familiar with, so that you can continue communicating in a way your contacts are willing and able to do. This has traditionally been in a client-server model, meaning that your metadata (specifically the relationships between contacts) can be logged by the server. However, your route to the server will be hidden because you are communicating over Tor.
We are also excited about systems like Pond and Ricochet, which try to solve this problem, and would encourage you to look at their designs and use them too.

Why Instantbird?

We considered a number of messaging clients: Pidgin, Adam Langley's xmpp-client, and Instantbird. Instantbird was the pragmatic choice -- its transport protocols are written in a memory-safe language (JavaScript); it has a graphical user interface and already supports many natural languages; and it's a XUL application, which means we can leverage both the code (Tor Launcher) and in-house expertise that the Tor Project has developed working on Tor Browser with Firefox. It also has an active and vibrant software developer community that has been very responsive and understanding of our needs. The main feature it lacked was OTR support, which we have implemented and hope to upstream to the main Instantbird repository for the benefit of all Instantbird (and Thunderbird) users.

Instructions

  • On Linux, extract the bundle(s) and then run: ./start-tor-messenger.desktop
  • On OS X, copy the Tor Messenger application from the disk image to your local disk before running it.
  • On all platforms, Tor Messenger sets the profile folder for Firefox/Instantbird to the installation directory.
  • Note that as a policy, unencrypted one-to-one conversations are not allowed and your messages will not be transmitted if the person you are talking with does not have an OTR-enabled client. You can disable this option in the preferences to allow unencrypted communication but doing so is not recommended.


MassBleed - Mass SSL Vulnerability Scanner

$
0
0

USAGE
 sh massbleed.sh [CIDR|IP] [single|port|subnet] [port] [proxy]

ABOUT
This script has four main functions with the ability to proxy all connections:
  1. To mass scan any CIDR range for OpenSSL vulnerabilities via port 443/tcp (https) (example: sh massbleed.sh 192.168.0.0/16)
  2. To scan any CIDR range for OpenSSL vulnerabilities via any custom port specified (example: sh massbleed.sh 192.168.0.0/16 port 8443)
  3. To individual scan every port (1-10000) on a single system for vulnerable versions of OpenSSL (example: sh massbleed.sh 127.0.0.1 single)
  4. To scan every open port on every host in a single class C subnet for OpenSSL vulnerabilities (example: sh massbleed.sh 192.168.0. subnet)

PROXY: A proxy option has been added to scan via proxychains. You'll need to configure /etc/proxychains.conf for this to work.

PROXY USAGE EXAMPLES: (example: sh massbleed.sh 192.168.0.0/16 0 0 proxy) (example: sh massbleed.sh 192.168.0.0/16 port 8443 proxy) (example: sh massbleed.sh 127.0.0.1 single 0 proxy) (example: sh massbleed.sh 192.168.0. subnet 0 proxy)

VULNERABILITIES:
  1. OpenSSL HeartBleed Vulnerability (CVE-2014-0160)
  2. OpenSSL CCS (MITM) Vulnerability (CVE-2014-0224)
  3. Poodle SSLv3 vulnerability (CVE-2014-3566)

USBTracker - Script to track USB devices events and artifacts in a Windows OS

$
0
0

USBTracker is a quick & dirty coded incident response and forensics Python script to dump USB related information and artifacts from a Windows OS (vista and later).

Special recommandations
USBTracker read some protected log files and needs to be run with administrator permissions. The most simple way to run USBTracker is to launch a CMD or Powershell console with a right click "run as administrator" , then execute the script / exe inside it.

Executable version
If you don't have a python distribution installed on the computer you want to analyze with USBTracker, you can also download an .exe "compiled" version with *PyInstaller of the script from the repository.

Dependencies
USBTracker is developed with Python 2.7 and has not been tested with other Python versions. It uses the great Python module Python-evtx of Willi Ballenthin. So, please don't forget to install it before use USBTracker.

Usage

Help
If you want display help, just use the "-h" flag :
PS C:\XXX\XXX\XXX\XXX> .\usbtracker.py -h
USBTracker alpha
2015 - Sysinsider

USBTracker it's a free tool which allow you to extract some USB artifacts from a Windows OS (Vista and later).
You must execute USBTracker inside a CMD/Powershell console runnnig with administror privileges to be able to dump some
log files artifacts.

usage: usbtracker.py [-h] [-u | -uu] [-nh] [-df] [-x]

optional arguments:
-h, --help show this help message and exit
-u, --usbstor Dump USB artifacts from USBSTOR registry
-uu, --usbstor-verbose
Dump USB detailed artifacts from USBSTOR registry.
-nh, --no-hardwareid Hide HardwareID value during a USBSTOR detailed
artifacts registry dump.
-df, --driver-frameworks
Dump USB artifacts and events from the Windows
DriverFrameworks Usermode log.
-x, --raw-xml-event Display event results in raw xml (with -df option
only).

List known USB storage devices
If you want to list all USB storage devices known by Windows, use the "-u" flag to get a simple list :
PS C:\XXX\XXX\XXX\XXX> .\usbtracker.py -u
USBTracker alpha
2015 - Sysinsider

USBTracker it's a free tool which allow you to extract some USB artifacts from a Windows OS (Vista and later).
You must execute USBTracker inside a CMD/Powershell console runnnig with administror privileges to be able to dump some
log files artifacts.

USB device(s) known by this computer :
=====================================

CdRom&Ven_HL-DT-ST&Prod_DVDRAM_GP08NU20&Rev_1.00
Disk&Ven_Generic&Prod_STORAGE_DEVICE&Rev_0272
Disk&Ven_Kingston&Prod_DataTraveler_2.0&Rev_1.00
Disk&Ven_WD&Prod_5000AAV_External&Rev_1.65
Disk&Ven_WD&Prod_Elements_10B8&Rev_1012
Disk&Ven_WD&Prod_My_Book_1140&Rev_1012
Other&Ven_WD&Prod_SES_Device&Rev_1012
or the "-uu" flag if you want to get a detailed list :
PS C:\XXX\XXX\XXX\XXX> .\usbtracker.py -uu
USBTracker alpha
2015 - Sysinsider

USBTracker it's a free tool which allow you to extract some USB artifacts from a Windows OS (Vista and later).
You must execute USBTracker inside a CMD/Powershell console runnnig with administror privileges to be able to dump some
log files artifacts.

USB device(s) known by this computer :
=====================================

CdRom&Ven_HL-DT-ST&Prod_DVDRAM_GP08NU20&Rev_1.00

Serial : 00101016400086C55&0

DeviceDesc : @cdrom.inf,%gencdrom_devdesc%;CD-ROM Drive
Capabilities : 16
HardwareID : [u'USBSTOR\\CdRomHL-DT-STDVDRAM_GP08NU20_1.00', u'USBSTOR\\CdRomHL-DT-STDVDRAM_GP08NU20_', u'USBSTO
R\\CdRomHL-DT-ST', u'USBSTOR\\HL-DT-STDVDRAM_GP08NU20_1', u'HL-DT-STDVDRAM_GP08NU20_1', u'USBSTOR\\GenCdRom', u'GenCdRom
']
CompatibleIDs : [u'USBSTOR\\CdRom', u'USBSTOR\\RAW']
ContainerID : {def10b43-2e59-5e9f-8ca6-ffab1cfc9afa}
Service : cdrom
ClassGUID : {4d36e965-e325-11ce-bfc1-08002be10318}
ConfigFlags : 0
Driver : {4d36e965-e325-11ce-bfc1-08002be10318}\0001
Class : CDROM
Mfg : @cdrom.inf,%genmanufacturer%;(Standard CD-ROM drives)
FriendlyName : HL-DT-ST DVDRAM GP08NU20 USB Device

======================================================================

Disk&Ven_Generic&Prod_STORAGE_DEVICE&Rev_0272

Serial : 000000000272&0

DeviceDesc : @disk.inf,%disk_devdesc%;Disk drive
Capabilities : 16
HardwareID : [u'USBSTOR\\DiskGeneric_STORAGE_DEVICE__0272', u'USBSTOR\\DiskGeneric_STORAGE_DEVICE__', u'USBSTOR\
\DiskGeneric_', u'USBSTOR\\Generic_STORAGE_DEVICE__0', u'Generic_STORAGE_DEVICE__0', u'USBSTOR\\GenDisk', u'GenDisk']
CompatibleIDs : [u'USBSTOR\\Disk', u'USBSTOR\\RAW']
ContainerID : {a3ce89cb-5363-54a8-8d4f-af2374c200a5}
ConfigFlags : 0
ClassGUID : {4d36e967-e325-11ce-bfc1-08002be10318}
Driver : {4d36e967-e325-11ce-bfc1-08002be10318}\0004
Class : DiskDrive
Mfg : @disk.inf,%genmanufacturer%;(Standard disk drives)
Service : disk
FriendlyName : Generic STORAGE DEVICE USB Device

======================================================================

...


Dumping events and artifacts from Microsoft-Windows-DriverFrameworks-UserMode%4Operational.evtx log file :
To dump all USB related events (currently EventID 2003, 2004, 2005, 2010, 2100, 2102 & 2105) from the Microsoft-Windows-DriverFrameworks-UserMode%4Operational.evtx log file, use the "-df" flag.
PS C:\XXX\XXX\XXX\XXX> .\usbtracker.py -df
USBTracker alpha
2015 - Sysinsider

USBTracker it's a free tool which allow you to extract some USB artifacts from a Windows OS (Vista and later).
You must execute USBTracker inside a CMD/Powershell console runnnig with administror privileges to be able to dump some
log files artifacts.

USB related event(s) found in the event log :
=============================================

UTC Time : 2015-01-18 20:31:34.138399
EventID : 2003 | Description : UMDFHostDeviceArrivalBegin | Computer : 37L4247F27-25 | User SID : S-1-5-19 | User : LocalService
Lifetime : 8c076f4d-6405-4414-a829-ee44a94e3893
WPDBUSENUMROOT\UMB\2&37C186B&0&STORAGE#VOLUME#_??_USBSTOR#DISK&VEN_KINGSTON&PROD_DATATRAVELER_2.0&REV_1.00#0019B931D970C8C0C5DB00B9&0#

UTC Time : 2015-01-18 20:31:34.138399
EventID : 2010 | Description : UMDFHostDeviceArrivalEnd | Computer : 37L4247F27-25 | User SID : S-1-5-19 | User : LocalService
Lifetime : 8c076f4d-6405-4414-a829-ee44a94e3893
WPDBUSENUMROOT\UMB\2&37C186B&0&STORAGE#VOLUME#_??_USBSTOR#DISK&VEN_KINGSTON&PROD_DATATRAVELER_2.0&REV_1.00#0019B931D970C8C0C5DB00B9&0#

UTC Time : 2015-01-18 20:31:34.138399
EventID : 2004 | Description : UMDFHostAddDeviceBegin | Computer : 37L4247F27-25 | User SID : S-1-5-19 | User : LocalService
Lifetime : 8c076f4d-6405-4414-a829-ee44a94e3893
WPDBUSENUMROOT\UMB\2&37C186B&0&STORAGE#VOLUME#_??_USBSTOR#DISK&VEN_KINGSTON&PROD_DATATRAVELER_2.0&REV_1.00#0019B931D970C8C0C5DB00B9&0#

...
To dump the same events in XML format, just add the "-x" flag :
PS C:\XXX\XXX\XXX\XXX> .\usbtracker.py -df -x
USBTracker alpha
2015 - Sysinsider

USBTracker it's a free tool which allow you to extract some USB artifacts from a Windows OS (Vista and later).
You must execute USBTracker inside a CMD/Powershell console runnnig with administror privileges to be able to dump some
log files artifacts.

USB related event(s) found in the event log :
=============================================

<Event xmlns="http://schemas.microsoft.com/win/2004/08/events/event"><System><Provider Name="Microsoft-Windows-DriverFra
meworks-UserMode" Guid="2e35aaeb-857f-4beb-a418-2e6c0e54d988"></Provider>
<EventID Qualifiers="">1003</EventID>
<Version>1</Version>
<Level>4</Level>
<Task>17</Task>
<Opcode>1</Opcode>
<Keywords>0x8000000000000000</Keywords>
<TimeCreated SystemTime="2015-01-18 20:31:34.013599"></TimeCreated>
<EventRecordID>2</EventRecordID>
<Correlation ActivityID="" RelatedActivityID=""></Correlation>
<Execution ProcessID="836" ThreadID="1488"></Execution>
<Channel>Microsoft-Windows-DriverFrameworks-UserMode/Operational</Channel>
<Computer>37L4247F27-25</Computer>
<Security UserID="S-1-5-18"></Security>
</System>
<UserData><UMDFDriverManagerHostCreateStart lifetime="8c076f4d-6405-4414-a829-ee44a94e3893" xmlns:auto-ns2="http://schem
as.microsoft.com/win/2004/08/events" xmlns="http://www.microsoft.com/DriverFrameworks/UserMode/Event"><HostGuid>{193a182
0-d9ac-4997-8c55-be817523f6aa}</HostGuid>
<DeviceInstanceId>WPDBUSENUMROOT.UMB.2&amp;37C186B&amp;0&amp;STORAGE#VOLUME#_??_USBSTOR#DISK&amp;VEN_KINGSTON&amp;PROD_D
ATATRAVELER_2.0&amp;REV_1.00#0019B931D970C8C0C5DB00B9&amp;0#</DeviceInstanceId>
</UMDFDriverManagerHostCreateStart>
</UserData>
</Event>

...

Dumping events and artifacts from setupapi.dev.log log file :
To dump all USB devices installation events (generally first use of devices) from the setupapi.dev.log log file, use the "-sa" flag.
PS C:\XXX\XXX\XXX\XXX> .\usbtracker.py -sa
USBTracker alpha
2015 - Sysinsider

USBTracker it's a free tool which allow you to extract some USB artifacts from a Windows OS (Vista and later).
You must execute USBTracker inside a CMD/Powershell console runnnig with administror privileges to be able to dump some log files artifacts.

>>> [Setup online Device Install (Hardware initiated) - usb\vid_0930&pid_6544\0019b931d970c8c0c5db00b9]
>>> Section start 2015/01/18 21:31:02.314

>>> [Setup online Device Install (Hardware initiated) - storage\volume\_??_usbstor#disk&ven_kingston&prod_datatraveler_2.0&rev_1.00#0019b931d970c8c0c5db00b9&0#{53f56307-b6bf-11d0-94f2-00a0c91efb8b}]
>>> Section start 2015/01/18 21:31:28.241

>>> [Setup online Device Install (Hardware initiated) - WpdBusEnumRoot\UMB\2&37c186b&0&STORAGE#VOLUME#_??_USBSTOR#DISK&VEN_KINGSTON&PROD_DATATRAVELER_2.0&REV_1.00#0019B931D970C8C0C5DB00B9&0#]
>>> Section start 2015/01/18 21:31:30.956

>>> [Setup online Device Install (Hardware initiated) - usb\root_hub20\4&56dcbd&0]
>>> Section start 2015/01/18 21:31:59.457

>>> [Setup online Device Install (Hardware initiated) - usb\root_hub\4&38d808bf&0]
>>> Section start 2015/01/18 21:32:28.925

>>> [Setup online Device Install (Hardware initiated) - usb\root_hub\4&fee3d1d&0]
>>> Section start 2015/01/18 21:32:31.593

>>> [Setup online Device Install (Hardware initiated) - usb\root_hub20\4&3a831ac0&0]
>>> Section start 2015/01/18 21:32:32.825

>>> [Setup online Device Install (Hardware initiated) - usb\vid_0458&pid_0137\5&1d8fb94c&0&3]
>>> Section start 2015/01/18 21:32:36.866

>>> [Setup online Device Install (Hardware initiated) - usb\vid_05ac&pid_8242\5&1d8fb94c&0&5]
>>> Section start 2015/01/18 21:32:47.037

>>> [Setup online Device Install (Hardware initiated) - usb\vid_05ac&pid_8502\8t9a9e8d577k3l00]
>>> Section start 2015/01/18 21:32:48.160

...


Joomlavs - A Black Box, Joomla Vulnerability Scanner

$
0
0

JoomlaVS is a Ruby application that can help automate assessing how vulnerable a Joomla installation is to exploitation. It supports basic finger printing and can scan for vulnerabilities in components, modules and templates as well as vulnerabilities that exist within Joomla itself.

How to install
JoomlaVS has so far only been tested on Debian, but the installation process should be similar across most operating systems.
  1. Ensure Ruby [2.0 or above] is installed on your system
  2. Clone the source code using git clone https://github.com/rastating/joomlavs.git
  3. Install bundler and required gems using sudo gem install bundler && bundle install

How to use
The only required option is the -u / --url option, which specifies the address to target. To do a full scan, however, the --scan-all option should also be specified, e.g. ruby joomlavs.rb -u yourjoomlatarget.com --scan-all .
A full list of options can be found below:
usage: joomlavs.rb [options]
Basic options
-u, --url The Joomla URL/domain to scan.
--basic-auth <username:password> The basic HTTP authentication credentials
-v, --verbose Enable verbose mode
Enumeration options
-a, --scan-all Scan for all vulnerable extensions
-c, --scan-components Scan for vulnerable components
-m, --scan-modules Scan for vulnerable modules
-t, --scan-templates Scan for vulnerable templates
-q, --quiet Scan using only passive methods
Advanced options
--follow-redirection Automatically follow redirections
--no-colour Disable colours in output
--proxy <[protocol://]host:port> HTTP, SOCKS4 SOCKS4A and SOCKS5 are supported. If no protocol is given, HTTP will be used
--proxy-auth <username:password> The proxy authentication credentials
--threads The number of threads to use when multi-threading requests
--user-agent The user agent string to send with all requests


Mosca - Static Analysis Tool To Find Bugs

$
0
0


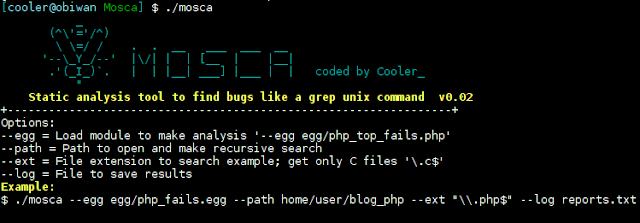
Just another Simple static analysis tool to find bugs like a grep unix command, at mosca have a modules, that was call egg, each egg is a simple config to find bug at especific language like PHP,Ruby,ASP etc... Example of egg config at directory "egg", If Mosca read a line with vunerability of egg in source code, then, mosca have alert about vulnerability and save at logs.


Flashlight - Automated Information Gathering Tool for Penetration Testers

$
0
0

Pentesters spend too much time during information gathering phase. Flashlight (Fener) provides services to scan network/ports and gather information rapidly on target networks. So Flashlight should be the choice to automate discovery step during a penetration test. In this article, usage of Flashligh application will be explained.

For more information about using Flashlight, "-h" or "-help" option can be used.

Parameters for the usage of this application can be listed below

  • -h, --help: It shows the information about using the Flashlight application.
  • -p <ProjectName> or --project < ProjectName>: It sets project name with the name given. This paramater can be used to save different projects in different workspaces.
  • -s <ScanType> or –scan_type < ScanType >: It sets the type of scans. There are four types of scans: Active Scan , Passive Scan, Screenshot Scan and Filtering. These types of scans will be examined later in detail.
  • -d < DestinationNetwork>, --destination < DestinationNetwork >: It sets the network or IP where the scan will be executed against.
  • -c <FileName>, --config <FileName>: It specifies the configuration file. The scanning is realized according to the information in the configuration file.
  • -u <NetworkInterface>, --interface < NetworkInterface>: It sets the network interface used during passive scanning.
  • -f <PcapFile>, --pcap_file < PcapFile >: It sets cap File that will be filtered.
  • -r <RasterizeFile>, --rasterize < RasterizeFile>: It sets the specific location of Rasterize JavaScript file which will be used for taking screenshots.
  • -t <ThreadNumber>, --thread <Threadnember>: It sets the number of Threads. This parameter is valid only on screenshot scanning (screen scan) mode.
  • -o <OutputDiectory>, --output < OutputDiectory >: It sets the directory in which the scan results can be saved. The scan results are saved in 3 sub-directories : For Nmap scanning results, "nmap" subdirectory, for PCAP files "pcap" subdirectory and for screenshots "screen" subdirectories are used. Scan results are saved in directory, shown under the output directories by this parameter. If this option is not set, scan results are saved in the directory that Flashlight applications are running.
  • -a, --alive: It performs ping scan to
  • “-I” parameter is chosen.
  • -l <LogFile>, --log < LogFile >: It specifies the log file to save the scan results. If not set, logs are saved in “flashlight.log” file in working directory.
  • -k <PassiveTimeout>, --passive_timeout <PassiveTimeout>: It specifies the timeout for sniffing in passive mode. Default value is 15 seconds. This parameter is used for passive scan.
  • -m, --mim: It is used to perform MITM attack.
  • -n, --nmap-optimize: It is used to optimize nmap scan.
  • -v, --verbose: It is used to list detailed information.
  • -V, --version: It specifies version of the program. 
  •  discover up IP addresses before the actual vulnerability scan. It is used for active scan.
  • -g <DefaultGateway>, --gateway < DefaultGateway >: It identifies the IP address of the gateway. If not set, interface with “-I” parameter is chosen.
  • -l <LogFile>, --log < LogFile >: It specifies the log file to save the scan results. If not set, logs are saved in “flashlight.log” file in working directory.
  • -k <PassiveTimeout>, --passive_timeout <PassiveTimeout>: It specifies the timeout for sniffing in passive mode. Default value is 15 seconds. This parameter is used for passive scan.
  • -m, --mim: It is used to perform MITM attack.
  • -n, --nmap-optimize: It is used to optimize nmap scan.
  • -v, --verbose: It is used to list detailed information.
  • -V, --version: It specifies version of the program. 

Videos :


https://www.youtube.com/watch?v=EUMKffaAxzs&list=PL1BVM6VWlmWZOv9Hv8TV2v-kAlUmvA5g7&index=4https://www.youtube.com/watch?v=qCgW-SfYl1c&list=PL1BVM6VWlmWZOv9Hv8TV2v-kAlUmvA5g7&index=5https://www.youtube.com/watch?v=98Soe01swR8&list=PL1BVM6VWlmWZOv9Hv8TV2v-kAlUmvA5g7&index=6https://www.youtube.com/watch?v=9wft9zuh1f0&list=PL1BVM6VWlmWZOv9Hv8TV2v-kAlUmvA5g7&index=7

Installation

apt-get install nmap tshark tcpdump dsniff
In order to install phantomjs easily, you can download and extract it from https://bitbucket.org/ariya/phantomjs/downloads.
Flashlight application can perform 3 basic scan types and 1 analysis type. Each of them are listed below.

1) Passive Scan

In passive scan, no packets are sent into wire. This type of scan is used for listening network and analyzing packets.
To launch a passive scan by using Flashlight; a project name should be specified like “passive-pro-01”. In the following command, packets that are captured by eth0 are saved into “/root/Desktop/flashlight/output/passive-project-01/pcap" directory, whereas, Pcap files and all logs are saved into "/root/Desktop/log" directory.

./flashlight.py -s passive -p passive-pro-01 -i eth0 -o /root/Desktop/flashlight_test -l /root/Desktop/log –v

2) Active Scan

During an active scan, NMAP scripts are used by reading the configuration file. An example configuration file (flashlight.yaml) is stored in “config” directory under the working directory.
tcp_ports:
   - 21, 22, 23, 25, 80, 443, 445, 3128, 8080
udp_ports:
   - 53, 161
scripts:
   - http-enum

According to "flashlight.yaml" configuration file, the scan executes against "21, 22, 23, 25, 80, 443, 445, 3128, 8080" TCP ports, "53, 161" UDP ports, "http-enum" script by using NMAP.

Note: During active scan “screen_ports” option is useless. This option just works with screen scan.
“-a” option is useful to discover up hosts by sending ICMP packets. Beside this, incrementing thread number by using “-t” parameter increases scan speed.

./flashlight.py -p active-project -s active -d 192.168.74.0/24 –t 30 -a -v

By running this command; output files in three different formats (Normal, XML and Grepable) are emitted for four different scan types (Operating system scan, Ping scan, Port scan and Script Scan).

The example commands that Flashlight Application runs can be given like so:

  • Operating System Scan: /usr/bin/nmap -n -Pn -O -T5 -iL /tmp/"IPListFile" -oA /root/Desktop/flashlight/output/active-project/nmap/OsScan-"Date"
  • Ping Scan: /usr/bin/nmap -n -sn -T5 -iL /tmp/"IPListFile" -oA /root/Desktop/flashlight/output/active-project/nmap/PingScan-"Date"
  • Port Scan: /usr/bin/nmap -n -Pn -T5 --open -iL /tmp/"IPListFile" -sS -p T:21,22,23,25,80,443,445,3128,8080,U:53,161 -sU -oA /root/Desktop/flashlight/output/active-project/nmap/PortScan-"Date"
  • Script Scan: /usr/bin/nmap -n -Pn -T5 -iL /tmp/"IPListFile" -sS -p T:21,22,23,25,80,443,445,3128,8080,U:53,161 -sU --script=default,http-enum -oA /root/Desktop/flashlight/output/active-project/nmap/ScriptScan-"Date" 

 3) Screen Scan

Screen Scan is used to get screenshots of web sites/applications by using directives in config file (flashlight.yaml). Directives in this file provide screen scan for four ports ("80, 443, 8080, 8443") screen_ports: - 80, 443, 8080, 8443 Sample screen scan can be performed like this: ``` ./flashlight.py -p project -s screen -d 192.168.74.0/24 -r /usr/local/rasterize.js -t 10 -v ```

4) Filtering

Filtering option is used to analyse pcap files. An example for this option is shown below: ``` ./flashlight.py -p filter-project -s filter -f /root/Desktop/flashlight/output/passive-project-02/pcap/20150815072543.pcap -v ``` By running this command some files are created on “filter” sub-folder. This option analyzes PCAP packets according to below properties:
  • Windows hosts
  • Top 10 DNS requests

...


Collection Of Awesome Honeypots

$
0
0

A curated list of awesome honeypots, tools, components and much more. The list is divided into categories such as web, services, and others, focusing on open source projects.

Honeypots

Honeyd Tools

Network and Artifact Analysis

  • Sandbox
  • Sandbox-as-a-Service
    • malwr.com - free malware analysis service and community
    • detux.org - Multiplatform Linux Sandbox
    • Joebox Cloud - analyzes the behavior of malicious files including PEs, PDFs, DOCs, PPTs, XLSs, APKs, URLs and MachOs on Windows, Android and Mac OS X for suspicious activities

Data Tools

  • Front Ends
    • Tango - Honeypot Intelligence with Splunk
    • Django-kippo - Django App for kippo SSH Honeypot
    • Wordpot-Frontend - a full featured script to visualize statistics from a Wordpot honeypot -Shockpot-Frontend - a full featured script to visualize statistics from a Shockpot honeypot
  • Visualization
    • HoneyMap - Real-time websocket stream of GPS events on a fancy SVG world map
    • HoneyMalt - Maltego tranforms for mapping Honeypot systems

Pyersinia - Network Attack Tool

$
0
0
Pyersinia is a similar tool to Yersinia, but Pyersinia is implemented in Python using Scapy. The main objective is the realization of network attacks such as spoofing ARP, DHCP DoS , STP DoS among others. The community can add new attacks on the tool in a simple way, using plugins. This is because Pyersinia uses the STB (Security Tools Builder) framework.

What's new?

Adding new attacks on the tool is a simple task because we use the framework STB (Security Tool Builder). The new attacks are added by plugins.

Installation

Install pyersinia is so easy:
$ python -m pip install pyersinia
Or install from Pypi:
# pip install pyersinia

Quick start

You can display inline help writing:

positional arguments:
arp_spoof_TARGET
arp_spoof_VICTIM

optional arguments:
-h, --help show this help message and exit
-v, --verbosity verbosity level
-a ATTACK_TYPE choose supported attack type
-i IFACE choose network interface

supported attacks:
arp_spoof, dhcp_discover_dos, stp_tcn, stp_conf, stp_root

examples:
python pyersinia.py -a arp_spoof 127.0.0.1 127.0.0.1
python pyersinia.py -a stp_root -i eth0


ATSCAN - Server, Site and Dork Scanner

$
0
0


Description:

  • ATSCAN Version 2 
  • Dork scanner. 
  • XSS scanner. 
  • Sqlmap. 
  • LFI scanner.
  • Filter wordpress and Joomla sites in the server. 
  • Find Admin page.
  • Decode / Encode MD5 + Base64. 

Libreries to install:

ap-get install libxml-simple-perl
NOTE: Works in linux platforms.

Permissions & Executution:

$chmod +x atscan.pl 
perl ./atscan.pl

Screenshots: 


credmap - The Credential Mapper

$
0
0


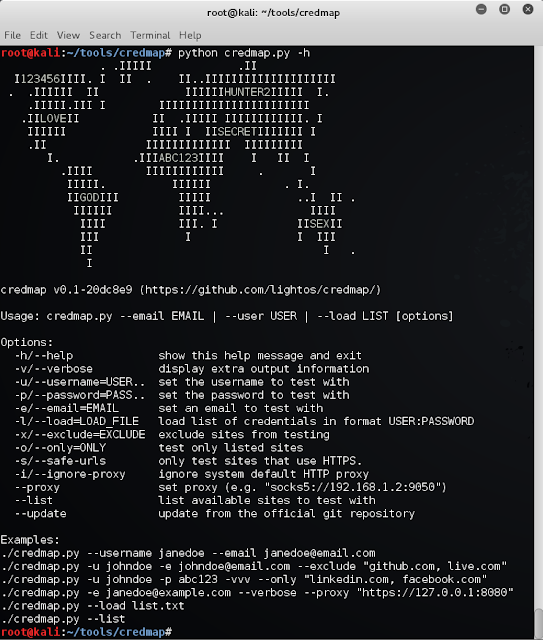
Credmap is an open source tool that was created to bring awareness to the dangers of credential reuse. It is capable of testing supplied user credentials on several known websites to test if the password has been reused on any of these.

Help Menu

Usage: credmap.py --email EMAIL | --user USER | --load LIST [options]

Options:
-h/--help show this help message and exit
-v/--verbose display extra output information
-u/--username=USER.. set the username to test with
-p/--password=PASS.. set the password to test with
-e/--email=EMAIL set an email to test with
-l/--load=LOAD_FILE load list of credentials in format USER:PASSWORD
-x/--exclude=EXCLUDE exclude sites from testing
-o/--only=ONLY test only listed sites
-s/--safe-urls only test sites that use HTTPS.
-i/--ignore-proxy ignore system default HTTP proxy
--proxy=PROXY set proxy (e.g. "socks5://192.168.1.2:9050")
--list list available sites to test with

Examples

./credmap.py --username janedoe --email janedoe@email.com
./credmap.py -u johndoe -e johndoe@email.com --exclude "github.com, live.com"
./credmap.py -u johndoe -p abc123 -vvv --only "linkedin.com, facebook.com"
./credmap.py -e janedoe@example.com --verbose --proxy "https://127.0.0.1:8080"
./credmap.py --load list.txt
./credmap.py --list

Prerequisites

To get started, you will need Python 2.6+ (previous versions may work as well, however I haven't tested them)
  • Python 2.6+
  • Git (Optional)

Running the program

To run credmap, simply execute the main script "credmap.py".
$ python credmap.py -h

Video


Ares - Python Botnet and Backdoor

$
0
0


Ares is made of two main programs:
  • A Command aNd Control server, which is a Web interface to administer the agents
  • An agent program, which is run on the compromised host, and ensures communication with the CNC
The Web interface can be run on any server running Python. You need to install the cherrypy package.
The client is a Python program meant to be compiled as a win32 executable using pyinstaller. It depends on the requests, pythoncom, pyhook python modules and on PIL (Python Imaging Library).

It currently supports:
  • remote cmd.exe shell
  • persistence
  • file upload/download
  • screenshot
  • key logging

Installation

Server

To install the server, first create the sqlite database:
cd server/
python db_init.py
If no installed, install the cherrypy python package.
Then launch the server by issuing: python server.py
By default, the server listens on http://localhost:8080

Agent

The agent can be launched as a python script, but it is ultimately meant to be compiled as a win32 executable using pyinstaller.

First, install all the dependencies:
  • requests
  • pythoncom
  • pyhook
  • PIL
Then, configure agent/settings.py according to your needs:
SERVER_URL = URL of the CNC http server
BOT_ID = the (unique) name of the bot, leave empty to use hostname
DEBUG = should debug messages be printed to stdout ?
IDLE_TIME = time of inactivity before going in idle mode (the agent checks the CNC for commands far less often when idle).
REQUEST_INTERVAL = interval between each query to the CNC when active
Finally, use pyinstaller to compile the agent into a single exe file:
cd client/
pyinstaller --onefile --noconsole agent.py


Domi-Owned - Tool Used for Compromising IBM/Lotus Domino Servers

$
0
0

Domi-Owned is a tool used for compromising IBM/Lotus Domino servers.
Tested on IBM/Lotus Domino 8.5.2, 8.5.3, 9.0.0, and 9.0.1 running on Windows and Linux.

Usage

A valid username and password is not required unless 'names.nsf' and/or 'webadmin.nsf' requires authentication.

Fingerprinting

Running Domi-Owned with just the
--url
flag will attempt to identify the Domino server version, as well as check if 'names.nsf' and 'webadmin.nsf' requires authentication.
If a username and password is given, Domi-Owned will check to see if that account can access 'names.nsf' and 'webadmin.nsf' with those credentials.

Reverse Bruteforce

To perform a Reverse Bruteforce attack against a Domino server, specify a file containing a list of usernames with
-U
, a password with
-p
, and the
--bruteforce
flag. Domi-Owned will then try to authenticate to 'names.nsf', returning successful accounts.

Dump Hashes

To dump all Domino accounts with a non-empty hash from 'names.nsf', run Domi-Owned with the
--hashdump
flag. This prints the results to the screen and writes them to separate out files depending on the hash type (Domino 5, Domino 6, Domino 8).

Quick Console

The Domino Quick Console is active by default; however, it will not show the command's output. A work around to this problem is to redirect the command output to a file, in this case 'log.txt', that is then displayed as a web page on the Domino server.
If the
--quickconsole
flag is given, Domi-Owned will access the Domino Quick Console, through 'webadmin.nsf', allowing the user to issue native Windows or Linux commands. Domi-Owned will then retrieve the output of the command and display the results in real time, through a command line interpreter. Type
exit
to quit the Quick Console interpreter, which will also delete the 'log.txt' output file.

Examples

Fingerprint Domino server

python domi-owned.py --url http://domino-server.com

Preform a reverse bruteforce attack

python domi-owned.py --url http://domino-server.com -U ./usernames.txt -p password --bruteforce

Dump Domino account hashes

python domi-owned.py --url http://domino-server.com -u user -p password --hashdump

Interact with the Domino Quick Console

python domi-owned.py --url http://domino-server.com -u user -p password --quickconsole


YaVol - GUI for Volatility Framework and Yara

$
0
0

This is just another GUI for volatility and yara which could make someone's life easier. It is inteded for Incident responders for quick examination of a memory image. Results are stored in sqlite db for reuse.

1. Installation

Clone repo
  • git clone https://Ft44k@bitbucket.org/Ft44k/yavol.git
  • default forder for yara sigs is /yara_rules

2. Prerequisites

you need to have installed Python (2.7), PyQt4, and sqlite3


Viewing all 5816 articles
Browse latest View live


<script src="https://jsc.adskeeper.com/r/s/rssing.com.1596347.js" async> </script>