Quantcast
Channel: KitPloit - PenTest Tools!
Viewing all 5816 articles
Browse latest View live

AutoReaver - Mutliple Access Point Targets Attack Using Reaver

$
0
0
AutoReaver is bash script which provides multiple access point attack using reaver and BSSIDs list from a text file.

If processed AP reaches rate limit, script goes to another from the list, and so forth.

HOW IT WORKS ?
Script takes AP targets list from text file in following format
BSSID CHANNEL ESSID
For example:
AA:BB:CC:DD:EE:FF 1 MyWlan 
00:BB:CC:DD:EE:FF 13 TpLink
00:22:33:DD:EE:FF 13 MyHomeSSID
And then following steps are being processed:
  • Every line of list file is checked separately in for loop
  • After every AP on the list once, script automatically changes MAC address of your card to random MAC using macchanger (you can also setup your own MAC if you need),
  • Whole list is checked again and again, in endless while loop, until there is nothing to check loop is stopped,
  • Found PINS/WPA PASSPHRASES are stored in {CRACKED_LIST_FILE_PATH} file.

REQUIREMENTS
  • Wireless adapter which supports injection (see [https://code.google.com/p/reaver-wps/wiki/SupportedWirelessDrivers Reaver Wiki])
  • Linux Backtrack 5
  • Root access on your system (otherwise some things may not work)
  • AND if you use other Linux distribution*
    • Reaver 1.4 (I didn't try it with previous versions)
    • KDE (unless you'll change 'konsole' invocations to 'screen', 'gnome-terminal' or something like that... this is easy)
    • Gawk (Gnu AWK)
    • Macchanger
    • Airmon-ng, Airodump-ng, Aireplay-ng
    • Wash (WPS Service Scanner)
    • Perl

USAGE EXAMPLE
First you have to download lastest version
git clone https://code.google.com/p/auto-reaver/
Go to auto-reaver directory
cd ./auto-reaver
Make sure that scripts have x permissions for your user, if not run
chmod 700 ./washAutoReaver
chmod 700 ./autoReaver
Run wash scanner to make a formatted list of Access Points with WPS service enabled
./washAutoReaverList > myAPTargets
Wait for 1-2 minutes for wash to collect APs, and hit CTRL+C to kill the script. Check if any APs were detected
cat ./myAPTargets
If there are targets in myAPTargets file, you can proceed attack, with following command:
./autoReaver myAPTargets

ADDITIONAL FEATURES
  • Script logs dates of PIN attempts, so you can check how often AP is locked and for how long. Default directory for those logs is ReaverLastPinDates.
  • Script logs each AP rate limit for every AP (default directory is /tmp/APLimitBSSID), so you can easily check when last rate limit occured
  • You can setup your attack using variables from configurationSettings file (sleep/wait times between AP`s and loops, etc.)
  • You can disable checking AP by adding "#" sign in the beginning of line, in myAPTargets file (then AP will be ommited in loop)
  • (added 2014-07-03) You can setup specific settings per access point.
    To do that for AP with MAC AA:BB:CC:DD:EE:FF, just create file ./configurationSettingsPerAp/AABBCCDDEEFF
    and put there variables from ./configurationSettings file that you want to change for example:
    ADDITIONAL_OPTIONS="-g 10 -E -S -N -T 1 -t 15 -d 0 -x 3";
so AA:BB:CC:DD:EE:FF will have only ADDITIONAL_OPTIONS changed (rest of variables from ./configurationSettings file remains unchanged).
You can define channel as random by setting it's value (in myAPTargets file) to R, you can force script to automatically find AP channel.
Example:
AA:BB:CC:DD:EE:FF R MyWlan

But remember that you probably should also increase value of BSSID_ONLINE_TIMEOUT variable - since hopping between all channels takes much more time than searching on one channel.


Lynis 2.1.0 - Security Auditing Tool for Unix/Linux Systems

$
0
0

Lynis is an open source security auditing tool. Commonly used by system administrators, security professionals and auditors, to evaluate the security defenses of their Linux/Unix based systems. It runs on the host itself, so it can perform very extensive security scans.

Supported operating systems

The tool has almost no dependencies, therefore it runs on almost all Unix based systems and versions, including:
  • AIX
  • FreeBSD
  • HP-UX
  • Linux
  • Mac OS
  • NetBSD
  • OpenBSD
  • Solaris
  • and others
It even runs on systems like the Raspberry Pi and several storage devices!

No installation required

The tool is very flexible and easy to use. It is one of the few tools, in which installation is optional. Just place it on the system, give it a command like "audit system", and it will run. It is written in shell script and released as open source software (GPL).

How it works

Lynis performs hundreds of individual tests, to determine the security state of the system. The security scan itself consists of performing a set of steps, from initialization the program, up to the report.

Steps
  1. Determine operating system
  2. Search for available tools and utilities
  3. Check for Lynis update
  4. Run tests from enabled plugins
  5. Run security tests per category
  6. Report status of security scan
During the scan, technical details about the scan are stored in a log file. At the same time findings (warnings, suggestions, data collection), are stored in a report file.

Opportunistic scanning

Lynis scanning is opportunistic: it uses what it can find.
For example if it sees you are running Apache, it will perform an initial round of Apache related tests. When during the Apache scan it also discovers a SSL/TLS configuration, it will perform additional auditing steps on that. While doing that, it then will collect discovered certificates, so they can be scanned later as well.

In-depth security scans

By performing opportunistic scanning, the tool can run with almost no dependencies. The more it finds, the deeper the audit will be. In other words, Lynis will always perform scans which are customized to your system. No audit will be the same!

Use cases

Since Lynis is flexible, it is used for several different purposes. Typical use cases for Lynis include:
  • Security auditing
  • Compliance testing (e.g. PCI, HIPAA, SOx)
  • Vulnerability detection and scanning
  • System hardening

Resources used for testing

Many other tools use the same data files for performing tests. Since Lynis is not limited to a few common Linux distributions, it uses tests from standards and many custom ones not found in any other tool.
  • Best practices
  • CIS
  • NIST
  • NSA
  • OpenSCAP data
  • Vendor guides and recommendations (e.g. Debian Gentoo, Red Hat)

Lynis Plugins

Plugins enable the tool to perform additional tests. They can be seen as an extension (or add-on) to Lynis, enhancing its functionality. One example is the compliance checking plugin, which performs specific tests only applicable to some standard.

Comparison with other tools

Lynis has a different way of doing things, so you have more flexibility. After all, you should be the one deciding what security controls make sense for your environment. We have a small comparison with some other well known tools:

Bastille Linux

Bastille was for a long time the best known utility for hardening Linux systems. It focuses mainly on automatically hardening the system.
Differences with Bastille
Automated hardening tools are helpful, but at the same time might give a false sense of security. Instead of just turning on some settings, Lynis perform an in-depth security scan. You are the one to decide what level of security is appropriate for your environment. After all, not all systems have to be like Fort Knox, unless you want it to be.

Benefits of Lynis
  • Supports more operating systems
  • Won't break your system
  • More in-depth audit


OpenVAS / Nessus

These products focus primarily on vulnerability scanning. They do this via the network by polling services. Optionally they will log in to a system and gather data.
Differences with OpenVAS / Nessus
Lynis runs on the host itself, therefore it can perform a deeper analysis compared with network based scans. Additionally, there is no risk for your business processes, and log files remain clean from connection attempts and incorrect requests.
Although Lynis is an auditing tool, it will actually discover vulnerabilities as well. It does so by using existing tools and analyzing configuration files.
Lynis and OpenVAS are both open source and free to use. Nessus is a closed source and paid.

Benefits of Lynis
  • Much faster
  • No pollution of log files, no disruption to business services
  • Host based scans provides more in-depth audit

Changelog
Lynis 2.1.0
 = Lynis 2.1.0 (2015-04-16) =

General:
---------
Screen output has been improved to provide additional information.

OS support:
------------
CUPS detection on Mac OS has been improved. AIX systems will now use csum
utility to create host ID. Group check have been altered on AIX, to include
the -n ALL. Core dump check on Linux is extended to check for actual values
as well.

Software:
----------
McAfee detection has been extended by detecting a running cma binary.
Improved detection of pf firewall on BSD and Mac OS. Security patch checking
with zypper extended.

Session timeout:
-----------------
Tests to determine shell time out setting have been extended to account for
AIX, HP-UX and other platforms. It will now determine also if variable is
exported as a readonly variable. Related compliance section PCI DSS 8.1.8
has been extended.

Documentation:
---------------
- New document: Getting started with Lynis
https://cisofy.com/documentation/lynis/get-started/

Plugins (Enterprise):
----------------------
- Update to file integrity plugin
Changes to PLGN-2606 (capabilities check)

- New configuration plugins:
PLGN-4802 (SSH settings)
PLGN-4804 (login.defs)


Net-creds - Sniff passwords and hashes from an interface or pcap file

$
0
0


Thoroughly sniff passwords and hashes from an interface or pcap file. Concatenates fragmented packets and does not rely on ports for service identification.

Sniffs
  • URLs visited
  • POST loads sent
  • HTTP form logins/passwords
  • HTTP basic auth logins/passwords
  • HTTP searches
  • FTP logins/passwords
  • IRC logins/passwords
  • POP logins/passwords
  • IMAP logins/passwords
  • Telnet logins/passwords
  • SMTP logins/passwords
  • SNMP community string
  • NTLMv1/v2 all supported protocols like HTTP, SMB, LDAP, etc
  • Kerberos

Examples

Auto-detect the interface to sniff
sudo python net-creds.py
Choose eth0 as the interface
sudo python net-creds.py -i eth0
Ignore packets to and from 192.168.0.2
sudo python net-creds.py -f 192.168.0.2
Read from pcap
python net-creds.py -p pcapfile


Rekall - The Most Complete Memory Analysis Framework

$
0
0

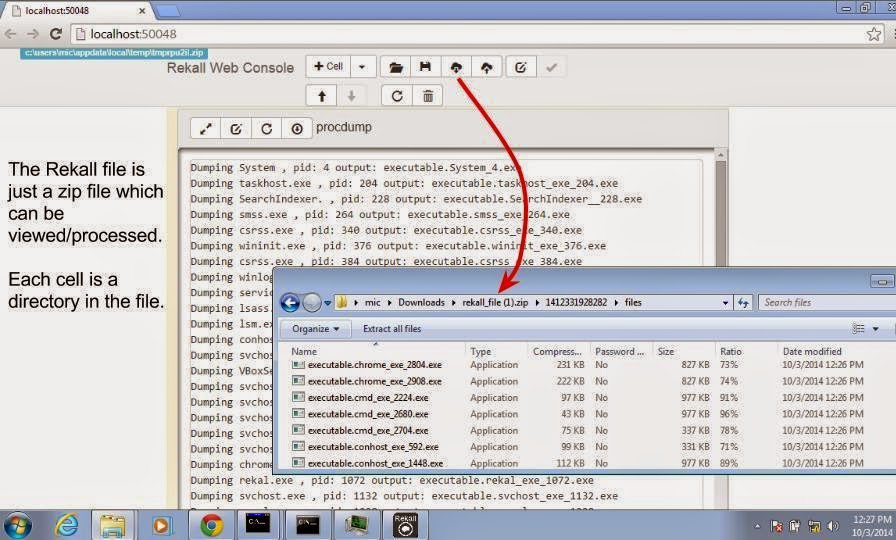
The Rekall Framework is a completely open collection of tools, implemented in Python under the GNU General Public License, for the extraction of digital artifacts from volatile memory (RAM) samples. The extraction techniques are performed completely independent of the system being investigated but offer visibilty into the runtime state of the system. The framework is intended to introduce people to the techniques and complexities associated with extracting digital artifacts from volatile memory samples and provide a platform for further work into this exciting area of research.

The Rekall distribution is available from: http://www.rekall-forensic.com/
Rekall should run on any platform that supports Python (http://www.python.org)

Rekall supports investigations of the following x86 bit memory images:
  • Microsoft Windows XP Service Pack 2 and 3
  • Microsoft Windows 7 Service Pack 0 and 1
  • Linux Kernels 2.6.24 to 3.10.
  • OSX 10.6-10.8.
Rekall also provides a complete memory sample acquisition capability for all major operating systems (see the tools directory).

Quick start

Rekall is available as a python package installable via the pip package manager. Simply type (for example on Linux):
sudo pip install rekall
You might need to specifically allow pre-release software to be included (until Rekall makes a major stable release):
sudo pip install --pre rekall
To have all the dependencies installed. You still need to have python and pip installed first.
To be able to run the ipython notebook, the following are also required:
pip install Jinja2 MarkupSafe Pygments astroid pyzmq tornado wsgiref
For windows, Rekall is also available as a self contained installer package. Please check the download page for the most appropriate installer to use.

Development version

For development it is easier to install rekall inside a virtual env. Virtual Env is a way for containing and running multiple versions of python packages at the same time, without interfering with the host system.
# You might need to install virtualenv:
$ sudo apt-get install python-virtualenv

# This will build a new empty python environment.
$ virtualenv /tmp/Test

# Now we switch to the environment - all python code runs from here.
$ source /tmp/Test/bin/activate

# This will install all dependencied into the virtual environment.
$ pip install --pre rekall

# For development run the devel version
$ git clone https://github.com/google/rekall.git
$ cd rekall
$ python setup.py develop
When done you can just remove the /tmp/Test directory.


Burp Suite Professional v1.6.16 - The Leading Toolkit for Web Application Security Testing

$
0
0

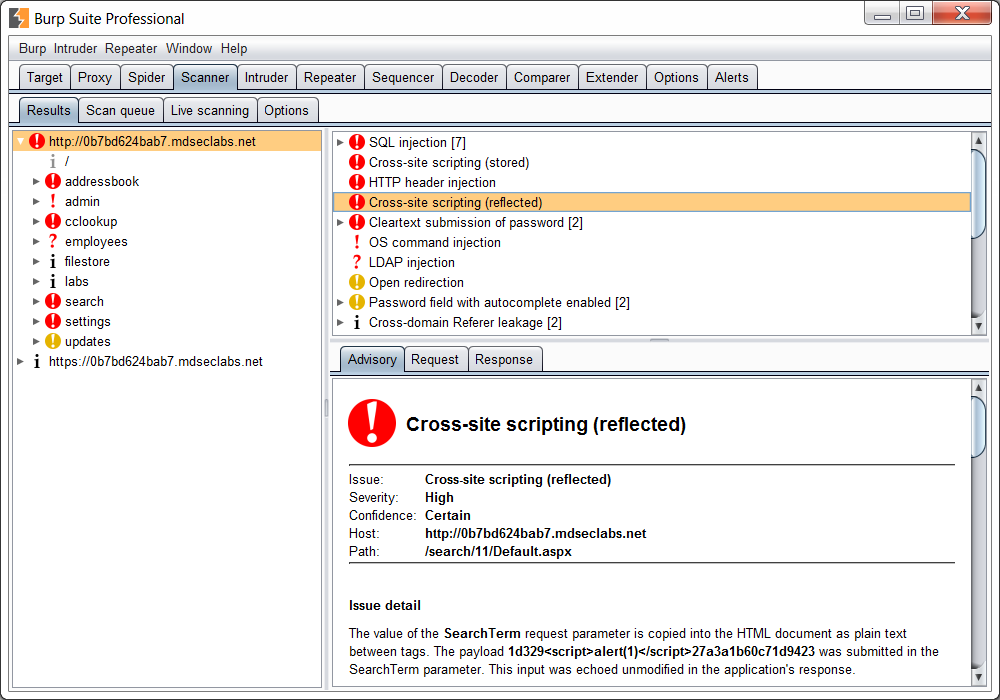
Burp Suite is an integrated platform for performing security testing of web applications. Its various tools work seamlessly together to support the entire testing process, from initial mapping and analysis of an application's attack surface, through to finding and exploiting security vulnerabilities.
Burp gives you full control, letting you combine advanced manual techniques with state-of-the-art automation, to make your work faster, more effective, and more fun.

Burp Suite contains the following key components:
  • An intercepting Proxy, which lets you inspect and modify traffic between your browser and the target application.
  • An application-aware Spider, for crawling content and functionality.
  • An advanced web application Scanner, for automating the detection of numerous types of vulnerability.
  • An Intruder tool, for performing powerful customized attacks to find and exploit unusual vulnerabilities.
  • A Repeater tool, for manipulating and resending individual requests.
  • A Sequencer tool, for testing the randomness of session tokens.
  • The ability to save your work and resume working later.
  • Extensibility, allowing you to easily write your own plugins, to perform complex and highly customized tasks within Burp.

Burp is easy to use and intuitive, allowing new users to begin working right away. Burp is also highly configurable, and contains numerous powerful features to assist the most experienced testers with their work.

Release Notes

v1.6.15

This release introduces a brand new feature: Burp Collaborator.

Burp Collaborator is an external service that Burp can use to help discover many kinds of vulnerabilities, and has the potential to revolutionize web security testing. In the coming months, we will be adding many exciting new capabilities to Burp, based on the Collaborator technology.
This release is officially beta due to the introduction of some new types of Scanner checks, and the reliance on a new service infrastructure. However, we have tested the new capabilities thoroughly and are not aware of any stability issues.

v1.6.16

This release fixes some issues with yesterday's beta release of the new Burp Collaborator feature, including a bug that may cause Burp to sometimes send some Collaborator-related test payloads even if the user has disabled use of the Collaborator feature.

This release is still officially beta while we monitor the Burp Collaborator capabilities for any further issues.


Sptoolkit Rebirth - Phishing Education Toolkit

$
0
0

The spt (rebirth) project is an open source phishing education toolkit that aims to help in securing the mind as opposed to securing computers. Organizations spend billions of dollars annually in an effort to safeguard information systems, but spend little to nothing on the under trained and susceptible minds that operate these systems, thus rendering most technical protections instantly ineffective. A simple, targeted link is all it takes to bypass the most advanced security protections. The link is clicked, the deed is done.

spt was developed from the ground up to provide a simple and easy to use framework to identify your weakest links so that you can patch the human vulnerability. If the spt project sounds interesting to you, please consider downloading it for evaluation in your own organization. Feedback is welcomed and always appreciated.

INSTALLATION

The Basics
  1. Create and configure the MySQL database. spt will need a MySQL database to house its data, so go ahead and create that database and configure the associated user account for the new database with ALL PRIVILEGES assigned to it. Be sure you record the database name, user name and password in a safe place, you'll need it soon to install spt!
  2. Ensure you have PHP 5.4
  3. Extract the spt files from the archive.
  4. Create a new directory on your web server, such as "spt" and upload the files to the directory.

Install spt
  1.  Open your web browser and navigate to the location where you uploaded the files and browse to install.php. For example, http://www.myhost.com/spt/install.php. If you accidentally just go to the root of the folder you placed the files in, you will be prompted to start the installation by clicking the right pointing arrow.
  2. When prompted to accept the GNU General Public License, click the "I Agree!" button. For reference, you can read the full text of the license in the license.htm file included in the root of the extracted files.
  3. On the next page, you will get feedback on the readiness of your server to install the spt. You can learn more about any failed items by hovering over the icon. Click the “Proceed!” button if all checks passed, or click the “Proceed Anyways” button if one of the checks failed and you have verified that the spt installer is reporting incorrectly.
  4. On the next page, you will need to provide those database details from earlier. The default server and database ports are provided, be sure to change them if your installation will require something else. Enter in the remaining required information and click the "Install Database!" button to get things moving along.
  5. If all goes well, you will see a listing of tables that have been successfully created. Click "Continue!" to move on.
  6. If instead you see an error indicated, click the "<back" button to go back and enter the database information again.
  7. Now it's time to create your first user, for you! Enter your first and last name, email address and password and click the "Create User" button to continue on.
  8. If you receive any errors, such as for an invalid email address or a password that does not meet the complexity requirements, click the "<back" button and try it again.
  9. Once you enter the required information successfully, you will receive confirmation. Click the "Proceed to Login" button to get logged into the spt!
  10. Now it's time to login using the email address and password you entered in the previous step. See, that was easy!


MobaXterm - Terminal for Windows with X11 server, tabbed SSH client, network tools and much more...

$
0
0

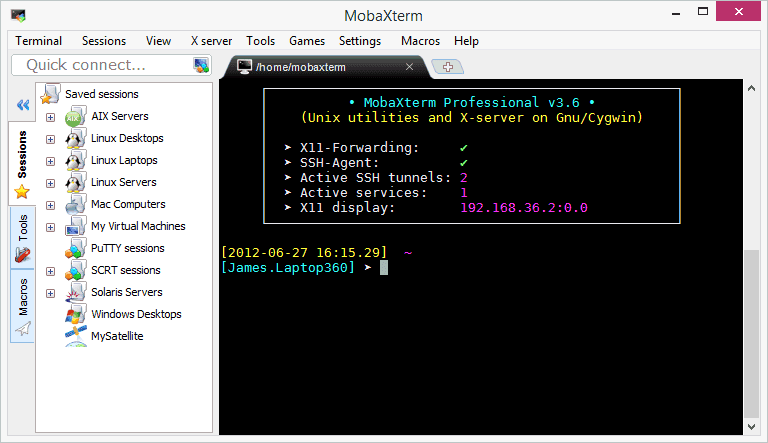
MobaXterm is your ultimate toolbox for remote computing. In a single Windows application, it provides loads of functions that are tailored for programmers, webmasters, IT administrators and pretty much all users who need to handle their remote jobs in a more simple fashion.

MobaXterm provides all the important remote network tools (SSH, X11, RDP, VNC, FTP, MOSH, ...) and Unix commands (bash, ls, cat, sed, grep, awk, rsync, ...) to Windows desktop, in a single portable exe file which works out of the box.

There are many advantages of having an All-In-One network application for your remote tasks, e.g. when you use SSH to connect to a remote server, a graphical SFTP browser will automatically pop up in order to directly edit your remote files. Your remote applications will also display seamlessly on your Windows desktop using the embedded X server.

You can download and use MobaXterm Home Edition for free. If you want to use it inside your company, you should consider subscribing to MobaXterm Professional Edition: this will give you access to much more features, professional support and "Customizer" software.

When developing MobaXterm, we focused on a simple aim: proposing an intuitive user interface in order for you to efficiently access remote servers through different networks or systems.

Key features

Embedded X serverFully configured Xserver based on X.org
Easy DISPLAY exportationDISPLAY is exported from remote Unix to local Windows
X11-Forwarding capabilityYour remote display uses SSH for secure transport
Tabbed terminal with SSHBased on PuTTY/MinTTY with antialiased fonts and macro support
Many Unix/Linux commands on WindowsIncludes basic Cygwin commands (bash, grep, awk, sed, rsync,...)
Add-ons and pluginsYou can extend MobaXterm capabilities with plugins
Versatile session managerAll your network tools in one app: Rdp, Vnc, Ssh, Mosh, X11, ...
Portable and light applicationMobaXterm has been packaged as a single executable which does not require admin rights and which you can start from an USB stick
Professional applicationMobaXterm Professional has been designed for security and stability for very challenging people

MobaXterm plugins

Corkscrew: Corkscrew allows to tunnel TCP connections through HTTP proxies
Curl: Curl is a command line tool for transferring data with URL syntax
CvsClient: A command line tool to access CVS repositories
Gcc, G++ and development tools: the GNU C/C++ compiler and other development tools
DnsUtils: This plugin includes some useful utilities for host name resolution:
dig, host, nslookup and nsupdate.
E2fsProgs: Utilities for creating, fixing, configuring, and debugging ext2/3/4 filesystems.
Emacs: The extensible, customizable, self-documenting real-time display editor
Exif: Command-line utility to show EXIF information hidden in JPEG files.
FVWM2: A light but powerful window manager for X11.
File: Determines file type using magic numbers.
Fontforge: A complete font editor with many features
GFortran: The GNU Fortran compiler.
Git: A fast and powerful version control system.
Gvim: The Vim editor with a GTK interface
Httperf: A tool for measuring web server performance.
Joe: Fast and simple editor which emulates 5 other editors.
Lftp: Sophisticated file transfer program and ftp/http/bittorrent client.
Lrzsz: Unix communication package providing the XMODEM, YMODEM ZMODEM file transfer protocols.
Lynx: A text-mode web browser.
MPlayer: The ultimate video player
Midnight Commander: Midnight Commander is a feature rich text mode visual file manager.
Mosh: MOSH has been included into MobaXterm main executable in version 7.1 directly in the sessions manager. This plugin is deprecated.
Multitail: Program for monitoring multiple log files, in the fashion of the original tail program.
NEdit: NEdit is a multi-purpose text editor for the X Window System.
Node.js: Node.js is a platform built on Chrome's JavaScript runtime for easily building fast, scalable network applications. This plugin does not include NPM.
OpenSSL: A toolkit implementing SSL v2/v3 and TLS protocols.
PdKsh: A KSH shell open-source implementation.
Perl: Larry Wall's Practical Extracting and Report Language
Png2Ico: Png2Ico Converts PNG files to Windows icon resource files.
Python: An interpreted, interactive object-oriented programming language.
Ruby: Interpreted object-oriented scripting language.
Screen: Screen is a terminal multiplexer and window manager that runs many separate 'screens' on a single physical character-based terminal.
Sqlite3: Software library that implements a self-contained, serverless, zero-configuration, transactional SQL database engine.
SquashFS: mksquashfs and unsquashfs tools allow you to create/unpack squashfs filesystems from Windows.
Subversion (SVN): Subversion is a powerful version control system.
Tcl / Tk / Expect: Tcl is a simple-to-learn yet very powerful language. Tk is its graphical toolkit. Expect is an automation tool for terminal.
X11Fonts: Complete set of fonts for X11 server.
X3270Suite: IBM 3270 terminal emulator for Windows.
XServers: Xephyr, Xnest, Xdmx, Xvfb and Xfake alternate X11 servers.
Xmllint: A command line XML tool.
Xorg (legacy): The old X11 (Xorg v1.6.5) server: use this plugin if you have trouble connecting to an old Unix station through XDMCP.
Zip: Zip compression utility.


Packet Sender - The UDP and TCP Network Test Utility

$
0
0

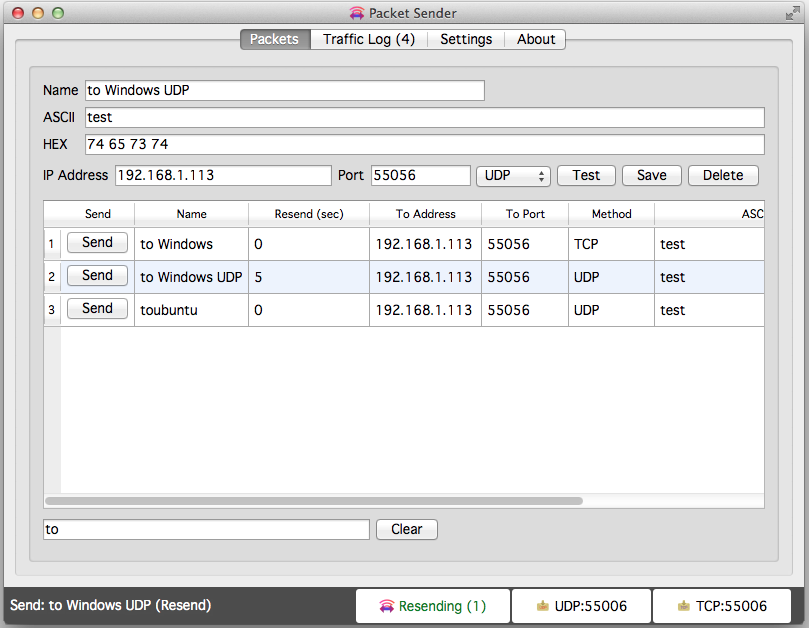
Packet Sender is an open source utility to allow sending and receiving TCP and UDP packets. It is available free (no ads / no bundleware) for Windows, Mac, and Linux. It can be used for both commercial and personal use (license). It's designed to be very easy to use while still providing enough features for power users to do what they need.

Mobile 

The native mobile versions have been abandoned to focus on the more popular and more capable desktop version. However, the GitHub projects for bothiOS and Android are MIT Licensed and available for forking.


Change log
  • Version 2015-04-19
    • Portable mode
    • Read in file from command line
    • Save traffic log
    • Mobile versions have been abandoned. Project focus is now on the far more popular desktop version.
  • Version 2015-02-13
    • Migrated to GitHub
    • New vector-based logo
    • Bug fix in quick-disable/enable
    • Migrated to Qt 5.4
    • Ubuntu version brought up to date.
    • Forums are closed (spammers killed it).
  • Version 2014-10-07
    • Initial launch of forums.
    • Multi-Send.
    • Quick-send from traffic log selected packets.
    • Packet Export/Import.
    • Rolling traffic log support.
    • Numerous configuration settings added:
      • Copy raw packet data to clipboard.
      • Receive before send.
      • Connection delays for slow devices.
    • Command line interface default binds to 0.
    • Universal (XP through 8.1) Windows installer.
    • Migrated to Qt 5.3
    • Some rework of the "About" section.
  • Version 2014-02-22
    • TCP connections are now fully threaded (no more UI freezes).
    • Brand new and highly capable command line interface. (Run PacketSender --help)
    • Some mild UI enhancements to make sending easier.
    • Ubuntu version brought up to date.
    • Windows XP now separated.
    • Qt 5.2
  • Version 1.5 (Mobile)
    • Android version released.
  • Version 2013-11-18
    • Copy to Clipboard button on traffic log.
    • Name prompt for traffic log.
  • Version 2013-11-11
    • Bad installer on Windows. No other changes made.
  • Version 2013-11-09
    • Searching packets from traffic log.
    • Fixed some traffic log stability problems.
  • Version 2013-11-05
    • Added resending packets at user-specified intervals.
    • Traffic log sped up significantly.
    • Packet searching.
    • Table headers (both saved packets and traffic log) can be rearranged.
    • Response packet for TCP actually works now.
    • Response packet data can be manually updated.
    • About / License stuff moved to another tab.
    • Internal libraries updated.
  • Version 2013-10-20
    • 64-bit Ubuntu and Linux Mint support.
  • Version 2013-10-14
    • Ubuntu and Linux Mint support.
  • Version 2013-05-20
    • Saving is less quirky.
    • Domain names can be used in IP address line. Packet Sender will do a quick lookup to find the IP.
    • Internal libraries updated.
  • Version 2012-09-12
    • Public release of deskop version.


BackBox Linux 4.2 - Ubuntu-based Linux Distribution Penetration Test and Security Assessment

$
0
0

BackBox is a Linux distribution based on Ubuntu. It has been developed to perform penetration tests and security assessments. Designed to be fast, easy to use and provide a minimal yet complete desktop environment, thanks to its own software repositories, always being updated to the latest stable version of the most used and best known ethical hacking tools.

The BackBox Team is pleased to announce the updated release of BackBox Linux, the version 4.2! This release includes features such as Linux Kernel 3.16 and Ruby 2.1.

What's new
  • Preinstalled Linux Kernel 3.16
  • New Ubuntu 14.04.2 base
  • Ruby 2.1
  • Installer with LVM and Full Disk Encryption options
  • Handy Thunar custom actions
  • RAM wipe at shutdown/reboot
  • System improvements
  • Upstream components
  • Bug corrections
  • Performance boost
  • Improved Anonymous mode
  • Predisposition to ARM architecture (armhf Debian packages)
  • Predisposition to BackBox Cloud platform
  • New and updated hacking tools: beef-project, crunch, fang, galleta, jd-gui, metasploit-framework, pasco, pyew, rifiuti2, setoolkit, theharvester, tor, torsocks, volatility, weevely, whatweb, wpscan, xmount, yara, zaproxy
System requirements
  • 32-bit or 64-bit processor
  • 512 MB of system memory (RAM)
  • 6 GB of disk space for installation
  • Graphics card capable of 800×600 resolution
  • DVD-ROM drive or USB port (2 GB)

Tor Browser 4.5 - Everything you Need to Safely Browse the Internet

$
0
0

The Tor software protects you by bouncing your communications around a distributed network of relays run by volunteers all around the world: it prevents somebody watching your Internet connection from learning what sites you visit, it prevents the sites you visit from learning your physical location, and it lets you access sites which are blocked.

The Tor Browser lets you use Tor on Windows, Mac OS X, or Linux without needing to install any software. It can run off a USB flash drive, comes with a pre-configured web browser to protect your anonymity, and is self-contained.

The 4.5 series provides significant usability, security, and privacy enhancements over the 4.0 series. Because these changes are significant, we will be delaying the automatic update of 4.0 users to the 4.5 series for one week.

Usability Improvements

On the usability front, we've improved the application launch experience for both Windows and Linux users. During install, Windows users are now given the choice to add Tor Browser to the Start Menu/Applications view, which should make it easier to find and launch. This choice is on by default, but can be disabled, and only affects the creation of shortcuts - the actual Tor Browser is still self-contained as a portable app folder. On the Linux side, users now start Tor Browser through a new wrapper that enables launching from the File Manager, the Desktop, or the Applications menu. The same wrapper can also be used from the command line.
We've also simplified the Tor menu (the green onion) and the associated configuration windows. The menu now provides information about the current Tor Circuit in use for a page, and also provides an option to request a new Tor Circuit for a site. Tor Browser is also much better at handling Tor Circuits in general: while a site remains in active use, all associated requests will continue to be performed over the same Tor Circuit. This means that sites should no longer suddenly change languages, behaviors, or log you out while you are using them.

Figure 1: The new Tor Onion Menu


Security Improvements

On the security front, the most exciting news is the new Security Slider. The Security Slider provides user-friendly vulnerability surface reduction - as the security level is increased, browser features that were shown to have a high historical vulnerability count in the iSec Partners hardening study are progressively disabled. This feature is available from the Tor onion menu's "Privacy and Security Settings" choice.

Figure 2: The new Security Slider

Our Windows packages are now signed with a hardware signing token graciously donated by DigiCert. This means that Windows users should no longer be prompted about Tor Browser coming from an unknown source. Additionally, our automatic updates are now individually signed with an offline signing key. In both cases, these signatures can be reproducibly removed, so that builders can continue to verify that the packages they produce match the official build binaries.
The 4.5 series also features a rewrite of the obfs2, obfs3, and ScrambleSuit transports in GoLang, as well as the introduction of the new obfs4 transport. The obfs4 transport provides additional DPI and probing resistance features which prevent automated scanning for Tor bridges. As long as they are not discovered via other mechanisms, fresh obfs4 bridge addresses will work in China today. Additionally, barring new attacks, private obfs4 addresses should continue to work indefinitely.

Privacy Improvements

On the privacy front, the 4.5 series improves on our pre-existing first party isolation implementation to prevent third party tracking. First party isolation provides the property that third party advertisements, "like buttons", or "mashup" content that is included on one site will at most only know about your activity on that site, and will not be able to match it to your activity while you are on any other site. In other words, with first party isolation, Facebook, Twitter, and Google+ can't track you around the entire web using their infamous like buttons.
Specifically, in the 4.5 release, we now ensure that blob: URIs are scoped to the URL bar domain that created them, and the SharedWorker API has been disabled to prevent cross-site and third party communication. We also now make full use of Tor's circuit isolation to ensure that all requests for any third party content included by a site travel down the same Tor Circuit. This isolation also ensures that requests to the same third party site actually use separate Tor Circuits when the URL bar domain is different. This request isolation is enforced even when long-lived "HTTP Keep-Alive" connections are used.

We have also improved our resolution and locale fingerprinting defenses, and we now disable the device sensor and video statistics APIs.

New Search Provider

Our default search provider has also been changed to Disconnect. Disconnect provides private Google search results to Tor users without Captchas or bans.

Full Changelogs

Here is the complete list of changes in the 4.5 series since 4.0:
  • All Platforms
    • Update Tor to 0.2.6.7 with additional patches:
      • Bug 15482: Reset timestamp_dirty each time a SOCKSAuth circuit is used
    • Update NoScript to 2.6.9.22
    • Update HTTPS-Everywhere to 5.0.3
      • Bug 15689: Resume building HTTPS-Everywhere from git tags
    • Update meek to 0.17
    • Include obfs4proxy 0.0.5
      • Use obfs4proxy for obfs2, obfs3, obfs4, and ScrambleSuit bridges
    • Pluggable Transport Dependency Updates:
      • Bug 15265: Switch go.net repo to golang.org/x/net
      • Bug 15448: Use golang 1.4.2 for meek and obs4proxy
    • Update Tor Launcher to 0.2.7.4. Changes since 0.2.7.0.2 in 4.0.8:
      • Bug 11879: Stop bootstrap if Cancel or Open Settings is clicked
      • Bug 13271: Display Bridge Configuration wizard pane before Proxy pane
      • Bug 13576: Don't strip "bridge" from the middle of bridge lines
      • Bug 13983: Directory search path fix for Tor Messanger+TorBirdy
      • Bug 14122: Hide logo if TOR_HIDE_BROWSER_LOGO set
      • Bug 14336: Fix navigation button display issues on some wizard panes
      • Bug 15657: Display the host:port of any connection faiures in bootstrap
      • Bug 15704: Do not enable network if wizard is opened
    • Update Torbutton to 1.9.2.2. Changes since 1.7.0.2 in 4.0.8:
      • Bug 3455: Use SOCKS user+pass to isolate all requests from the same url domain
      • Bug 5698: Use "Tor Browser" branding in "About Tor Browser" dialog
      • Bug 7255: Warn users about maximizing windows
      • Bug 8400: Prompt for restart if disk records are enabled/disabled.
      • Bug 8641: Create browser UI to indicate current tab's Tor circuit IPs
        • (Many Circuit UI issues were fixed during 4.5; see release changelogs for those).
      • Bug 9387: Security Slider 1.0
        • Include descriptions and tooltip hints for security levels
        • Notify users that the security slider exists
        • Make use of new SVG, jar, and MathML prefs
      • Bug 9442: Add New Circuit button to Torbutton menu
      • Bug 9906: Warn users before closing all windows and performing new identity.
      • Bug 10216: Add a pref to disable the local tor control port test
      • Bug 10280: Strings and pref for preventing plugin initialization.
      • Bug 11175: Remove "About Torbutton" from onion menu.
      • Bug 11236: Don't set omnibox order in Torbutton (to prevent translation)
      • Bug 11449: Fix new identity error if NoScript is not enabled
      • Bug 13019: Change locale spoofing pref to boolean
      • Bug 13079: Option to skip control port verification
      • Bug 13406: Stop directing users to download-easy.html.en on update
      • Bug 13650: Clip initial window height to 1000px
      • Bugs 13751+13900: Remove SafeCache cache isolation code in favor of C++ patch
      • Bug 13766: Set a 10 minute circuit lifespan for non-content requests
      • Bug 13835: Option to change default Tor Browser homepage
      • Bug 13998: Handle changes in NoScript 2.6.9.8+
      • Bug 14100: Option to hide NetworkSettings menuitem
      • Bug 14392: Don't steal input focus in about:tor search box
      • Bug 14429: Provide automatic window resizing, but disable for now
      • Bug 14448: Restore Torbutton menu operation on non-English localizations
      • Bug 14490: Use Disconnect search in about:tor search box
      • Bug 14630: Hide Torbutton's proxy settings tab.
      • Bug 14631: Improve profile access error msgs (strings for translation).
      • Bugs 14632+15334: Display Cookie Protections only if disk records are enabled
      • Bug 15085: Fix about:tor RTL text alignment problems
      • Bug 15460: Ensure FTP urls use content-window circuit isolation
      • Bug 15502: Wipe blob: URIs on New Identity
      • Bug 15533: Restore default security level when restoring defaults
      • Bug 15562: Bind SharedWorkers to thirdparty pref
    • Bug 3455: Patch Firefox SOCKS and proxy filters to allow user+pass isolation
    • Bug 4100: Raise HTTP Keep-Alive back to 115 second default
    • Bug 5698: Fix branding in "About Torbrowser" window
    • Bug 10280: Don't load any plugins into the address space by default
    • Bug 11236: Fix omnibox order for non-English builds
      • Also remove Amazon, eBay and bing; add Youtube and Twitter
    • Bug 11955: Backport HTTPS Certificate Pinning patches from Firefox 32
    • Bug 12430: Provide a preference to disable remote jar: urls
    • Bugs 12827+15794: Create preference to disable SVG images (for security slider)
    • Bug 13019: Prevent Javascript from leaking system locale
    • Bug 13379: Sign our MAR update files
    • Bug 13439: No canvas prompt for content callers
    • Bug 13548: Create preference to disable MathML (for security slider)
    • Bug 13586: Make meek use TLS session tickets (to look like stock Firefox).
    • Bug 13684: Backport Mozilla bug #1066190 (pinning issue fixed in Firefox 33)
    • Bug 13788: Fix broken meek in 4.5-alpha series
    • Bug 13875: Spoof window.devicePixelRatio to avoid DPI fingerprinting
    • Bug 13900: Remove 3rd party HTTP auth tokens via Firefox patch
    • Bug 14392: Make about:tor hide itself from the URL bar
    • Bug 14490: Make Disconnect the default omnibox search engine
    • Bug 14631: Improve startup error messages for filesystem permissions issues
    • Bugs 14716+13254: Fix issues with HTTP Auth usage and TLS connection info display
    • Bug 14937: Hard-code meek and flashproxy node fingerprints
    • Bug 15029: Don't prompt to include missing plugins
    • Bug 15406: Only include addons in incremental updates if they actually update
    • Bug 15411: Remove old (and unused) cacheDomain cache isolation mechanism
    • Bug 15502: Isolate blob: URI scope to URL domain; block WebWorker access
    • Bug 15562: Disable Javascript SharedWorkers due to third party tracking
    • Bug 15757: Disable Mozilla video statistics API extensions
    • Bug 15758: Disable Device Sensor APIs
  • Linux
    • Bug 12468: Only print/write log messages if launched with --debug
    • Bug 13375: Create a hybrid GUI/desktop/shell launcher wrapper
    • Bug 13717: Make sure we use the bash shell on Linux
    • Bug 15672: Provide desktop app registration+unregistration for Linux
    • Bug 15747: Improve start-tor-browser argument handling
  • Windows
    • Bug 3861: Begin signing Tor Browser for Windows the Windows way
    • Bug 10761: Fix instances of shutdown crashes
    • Bug 13169: Don't use /dev/random on Windows for SSP
    • Bug 14688: Create shortcuts to desktop and start menu by default (optional)
    • Bug 15201: Disable 'runas Administrator' codepaths in updater
    • Bug 15539: Make installer exe signatures reproducibly removable
  • Mac
    • Bug 10138: Switch to 64bit builds for MacOS
Here is the list of changes since the last 4.5 alpha (4.5a5):

  • All Platforms
    • Update Tor to 0.2.6.7 with additional patches:
      • Bug 15482: Reset timestamp_dirty each time a SOCKSAuth circuit is used
    • Update NoScript to 2.6.9.22
    • Update HTTPS-Everywhere to 5.0.3
      • Bug 15689: Resume building HTTPS-Everywhere from git tags
    • Update meek to 0.17
    • Update obfs4proxy to 0.0.5
    • Update Tor Launcher to 0.2.7.4
      • Bug 15704: Do not enable network if wizard is opened
      • Bug 11879: Stop bootstrap if Cancel or Open Settings is clicked
      • Bug 13576: Don't strip "bridge" from the middle of bridge lines
      • Bug 15657: Display the host:port of any connection faiures in bootstrap
    • Update Torbutton to 1.9.2.2
      • Bug 15562: Bind SharedWorkers to thirdparty pref
      • Bug 15533: Restore default security level when restoring defaults
      • Bug 15510: Close Tor Circuit UI control port connections on New Identity
      • Bug 15472: Make node text black in circuit status UI
      • Bug 15502: Wipe blob URIs on New Identity
      • Bug 15795: Some security slider prefs do not trigger custom checkbox
      • Bug 14429: Disable automatic window resizing for now
    • Bug 4100: Raise HTTP Keep-Alive back to 115 second default
    • Bug 13875: Spoof window.devicePixelRatio to avoid DPI fingerprinting
    • Bug 15411: Remove old (and unused) cacheDomain cache isolation mechanism
    • Bugs 14716+13254: Fix issues with HTTP Auth usage and TLS connection info display
    • Bug 15502: Isolate blob URI scope to URL domain; block WebWorker access
    • Bug 15794: Crash on some pages with SVG images if SVG is disabled
    • Bug 15562: Disable Javascript SharedWorkers due to third party tracking
    • Bug 15757: Disable Mozilla video statistics API extensions
    • Bug 15758: Disable Device Sensor APIs
  • Linux
    • Bug 15747: Improve start-tor-browser argument handling
    • Bug 15672: Provide desktop app registration+unregistration for Linux
  • Windows
    • Bug 15539: Make installer exe signatures reproducibly removable
    • Bug 10761: Fix instances of shutdown crashes  


GoAccess - Real-time Web Log Analyzer and Interactive Viewer

$
0
0

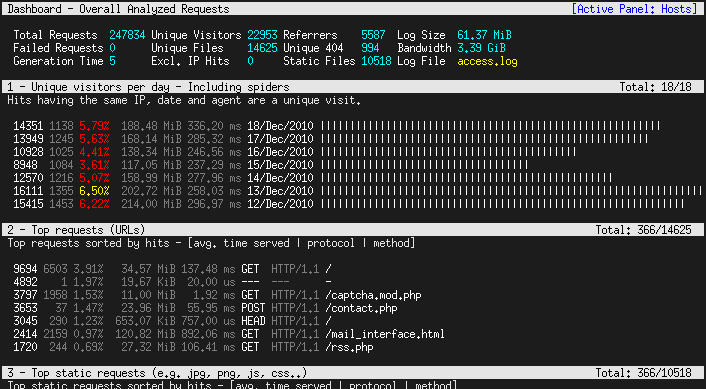
GoAccess is an open source real-time web log analyzer and interactive viewer that runs in a terminal in *nix systems. It provides fast and valuable HTTP statistics for system administrators that require a visual server report on the fly.

Features 

GoAccess parses the specified web log file and outputs the data to the X terminal.
  • General statistics, bandwidth, etc.
  • Time taken to serve the request (useful to track pages that are slowing down your site)
  • Top visitors
  • Requested files & static files
  • 404 or Not Found
  • Hosts, Reverse DNS, IP Location
  • Operating Systems
  • Browsers and Spiders
  • Referring Sites & URLs
  • Keyphrases
  • Geo Location - Continent/Country/City
  • Visitors Time Distribution New
  • HTTP Status Codes
  • Ability to output JSON and CSV
  • Different Color Schemes
  • Support for large datasets + data persistence
  • Support for IPv6
  • Output statistics to HTML. See report
  • and more...
GoAccess allows any custom log format string. Predefined options include, but not limited to:
  • Amazon CloudFront (Download Distribution).
  • Apache/Nginx Common/Combined + VHosts
  • W3C format (IIS)

Why GoAccess?

The main idea behind GoAccess is being able to quickly analyze and view web server statistics in real time without having to generate an HTML report. Although it is possible to generate an HTML, JSON, CSV report, by default it outputs to a terminal.
You can see it more as a monitor command tool than anything else.


WifiInfoView v1.79 - WiFi Scanner for Windows 7/8/Vista

$
0
0

WifiInfoView scans the wireless networks in your area and displays extensive information about them, including: Network Name (SSID), MAC Address, PHY Type (802.11g or 802.11n), RSSI, Signal Quality, Frequency, Channel Number, Maximum Speed, Company Name, Router Model and Router Name (Only for routers that provides this information), and more...

When you select a wireless network in the upper pane of this tool, the lower pane displays the Wi-Fi information elements received from this device, in hexadecimal format.

WifiInfoView also has a summary mode, which displays a summary of all detected wireless networks, grouped by channel number, company that manufactured the router, PHY type, or the maximum speed.

Columns In the Upper Pane
  • SSID: The name of the network.
  • MAC Address: MAC address of the router.
  • PHY Type: The PHY type for this network - 802.11a, 802.11g, 802.11n, or High-Rate DSSS
  • RSSI: The received signal strength indicator value, in units of decibels referenced to 1.0 milliwatts (dBm), as detected by the wireless LAN interface driver for the AP or peer station.
  • Signal Quality: A number between 0 and 100 that represents the quality of the signal.
  • Frequency: The channel center frequency of the band on which the 802.11 Beacon or Probe Response frame was received. The value of this column is in units of Gigahertz (GHz).
  • Channel: Channel number used by this wireless network.
  • Information Size:The total size (in bytes) of all Wi-Fi information elements received from this wireless network.
  • Elements Count: The total number of Wi-Fi information elements received from this wireless network.
  • Company: The company that manufactured the router, according to the 3 first bytes of the MAC address.
  • Router Model: The model of the router. This value is displayed only for routers that provide this information inside the Wi-Fi information elements.
  • Router Name: The name of the router. This value is displayed only for routers that provide this information inside the Wi-Fi information elements.
  • Security: Specifies whether the network is secured (Yes/No).
  • Maximum Speed: The maximum speed (in Mbps) that you can get when connecting to this wireless network.
  • First Detection: The first date/time that this network was detected.
  • Last Detection: The last date/time that this network was detected.
  • Detection Count: The number of times that this network was detected.  

Command-Line Options

/cfg <Filename> Start WifiInfoView with the specified configuration file. For example:
WifiInfoView.exe /cfg "c:\config\csv.cfg"
WifiInfoView.exe /cfg "%AppData%\WifiInfoView.cfg"
/NumberOfScans <Number> Specifies the number of scans to perform when using the save command-line options (/scomma, /shtml, and so on...)
/stext <Filename> Save the list of wireless networks into a regular text file.
/stab <Filename> Save the list of wireless networks into a tab-delimited text file.
/scomma <Filename> Save the list of wireless networks into a comma-delimited text file (csv).
/stabular <Filename> Save the list of wireless networks into a tabular text file.
/shtml <Filename> Save the list of wireless networks into HTML file (Horizontal).
/sverhtml <Filename> Save the list of wireless networks into HTML file (Vertical).
/sxml <Filename> Save the list of wireless networks into XML file.
/sort <column> This command-line option can be used with other save options for sorting by the desired column. If you don't specify this option, the list is sorted according to the last sort that you made from the user interface. The <column> parameter can specify the column index (0 for the first column, 1 for the second column, and so on) or the name of the column, like "SSID" and "RSSI". You can specify the '~' prefix character (e.g: "~SSID") if you want to sort in descending order. You can put multiple /sort in the command-line if you want to sort by multiple columns. Examples:
WifiInfoView.exe /shtml "d:\temp\wifi.html" /sort 2 /sort ~1
WifiInfoView.exe /scomma "d:\temp\wifi.html" /sort "~Security" /sort "SSID"
/nosort When you specify this command-line option, the list will be saved without any sorting.
/UseOnlyAdapter <0 | 1> Specifies whether to use only the desired network adapter. 0 = No, 1 = Yes.
/NetworkAdapter <Adapter Guid> Specifies the guid of the network adapter to use, for example:
WifiInfoView.exe /UseOnlyAdapter 1 /NetworkAdapter "{F261051F-D217-12D0-B9A9-F61D323AD21E}"
/SortOnEveryUpdate <0 | 1> Specifies whether to sort on every update. 0 = No, 1 = Yes.
/MacAddressFormat <1 - 3> Specifies the MAC address format. 1 = XX-XX-XX-XX-XX-XX, 2 = XX:XX:XX:XX:XX:XX, 3 = XXXXXXXXXXXX.
/DisplayMode <1 - 11> Specifies the display mode:
1 - Full Details Mode
2 - Channels Summary Mode
3 - Companies Summary Mode
4 - PHY Types Summary Mode
5 - Max Speed Summary Mode
6 - Router Model Summary Mode
7 - Router Name Summary Mode
8 - Signal Quality Summary Mode
9 - BSS Type Summary Mode
10 - Security Summary Mode
11 - WPS Summary Mode
/UpdateRate <1 - 4> Specifies the update rate: 1- Low, 2 - Medium, 3 - High, 4 - Very High.


SQLassie - Effective Database Security

$
0
0

SQLassie is a free MySQL database firewall that prevents SQL injection attacks at runtime. SQLassie uses Bayesian classifiers to determine the likelihood of a query being an attack. This approach produces fewer false positives than other similar approaches.

Security
SQLassie prevents injection attacks before they have a chance to run.

Instantaneous
Protection is instantaneous - just point your web applications at SQLassie and you're done!

Analysis
SQLassie tracks suspicious queries, classifies them based on their intent, and logs this information for further review.

Options
SQLassie can be used as a passive intrusion detection system or as an active intrusion prevention system.

Support
SQLassie is free and being constantly updated and improved. Have a problem or feature request? Let us know!

Usage

SQLassie currently only supports MySQL. To start SQLassie, you'll need to configure how SQLassie connects to the MySQL server, start SQLassie listening on a different port that is now protected, and then configure your applications to connect through this alternate port instead of directly to MySQL.
As an example, consider a scenario where you have a MySQL database engine running and listening for connections on the domain socket /var/run/mysql/mysqld.sock and are running a MediaWiki installation.

First, start SQLassie using
./sqlassie -s /var/run/mysql/mysqld.sock -l 3307
Then, edit MediaWiki's configuration file LocalSettings.php connect to port 3307.
$wgDBServer = "127.0.0.1:3307"

Note that you can't use localhost here; by default, MySQL interprets localhost as a request to use the direct database domain socket connection, and most web applications behave this way as well. Therefore, you have to use the explicit string 127.0.0.1 in order to force connections to go through the TCP port. Check your application's documentation for more information.


Graudit - Find potential security flaws in source code using grep

$
0
0

Graudit is a simple script and signature sets that allows you to find potential security flaws in source code using the GNU utility grep. It's comparable to other static analysis applications like RATS, SWAAT and flaw-finder while keeping the technical requirements to a minimum and being very flexible.

Who should use graudit?
System administrators, developers, auditors, vulnerability researchers and anyone else that cares to know if the application they develop, deploy or otherwise use is secure.

What languages are supported?
  • ASP
  • JSP
  • Perl
  • PHP
  • Python
  • Other (looks for suspicious comments, etc)

USAGE
Graudit supports several options and tries to follow good shell practices. For a list of the options you can run graudit -h or see below. The simplest way to use graudit is;
graudit /path/to/scan

DEPENDENCIES
Required: bash, grep, sed

The following options are available:
  -A scan ALL files
-c number of lines of context to display, default is 2
-d database to use
-h prints a short help text
-i case in-sensitive search
-l lists databases available
-L vim friendly lines
-v prints version number
-x exclude these files
-z supress colors
-Z high contrast colors


Wireless Network Watcher v1.79 - Show who is connected to your wireless network

$
0
0

Wireless Network Watcher is a small utility that scans your wireless network and displays the list of all computers and devices that are currently connected to your network. 
For every computer or device that is connected to your network, the following information is displayed: IP address, MAC address, the company that manufactured the network card, and optionally the computer name. 
You can also export the connected devices list into html/xml/csv/text file, or copy the list to the clipboard and then paste into Excel or other spreadsheet application.

Using Wireless Network Watcher

Wireless Network Watcher doesn't require any installation process or additional dll files. In order to start using it, simply extract the executable file (WNetWatcher.exe) from the zip file, and run it. 
If you want, you can also download WNetWatcher with full install/uninstall support (wnetwatcher_setup.exe), so a shortcut for running WNetWatcher will be automatically added into your start menu.
After running WNetWatcher, it automatically locates your wireless adapter, and scans your network. After a few seconds, you should start see the list of computers that are currently connected to your network.
If from some reason, WNetWatcher failed to locate and scan your network, you can try to manually choosing the correct network adapter, by pressing F9 (Advanced Options) and choosing the right network adapter.

Columns Description
  • IP Address: IP Address of the device or computer.
  • Device Name: The name of the device or computer. This field may remain empty if the computer or the device doesn't provide its name.
  • MAC Address: The MAC address of the network adapter.
  • Network Adapter Company:The company that manufactured the network adapter, according to the MAC Address. This column can help you to detect the type of the device or computer. For example, if the company name is Apple, the device is probably a Mac computer, iPhone, or iPad. 
    if the company name is Nokia, the device is probably a cellular phone of Nokia.

    By default, this utility uses an internal MAC addresses database stored inside the .exe file, but it's not always updated with the latest MAC address assignments. 
    You can manually download the latest MAC addresses file from http://standards.ieee.org/develop/regauth/oui/oui.txtand then put oui.txt in the same folder where WNetWatcher.exe is located. When you run WNetWatcher.exe, it'll automatically load and use the external oui.txt instead of the internal MAC addresses database.
  • Device Information:This column displays 'Your Computer' if the device is the computer that you currently use. This column displays 'Your Router' if the device is the wireless router.
  • User Text:You can assign your own text to any device detected by WNetWatcher. By default, this field is filled with the device name. In order to change the User Text, simply double-click the item and type the desired text.
  • Active:Specifies whether this device is currently active. When a device is not detected anymore, the 'Active' value is turned from 'Yes' to 'No'
Background Scan

Starting from version 1.15, there is a new option under the Options menu - 'Background Scan'. 
When it's turned on, Wireless Network Watcher first make the regular fast network scan to discover all current connected devices. After that, a continuous background scan is activated to discover when new devices are connected to your network. The background scan is slower and less intensive then the regular scan, so it won't overload your computer and you can leave it to run in the background while using other programs. 
When the background scan is running, a counter of the scan process is displayed in the second section of the bottom status bar.
When the background scan is used, you can use the 'Beep On New Device' option to get a beep sound when a new device is detected.

Command-Line Options
/cfg <Filename> Start Wireless Network Watcher with the specified configuration file. For example:
WNetWatcher.exe /cfg "c:\config\wnw.cfg"
WNetWatcher.exe /cfg "%AppData%\WNetWatcher.cfg"
/stext <Filename> Scan your network, and save the network devices list into a regular text file.
/stab <Filename> Scan your network, and save the network devices list into a tab-delimited text file.
/scomma <Filename> Scan your network, and save the network devices list into a comma-delimited text file (csv).
/stabular <Filename> Scan your network, and save the network devices list into a tabular text file.
/shtml <Filename> Scan your network, and save the network devices list into HTML file (Horizontal).
/sverhtml <Filename> Scan your network, and save the network devices list into HTML file (Vertical).
/sxml <Filename> Scan your network, and save the network devices list into XML file.    


Password Cracking Suite

$
0
0

How To Use It:

Dics Path:
In this path, you can add any dictionary you would like to use.

Tools Path:
In this path, the script will install 3rd party tools. You can download some here:
http://www.moehre.org/bruteforce.html
http://cyberwarzone.com/cyberwarfare/password-cracking-mega-collection-password-cracking-word-lists
http://www.packetstormsecurity.org/Crackers/wordlists/
http://www.theargon.com/achilles/wordlists/
http://www.openwall.com/wordlists/
http://www.outpost9.com/files/WordLists.html

Tools used by the script:

Availible Hash Types:
afs bf bfegg bsdi crc32 crypt
des django dmd5 dominosec dragonfly3-32 dragonfly3-64
dragonfly4-32 dragonfly4-64 drupal7 dummy dynamic_n
epi episerver gost hdaa hmac-md5 hmac-sha1
hmac-sha224 hmac-sha256 hmac-sha384 hmac-sha512
hmailserver ipb2 keepass keychain krb4 krb5 lm lotus5
md4-gen md5 md5ns mediawiki mscash mscash2 mschapv2
mskrb5 mssql mssql05 mysql mysql-sha1 nethalflm netlm
netlmv2 netntlm netntlmv2 nsldap nt nt2 odf office
oracle oracle11 osc pdf phpass phps pix-md5 pkzip po
pwsafe racf rar raw-md4 raw-md5 raw-md5u raw-sha
raw-sha1 raw-sha1-linkedin raw-sha1-ng raw-sha224
raw-sha256 raw-sha384 raw-sha512 salted-sha1 sapb
sapg sha1-gen sha256crypt sha512crypt sip ssh
sybasease trip vnc wbb3 wpapsk xsha xsha512 zip


wig - WebApp Information Gatherer

$
0
0

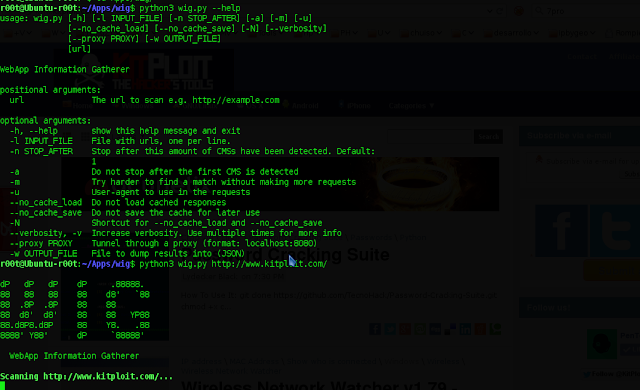
wig is a web application information gathering tool, which can identify numerous Content Management Systems and other administrative applications.
The application fingerprinting is based on checksums and string matching of known files for different versions of CMSes. This results in a score being calculated for each detected CMS and its versions. Each detected CMS is displayed along with the most probable version(s) of it. The score calculation is based on weights and the amount of "hits" for a given checksum.
wig also tries to guess the operating system on the server based on the 'server' and 'x-powered-by' headers. A database containing known header values for different operating systems is included in wig, which allows wig to guess Microsoft Windows versions and Linux distribution and version.

wig features:
  • CMS version detection by: check sums, string matching and extraction
  • Lists detected package and platform versions such as asp.net, php, openssl, apache
  • Detects JavaScript libraries
  • Operation system fingerprinting by matching php, apache and other packages against a values in wig's database
  • Checks for files of interest such as administrative login pages, readmes, etc
  • Currently the wig's databases include 28,000 fingerprints
  • Reuse information from previous runs (save the cache)
  • Implement a verbose option
  • Remove dependency on 'requests'
  • Support for proxy
  • Proper threading support
  • Included check for known vulnerabilities

Requirements

wig is built with Python 3, and is therefore not compatible with Python 2.

How it works

The default behavior of wig is to identify a CMS, and exit after version detection of the CMS. This is done to limit the amount of traffic sent to the target server. This behavior can be overwritten by setting the '-a' flag, in which case wig will test all the known fingerprints. As some configurations of applications do not use the default location for files and resources, it is possible to have wig fetch all the static resources it encounters during its scan. This is done with the '-c' option. The '-m' option tests all fingerprints against all fetched URLs, which is helpful if the default location has been changed.

Help Screen
usage: wig.py [-h] [-l INPUT_FILE] [-n STOP_AFTER] [-a] [-m] [-u]
[--no_cache_load] [--no_cache_save] [-N] [--verbosity]
[--proxy PROXY] [-w OUTPUT_FILE]
[url]

WebApp Information Gatherer

positional arguments:
url The url to scan e.g. http://example.com

optional arguments:
-h, --help show this help message and exit
-l INPUT_FILE File with urls, one per line.
-n STOP_AFTER Stop after this amount of CMSs have been detected. Default:
1
-a Do not stop after the first CMS is detected
-m Try harder to find a match without making more requests
-u User-agent to use in the requests
--no_cache_load Do not load cached responses
--no_cache_save Do not save the cache for later use
-N Shortcut for --no_cache_load and --no_cache_save
--verbosity, -v Increase verbosity. Use multiple times for more info
--proxy PROXY Tunnel through a proxy (format: localhost:8080)
-w OUTPUT_FILE File to dump results into (JSON)

Example of run:
$ ./wig.py example.com

dP dP dP dP .88888.
88 88 88 88 d8' `88
88 .8P .8P 88 88
88 d8' d8' 88 88 YP88
88.d8P8.d8P 88 Y8. .88
8888' Y88' dP `88888'

WebApp Information Gatherer

Redirected to http://www.example.com. Continue? [Y|n]:

TITLE
--- HTML TITLE ---

IP
255.255.255.256


SOFTWARE VERSION CATEGORY
Drupal 7.28 | 7.29 | 7.30 | 7.31 | 7.32 CMS
ASP.NET 4.0.30319.18067 Platform
Microsoft-HTTPAPI 2.0 Platform
Microsoft-IIS 6.0 | 7.0 | 7.5 | 8.0 Platform
Microsoft Windows Server 2003 SP2 | 2008 | 2008 R2 | 2012 Operating System

SOFTWARE VULNERABILITIES LINK
Drupal 7.28 7 http://cvedetails.com/version/169265
Drupal 7.29 3 http://cvedetails.com/version/169917
Drupal 7.30 3 http://cvedetails.com/version/169916

URL NOTE CATEGORY
/login/ Test directory Interesting URL
/login/index_form.html ASP.NET detailed error Interesting URL
/robots.txt robots.txt index Interesting URL
/test/ Test directory Interesting URL
_______________________________________________________________________________
Time: 15.7 sec Urls: 351 Fingerprints: 28989


Double the bang for your buck with Acunetix Vulnerability Scanner

$
0
0

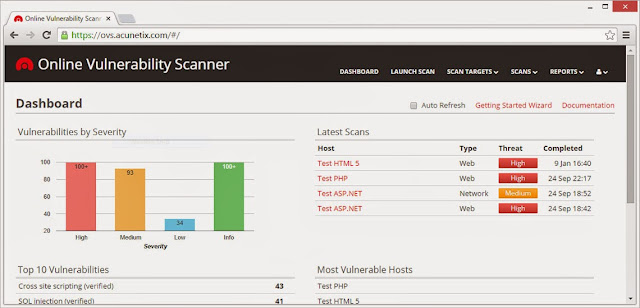
Acunetix have announced that they are extending their current free offering of the network security scan, part of their cloud-based web and network vulnerability scanner. Those signing up for a trial of the online version of Acunetix vulnerability scanner will now be able to scan their perimeter servers for network security issues on up to 3 targets with no expiry.

In addition, existing Acunetix customers will also be able to double up on their current license-based quota of scan targets by adding the same amount of network scans. i.e a 25 scan target license can now make use of an extra 25 network-only scan targets for free.

An analysis of scans performed over the past year following the launch of Acunetix Vulnerability Scanner (online version) show that on average 50% of the targets scanned have a medium or high network security vulnerability. It’s worrying that in the current cybersecurity climate, network devices remain vulnerable to attack. The repercussions of a vulnerable network are catastrophic as seen in some recent, well publicised Lizard Squad attacks, the black hat hacking group, mainly known for their claims of DoS attacks.

“Acunetix secure the websites of some of the biggest global enterprises, and with our online vulnerability scanner we are not only bringing this technology within reach of many more businesses but we are also providing free network security scanning technology to aid smaller companies secure their network,” said Nick Galea, CEO of Acunetix.

How Acunetix keeps perimeter servers secure

A network security scan checks the perimeter servers, locating any vulnerabilities in the operating system, server software, network services and protocols. Acunetix network security scan uses the OpenVAS database of network vulnerabilities and scans for more than 35,000 network level vulnerabilities. A network scan is where vulnerabilities such as Shellshock, Heartbleed and POODLE are detected, vulnerabilities which continue to plague not only web servers but also a large percentage of other network servers. A network scan will also:
  • Detect misconfigurations and vulnerabilities in OS, server applications, network services, and protocols
  • Assess security of detected devices (routers, hardware firewalls, switches and printers)
  • Scan for trojans, backdoors, rootkits, and other malware that can be detected remotely
  • Test for weak passwords on FTP, IMAP, SQL servers, POP3, Socks, SSH, Telnet
  • Check for DNS server vulnerabilities such as Open Zone Transfer, Open Recursion and Cache Poisoning
  • Test FTP access such as anonymous access potential and a list of writable FTP directories
  • Check for badly configured Proxy Servers, weak SNMP Community Strings, weak SSL ciphers and many other security weaknesses.

Register for a free trial and start scanning http://www.acunetix.com/free-network-security-scanner/ 

About Acunetix

Acunetix is the market leader in web application security technology, founded to combat the alarming rise in web attacks. Its products and technologies are the result of a decade of work by a team of highly experienced security developers. Acunetix’ customers include the U.S. Army, KPMG, Adidas and Fujitsu. More information can be found at www.acunetix.com.


SmartSniff v2.17 - Capture TCP/IP packets on your network adapter

$
0
0

SmartSniff is a network monitoring utility that allows you to capture TCP/IP packets that pass through your network adapter, and view the captured data as sequence of conversations between clients and servers. You can view the TCP/IP conversations in Ascii mode (for text-based protocols, like HTTP, SMTP, POP3 and FTP.) or as hex dump. (for non-text base protocols, like DNS)
SmartSniff provides 3 methods for capturing TCP/IP packets :
  1. Raw Sockets (Only for Windows 2000/XP or greater): Allows you to capture TCP/IP packets on your network without installing a capture driver. This method has some limitations and problems.
  2. WinPcap Capture Driver: Allows you to capture TCP/IP packets on all Windows operating systems. (Windows 98/ME/NT/2000/XP/2003/Vista) In order to use it, you have to download and install WinPcap Capture Driver from this Web site. (WinPcap is a free open-source capture driver.) 
    This method is generally the preferred way to capture TCP/IP packets with SmartSniff, and it works better than the Raw Sockets method.
  3. Microsoft Network Monitor Driver (Only for Windows 2000/XP/2003): Microsoft provides a free capture driver under Windows 2000/XP/2003 that can be used by SmartSniff, but this driver is not installed by default, and you have to manually install it, by using one of the following options:
  4. Microsoft Network Monitor Driver 3: Microsoft provides a new version of Microsoft Network Monitor driver (3.x) that is also supported under Windows 7/Vista/2008. Starting from version 1.60, SmartSniff can use this driver to capture the network traffic. 
    The new version of Microsoft Network Monitor (3.x) is available to download from Microsoft Web site
    Notice:If WinPcap is installed on your system, and you want to use the Microsoft Network Monitor Driver method, it's recommended to run SmartSniff with /NoCapDriver, because the Microsoft Network Monitor Driver may not work properly when WinPcap is loaded too.   

Using SmartSniff

In order to start using SmartSniff, simply copy the executable (smsniff.exe) to any folder you like, and run it (installation is not needed).
After running SmartSniff, select "Start Capture" from the File menu, or simply click the green play button in the toolbar. If it's the first time that you use SmartSniff, you'll be asked to select the capture method and the network adapter that you want to use. If WinPcap is installed on your computer, it's recommended to use this method to capture packets.
After selecting the capture method and your network adapter, click the 'OK' button to start capturing TCP/IP packets. while capturing packets, try to browse some Web sites, or retrieve new emails from your email software. After stopping the capture (by clicking the red stop button) SmartSniff displays the list of all TCP/IP conversations the it captured. When you select a specific conversation in the upper pane, the lower pane displays the TCP/IP streams of the selected client-server conversation.
If you want the save the captured packets for viewing them later, use "Save Packets Data To File" option from the File menu.

Display Mode

SmartSniff provides 3 basic modes to display the captured data: Automatic, Ascii, and Hex Dump. On Automatic mode (the default), SmartSniff checks the first bytes of the data stream - If it contains characters lower than 0x20 (excluding CR, LF and tab characters), it displays the data in Hex mode. otherwise, it displays it in Ascii mode.
You can easily switch between display modes by selecting them from the menu, or by using F2 - F4 keys. Be aware that 'Hex Dump' mode is much slower than Ascii mode.
Starting from version 1.35, there is a new mode - 'URL List'. This mode only display the URL addresses list (http://...) found in the captured packets.

Exporting the captured data

SmartSniff allows you to easily export the captured data for using it in other applications:
  • The upper pane: you can select one or more items in the upper pane, and then copy them to the clipboard (You can paste the copied items into Excel or into spreadsheet of OpenOffice.org) or save them to text/HTML/XML file (by using 'Save Packet Summaries').
  • The lower pane: You can select any part of the TCP/IP streams (or select all text, by using Ctrl+A), copy the selected text to the clipboard, and then paste it to Notepad, Wordpad, MS-Word or any other editor. When you paste the selected streams to document of Wordpad, OpenOffice.org, or MS-Word, the colors are also transferred. 
    Your can also export the TCP/IP streams to text file, HTML file, or raw data file, by using "Export TCP/IP Streams" option. 

Capture and Display Filters

Starting from version 1.10, you can filter unwanted TCP/IP activity during the capture process (Capture Filter), or when displaying the captured TCP/IP data (Display Filter).
For both filter types, you can add one or more filter strings (separated by spaces or CRLF) in the following syntax:
[include | exclude] : [local | remote | both] : [tcp | udp | tcpudp | icmp | all] : [IP Range | Ports Range]
Here's some examples that demonstrate how to create a filter string:
  • Display only packets with remote tcp port 80 (Web sites): 
    include:remote:tcp:80
  • Display only packets with remote tcp port 80 (Web sites) and udp port 53 (DNS): 
    include:remote:tcp:80 
    include:remote:udp:53
  • Display only packets originated from the following IP address range: 192.168.0.1 192.168.0.100: 
    include:remote:all:192.168.0.1-192.168.0.100
  • Display only TCP and UDP packets that use the following port range: 53 - 139: 
    include:both:tcpudp:53-139
  • Filter most BitTorrent packets (port 6881): 
    exclude:both:tcpupd:6881
  • Filter all ICMP packets (Ping/Traceroute activity): 
    exclude:both:icmp
Notice: A single filter string must not include spaces !

Live Mode

Starting from version 1.10, a new option was added to 'Advanced Options' section - 'Live Mode'. When SmartSniff capture packets in live mode, the TCP/IP conversations list is updated while capturing the packets, instead of updating it only after the capture is finished. Be aware that "Live Mode" requires more CPU resources than non-live mode. So if your computer is slow, or your have a very high traffic on your network, it's recommended to turn off this option.
Starting from version 1.20, you can also view the content of each TCP/IP conversation (in the lower pane) while capturing the packets. However, if the TCP/IP conversation is too large, you won't be able to watch the entire TCP/IP conversation until the capture is stopped.

Viewing process information

Starting from version 1.30, you can view the process information (ProcessID and process filename) for captured TCP packets. However, this feature have some limitations and problems:
  • Process information is only displayed for TCP packets (It doesn't work with UDP)
  • Process information may not be displayed for TCP connections that closed after short period of time.
  • Retrieving process information consume more CPU resources and may slow down your computer. It's not recommended to use this feature if you have intensive network traffic.
  • Process information is currently not saved in ssp file.
In order to activate this feature, go to 'Advanced Options' dialog-box, check the "Retrieve process information while capturing packets" option and click the 'OK' button. 2 new columns will be added: ProcessID and Process Filename. Start capturing, and process information will be displayed for the captured TCP conversations.

The structure of .ssp file (SmartSniff Packets File)

The structure of .ssp file saved by SmartSniff is very a simple. It contains one main header in the beginning of the file, followed by sequence of all TCP/IP packets, each of them begins with a small header.
The main header structure:
00 - SMSNF200 signature.
08 - (2 bytes) The number of bytes in the header (currently 4 bytes for the IP Address)
0A - (4 bytes) IP Address
Header of each packet:
00 (2 Bytes) packet header size (currently 0x18 bytes)
02 (4 Bytes) number of received bytes in packet.
06 (8 Bytes) Packet time in Windows FILETIME format.
0E (6 Bytes) Source Mac Address.
14 (6 Bytes) Dest. Mac Address.
1A The remaining bytes are the TCP/IP packet itself.    


Kunai - Pwning & Info Gathering via User Browser

$
0
0


Sometimes there is a need to obtain ip address of specific person or perform client-side attacks via user browser. This is what you need in such situations.

Kunai is a simple script which collects many informations about a visitor and saves output to file; furthermore, you may try to perform attacks on user browser, using beef or metasploit.

In order to grab as many informations as possible, script detects whenever javascript is enabled to obtain more details about a visitor. For example, you can include this script in iframe, or perform redirects, to avoid detection of suspicious activities. Script can notify you via email about user that visit your script. Whenever someone will visit your hook (kunai), output fille will be updated.

Functions
  • Stores informations about users in elegant output
  • Website spoofing
  • Redirects
  • BeEF & Metasploit compatibility
  • Email notification
  • Diffrent reaction for javascript disabled browser
  • One file composition

Example configs
  • Website spoofing (more stable & better for autopwn & beef):
  • Redirect (better for quick ip catching):
goo.gl/urlink -> evilhost/x.php -> site.com/kitty.png
  • Cross Site Scripting (inclusion)

Viewing all 5816 articles
Browse latest View live


<script src="https://jsc.adskeeper.com/r/s/rssing.com.1596347.js" async> </script>